NavAtlas DXP1000DVR Betriebsanleitung

INSTALLATION/OWNER’S MANUAL
Receiver with Bluetooth®
featuring a 6.2" Touch Screen Display
DXP1000DVR

Copyright Notes
This product incorporates copyright protection technology that is protected by method claims of certain U.S. patents and other
intellectual property rights owned by Macrovision Corporation and other rights owners. Use of this copyright protection technology
must be authorized by Macrovision Corporation, and is intended for home and other limited viewing uses only unless otherwise
authorized by Macrovision Corporation. Reverse engineering or disassembly is prohibited. Other trademarks and trade names are
those of their respective owners.

2
DXP1000DVR
3
4
5
6
7-8
9
10-12
13-14
15-16
17-18
19-20
21-22
23
24
25
Page
Warning Statement . . . . . . . . . . . . . . . . . . . . . . . . . . . . . . . . . . . . . . . . . . . . .
Safety Information/Precautions . . . . . . . . . . . . . . . . . . . . . . . . . . . . . . . . . . .
Preparation/Mounting . . . . . . . . . . . . . . . . . . . . . . . . . . . . . . . . . . . . .
Wiring Diagram . . . . . . . . . . . . . . . . . . . . . . . . . . . . . . . . . .
Audio Wiring Connections. . . . . . . . . . . . . . . . . . . . . . . . . . . . . . . . . . .
Control Locations. . . . . . . . . . . . . . . . . . . . . . . . . . . . . . . . . . . . . . . .
General Operation . . . . . . . . . . . . . . . . . . . . . . . . . . . . . . . . .
AM/FM Tuner Operation . . . . . . . . . . . . . . . . . . . . . . . . . . . . . . . . .
USB Operation . . . . . . . . . . . . . . . . . . . . . . . . . . . . . . . . . . . . . . . . .
DVR Operation . . . . . . . . . . . . . . . . . . . . . . . . . . . . . . . . . . . . . . . . . .
DualMirror Operation . . . . . . . . . . . . . . . . . . . . . . . . . . . . . . . . . . . . . . . . . .
Bluetooth Operation . . . . . . . . . . . . . . . . . . . . . . . . . . . . . . . . . . . . . . . . .
Auxiliary Inputs/Rear Camera Operation. . . . . . . . . . . . . . . . . . . . . . . . . .
Specifications . . . . . . . . . . . . . . . . . . . . . . . . . . . . . . . . . . . . . . . . . . . . . . . . . .
Warranty . . . . . . . . . . . . . . . . . . . . . . . . . . . . . . . . . . . . . . . . . . . . . . . . . . . . .
Table of Contents

3
DXP1000DVR
Upon installation of this Monitor (“unit”) into a vehicle, the driver of the vehicle must not
operate this unit by watching videos or playing video games while driving. Failure
to follow this instruction could lead to driver distraction which could result in serious
injury or death to the vehicle’s occupants or persons outside the vehicle and/or property
damage.
Several states prohibit the installation of monitors if the screen is visible from the driver’s
seat. If you reside in a jurisdiction which has enacted such a law, this unit must not be
installed so that the screen is visible from the driver’s seat. When installing this unit
in the front console/dashboard, the unit must be positioned so that it is facing the front
passenger seat only. Failure to follow this instruction could lead to driver distraction
which could result in serious injury or death to the vehicle’s occupants or persons outside
the vehicle and/or property damage.
When operating this unit, keep the unit’s volume level low enough so that the vehicle’s
occupants can hear traffic-related sounds such as police and emergency vehicles.
Failure to follow this instruction could lead to driver distraction which could result in
serious injury or death to the vehicle’s occupants or persons outside the vehicle and/or
property damage.
WARNING

4
DXP1000DVR
Safety Information
Please read all instructions carefully before attempting to install or operate.
Due to its technical nature, it is highly recommended that your DXP1000DVR is installed by a professional installer
or an authorized dealer. This product is only for use in vehicles with 12VDC negative ground only.
To prevent damage or injury:
• Make sure to ground the unit securely to the vehicle chassis ground.
• Do not subject the unit to excessive shock.
• When replacing a fuse, only use a new one with the prescribed rating. Using a fuse with the wrong rating may
cause the unit to malfunction.
• To prevent short circuits when replacing a fuse, disconnect the wiring harness first.
• Use only the provided hardware and wire harness.
• To clean the monitor, wipe only with a dry silicone cloth or soft cloth. Do not use a stiff cloth, or volatile solvents
such as paint thinner and alcohol. They can scratch the surface of the panel and/or remove the printing.
• When the temperature of the unit falls (as in winter), the liquid crystal inside the screen will become darker than
usual. Normal brightness will return after using the monitor for a while.
• When extending the ignition, battery or ground cables, make sure to use automotive-grade cables or other cables
with an area of 0.75mm (AWG 18) or more to prevent voltage drops.
• Do not touch the liquid crystal fluid if the LCD is damaged or broken. The liquid crystal fluid may be hazardous
to your health or fatal. If the liquid crystal fluid from the LCD contacts your body or clothing, wash it off with soap
immediately.
FCC Compliance
This device complies with Part 15 of the FCC Rules. Operation is subject to the following two conditions:
(1) this device may not cause harmful interference, and
(2) this device must accept any interference received, including interference that may cause undesired operation.
Warning: Changes or modifications to this unit not expressly approved by the party responsible for compliance
could void the user’s authority to operate the equipment.
Note: This equipment has been tested and found to comply with the limits for a Class B digital device, pursuant to
Part 15 of the FCC Rules. These limits are designed to provide reasonable protection against harmful interference
in a residential installation. This equipment generates, uses and can radiate radio frequency energy and, if not
installed and used in accordance with the instructions, may cause harmful interference to radio communications.
However, there is no guarantee that interference will not occur in a particular installation. If this equipment does
cause harmful interference to radio or television reception, which can be determined by turning the equipment off
and on, the user is encouraged to try to correct the interference by one or more of the following measures:
• Reorient or relocate the receiving antenna.
• Increase the separation between the equipment and receiver.
• Connect the equipment into an outlet on a circuit different from that to which the receiver is connected.
• Consult the dealer or an experienced radio/TV technician for help.

5
DXP1000DVR
Preparation
Before You Start
• Disconnect negative battery terminal. Consult a qualified technician for instructions.
• Avoid installing the unit where it would be subject to high temperatures, such as from direct sunlight, or where it
would be subject to dust, dirt or excessive vibration.
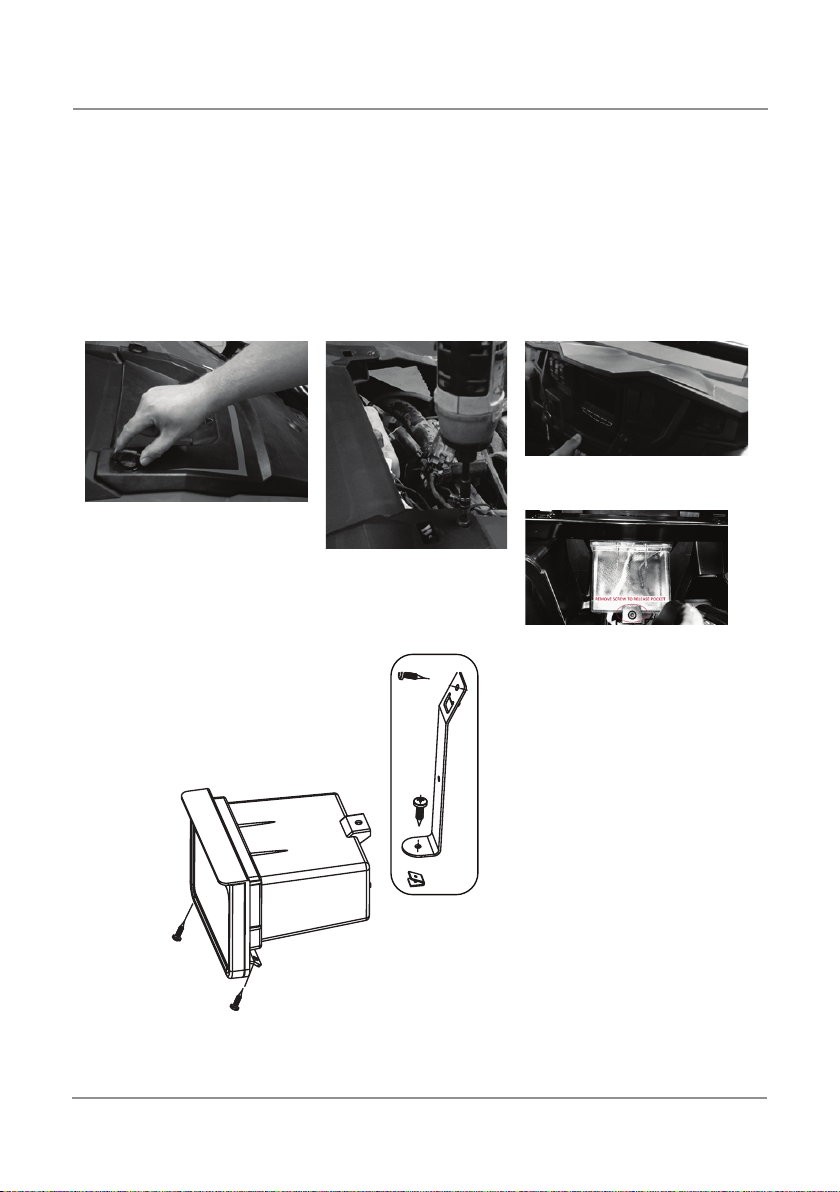
Pocket Removal
• Unlock hood tabs and remove hood panel.
• Unscrew torx to remove dash panel.
• Pull dash panel to unclip from dash.
• Unscrew torx screw and pull out pocket.
Note: Remove screw anchor
from factory pocket and attach
to DXP1000DVR for mounting.
(Factory bracket
not included with
DXP1000DVR unit)
A
fter installation, use
screws to support unit.
1. Unlock hood tabs and remove
hood panel
.
2. Unscrew torx to
remove dash panel.
3. Pull dash panel to unclip from
dash.
4. Unscrew torx screw, and pull
out pocket.

6
DXP1000DVR
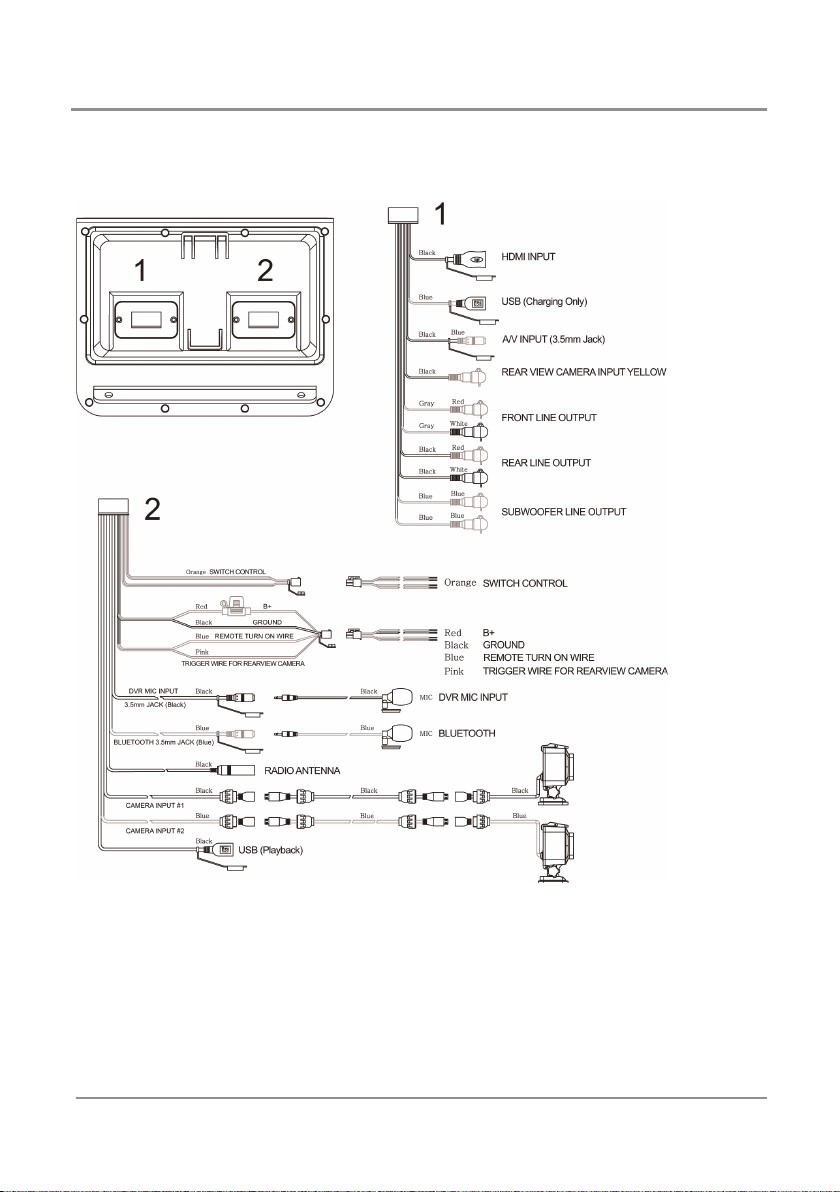
Wiring Diagram - Inputs/Outputs
Note: Please connect cameras before
powering the unit. Damage or no
video signal may occur if connected
after unit is on.
(Optional RBX4)
12V @ 1A AUX Switches
(External lighting, etc.)
Universal antenna required
(sold separately)
Universal antenna
required
(sold separately)
Note: Amplier (RCA) cables not
included (must purchase separately)
ANBX1/DMH25)
ACC
(

7
DXP1000DVR
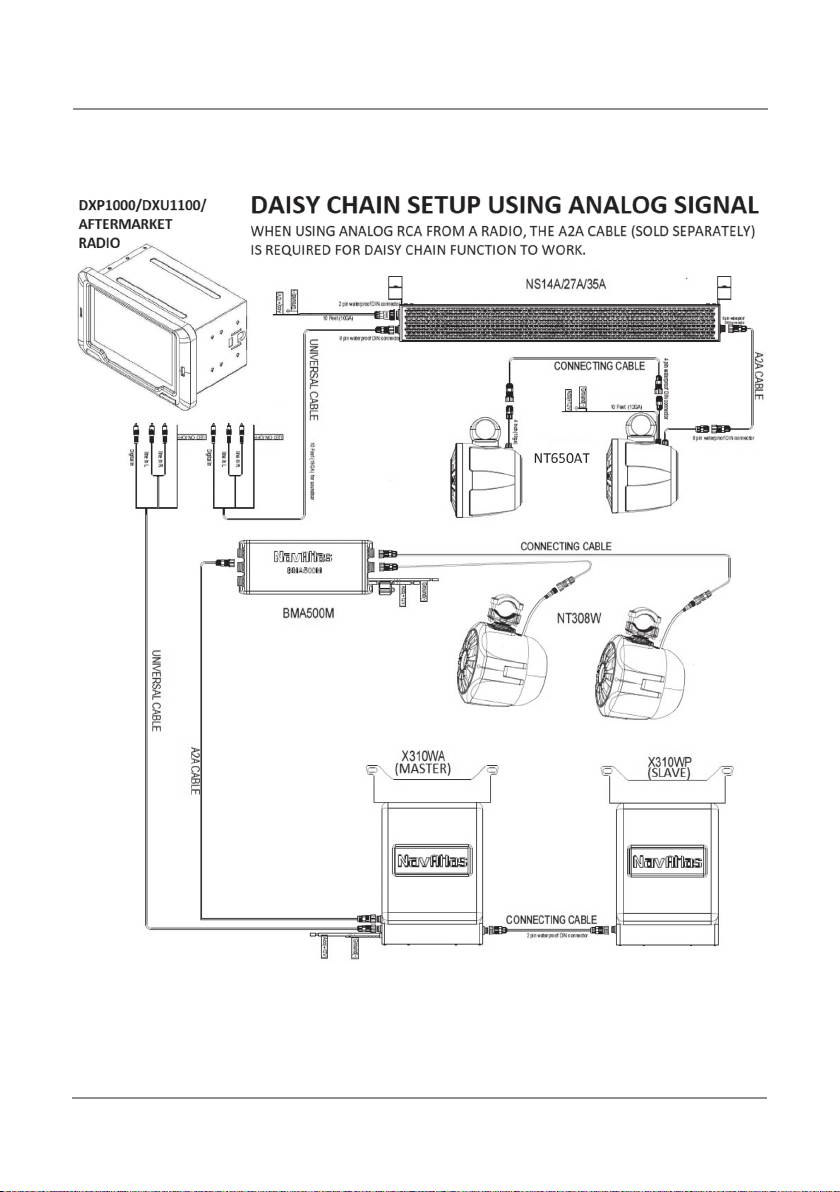
Audio Wiring Configuration

8
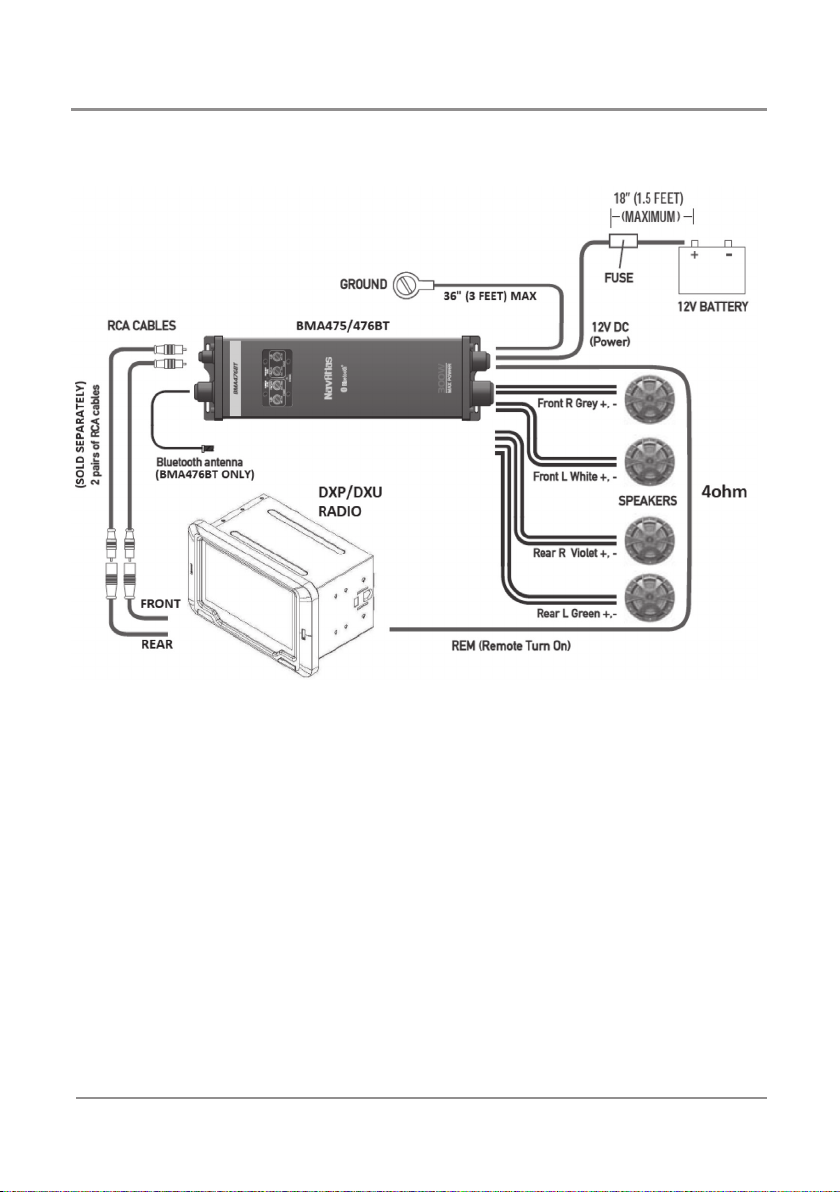
DXP1000DVR
Audio Wiring Configuration

9
DXP1000DVR
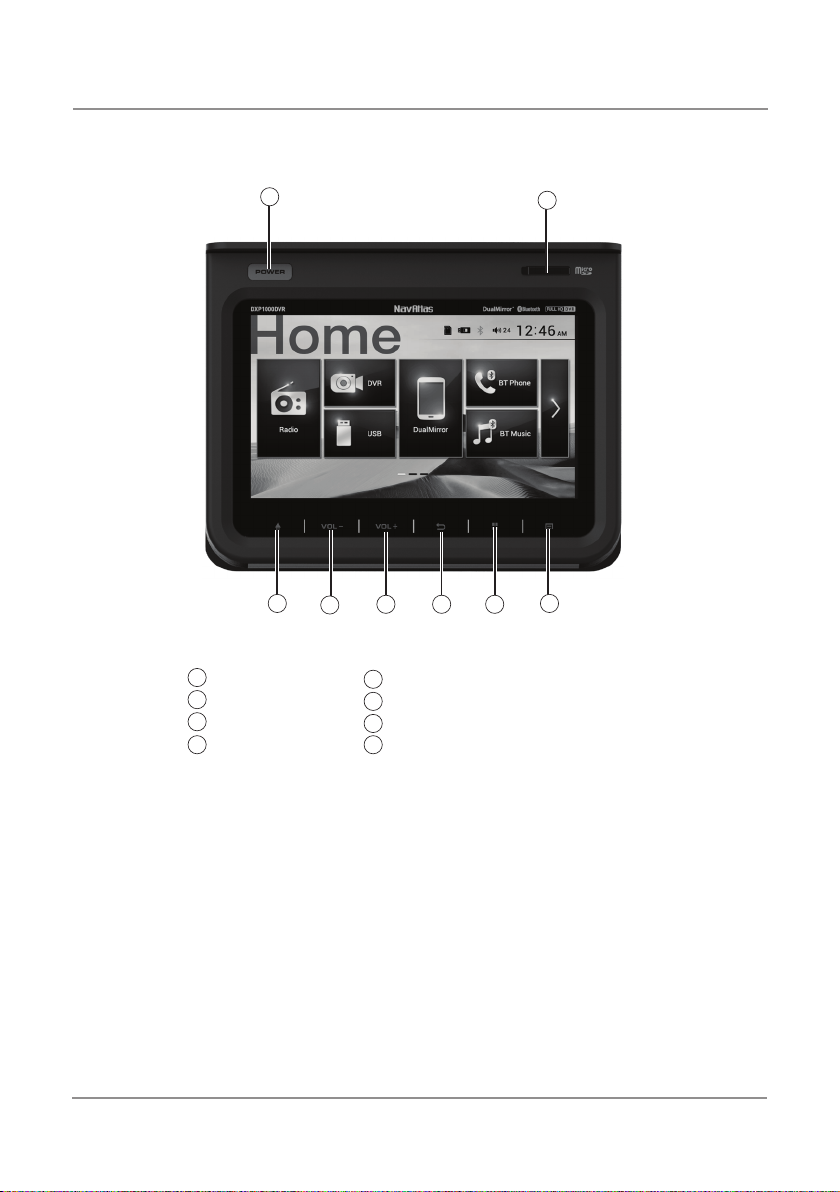
Control Locations
Power / Mode
Home
Volume Down
Volume Up
1
2
3
Go Back (for DualMirror control via Android only)
Home (for DualMirror control via Android only)
Menu (for DualMirror control via Android only)
microSD slot (for DVR only)
5
6
7
4
234 5 7
6
18
8
Inhaltsverzeichnis