
ND tackle SMART BITE R16 Bedienungsanleitung

USER MANUAL
newdirectiontackle.co.uk
E ma il : Info @ newdir ec tion tac kle. co. uk
WEE/AX4045YF
Old electrical appliances must not be disposed of together with the residual waste, but
have to be disposed of separately.
The disposal at the communal collecting point via private persons is for free.The owner
of old appliances is responsible to bring the appliances to these collecting points or to
similar collection points. With this little personal eort, you contribute to recycle valuable
raw materials and the treatment of toxic substances.
SMART BITE WATCH
ND TACKLE WEBSITE
SMART BITE WATCH
UK
D9
K9s S9
BEA ALARM N1
TH9s
TH10
H9PRO B9 S9r
R9s
R16
Bivvy light PRO H10
www.newdirectiontackle.co.uk
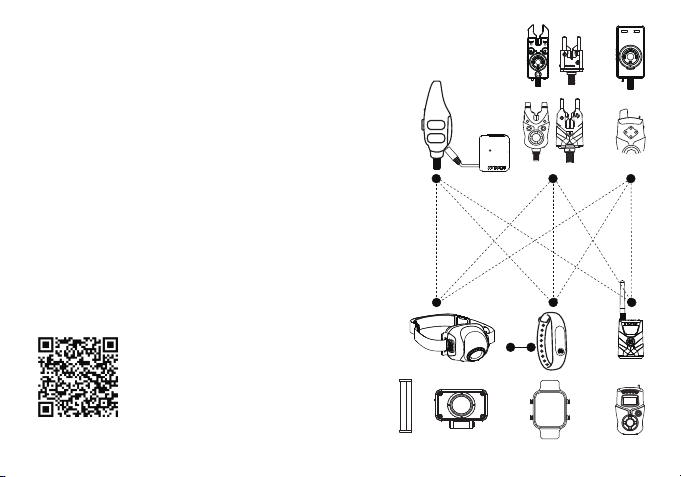
SMART LINK
SYSTEM
Smart Link is a system that allows our devices to interact with each other.
You won't nd a system like this anywhere else. Our devices can be linked
together, which oers incredible and unique features, such as the
headtorches switching on when there is a bite indication, or you can switch
on your headtorch via the Smart Bite Watch or Smart Band. There are so
many ways our devices can interact.This has all been done to enhance
your personal shing experience.

2
1
FEATURES & ADVANTAGES
ALUMINUM CASE AND CARPY DESIGN
The ND Smart Bite Watch has a robust aluminum case and has been specially designed for
carp anglers. The stylish green color matches the look of the angling community.
UK UK
FULLY WATERPROOF
The Smart Bite Watch is waterproof up to 2 meters.You can use the watch in rainy weather and
even a short dip in the water when catching or releasing a sh is no problem.
SOUND, DISPLAY AND VIBRATION
The ND watch has all receiver functions and guides you comfortably through the text-based menu.
The crisp display shows the most important information.
SUPER CONNECTIVITY DEVICE & REMOTE-CONTROL MODE
The watch is designed to control all your NDTackle smart link devices like headtorch, bivvy light,
air light sounder and much more. This allows you to control each device from a single button and
send on/o commands. You easily turn on the bivvy light and headtorch from your wrist which
adds so much comfort in many situations.
FULL FEATURED APP
The App acts as programming and operation tool for the
watch. You can dene actions and bind them to the buttons
of the watch but also run them from the app. For example,
you could program an action which sets all bite alarms
to a higher sensitivity setting at once.
MAGNETIC CHARGING PORT
The ND Smart Bite Watch comes with a magnetic charging cable which attracts itself to the
charging port on the watch.
LONG STANDBY TIME
With a 150 mAh lithium-ion battery the watch can run for up to 100 hours depending
on the personal use.

Press and hold the multifunction button for 3
seconds to enter the system menu of the R16
receiver.
SYSTEM MENU OF SMART BITE WATCH R16
R16 Smart Bite Watch Receiver
4
3
UK UK
1.Power ON/OFF/RETURN
2.UP
3.Multi-Function button
4.DOWN
RED
RUN
S C
00mm
No
1 2
34
RED
RUN
S C
00mm
No
1.Remote setup
2.Register alarm
3.Vitual band
4.Range test
5.Drop back set o
6.Date time set
7.Motor on

HOW TO REGISTER BITE ALARMS WITH RECEIVER
1.Press and hold the 'multifunction button' to enter the system menu of R16 (receiver).
2. Scroll down to select the 'register alarm' menu.
3.Select the color you want to register.
4.Turn the roller wheel of BEA, K9s, S9 or N1 bite alarm.
5.Registration was successful when the display shows ´Reg SUCCESS`.
Reg RED
Reg GREEN
Reg BLUE
Reg YELLOW
Reg WHITE
Reg Light
Reg Camera
A-EFT CHA1
A-EFT CHA2
A-EFT CHA3
A-EFT CHA4
Tip: How you delete all registered alarms on the
receiver - Clear all channels.
123
6
5
UK UK
1.Remote setup
2.Register alarm
3.Range test
4.Drop back set o
5.Date time set
6.Motor on
Reg RED
Reg GREEN
Reg BLUE
Reg YELLOW
Reg WHITE
Reg Light
Reg Camera
RED
RUN
S C
00mm
No
A-FET CHA1
A-FET CHA2
A-FET CHA3
A-FET CHA4
Clear all CHA
Reg success
Turn the alarm
RED
1.Remote setup
2.Register alarm
3.Vitual band
4.Range test
5.Drop back set o
6.Date time set
7.Motor on
1.Remote setup
2.Register alarm
3.Vitual band
4.Range test
5.Drop back set o
6.Date time set
7.Motor on
1.Remote setup
2.Register alarm
3.Vitual band
4.Range test
5.Drop back set o
6.Date time set
7.Motor on

HOW TO REGISTER ANTI-THEFT ALARM TH9s
1. Press and hold the 'multifunction button' to enter the system menu of R16 (receiver).
2.Scroll down to select the 'register alarm' menu.
3.Choose one of the A-EFT channels (A-EFT CHA1, A-EFT CHA2, A-EFT CHA3, A-EFT CHA4).
We recommend to start with A-EFT CHA1.
Press the button down to select the channel.
Reg RED
Reg GREEN
Reg BLUE
Reg YELLOW
Reg WHITE
Reg Light
Reg Camera
A-EFT CHA1
A-EFT CHA2
A-EFT CHA3
A-EFT CHA4
4.Turn on the TH9s Anti-Theft Alarm.
5.Press the right button on the TH9s twice.
6.Registration was successful when the display shows ‘SUCCESS’ .
Press
8
7
UK UK
1.Remote setup
2.Register alarm
3.Vitual band
4.Range test
5.Drop back set o
6.Date time set
7.Motor on
A-FET CHA1
A-FET CHA2
A-FET CHA3
A-FET CHA4
Clear all CHA
1.Remote setup
2.Register alarm
3.Vitual band
4.Range test
5.Drop back set o
6.Date time set
7.Motor on
1.Remote setup
2.Register alarm
3.Vitual band
4.Range test
5.Drop back set o
6.Date time set
7.Motor on
Reg success
Press the button
A-EFT1

1.Press and hold the 'multifunction button' to enter the system menu of R16 (receiver).
2.Choose menu ´Remote setup`.
3. Scroll up and down to select the channel of the registered bite alarm.
4.Press buttons 2 (up) and 4 (down) to navigate up and down. Use the multifunction
knob to select an entry, then use 2 and 4 to set the value.
*Some functions depend on the type of bite alarm. Not every bite alarm has all functions.
For example, the S9 and N1 bite alarms do not have a night light.
5. You always navigate back with button 1 (power on/o).
HOW TO REMOTE CONTROL FUNCTIONS OF BEA/TH9s via R16
set RED
set GREEN
set BLUE
set YELLOW
set WHITE
set Light
set Camera
set A-EFT1
set A-EFT2
set A-EFT3
set A-EFT4
RANGE TEST
10
9
UK UK
set RED
set GREEN
set BLUE
set YELLOW
set WHITE
set Light
set Camera
Volume 6
Tone 6
Sensitivity 6
Nightlight auto
Snag Bar
RED
Volume 6
Tone 6
Sensitivity 6
Nightlight auto
Snag Bar
RED
Volume 6
Tone 6
Sensitivity 6
Nightlight auto
Snag Bar
RED
Volume 6
Tone 6
Sensitivity 6
Nightlight auto
Snag Bar
RED
1.Remote setup
2.Register alarm
3.Vitual band
4.Range test
5.Drop back set o
6.Date time set
7.Motor on
The Range test function does not test the maximum range of the bite indicators to the receiver,
but how far the remote control mode reaches. There is a dierence between the range from the
bite indicator to the receiver and from the receiver to the bite indicator.
The real range of the bite indicator depends on environmental conditions. This range can only
be tested manually by turning the roller wheel.

HOW TO REGISTER H10 HEAD LIGHT WITH R16
12
11
UK UK
The apps connect to the watch automatically. Make sure Bluetooth is turned on
on your smartphone.
RED
RUN
S C
00mm
No
The app connection icon is highlighted and
not greyed out when the watch has an
app connection.
HOW TO REGISTER BIVVY LIGHT PRO H7 WITH R16
RED
RUN
S C
00mm
No
The apps connect to the watch automatically. Make sure Bluetooth is turned on
on your smartphone.
RED
RUN
S C
00mm
No
The app connection icon is highlighted and
not greyed out when the watch has an
app connection.
RED
RUN
S C
00mm
No

DATE TIME SET
1.Press and hold the 'multifunction button' to enter the system menu of R16 (receiver).
2.Scroll down to select the 'Date time set' menu.
APP SET
The apps connect to the watch automatically. Make sure Bluetooth is turned on
on your smartphone.
Most smartphones connect automatically without you having to enter a PIN code.
If your phone requires a PIN code, enter 000000 to try.
14
13
UK UK
Year 2021
Month 01
Day 01
Hour 08
Minute 08
Seconds 45
RED
RUN
S C
00mm
No
1.Remote setup
2.Register alarm
3.Vitual band
4.Range test
5.Drop back set o
6.Date time set
7.Motor on
The app connection icon is highlighted and
not greyed out when the watch has an
app connection.

SUPPORT
TELL US WHAT YOU THINK...
We are committed to providing you with the best possible products and services. However, if you
ever have a complaint or our APP has a bug that needs to be xed, please contact us immediately
using our support centre system.
To streamline support requests and provide you with better service, we use a support ticket
system. Each support request is assigned a unique ticket number that you can use to track
progress and response online. For your information, we provide a full archive and history of your
support requests. A valid email address is required to submit a ticket.
To maintain quality and product development, New Direction Tackle has listened to the
voices of its customers and identied their specic requirements and preferences. The
company has developed and produced a range of exciting products with the aim of
becoming the most popular brand on the market.
newdirectiontackle.co.uk/support/
16
15
UK UK
WHATSAPP GROUP
https://goo.gl/gRpJuB
NEWSLETTER
newdirectiontackle.co.uk/newsletter/
We're just happy that you're happy. If you don't know how to
express your newfound joy, we have a few suggestions....
Tell your friends and family
Share your experience by writing a review on Amazon or Ebay.
www.facebook.com/Newdirectiontackle
www.instagram.com/newdirectiontackle
Inhaltsverzeichnis
Sprachen:


