NK TECHNOLOGIES AG3 Series Bedienungsanleitung

INSTRUCTIONS
1. Runallcurrentcarryingconductorsthrough
detector window
A. Use anauxiliaryCTifconductors do notfit. Consult
Factory for CT selection.
2. Mount the detector to a surface if needed.
3. Connect output & power wiring.
A. Use 22 to 14 AWG copper wires.
B. Make sure load matches the output shown on the
detectors’label.
• Detectors labeled “xxAC” will only detector
AC.
• Detectors labeled “xxDC” will only detector
DC.
C. Make sure power supply matches the power input
shown on the label.
4. Test
A. Pressing the “TEST” button tests the detectors
internal circuits. CAUTION: The output and any
connected loads will detector!
AG1-NCAC-120 -FS - 005
Model Number KeySpecifications
Quick “How To” Guide
Power Supply Notes
AG 1, 2 & 3 SERIES
Ground Fault Detectors
Solid State Auto-Reset
AG-auto-reset Inst. Rev 5, 4/16 P/N 49-010-0002
Output Type
NCAC Normally Closed 1A @ 240 VAC
NOAC Normally Open 1A@ 240 VAC
NCDC Normally Closed 0.15A @ 30 VDC
NODC Normally Open 0.15A@ 30 VDC
Power Supply
24U 24 VAC/DC
120 120 VAC
240 200-240 VAC
Setpoint Range
1 5-100mA, Adjustable
2 80-950mA, Adjustable
3 Tri-Set, 5, 10 & 30 mA, Jumper Select
AG Series Ground Fault Detector
Setpoint Range AG1 Series: 5-100mA Field Adjustable
AG2 Series: 80-950mA Field Adjustable
AG3 Series: Tri-Set, 5, 10 & 30 mA, Jumper
Select
Voltage Range Up to 1,500 VAC (Monitored Circuit)
Frequency Range 50-400Hz (Monitored Circuit)
Output Options (See Product Label)
Solid State AC Detector 1A @ 240 VAC (2A for 10 Min.)
Solid State DC Detector 0.15A 30 VDC (500mA
momentary)
Response Time 150 mS @ 5% above setpoint.
100 mS @ 50% above setpoint.
Power Supply 120 VAC (50-400 Hz) (66-132 volts)
2.5 VA consumption
240 VAC (50-400 Hz) (200-240 volts)
2.9 VA consumption
24VAC or VDC (19-28 volts)
2.5VA consumption
Green LED=Power supply energized
Dimensions 2.5”H x 2.8”W x 1.5”D, (64x71x38mm),
aperture 0.75” (19mm) dia. (See Diagram)
Case UL 94V-O Flammability Rated
Environmental -4 to122° F (-20 to 50 °C),
0-95% RH, Non Condensing
Listings UL 1053, Class 1 Recognized, CE Certified
(Not all option combinations are recognized.
See product label)
System Grounding
3511 Charter Park Drive, San Jose, CA 95136
800-959-4014 or +1-408-871-7510 Phone
+1-408-871-7515 FAX
[email protected], www.nktechnologies.com
Know Your Power
Other NK Technologies Products Include:
AC & DC Current Transducers
AC & DC Current Operated Detectors
1φ& 3φPower Transducers
Current & Potential Transformers (CTs&PTs)
Alllow-currentGround-FaultDetectorsaresensitivedevices
that require reasonable care in system design to avoid false
trips caused by high electrical noise levels. Keep in mind
that the best way to reduce noise in a system is to suppress
it at its source.
1. Keep the detector power isolated from noisy circuits.
2. Donotpower thedetectorwiththesamecircuitwhichpow-
ers contactors or other high current, inductive loads.
Good design practice and code require that all AC power
systems be grounded. AG Series detectors are designed to
workongroundedAC powersystems. Theymay notoperate
properly on ungrounded systems.
Setpoint
005 to 950 Factory Adjusted
Setpoint in mA (specify
when ordering)
TR3 Tri-Set, 5, 10 & 30 mA,
Jumper Select
Options
FS Normally Energized
NF Normally De-energized
Normally Energized Models (-FS) Detects Ground Faults and loss of control power
CONTROL POWER APPLIED
NO POWER No Fault Fault Detected
Output Style Output LED Output LED Output LED
N.C. Normally Closed CLOSED Off OPEN ON CLOSED OFF
N.O. Normally Open OPEN Off CLOSED ON OPEN OFF
Normally De-Energized Models (-NF) Detects Ground Faults only.
CONTROL POWER APPLIED
NO POWER No Fault Fault Detected
Output Style Output LED Output LED Output LED
N.C. Normally Closed CLOSED Off CLOSED OFF OPEN ON
N.O. Normally Open OPEN Off OPEN OFF CLOSED ON
Description
Operation
Principal of Operation
AG Series ground fault detectors work in the same environ-
ment as motors, contactors, heaters, pull-boxes, and other
electrical enclosures. They can be mounted in any posi-
tion or hung directly on wires with a wire tie. Just leave at
least one inch distance between detector and other magnetic
devices.
Run all current carrying conductors through the detector
aperture in the same direction. (See “Principal of Opera-
tion)
Connect power wiringto the detector. Be sure that the power
supply matches the power rating on the detector label. Use
22 to 14AWG copper wire and tighten terminals to 7 inch-
pounds torque.
Connect controlled load to terminals. Be certain the output
current draw is lower or equal to the output rating on the
detector label.
Installation & Wiring
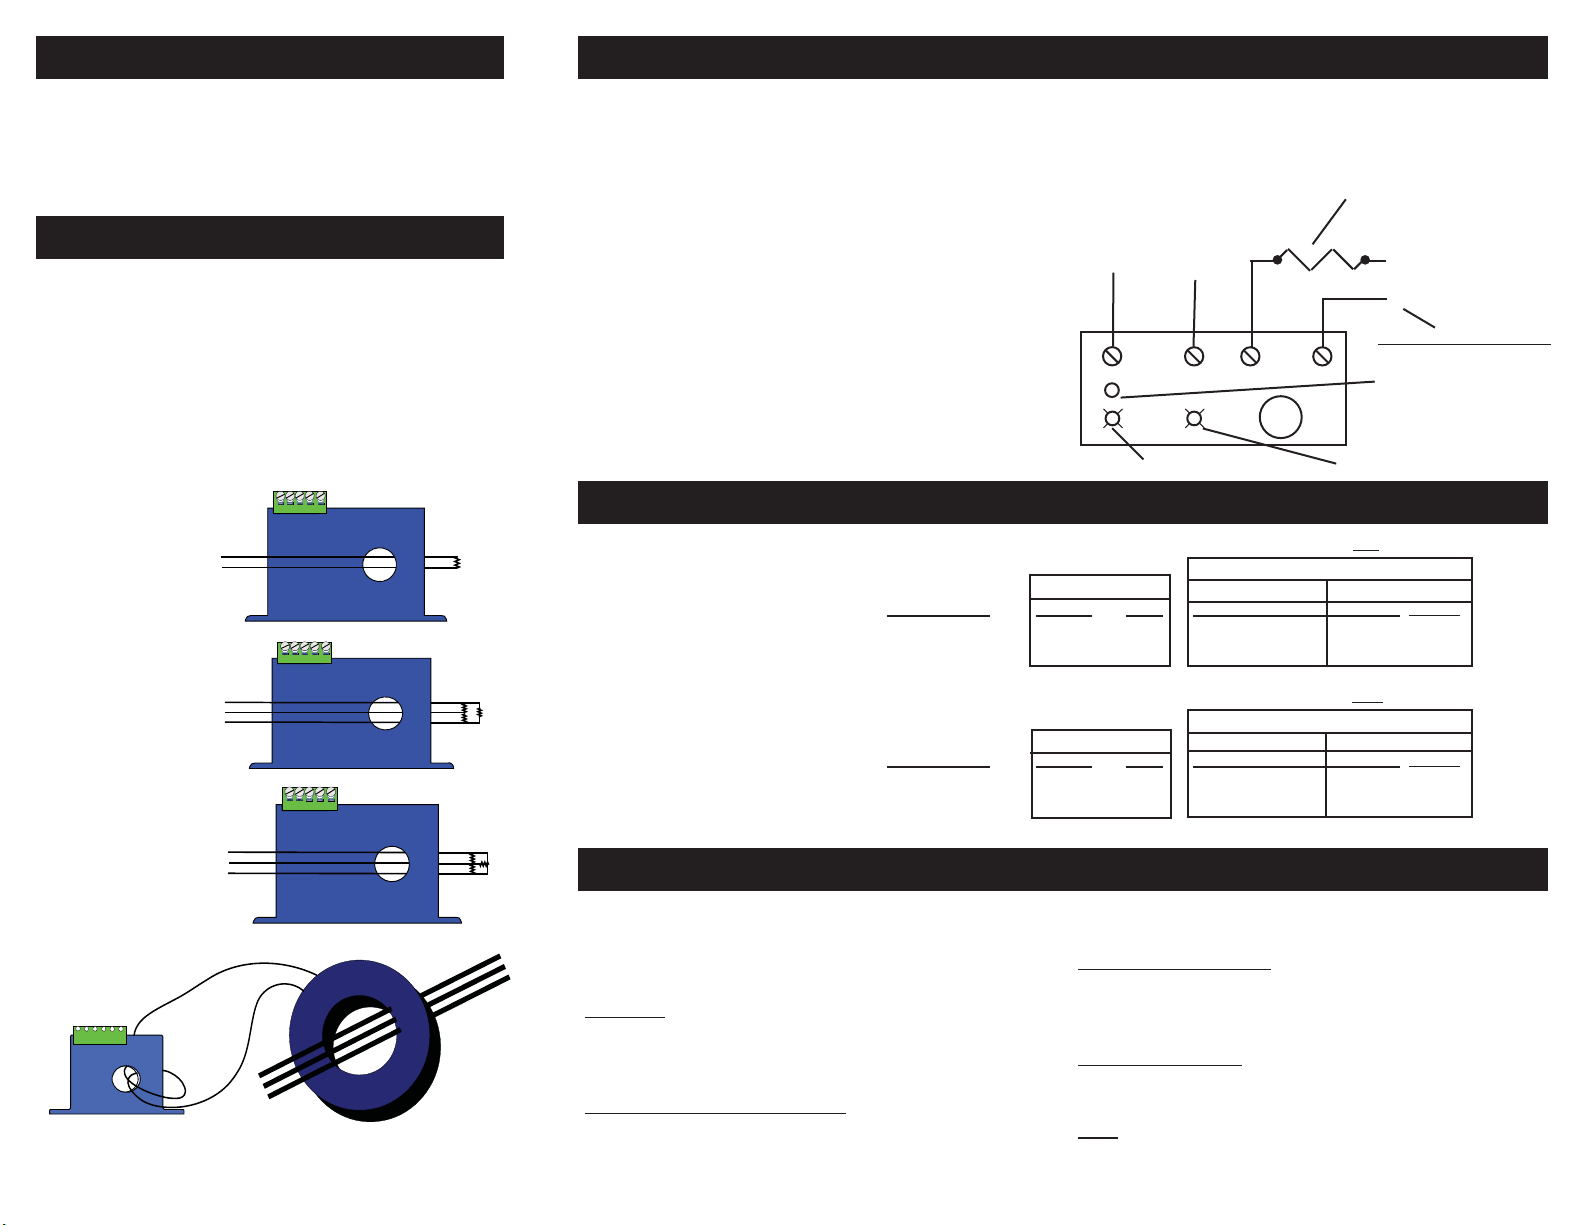
To test operation,gently pressthe
TEST button. This simulates a
faultandteststheinternalsensing
circuits. You should observe the
following operation.
CAUTION: Any circuit con-
nected to the detector will be
operated.
Power Output
G
X
Control Power
Match Detector Rating
(See Label)
Setpoint Adjust
Factory calibrated &
covered. Remove cover,
adjust & relabel if required.
Load
Contactor, Relay, Shunt Trip Breaker, etc.
Do not exceed Rating (See Label)
Output Power
Match Detector Rating
(See Label)
TEST
(+)
(_)
For DC Output Version
Observe Polarity
Setpoint Adjustment
AG1 &AG2 Series detectors are factory calibrated to trip
atthesetpointspecifiedat thetimeorder. We highly recom-
mend leaving this factory calibrated setpoint alone. If you
must change the factory setpoint, follow these steps:
A. Setup
Connect control power and output circuits. Run a conduc-
tor through the aperture with current equal to your desired
set point .
B. Adjust Setpoint to Maximum
Remove the Setpoint Cover. Turn the adjustment pot 4
revolutions CCW (Counter Clockwise) to the maximum
(least sensitive) setpoint. The Status LED should be OFF.
The adjustment pot has a slip clutch so you cannot feel or
damage the end point.
C. Dial in new Setpoint
Turn the pot slowly CW (Clockwise) until the LED turns
ON. The detector is now adjusted to trip at the current that
is passing through the aperture. Reset the detector.
D. Relabel Detector
Relabelthedetectorwiththenewsetpoint. Usealabelmaker
or tape with a permanent marker.
AG3 Move the jumper to the desired setpoint as shown on
the label. No other adjustment can be made.
Under normal conditions, the current in one wire of a two
wire load is equal in strength but opposite in sign to the cur-
rent in the other wire. The two wires create magnetic fields
that cancel, acondition known as“Zero Sum Current”.If any
current leaks to ground (Ground Fault), the two currents be-
come unbalanced and there is a net resulting magnetic field.
The AG detector detects this minute field and changes the
output state. This concept extends to three phase systems
such as 3 wire Delta and to 4 wire Wye.
AG Series ground fault detectors monitor all current carry-
ing wires in single or three phase systems to detect ground
faults. They provide a contact output that can operate
relays, contactors or signal automation systems.
Contact Status LED
Power Supply LED
Single Phase (Phase
& Neutral or Phase to
Phase)
3 Phase Delta (Include
neutral if the load uses
neutral)
3 Phase Wye (Include
neutral if load uses
neutral)
3 Phase Load, using an auxiliary Current Transformer. Contact
factory for details.
Dieses Handbuch passt für folgende Modelle
2
Andere NK TECHNOLOGIES Sicherheitssensor Handbücher


