Northern Industrial Tools M1107C Bedienungsanleitung

1
M1107C
ITEM NUMBER:1107
SERIAL NUMBER: _____________________
Owner’s Manual
Instructions for Assembly, Testing, Operation, Servicing, &
Storage
20 Ton Log Splitter: Outdoor hydraulic powered machine that
splits wood logs.
WARNING
READ and UNDERSTAND this manual completely before using log splitter.
All operators of this equipment must read and completely understand all safety information, operating instructions,
maintenance and storage instructions. Failure to properly operate and maintain the log splitter could result in serious injury
to the operator and bystanders from moving parts that can crush or cut, flying objects, burns, fire or explosion, escaping
high pressure hydraulic fluid, or carbon monoxide poisoning in particular, be aware of the following hazards.
Crush and Cut Hazards
Moving parts can crush and cut hands and fingers. Keep hands clear of endplate, wedge, and logs while splitting.
High Pressure Hydraulic Fluid Hazards
High fluid pressures and temperatures are developed in hydraulic Log splitters. Hydraulic fluid escaping through even
a pin-size hole opening can puncture skin and cause severe blood poisoning. Inspect hydraulic system regularly for
possible leaks. Never check for leaks with your hand while the system is pressurized. Seek medical attention
immediately if injured by escaping fluid.
Fire Hazards
If your log splitter is intended for use near and ignitable forest, brush, or grassy covered land, the engine exhaust
should be equipped with a spark arrestor. See the “Specifications” section of this manual to determine if your
splitter is equipped already has a spark arrestor. If not equipped, call Northstar Customer Service for ordering
information.
Keep a fire extinguisher with you, that is rated for ordinary combustibles and flammable liquids.
STOP!
ADD OIL TO ENGINE BEFORE USING: Engine is shipped without oil. DO NOT start log splitter without first adding oil.
VERIFY HYDRAULIC OIL LEVEL: Hydraulic reservoir is shipped with oil. Verify oil level is 1” from top before using.
INSPECT COMPONENTS: Closely inspect to make sure no components are missing or damaged.
See “Initial Unpacking and Setup” section for instructions and whom to contact to report missing or damaged parts.
Any Questions, Comments, Problems or Parts Orders
Call NorthStar Customer Service 1-800-270-0810

Hazard Signal Word Definitions
2

Table of Contents
3
About Your Log Splitter………………………………………………………………………………...4
Safety label Locations……………………………………………………………………………….….5
Machine Components Identification…………………………………………………...………………..7
Initial Unpacking & Set-up……………………………………………………………………….…….8
Moving & Towing to the Job Site…………………………………………………………………………. …..10
Before Each Use:
Step One: Inspection/Maintenance…………………………………………………………………….. ….13
Step Two: Refueling……………………………………………………………………………………. …15
Step Three: Work site Selection & Set-up……………………………………………………………..….16
Splitting Operation………………………………………………………………………………………..…….18
Storage………………………………………………………………………………………………………….25
Periodic Maintenance ……………………………………………………………………………………... …..26
Troubleshooting…………………………………………………………………………………………...……27
Specifications……………………………………………………………………………………………...……28
Parts Breakdown – Exploded View……………………………………………………………………….……29
Summary of Important Safety Information for Operation………………………………………………..…….31

About Your Log Splitter
4
Thank you for purchasing your Northstar log splitter!
About Your Log Splitter:
This log splitter is a machine designed to split wood logs using a hydraulically powered moving wedge. The log
splitter’s gasoline engine is used to pressurize the hydraulic system.
This log splitter is designed to split logs up to 24” long, lengthwise with the grain only.
Your splitter can be used in either a vertical or horizontal splitting position:
When the splitter is set up to operate in the horizontal splitting position, a log is placed on the horizontal
beam and the wedge moves horizontally into the end of the log to split it.
When the splitter is set up to operate in the vertical splitting position, the log is placed on the endplate,
upright on its end, and the wedge moves down into the top of the log to split it.
The horizontal splitting position is used for lighter logs that can be easily loaded onto the beam. The vertical
splitting position is used for heavier logs that are difficult to load onto the beam.
The technical specifications for your log splitter are provided in the “Specifications” section of this manual.
WARNING
This log splitter uses a high-pressure hydraulic system to generate a very strong splitting force.
Read the manual completely before using the machine to understand how to safely operate and
maintain it.
Follow all safety precautions presented throughout this manual. A summary of important safety information can
be found at the end of this manual.
Contact Northstar Customer Service at 1-800-270-0810 for any questions about the appropriate
use of this log splitter and /or optional accessories.
Warranty Registration:
Please fill out and submit the warranty registration card so that we have your contact information for any future
product literature or replacement parts you may need.
Attention: All Rental Companies and Private Owners who loan
this equipment to others!
All persons to whom you rent/loan the log splitter must have access to and read this manual. Keep this owner’s
manual with the splitter at all times and advise all persons who will operate the machine to read it. You must
provide instruction on how to safely operate the splitter and remain available to answer any questions a
renter/borrower might have.

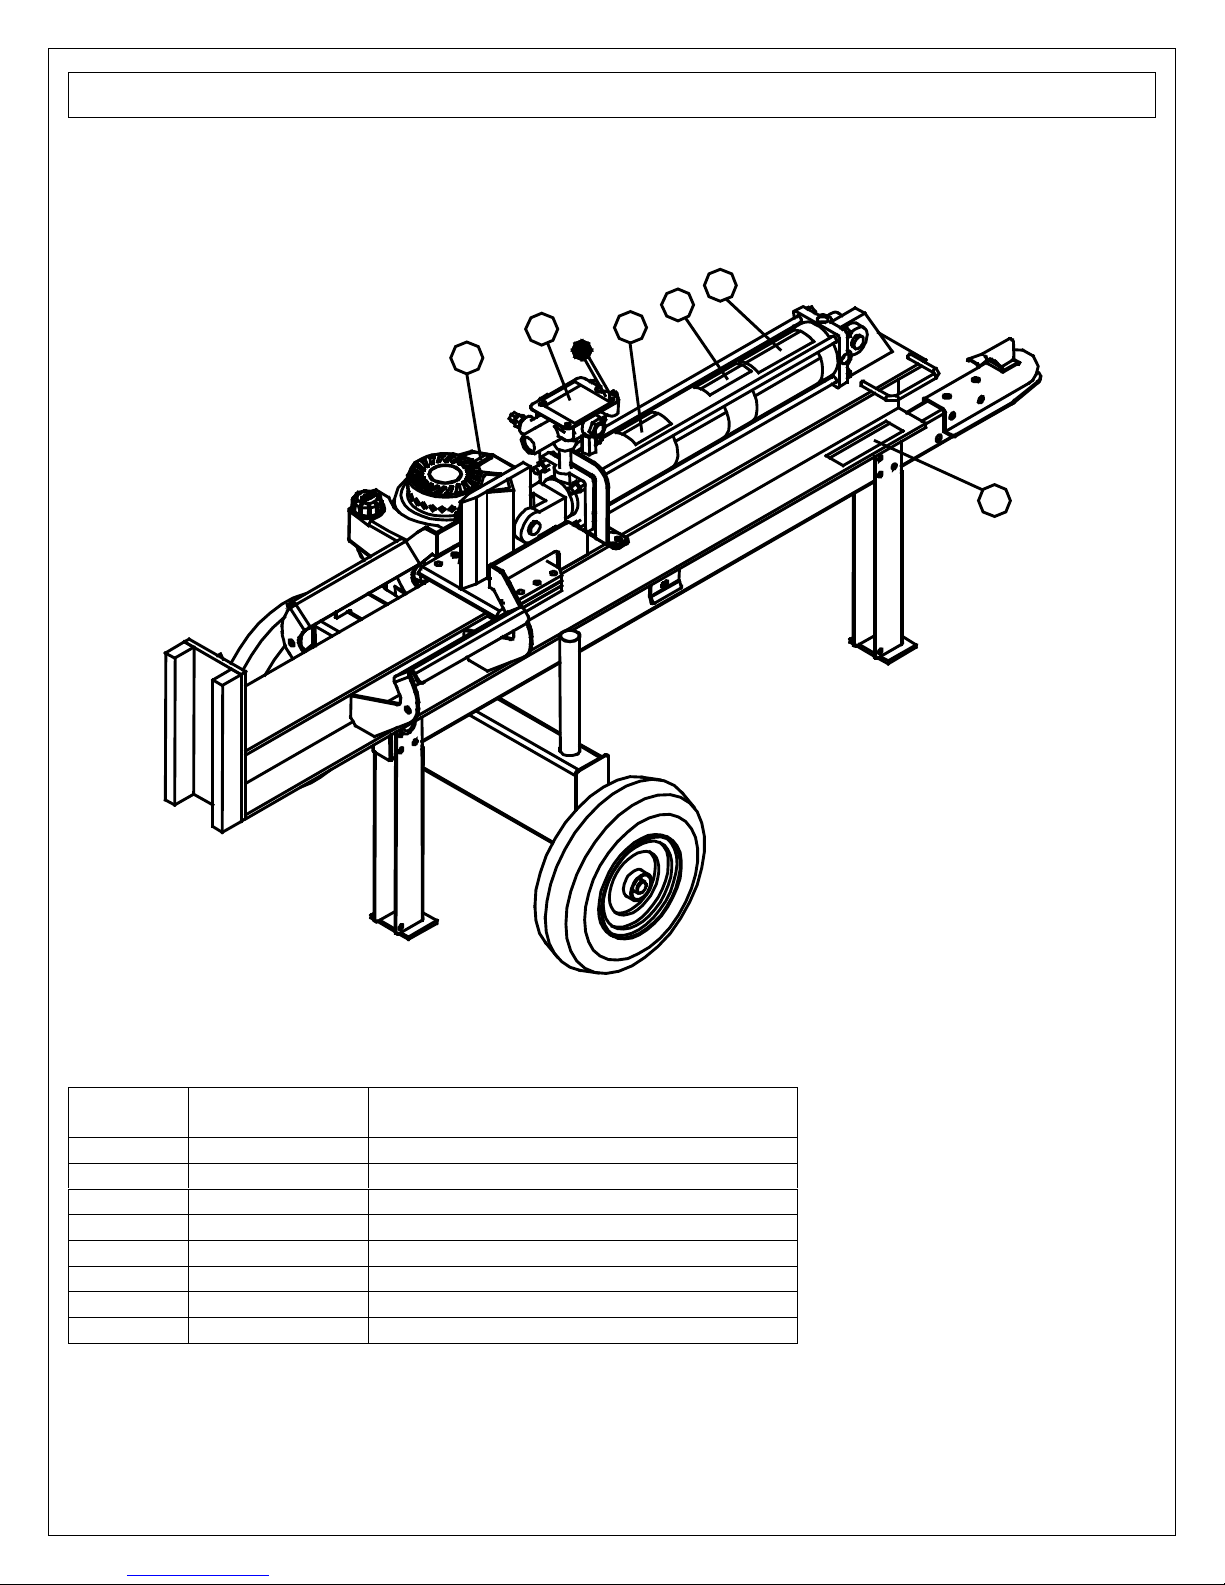
Safety Label Locations
5
5
8
7
4
6
3
2
1
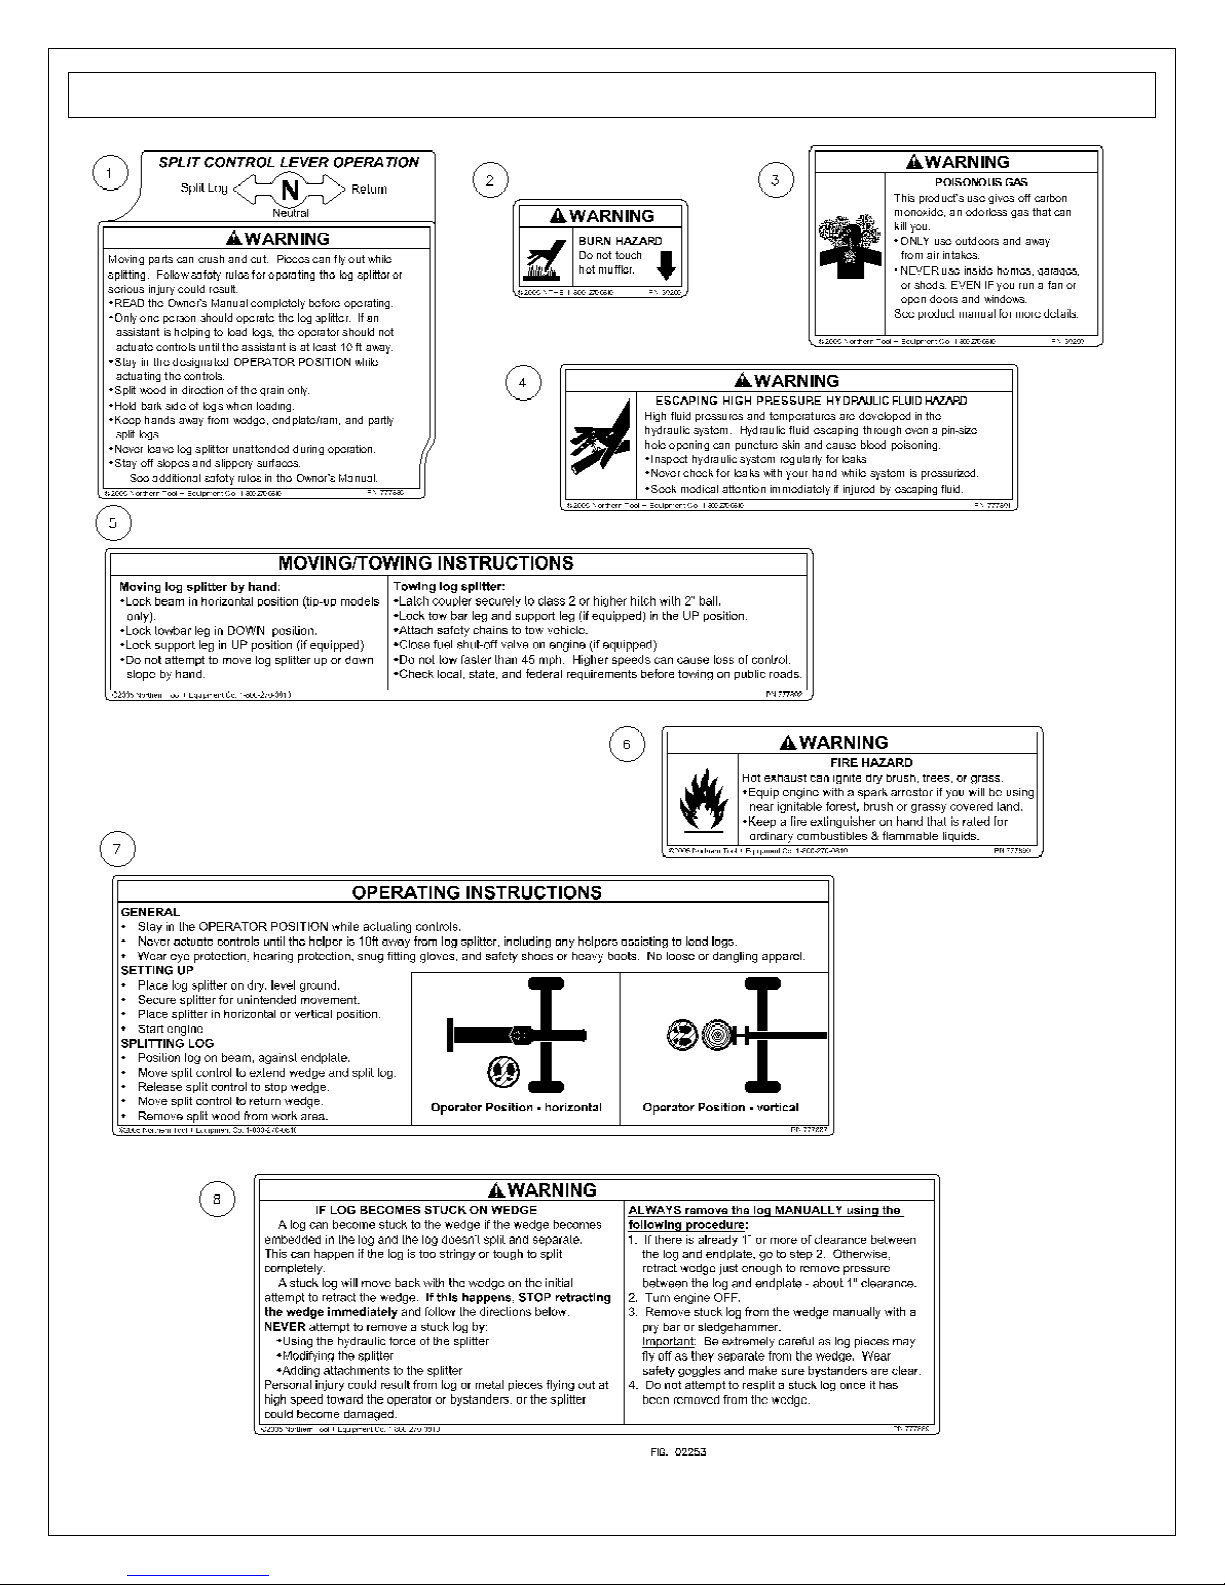
FIG. 2262
Reference
number Part Number Description
1 777886 Splitter Warning Decal
2 39260 Hot Muffler Decal
3 39259 Waning Decal
4 777891 Hydraulic Fluid Warning Decal
5 777892 Moving/Towing Decal
6 777890 Fire Hazard Warning Decal
7 777887 Splitter Operating Instruction Decal
8 777889 Stuck Log Warning Decal
Always make sure safety labels are in good condition. If a safety label is missing or not
legible, order new labels or unsafe operation could result.

Safety Label Locations
6

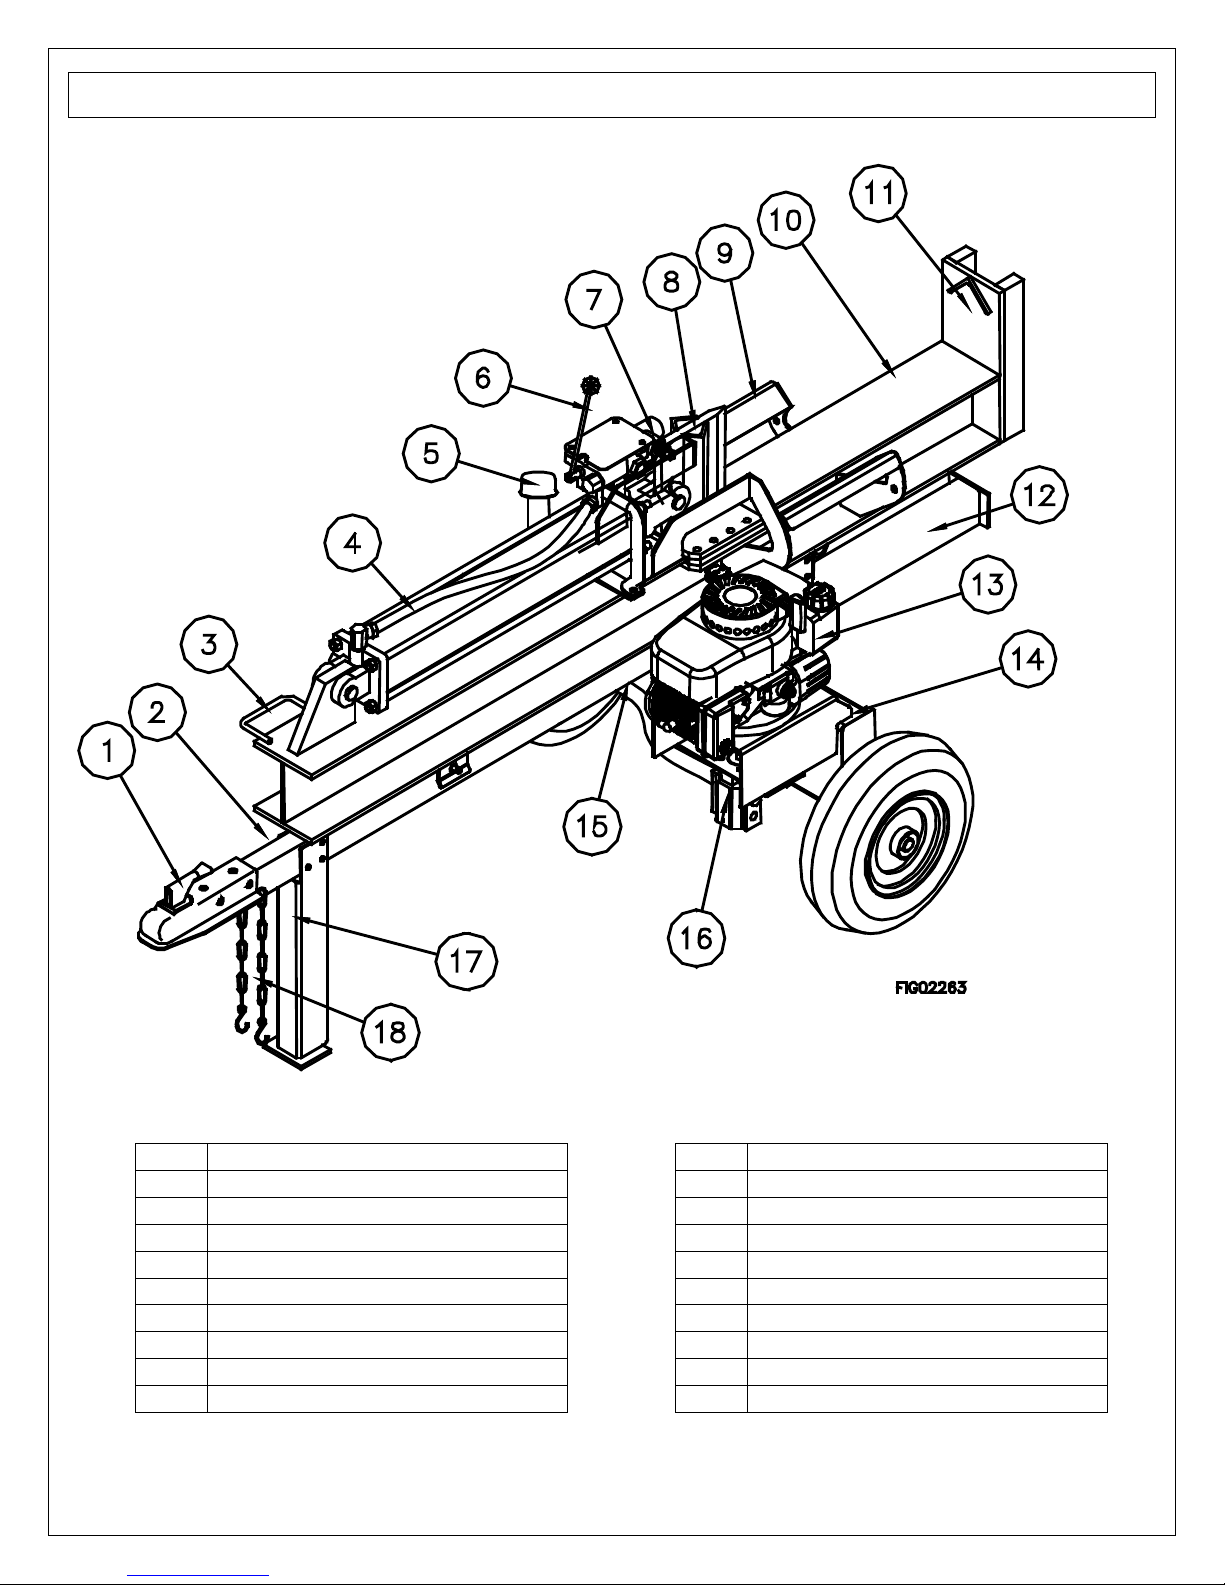
Machine Component Identification
7
Ref Description Ref Description
1 2” Ball Coupler 10 Beam
2 Horizontal Lock 11 Endplate
3 Lifting Handle 12 Support Leg
4 Cylinder 13 Engine
5 Hydraulic Oil Fill Cap 14 Hydraulic Tank
6 Split Control Lever 15 Suction Strainer
7 Control Valve 16 Pump
8 Wedge 17 Towbar Leg
9 Log Cradle 18 Safety Chains

Initial Unpacking & Set-Up
8
IMPORTANT!
Engine is shipped without oil. DO NOT start the engine before adding oil.
Step One:
Add oil Add oil to the engine. Using a funnel. Add SAE 30 oil up to the FULL mark on
the dipstick. (See engine Owner’s Manual for oil capacity and location of fill
cap.)
Step Two:
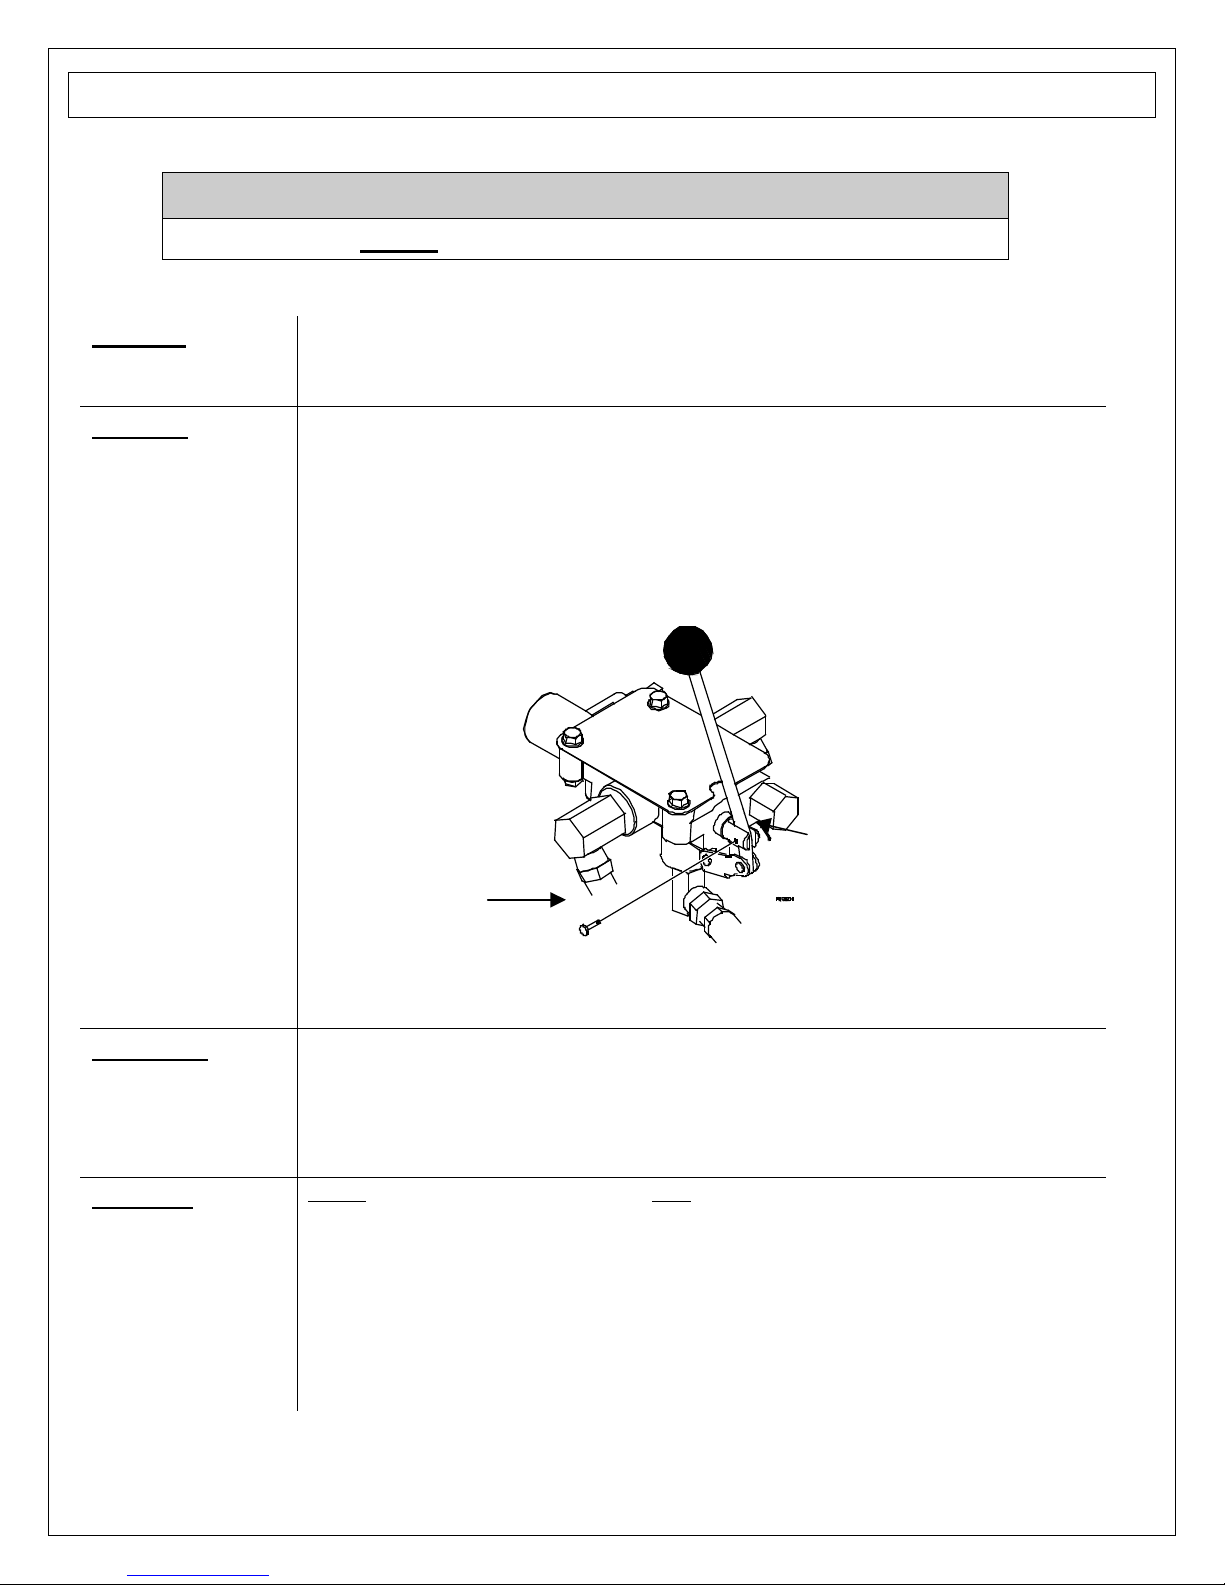
Secure Split Control
Lever
Secure Split Control Lever to Control Valve. Use following procedures :
1. Split Control Lever is shipped taped to the hydraulic cylinder. Untape to
release.
2. Raise lever to align lever hole with holes in valve bracket and insert clevis
pin through the holes to put lever in the up position.
3. Secure by inserting cotter pin in end of clevis pin and spreading ends apart.
Step Three: Inspect
Log Splitter
Components.
Closely inspect all log splitter components.
(See Machine Components section of this manual for diagram of components.)
If you have missing components, contact Customer Service at 1-800-270-0810.
If you have damaged components, contact the Freight Company that delivered the
unit and file a claim.
Step Four:
Verify Hydraulic
Oil Level.
NOTE: Hydraulic reservoir is shipped with oil.
1. Check hydraulic oil level:
a) Make sure engine is off and the cylinder is fully retracted.
b) Relieve all hydraulic system pressure by moving Split Control Lever back and
forth several times.
c) Remove Hydraulic oil fill cap. Verify that oil level is 1” from top of hydraulic
reservoir (not including fill neck).
Clevis pin
Cotter Pin

Initial Unpacking & Set-Up
9
WARNING: NEVER remove the hydraulic oil fill cap when the engine is
running or hot. Hot oil can escape causing severe burns. Allow log splitter
to cool completely before removing hydraulic oil fill cap.
2. If hydraulic oil level is low:
Add 10 wt. AW32, ASLE H-150, or ISO 32 oil to 1” from top.
Note: The log splitter comes filled with LIGHT 150-ISO 32 hydraulic oil. If the
log splitter will be run for long periods of time in outdoor temperatures
above 70F, we recommend changing the hydraulic oil to DEXTRON III.
3. Replace fill cap.
Step Five:
Lubricate Slide
Rail Beam.
Lubricate the surface of the slide rail beam with engine oil. This will help
prevent wear between the slide plates and beam.

Moving and Towing to Job Site
10
WARNING
The log splitter is heavy. It can crush and cause serious injury if it rolls out of control or
tips over.
Follow the instructions below for safely moving and towing the log splitter.
Moving the log splitter:
1. Place in
Horizontal
position
Make sure the log splitter is secure in the horizontal position with hitch pin before
moving.
NEVER move log splitter when it is in vertical configuration because it will be unstable
and could tip.
2. Engine off. IMPORTANT: Make sure log splitter engine is off.
Never move the log splitter with its engine running.
3. Fuel valve off Turn fuel valve off to prevent carburetor flooding and reduce the chance of fuel leakage.
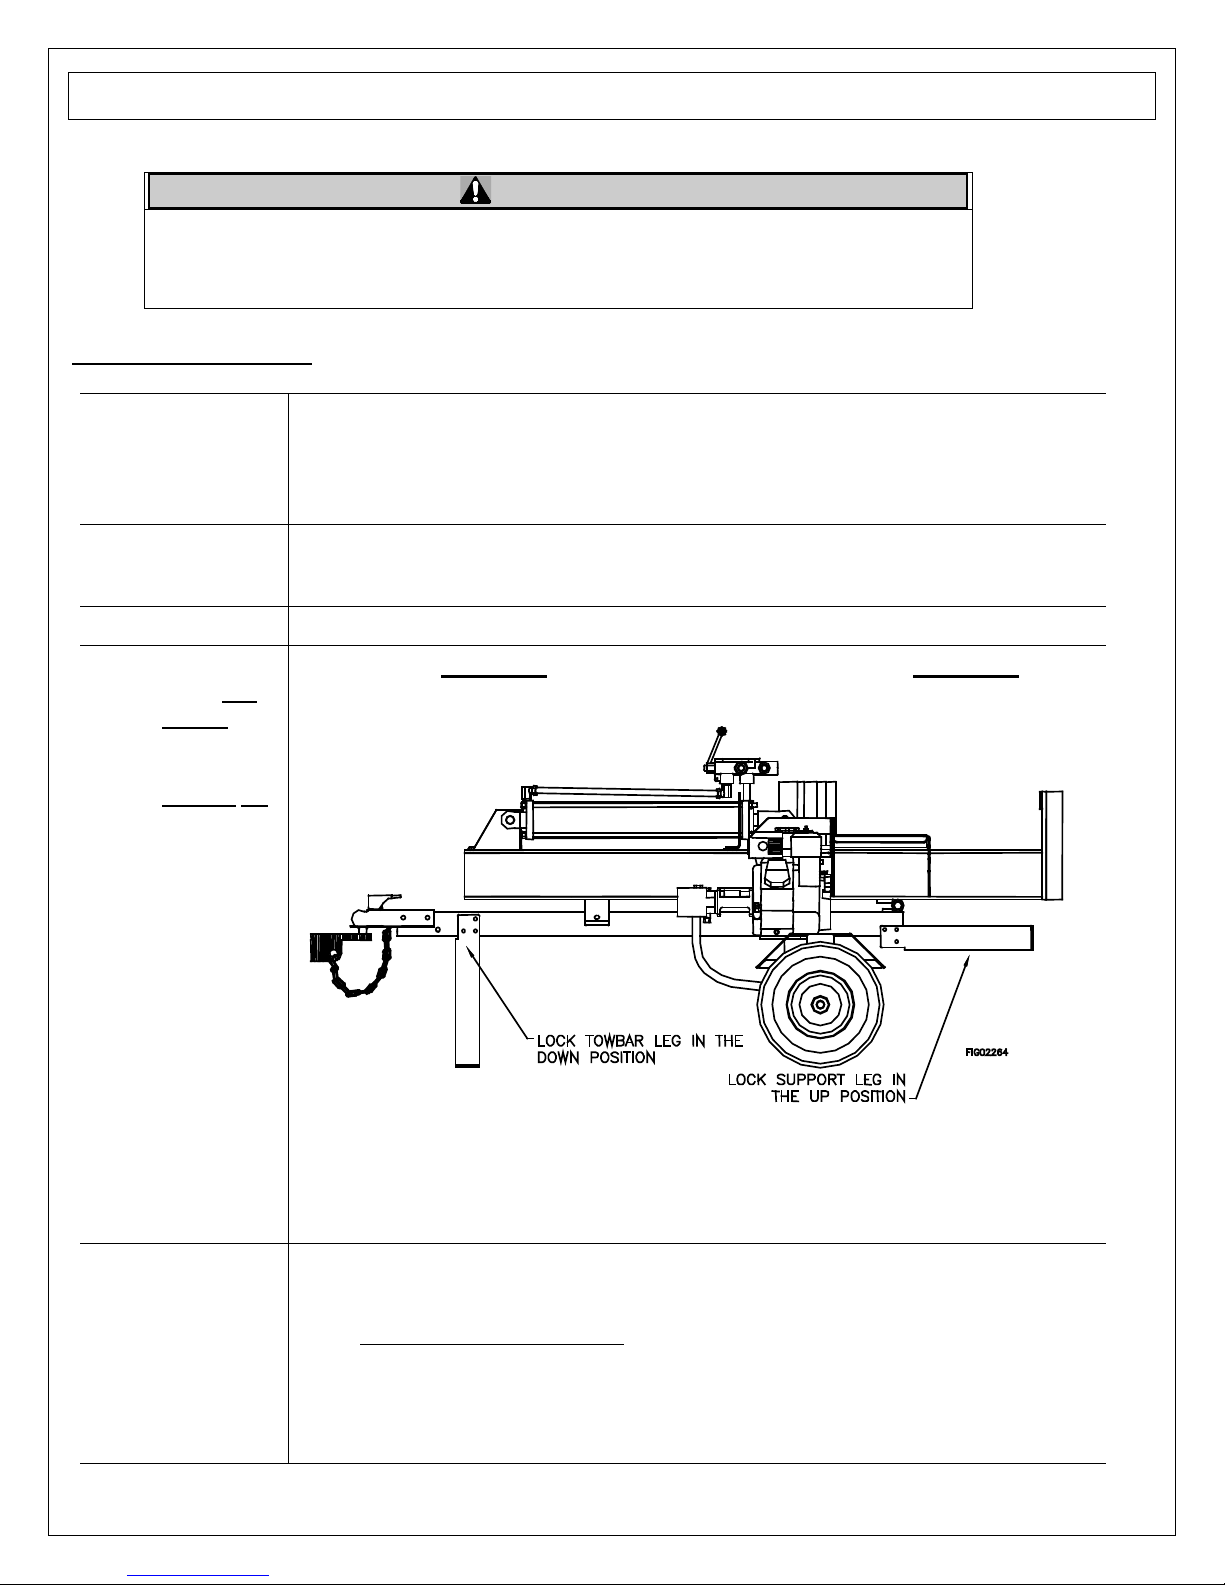
4. Lock:
●Front tow
bar leg
DOWN
●Rear
support leg
UP
Lock the front tow bar leg in the “DOWN” position and the rear support leg in
the “UP” position before you move the log splitter.
5. Move log
splitter to
work site or
tow hitch
Move log splitter by hand either directly to chosen work site or to vehicle hitch for
towing.
(See “Before Each Use” section for instructions on selecting a work site)
Important Safety Instructions:
Hills. Do not move the log splitter up or down hills by hand—use a towing
vehicle.
No riding. Never allow anyone to sit or ride on the log splitter.
No cargo. Never transport cargo or wood on the log splitter.
Inhaltsverzeichnis
Andere Northern Industrial Tools Holzspalter Handbücher
Beliebte Holzspalter Handbücher anderer Marken

Scheppach
Scheppach OX 3-1000 Montageanleitung

Swisher
Swisher 21200 Bedienungsanleitung

Elem Garden Technic
Elem Garden Technic FBHT65-22TCH Bedienungsanleitung

Champion Power Equipment
Champion Power Equipment 90720 Handbuch

Boss Industrial
Boss Industrial ES5T20 Bedienungsanleitung

Villager
Villager LSP 12 T Bedienungsanleitung