Nugens ND-24 Bedienungsanleitung

Nugens
24” Thin Bezel MONITOR
USER MANUAL
MODEL: ND-24

2
Content
1. Check the content.....................................................................................3
2. Installation.................................................................................................3
2.1 Connection.....................................................................................3
3. User’s Interface Control............................................................................3
3.1 OSD Control:..................................................................................3
3.2 Recommended Resolution and Mode ............................................4
4. Troubleshooting ........................................................................................5
5. Important Notice .......................................................................................5
5.1 Cleaning important notice ..............................................................5
5.2 Cautions on using the product .......................................................5
5.3 Power Cable and Signal Connecting cable ....................................6
5.4 Working Environment.....................................................................7
6. Function Adjusting ....................................................................................8
7. Product Specification ..............................................................................10

3
1. Check the content
Before beginning to use the display, please confirm the following items of
content are complete.
⚫1 x LCD liquid crystal display
⚫1 x power adapter
⚫1 set bracket (display stand)
⚫1 x user manual
2. Installation
If want to install all display to the host computer system, please operate
according to the following steps:
2.1 Connection
A. Connect VGA cable or HDMI cable to the host computer.
B. Plug in the power adapter of the display.
C. Power on the display: turn on the power of display and computer.
3. User’s Interface Control
3.1 OSD Control:
A. Press “MENU” button to view the OSD menu
B. Use the (+/-) button as “arrow keys” to choose from the OSD menu
C. Press “MENU” button (“OK” button) again to enter the selected title
D. Use the (+/-) button to adjust the setting value - higher or lower
value
E. Press “MENU” button again to save the new setting value
F. After saving the new setting value, press the “MENU” button again
to exit the OSD menu

4
3.2 Recommended Resolution and Mode
Recommend user to choose one kind of the following schemes:
Resolution
Horizontal scan
frequency (KHz)
Frame frequency
(Hz)
640*350
31.467 (+)
70.082 (-)
720*400
31.467 (-)
70.082 (+)
640*480
31.467 (-)
59.487 (-)
640*480
31.467 (-)
72.809 (-)
640*480
31.467 (-)
75.000 (-)
800*600
35.156 (+)
56.250 (+)
800*600
37.897 (+)
60.317 (+)
800*600
48.077 (+)
72.188 (+)
800*600
46.875 (+)
75.000 (+)
1024*768
48.363 (-)
60.004 (-)
1024*768
56.476 (-)
70.069 (-)
1024*768
60.023 (+)
75.029 (+)

5
4. Troubleshooting
Problem
Solutions
No display
⚫If the LED indicator light is off: Check
whether the cable is connected firmly.
⚫If LED indicates the light is off: Check
whether the connection of the HDMI or
VGA cable is firm at the same time,
and check whether the host computer
is turned on.
⚫Check whether horizontal
synchronization exceeds the range if
the LED indicator light shows green.
Picture unstable
(miscellaneous wave,
flickering, blurry, etc.)
⚫Check whether the connecting cable
(HDMI or VGA cable) is connected
well with the host computer.
⚫The rate (Hz) of monitor is compatible
with host computer.
5. Important Notice
5.1 Cleaning important notice
A. Please use the soft cloth to clean the LCD screen to remove dust
on screen.
B. Should not put pressure on the screen while polishing the screen
surface.
C. Please don’t use water and other chemical cleanser to polish the
screen surface of LCD, chemical drug may damage the screen
surface.
5.2 Cautions on using the product
Before using the product, please read these safety precautions for
proper use:
A. Do not conceal or block the heat dissipation hole under the
machine

6
B. Do not use sharp things, metal or liquid to stretch into or touch the
signal terminal or in the heat dissipation hole, to avoid a short
circuit and product damage.
C. If you have not used the product for a very long time, you shall pull
out the power cable from the wall power plug.
D. Do not try to resolve it by yourself or dismantle any parts of this
product, which may lead to damage to the product and injury to
the human body and make the product's guarantee void.
E. Do not touch the screen surface directly with the finger, may
damage the screen surface in this way, and very difficult to drive
out if the oil of the skin stays on the screen.
F. Do not exert pressure on the LCD screen, because the LCD
screen is very exquisite and fragile.
G. Must use the Power Supply provided by the original factory, to
avoid causing the products to be damaged.
H. Please pull out the Power adapter cable of this product in the
following situations:
◆If you do not use the product for some time.
◆If the cable or power plug is damaged.
Please assemble or adjust this product according to this user manual, if you meet
an unexpected condition while assembling this product, please pull out the Power
Supply cable first and contact us or our resellers/distributor as soon as possible.
5.3 Power Cable and Signal Connecting cable
A. Do not let any objects oppress Power Supply cable or signal
connecting cable.
B. Do not let Power Supply cable and signal connecting of this
product across walkway, or any places that people often pass by,
in case that the cable is trampled.
C. This product equips with three cables earth-type plug, this plug
only can adapt to earth-type outlet, this is a function of taking
security into account, if unable to insert it in the socket, please
consult your electrician to change old socket, should not give up
the earth type plug for the safety reason, if voltage of use area

7
where you locate is 220V-240V AC, should chose equipment cable
of additional ‘‘Tandem Blade’ plug as input terminal of 230V AC,
and should pay attention to this cable you choose must have
passed relevant safety certification and mechanism authentication.
D. Do not let outlet or cable overload.
E. Do not let cable or signal connecting cable of this product put at
strong moisture place.
5.4 Working Environment
A. Should not install this product on an unstable go-cart, shelf or
desk, this product may damage seriously because of dropping
from a high place.
B. Should install this product in a good ventilated environment
place when in use.
C. Should not install this product in the following environments:
Overheated, cold or highly moist places, places where
sunshine can shine directly, or places near the equipment will
cause a strong magnetic field.
8
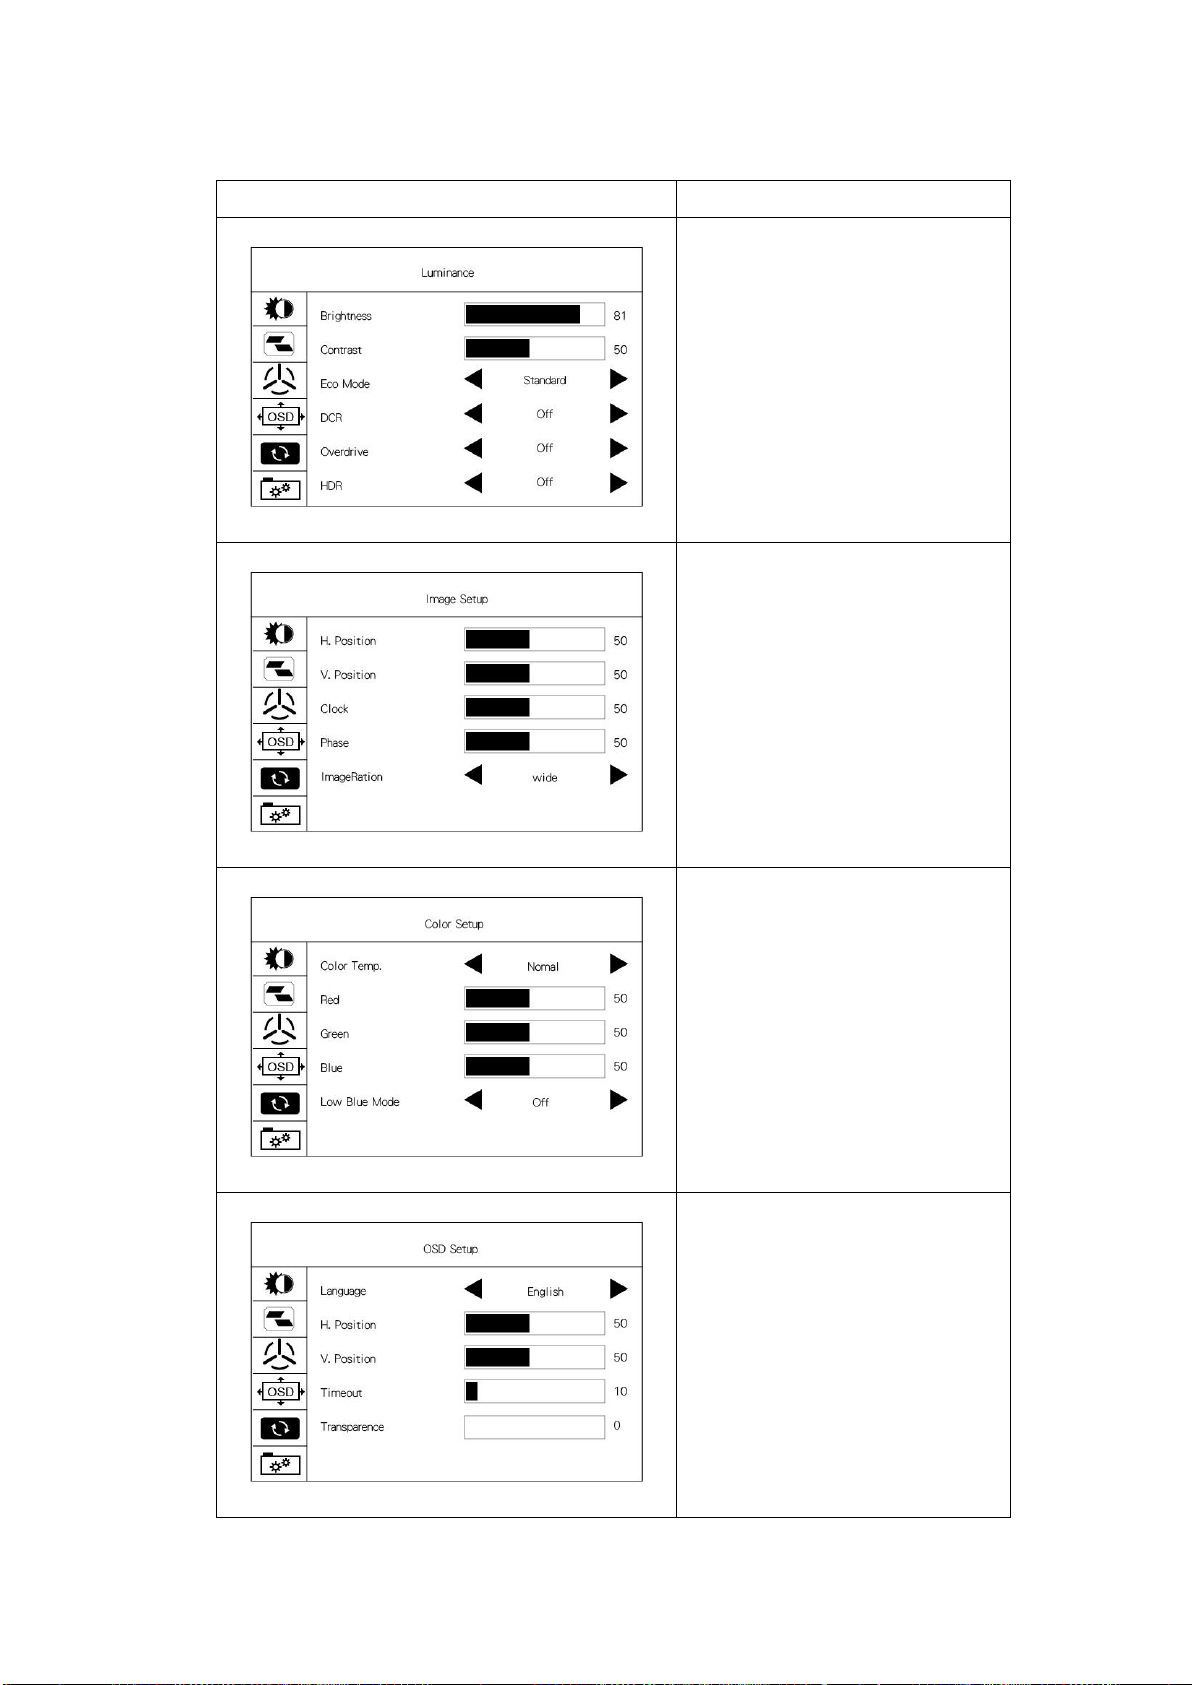
6. Function Adjusting
Main Menu
Function Setting
Brightness: 0-100
Contrast: 0-100
Eco Mode: Standard, Movie,
Game, Internet
DCR: On/Off
Overdrive: On/Off
HDR: On/Off
H.Position: 0-100
V.Position: 0-100
Clock: 0-100
Phase: 0-100
Image Ration: wide, 4:3
Color Temp: Normal, Warm,
User, sRGB, Cool,
Red: 0-100
Green: 0-100
Blue: 0-100
Low Blue Mode: On/Off
Language: Muti-Country
H.Position: 0-100
V.Position: 0-100
Timeout: 5-100
Transparent: 0-100

9
Auto Configure
(Press to enter auto
configure)
Auto Color
(Press to enter auto color)
Reset
Black Level: 0-100
Input Select: HDMI, VGA
Mute: On/Off
Volume: 0-100

10
7. Product Specification
Screen size
23.8 inch
Panel type
IPS
Resolution
1920*1080
Screen refresh rate
75Hz
Visible area
527.04*296.46(mm)
Viewing angle
(horizontal/vertical)
178°
Contrast
1000:1
Brightness
250cd/m2
Pixel
233.1um*233.1um
Aspect ratio
16:9
Display color
16.7M
Response time
2ms
Anti blue light mode
YES
Overdrive processor
YES
DCR mode
YES
HDR mode
YES
Input
HDMI+VGA
Speaker
Built-in speaker
Wall mount specs
VESA 100*100mm
OSD language
Multi-lingual
Power
DC 12V/3A
Power consumption
<20W
Standby mode
0.5W
Tilt (up/down)
-5°~ 20°
Rotate (left/right)
-45°~ 45°
Flip
90°
Height Adjustment
14cm
Screen Dimensions
59*10*45cm
Weight
5KG
Accessories
Power adapter, voltage transformer, monitor stand
Inhaltsverzeichnis
Andere Nugens Monitor Handbücher


