NUWA RobotCreator DX Betriebshandbuch

Product User Manual
Please read this manual carefully prior to use and keep it for future reference.
Model:AIR-H204

NUWATeam,2022
01
Thank you for choosing Robot Creator DX!
Robot Creator DX is a fun-filled DIY robot kit.
Using Kebbi Air as a foundation, Robot Creator DX is a passion project designed for robot
enthusiasts that doesn't require any prior knowledge of programming languages. Simply pick
up a screwdriver to build a smart robot that can talk, walk, and do much more!
The goal of our team is to create the world’s best robots. Nuwa Robotics is one of the few AI
robotics companies in the market that has the ability to independently design and develop
hardware, software, AI, and content. We envision a world filled with people who love robots as
much as we do, so that we can work together and create more interesting and unique robots.
Join us at Robot Creator DX, where you'll find a community full of fantasy and creativity. Show
us your unique creation!

Search “Robot Creator Support”, Start to Assemble
Search for "robot creator support" in the browser to start building your own robot. We
recommend that you use a larger screen (e.g. laptop, tablet) to read it for the best experience.
Painting 。Assembling 。Customize your Robot
Using Biztools 。 Create your Contents 。 MakerBase
02

Please cross-check with the list of parts to ensure all
parts are present. For any missing parts, please contact
customer service.
The charger in the accessory package is an OEM charger.
Please avoid using any other brand of charging cables in
order to keep the robot working properly.
Please read this User Manual thoroughly to ensure correct
and safe use of this product.
Regularly check the charging cable, connector, and outer
casing for damage. If damage is found, do not use until
repaired.
1.
2.
3.
4.
03
Product Introduction
Robot Creator
Relatedlinks
Nuwa BiztoolsRobot Creator
website
Nuwa Support /
Guidebook
NuwaSpace

Listening LED Indicator
7" Touch Panel
Power LED Indicator
Touch Area (Belly)
Status LED Indicator
Touch Area (Hands)
PIR Sensor
IR Drop Sensor
Product Description
Product Introduction
04
Camera
Charging Port
Return to Home Screen, Turn On / Off (Please refer to P.10 for more details)
There are 5 Touch Sensing Areas: Head, left and right Cheeks. Belly, and left
and right Hands. Please remember to touch Kebbi gently.
PIR Sensor: Senses whether there is anyone passing in front of Kebbi.
Please use with the orginal OEM charger.
Home Screen / Power Button
Touch Area
PIR Sensor
USB Type C Charging Port
Touch Area (Head)
Touch Area (Cheeks)
Speakers
Microphone
Micro SD Card Slot
Home (Power) Button

Start building your robot
Redesign your robot
Use your imagination to redesign your robot
with panel lines, spray paint, ink lines, and
3D-printed accessories.
Attention: Please carefully review our
website instructions for redesigning
techniques and special notices.
Before assembly, first confirm that all
parts are present
DIY assembly
Please visit our official website for
online instructions and assemble
according to step-by-step instruc-
tions.
05
Using Kebbi for the First Time
Second:
Press and hold the power button until the screen turns on.
Be sure there is enough space for your robot to safely move around.
Connect the charger and turn the power on. Hold for three seconds.
First:
Prepare a safe place for Kebbi and connect the charger.
How to Activate Nuwa BizTools
06
Fourth:
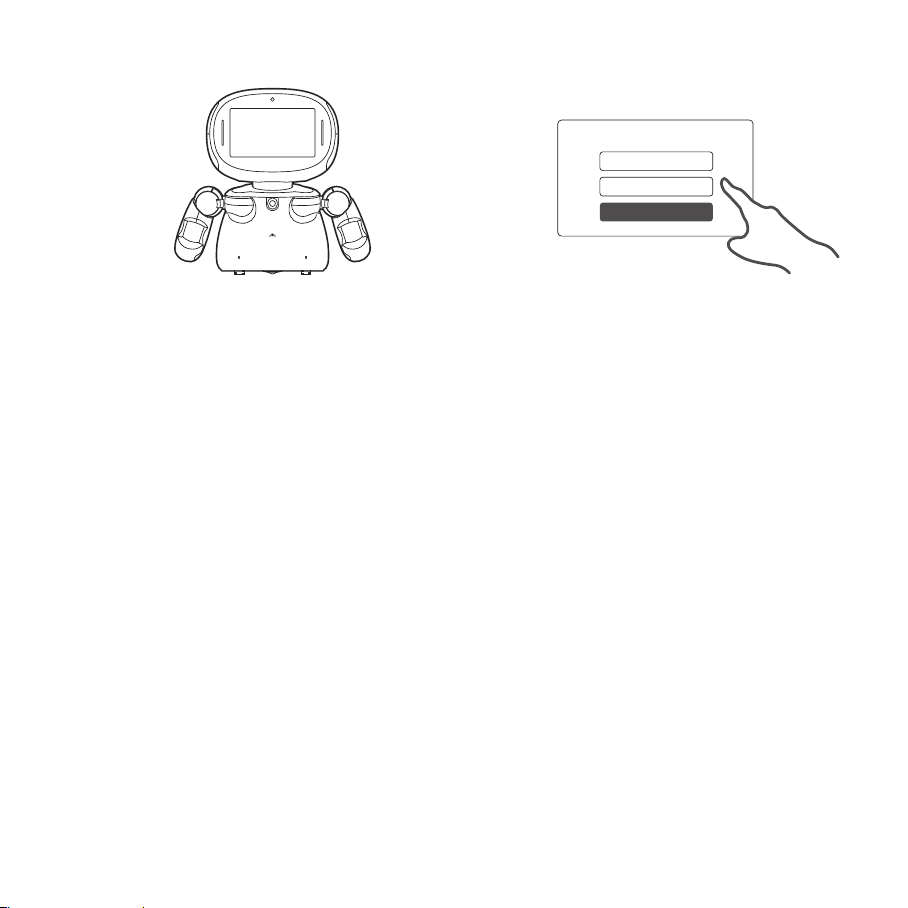
Sign up on Nuwa BizTools for create your own robot.
(BizTools are web based tools.)
Third:
Please follow the robot's instructions to complete the
initial setup.
WELCOME!
ID
PASSWORD
LOG IN
- A Nuwa BizTools product key will be sent to the buyer's designated email address or Internal message
of e-commerce platform when the product is shipped.
- Open the email and click on the link to visit "Nuwa Account."
- Sign in with the Nuwa account created when initializing the robot.
- Choose "Upgrade to NuwaPro" and enter the product key at "My Tools."
- Upon completion, the development tools will be available to you.
Sign up on Nuwa BizTools for a wide range of development programs!
*Please check your trash folder or contact customer service if you haven't received your Nuwa
BizTools product key.
Charging Indicator
(next to the lens)
LED Indicator Information
ColorIndicator Status Action / Description
Blue
Steady blue light System is normal
Orange
Steady orange light
Low battery
(less than 15%)
Red
Steady red light
Very low battery
(less than 5%)
-
Please charge the robot.
Please charge the robot.
Status Indicator
(on the chest)
Red
Flashing red light Charging
No flashing red light means one of two things:
1. The battery is fully charged
2. The battery is too low, please continue
charging for 10 minutes
Please refer to P.17 for more information
Safety Instructions
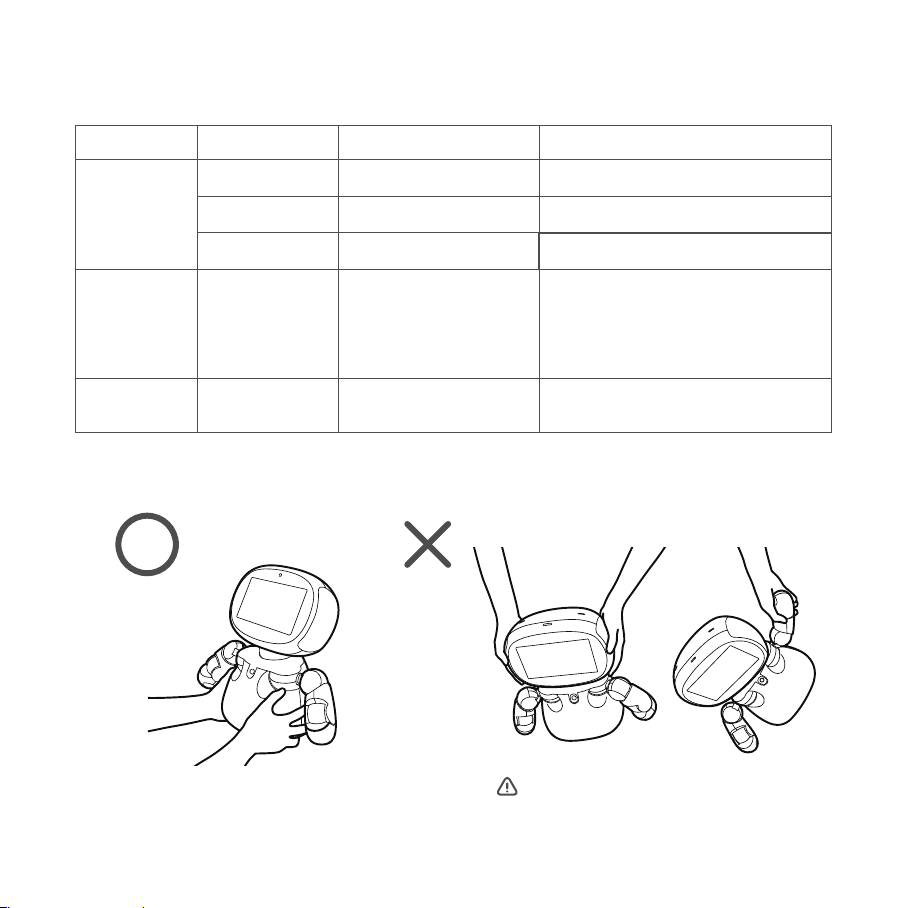
Pleaseholdtherobotwithbothhands
07
Pleasedonotliftorpulltherobot
byitsheadorarms
Camera in use Notifies user that camera is in use.
Camera Indicator
(next to the lens)
Green
Steady green light

08
Open the Menu
Notification Panel
Slide down from the top edge of the screen to open the Notifica-
tion Panel. There are three main areas: Function Shortcut,
Screen Brightness / Volume Control, and Notification Area.
Function Shortcut:
Shortcuts in this area enable you to quickly set up your robot. You may click
the editing button on the bottom to change the sequence or to display or
cancel the shortcuts.
Screen Brightness / Volume Control:
Drag the control bar to adjust the screen brightness or volume.
Notification Area:
Display the system status, system notification, or messages from different
applications of the robot.
Scrolldowntoseemorefunctions.
❶
❶
❸❷
❷
❸
00:00 MM/DD 100%
Pet Screen / Function Menu
You may swipe left and right on the screen to switch between
the Pet Screen and Function Menu.
Pet Screen:
This is the start-up default mode. You can have a conversation with the
robot on the Pet Screen. Click "Home Button" or swipe to the right from
the Function Menu to return to the Pet Screen.
Functon Menu:
You can browse all the built-in APPs of the robot in the Function Menu,
including Singing and Dancing and Creative Learning. You can also
explore the various functions of the robot and delete / manage them.

09
Common control instructions
You can adjust the following robot functions in the shortcut area of "Notification Panel" or "Settings" according to the situation:
WiFi
Please connect to WiFi or mobile hotspot
to allow you to enjoy a complete robot
experience.
Bluetooth
Bluetooth devices can be connected
according to the instructions of some
value-added services.
Image delivery
Images from the robot can be dropped on other
devices (supported but not guaranteed to be
compatible with all devices).
Action
In the OFF position, the Action Lock will
turn off the motors controlling the robot's
head and arms.
Movement
In the OFF position, the Motion Lock will turn off the
motor on the bottom of the robot, preventing the robot
from moving. The robot's arms and head will still move.
Audio recognition
In the ON position, when the robot is in Sleep Mode
(Standby) mode, the robot will turn in the direction of
wherever the wakening words come (this function
does not work when the Movement is turned off).
Active dialogue
You may turn off the recognition function to
avoid the robot seeing you. This is the function
that enables the robot to actively talk to you.
Subtitle
Captions can be turned off.
LED Control
LED lights can be turned off on the robot.
Eye Protection Mode
The eye protection mode of the robot screen can
be turned on to reduce the damage of blue light
to the eyes (the screen color will be yellow).
Notification
When this control is turned on, notifications
from NUWA will be sent to the user.
Edit
With the last button in the Shortcut Area,
you can edit the contents and order of
the buttons.
Inhaltsverzeichnis
Andere NUWA Robotik Handbücher

Beliebte Robotik Handbücher anderer Marken

STEMCenter USA
STEMCenter USA Pi-Bot v2.00 Bedienungsanleitung

SunFounder
SunFounder PiDog Bedienungsanleitung

Universal Robots
Universal Robots UR5 Bedienungsanleitung

Universal Robots
Universal Robots E Series Bedienungsanleitung

YASKAWA
YASKAWA MOTOMAN-MPL80 II Bedienungsanleitung

EFORT
EFORT ECR5 Gebrauchsanweisung


