Oak Plus EF-2050FU Montageanleitung

50 Inch Mounted Electric Fireplace
User Instruction
Read this manual before installing and operating this appliance.
Failure to follow these instructions may result in electric shock, fire property, or personal injury.
Do not store or use gasoline or other flammable liquids in vicinity of this appliance.
CONSUMER SAFETY INFORMATION

User Instrustion 1
1. Read all instructions before use this heater!
2. This heater is hot while using. To avoid burns, DO NOT let bare skin to touch hot
surfaces. If provided, use handles when moving this heater. Keep combustible
materials, such as furniture, pillows, bedding, papers, clothes, and curtains at least 3
feet (0.9m) from the front of the heater, and keep them away from the sides and
rear.
3. Extreme caution is necessary when any heater is used by or near children or invalids
and whenever the heater is left operating and unattended.
4. DO NOT operate any heater with a damaged cord or plug or after the heater
malfunctions, has been dropped or damaged in any manner, Discard heater, or
return to authorized service facility for examination and /or repair.
5. DO NOT run power cord under carpeting. DO NOT cover power cord with throw rugs,
runners, or similar coverings. DO NOT route power cord under furniture or appliances.
Arrange power cord away from traffic area, and where it will not be tripped over.
IMPORTANT SAFETY INFORMATION!
WARNING
WARNING
Connect to properly grounded outlets ONLY.
DO NOT insert or allow foreign objects to enter any ventilation or exhaust openings,
as this may cause electric shock or fire, or damage the heater.
To prevent a possible fire, DO NOT block air intakes or exhaust in any manner. Doing
so could cause a fire. DO NOT use on soft surfaces, like a bed, where openings may
become blocked.
A heater has hot and arcing or sparking parts inside. DO NOT use it in areas where
gasoline, paint, or flammable liquids are used or stored.
Use this heater only as described in this manual. Any other use not recommened
by the manufacturer may cause fire electric shock, or injury to persons.
ALWAYS plug heaters directly into a wall outlet/receptacle. Never use with
extension cord or relocatable power tap (outlet/power strip).
DO NOT place the heater near a bed because objects such as pillows or blankets can
fall off the bed and be ignited by the heater.
NEVER use this heater in bathrooms, laundry rooms, or any other location where the
heater could fall into a bathtub or pool, become damp or come in contact with
water.
AVOID FIRE! Regularly inspect all air vents to make sure they are free from dust, lint,
or other Blockage. Unplug the unit and clean with a vacuum ONLY.
DO NOT rinse or get wet.
ALWAYS mount to wall bracket before use. DO NOT set on the floor or other surface,
to use.
•
•
•
•
••
•
•
•
•
•

User Instrustion
2
•
•
•
•
•
•
•
•
•
•
•
•
PREPARATION
NEVER use a wall mount bracket from another manufacturer.
This product is not intended to be a primary heat source.
It is for supplemental heat only.
INDOOR use only! NEVER use this heater outdoors! Doing so may result in electric
shock!
Risk of electric shock! DO NOT OPEN! No user-serviceable parts inside!
ALWAYS turn this heater off before unplugging it from the outlet.
ALWAYS disconnect this unit from the power supply before performing any assembly
or cleaning, or before relocating the electric fireplace.
NEVER leave this heater unattended. ALWAYS unplug this heater when not in use.
ALWAYS store this heater in a dry location. NEVER use the fireplace if it has
become wet.
NEVER plug this heater into an outlet that is old, cracked, or has any loose wires or
connections. Plugging this heater into a faulty outlet could result in electric arcing
within the outlet that could cause the outlet to overheat or catch fire.
ALWAYS check your heater cord and plug connections with each use!
i) MAKE SURE the plug fits tight in the outlet! Faulty wall outlet connections or loose
plugs can cause the outlet to overheat.
ii) Heaters draw more current than small appliances. Overheating may occur even if
it has not occurred with the use of other appliances.
ii) During use check frequently to see if the plug outlet or face plate is HOT!
iv) If the outlet or face plate is HOT, discontinue use immediately and have a qualified
electrician inspect and/or replace the faulty outlets.
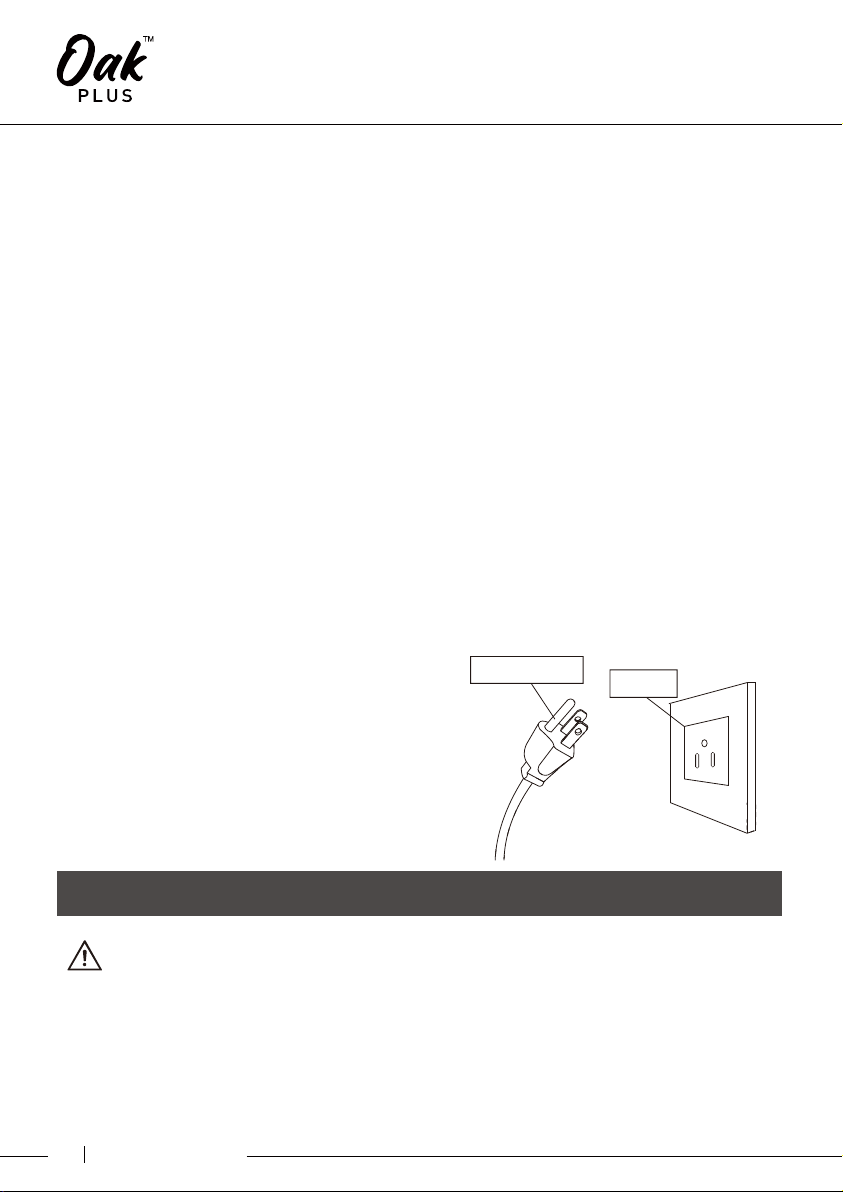
The power cord supplied with the heater
has a plug with two flat blades (live and
neutral) and one round pin(ground).If a
3-slot receptacle is not available,
an adapter MUST be used. The adapter MUST
be properly grounded to the outlet box
(see figure at right).
(Note: Adapter NOT INCLUDED. )
SAVE THESE INSTRUCTIONS!
Remove all parts and hardware from the carton and place them on a clean, soft, dry
surface. Parts and assembly steps are grounded for wall-hanging or recessing use. Check
the parts list to make sure nothing is missing. Dispose of packaging materials properly.
Please recycle whenever possible. You will need the following tools (not included) :
Phillips screwdriver; stud finder; level; tape measure; electric drill; 1/4" wood drill bit,
hammer.
This product includes a GLASS panel! Always use extreme caution when handing
glass. Failure to do so could result in personal injury or property damage.
Grounding Pin Adapter

User Instrustion 3
Specification and Dimension
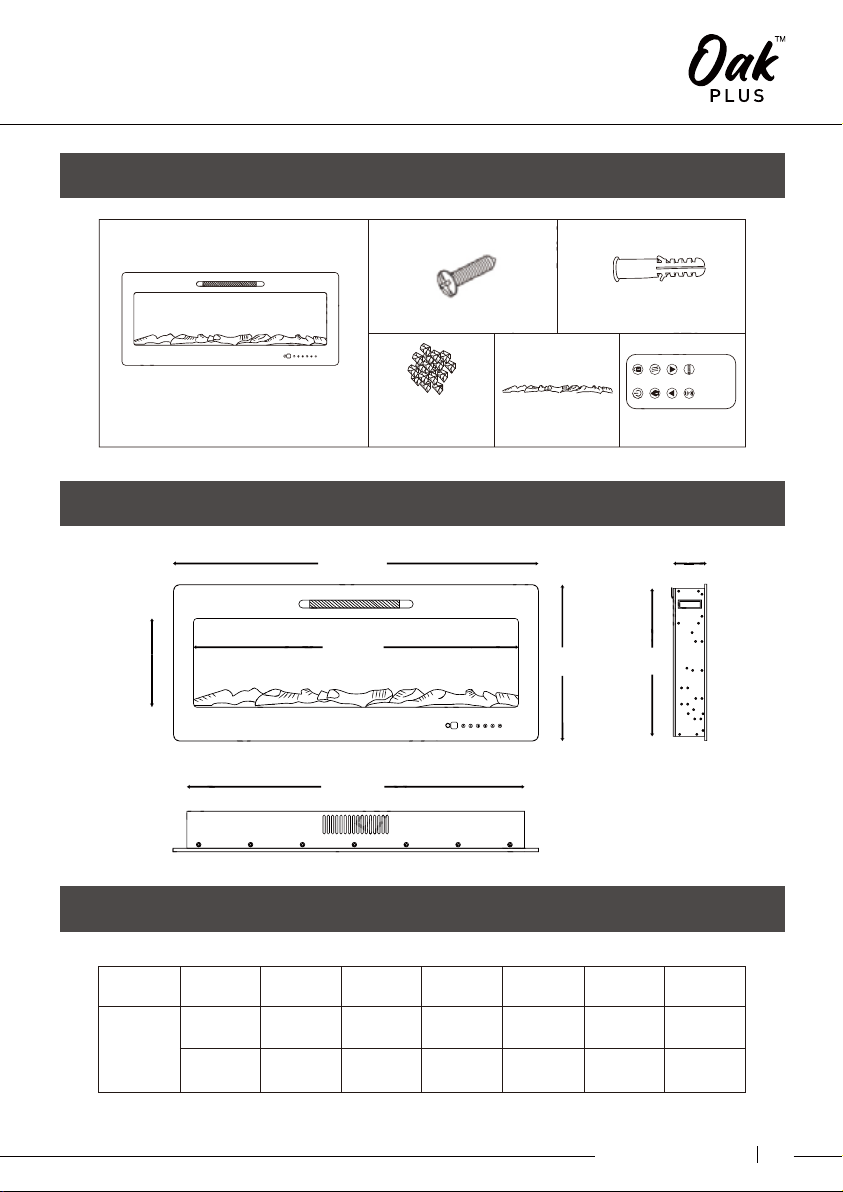
PRODUCT DIMENSIONS
PARTS & HARDWARE
B-Wood Screws C-Drywall anchors
A-Fireplace D-Decorative
Crystals E-Log set Remote control
Model
Number
EF-
2050FU
19"50"
127CM
5.1" 46. 5" 18" 10.6" 43.3"
48CM 13CM 118CM 45.5CM 27CM 110CM
A
A
B
B
C
C
D
D
E
E
F
F
G
G

User Instrustion
4
Features
•
•
•
•
•
•
•
•
•
•
•
•
50 inch Wall mounted or Wall recessed fireplace.
12 hours timer.
Fan heater with 2 heat setting options.
With Log flame and Crystals flame.
Black Flat tempered glass front panel.
Big front panel for better viewing.
Adjustable flame brightness.
Flame effect can be used independently.
With remote control.
Safety thermal cut-off device.
With 9 colors of flame bed.
With 3D flame effect.
EF - 2050FU
Model No. Electrial supply Heating output Product Size
120V~60Hz 750/1500W 50" X 5.1" X 19"
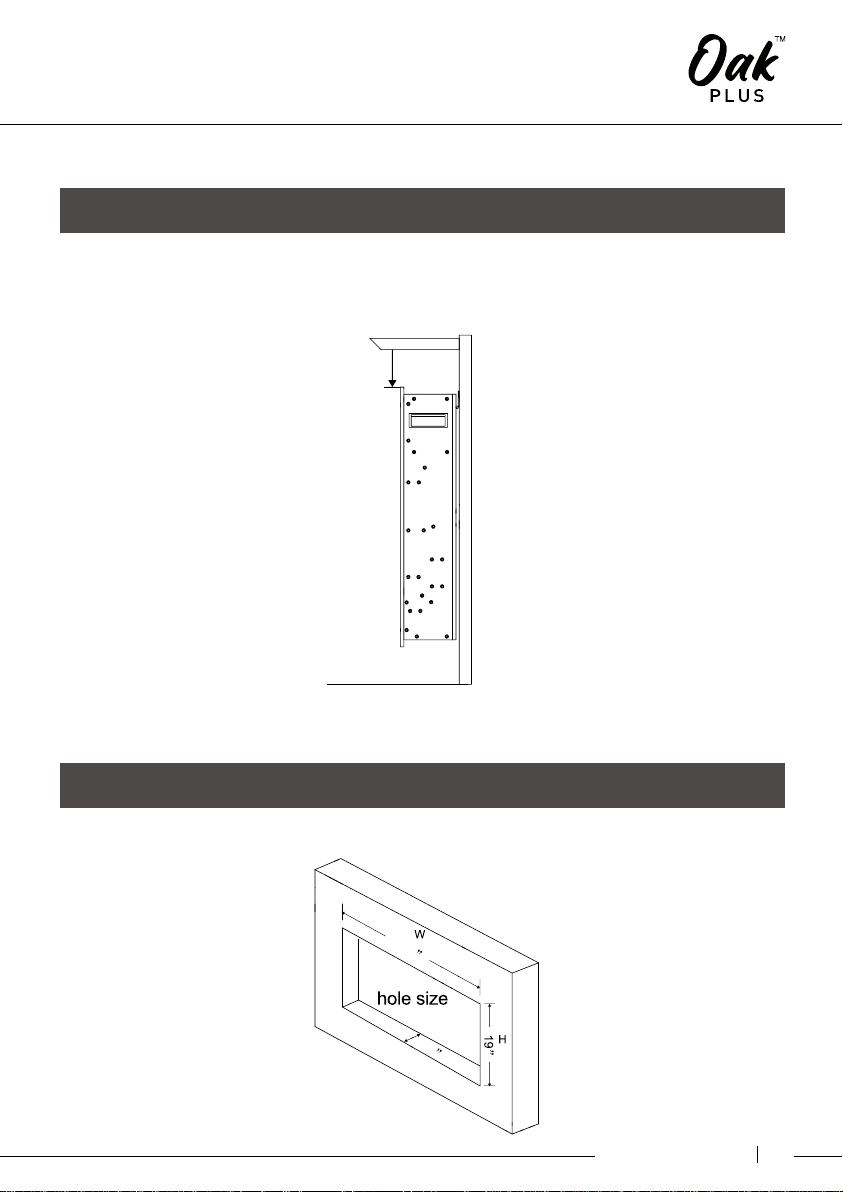
MINIMUM CLEARANCE TO COMBUSTIBLES
PREPARATION
Your appliance is a wall-mounted, recessed and /or mantel installed appliance. Select a
suitable location that is not susceptible to moisture and is away from drapes, furniture
and high traffic areas.
NOTE: Follow all National and local electrical codes.
Measurements are taken from the glass front.
Bottom 0"
0"
0"
Top
TopSides
11.8" (300mm) to mantel
Back

User Instrustion 5
WARNING
WHEN USING PAINT OR LACQUER TO FINISH THE MANTEL, THE PAINT OR
LACQUER MUST BE HEAT RESISTANT TO PREVENT DISCOLOURATION.
WARNING
Only qualified person can perform the installation.
RECESSED TO WALL INSTALLATION
MANTEL
11.8" (300mm)
SIDE VIEW
FLOOR
(A)
8.5
depth
47.5
MINIMUM MANTEL CLEARANCES

User Instrustion
6
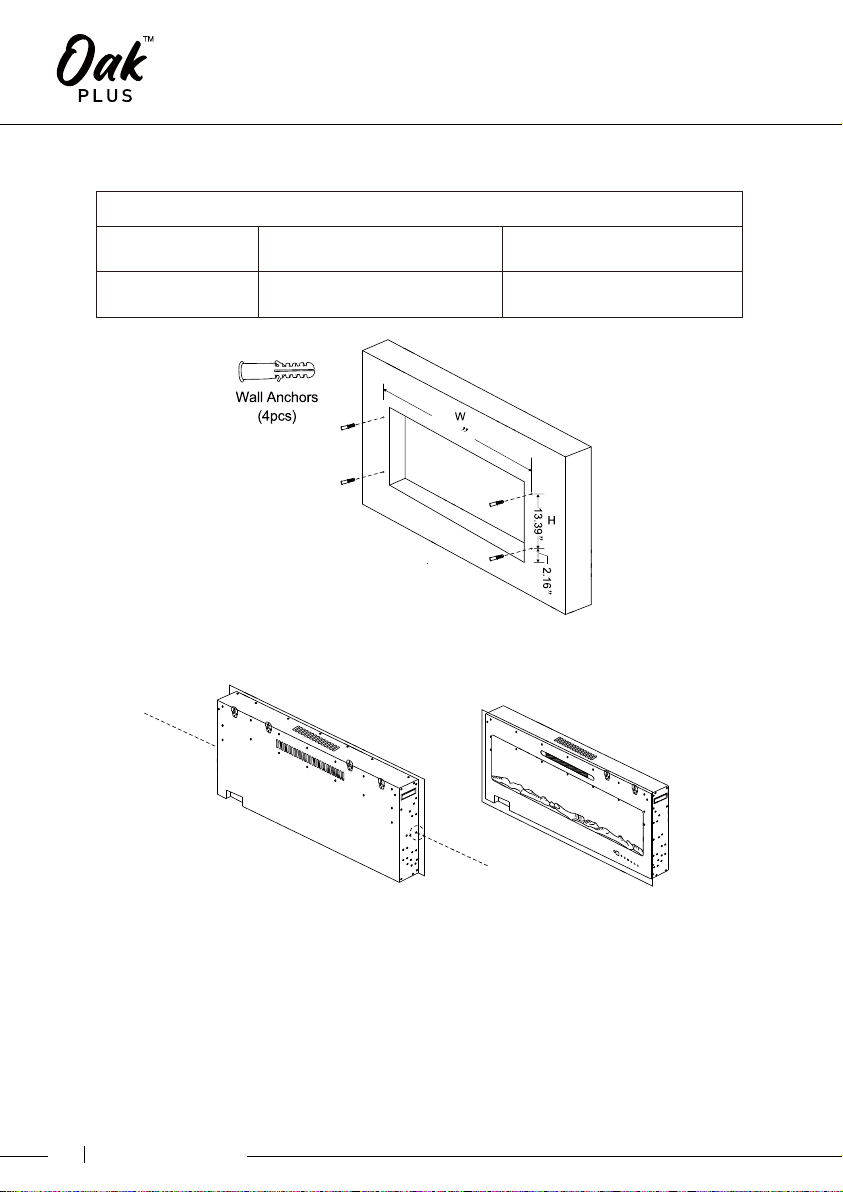
STEP A. Select a dry wall to open a hole for fireplace box. Size of hole as below chat.
STEP B. Punch 4 holes around the wall and install 4 Drywall anchors (Part C) , please
drive C completely into the wall.
EF - 2050FU
Framing Hole Size
Model Number HW
47.5" (120.6cm) 19" (48.3cm)
The fourth screw
from top to bottom (E)
(C)
(B)
STEP C. Take off the screws (The fourth screw from top to bottom) in both sides of
fireplace. Figure (C)
STEP D. Remove puckaging attachments from the log set.
1. Remove the front grass.
2. Remove the pear cotton block.
3. Remove the log set's packaging bag.
STEP E. Have two persons to take the glass panel out of the fireplace box. Place it to
a soft and clean place. Figure (E)
49

User Instrustion 7
(F) (G) (H)
STEP F. Take off the two screws in both sides of fireplace. Figure (C)
If the appliance is fully recessed into the wall:
Use the 4 screws (provided) to lock the appliance into wall with the existing two side
flanges, see Figure (F)
Install the media and re-install the glass front.
•
•
STEP G. Place the front panel to lock the appliance. See Figure (G)
STEP H. Fireplace will be like this after installation. Figure (H)
WARNING
Only qualified person can perform the installation.
Due to the many different materials used on different walls, it is highly recommended
that you consult your local builder before you install this appliance on the wall.
Wall Mounted Installation
1. You can see the 4 clips
on the back of the device.
2. Install 4 dry wall anchors
on the wall.

User Instrustion
8
3. Install 4 wood screws,taking care
not to screw them in completely.
Screw head exposed 0.12-0.19inch
distance.
4. Two people lift the fireplace and
hang the 4 clipson the back on the
4 dry wall anchors.
WARNING
Only qualified person can perform the installation.
Logset/Crystal Ember Installation
The fourth screw
from top to bottom
1. Remove the screws (The
fourth screw from top to
bottom) on both sides of the
device to remove the front grass.
2. Take out the logset inside. 3. Put the decorative crystals in.

User Instrustion 9
4. Install the glass plate.
WARNING
OPERATION INSTRUCTION:
Plug in a power plug hear a long buzzer and the electric fireplace is in standby mode.
Press the POWER key on the keyboard to show red, and the rest of the display is not
displayed. At this time, the electric fireplace is in standby mode.
Note: the ICONS on the keypad have the same function as the ICONS on the remote
control.
Read and understand this entire owner's manual, including all safety information,
before plugging in or using this product. Failure do to so could result in electric
shock, fire,serious injury, or death.
small remote control
Remove the romote control insulation sheet.
PULL
Dieses Handbuch passt für folgende Modelle
1
Inhaltsverzeichnis