Oakley THUMP PRO Bedienungsanleitung

USER GUIDE
™
2007.03.27
ThumpPro_Manual_ENG 3_07 3/29/07 12:23 PM Page 1

THUMP PRO USER GUIDE
Contents
GETTING STARTED..........................................................................................................................2-3
USING THUMP PRO WITH A MAC®.............................................................................................4-5
TRANSFERRING MUSIC FROM CDs................................................................................................6
CREATING PLAYLISTS / OVERDRIVE SONG SELECTION..........................................................7-8
LOADING COPY-PROTECTED (DRM) MUSIC ............................................................................9-11
STORING ANY KIND OF FILE...........................................................................................................12
CHARGING THE BATTERY ...............................................................................................................13
CHANGING THE LENSES.................................................................................................................14
TROUBLESHOOTING...................................................................................................................15-20
SAFETY AND HANDLING ...........................................................................................................21-22
CLEANING.....................................................................................................................................23-24
SERVICE AND SUPPORT............................................................................................................25-26
ThumpPro_Manual_ENG 3_07 3/29/07 12:23 PM Page 2

THUMP PRO USER GUIDE 1
Transfer AAC, MP3, WMA, WAV and Audible media from your computer and listen to music virtually anywhere with Oakley
THUMP Pro. You can also use it to backup important files and transport any kind of file from one computer to another.
THUMP Pro offers the absolute freedom of a cordless design, the durability of water resistance and the unbeatable
performance of High Definition Optics®(HDO®). Enjoy the all-day comfort, impact protection and 100% UV filtering of
patented optical technologies. Change your look or adapt to new light conditions by swapping the lenses with a different
optional set. THUMP Pro combines three decades of Oakley innovation with the freedom, convenience and fidelity of a fully
integrated, state-of-the-art digital audio engine.
To use THUMP Pro with a PC, you must have:
• Microsoft®Windows®XP, Windows 2000 or Windows ME. Windows 98SE users must download the USB Mass
Storage Device Driver. Note that THUMP Pro cannot be used with Windows NT.
• USB connection port
To use THUMP Pro with a Macintosh®, you must have:
• Mac®OS X 10.1.5 or later
• USB connection port
SUPPORTED MUSIC FILE FORMATS
You can use any of these song file formats with THUMP Pro:
• AAC (.m4a)
• MP3 (up to 320 kbps)
• MP3 Variable Bit Rate (VBR)
• WMA
• WMA DRM 9
• Audible (Windows only)
• WAV
Note: AAC, MP3, WMA and Audible files are more compressed than WAV files, so using them will
allow you to fit more songs in the internal memory.
ThumpPro_Manual_ENG 3_07 3/29/07 12:23 PM Page 1

GETTING STARTED
Follow the instructions below to get up and running. In-depth instructions can be found in other sections of this User Guide.
1. CHARGE THE BATTERY
• Connect the included USB cable directly to the USB port on your computer. Make sure your computer is powered on.
• Connect the other end of the USB cable to THUMP Pro.
• Allow to charge for a minimum of 3 hours (until the indicator light turns solid green).
See “CHARGING THE BATTERY” on page 13 for more information.
2. TRANSFER MUSIC TO THUMP PRO
While THUMP Pro is charging, you can transfer your favorite music onto it.
(For Mac, see “USING THUMP PRO WITH A MAC” on pages 4-5.)
The songs will play back in the order in which you transfer them.
See “LOADING COPY-PROTECTED (DRM) MUSIC” on pages 9-11 for more information on how to load music purchased through
an online music store.
THUMP PRO USER GUIDE 2
Open the drive labeled, “THUMP Pro”.
Open another folder window that displays
the music stored on your computer.
Drag-and-drop songs from your “Music”
folder onto the “THUMP Pro” drive.
ThumpPro_Manual_ENG 3_07 3/29/07 12:23 PM Page 2

3. FOLLOW THIS PROCEDURE TO SAFELY DISCONNECT THUMP PRO
After THUMP Pro is fully charged, disconnect it from your computer by doing the following:
4. EXPERIENCE ABSOLUTE MUSIC FREEDOM
Press and hold the
Play / Pause
button until the power-up tone is heard. Now get out and enjoy music virtually anywhere.
There are no wires or cords to tangle you, and with 6 hours of continuous music, you can power through a marathon session
or just experience the world at your own beat. (See the Quick Reference guide for information on THUMP Pro controls.)
For Mac, see “HOW TO SAFELY ‘EJECT’ FROM THE MAC OPERATING SYSTEM” on page 5.
THUMP PRO USER GUIDE 3
At the bottom right of your desktop
screen, locate the icon with the green
arrow.
Click it once with your left mouse button.
A small window will pop up.
Click on the words “Safely Remove USB
Mass Storage Device.”
Disconnect the USB cable from THUMP Pro.
USB PORT
ThumpPro_Manual_ENG 3_07 3/29/07 12:23 PM Page 3

USING THUMP PRO WITH A MAC
This section shows you how to use THUMP Pro with a Mac OS X based computer.
HOW TO FIND THUMP PRO ON A MAC
After connecting THUMP Pro to your Mac, you can locate and access THUMP Pro in two ways:
THUMP PRO USER GUIDE 4
Find the icon. Double-click the
“THUMP Pro” icon on your desktop screen.
Use the “Finder.” Select “THUMP Pro” from
the list of removable drives. The list is located
on the left side of every Finder window.
(Note: The sidebar list is part of Mac OS X
version 10.3 or later. For earlier versions,
click on the “Computer” icon located at the
top of the Finder window.)
ThumpPro_Manual_ENG 3_07 3/29/07 12:23 PM Page 4

THUMP PRO USER GUIDE 5
HOW TO TRANSFER MUSIC FILES FROM A MAC
Drag and drop from one window to another.
HOW TO SAFELY “EJECT” FROM THE MAC OPERATING SYSTEM
Your Mac recognizes THUMP Pro as an external drive. It is therefore necessary to “eject” THUMP Pro (in the operating system)
before unplugging the USB cable. Unplugging the USB cable without first “ejecting” THUMP Pro may result in loss of data.
After THUMP Pro has been properly “ejected” from your computer, disconnect the USB cable. Adjust the earphone
extenders to fit your ears. Press and hold the
Play / Pause
button until the power-up tone is heard. See the Quick
Reference guide for information on controls.
Open the drive labeled, “THUMP Pro”.
Open another folder window that displays
the music stored on your computer.
Drag-and-drop songs from your Music
folder onto the “THUMP Pro” drive.
Use the Dock. On the desktop screen,
click on the THUMP Pro icon and drag it
to the “Trash Bin” / “Eject” icon.
ThumpPro_Manual_ENG 3_07 3/29/07 12:23 PM Page 5

TRANSFERRING MUSIC FROM CDs
To transfer songs from a music CD to THUMP Pro, you must first convert the CD music into one of the supported file formats.
If you have a CD burner, the software included with the burner may have this ability. Otherwise, there are many music-
playing programs that can convert files. Check the Internet for these free third-party programs. One or more might already
be installed on your computer. Look in your computer menu for a media program that plays CDs, then select Help from the
menu and look for “file conversion” or “AAC” or “MP3” or “WMA” or “rip.” Once the files are converted, use the directions
above to transfer them to THUMP Pro.
Two applications with the ability to create THUMP Pro compatible media are:
THUMP PRO USER GUIDE 6
WARNING: Files created by these applications are for personal use only. Unauthorized recording or duplication of
copyrighted material may infringe upon the rights of third parties and may be contrary to copyright laws.
Microsoft Windows Media Player (version 9 and above)
Apple®iTunes®(version 5 and above)
ThumpPro_Manual_ENG 3_07 3/29/07 12:23 PM Page 6
THUMP PRO USER GUIDE 7
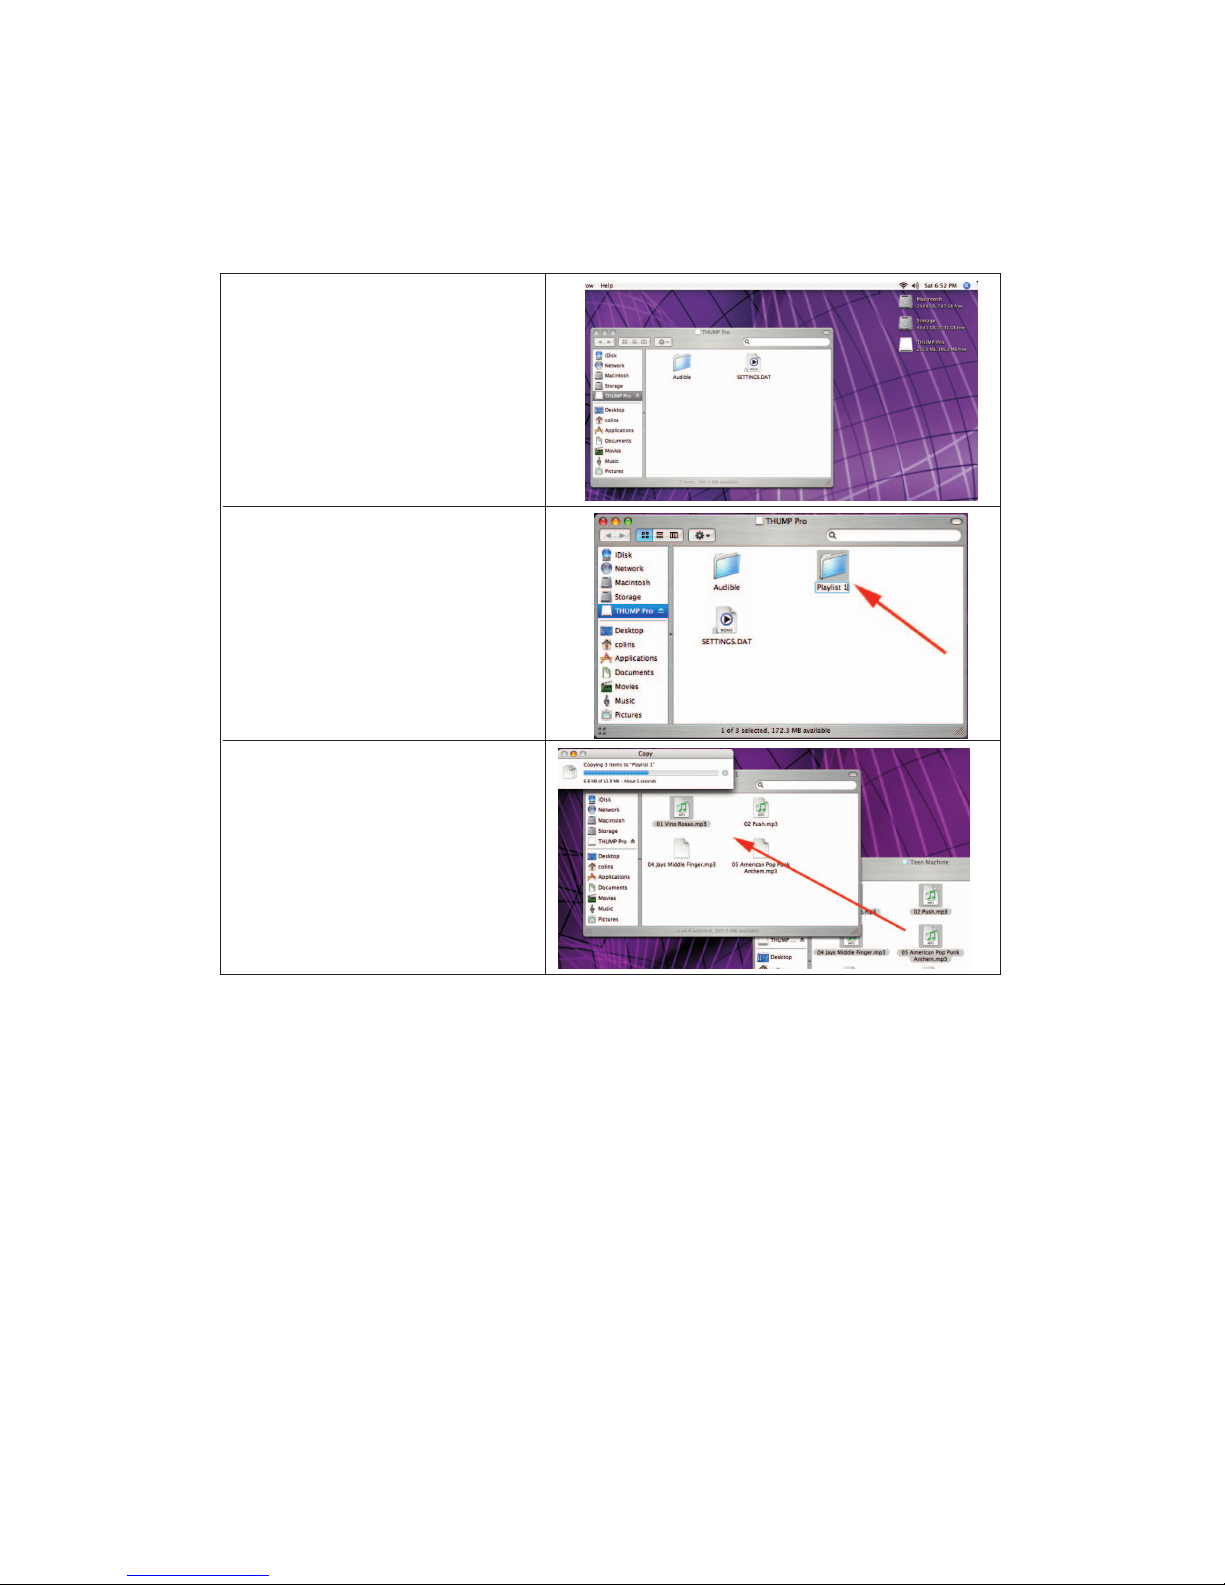
CREATING PLAYLISTS
To create playlists for THUMP Pro, simply organize your music into folders. Connect THUMP Pro to your computer and do
the following:
See the Quick Reference guide for instructions on how to navigate through your playlists.
Open the drive labeled, “THUMP Pro”.
Create a folder on the THUMP Pro drive.
Folders are played back alphabetically, so if
you want one playlist to play before another,
be sure to name the folders accordingly.
Drag and drop songs from your music
folder into the new folder on the
THUMP Pro drive. Songs will play back in
the order in which you transfer them.
ThumpPro_Manual_ENG 3_07 3/29/07 12:23 PM Page 7

THUMP PRO USER GUIDE 8
CREATING YOUR OVERDRIVE SONG SELECTION
No matter what the sport or activity, there’s always one song that kicks you into gear. Whatever song fuels you the most, you
can access it instantly with the OVERDRIVE feature. To designate your OVERDRIVE song, do the following:
To play your OVERDRIVE song, press the
Play / Pause
button and the Fast Forward button at the same time.
Open the drive labeled “THUMP Pro”.
Create a new folder on the THUMP Pro drive
and name the folder “Overdrive”.
Note that while you can load many files in
this folder, only the first song will be played
when OVERDRIVE is activated.
Drag and drop your desired song into the
“Overdrive” folder.
ThumpPro_Manual_ENG 3_07 3/29/07 12:23 PM Page 8
Andere Handbücher für THUMP PRO
1
Inhaltsverzeichnis
Andere Oakley Headset Handbücher


