Observer SecuFirst CWL401S2 Bedienungsanleitung

Surveillance System
With 7"Touchscreen Monitor
and Camera
Model: CWL401S2 CWL401W2
USER GUIDE
Please read these instructions completely before operating this product.

IMPORTANT SAFETY PRECAUTIONS
Damages caused by non-compliance with this operating manual will void the warranty! We will not assume any
liability for damages to items or persons caused by improper handling or noncompliance with the safety notices! Any
warranty claim will be null and void in such cases.
1. Do not drop, puncture or disassemble the camera; otherwise the warranty will be voided.
2. Avoid all contact with water, and dry hands before using.
3. Never tug on the power cords. Use the plug to unplug it from the wall outlet.
4. Do not expose the camera to high temperature or leave it in direct sunlight. Doing so may damage the camera or
cause camera temporary malfunction.
5. Use the devices with care. Avoid pressing hard on the camera body.
6. For your own safety, avoid using the camera or power off the camera when there is a storm or lightning.
7. Remove the power adapter during long periods between usages.
8. Use only the accessories and power adapters supplied by the manufacturer.
9. To meet the regulations pertaining to parental responsibility, keep the devices out of the reach of infants.
10. Check power cables, do not get crushed or damaged by sharp edges whenever the devices are in operation.
FCC/CE WARNING: This equipment has been tested and found to comply with limits for a Class B digital device, pursuant to Part
15 of the FCC rules and ETSI(EN) 300328. These limits are designed to provide reasonable protection against harmful
interference in residential installations. This equipment generates, uses, and can radiate radio frequency energy, and if not
installed and used in accordance with the instructions, may cause harmful interference to radio communications. However, there
is no guarantee that interference will not occur in a particular installation. If this equipment does interference to radio or
television equipment reception, which can be determined by turning the equipment off and on, the user is encouraged to try to
correct the interference by one or more of the following measures:
• Reorient or relocate the receiving antenna.
• Move the equipment away from the receiver.
• Plug the equipment into an outlet on a circuit different from that to which the receiver is connected.
• Consult the dealer or an experienced radio/television technician for additional suggestions.
You are cautioned that any change or modifications to the equipment not expressly approved by the party responsible for
compliance could void your authority to operate such equipment.
DISPOSAL: If the camera system no longer functions or can no longer be repaired, it must be disposed of according to the valid
statutory regulations. Disposal of spent batteries/accumulators: You are required by law (Battery Ordinance) to return all spent
batteries and accumulators. Disposing of spent batteries/accumulators with common household waste is prohibited!
Batteries/accumulators that contain hazardous substances are marked with the symbols on the side. These symbols indicate that
it is prohibited to dispose of these batteries/accumulators in the household waste. The abbreviations for the respective heavy
metals are: Cd=cadmium, Hg=mercury, Pb=lead. You can return spent batteries and accumulators that can no longer be
charged to the designated collection points in your community, outlets or wherever batteries or accumulators are sold. Following
these instructions will allow you to fulfill the legal requirements and contribute to the protection of our environment!
CAUTION: The CWL401S2 CWL401W2 which can receive video and audio data from CWL401S2 CWL401W2 Cameras (supports
up to 4 cameras), and is able to store received data to the microSD card. You are able to view the data in real-time, or at later
time. Remotely have live-view via mobile device(s) with Internet connection. The CWL401S2 CWL401W2 Camera is able to
wirelessly transfer compressed video and audio data in digital format which offers efficient, secure and ‘Interference Free’
wireless connection to the CWL401S2 CWL401W2 unit. The method of transferring audio and video is secure and private, and
eliminates the need of running cable(s) between the monitor and the cameras, ensures quick and easy installation with minimum
cost at the same time.
FCC Compliance Statement: This device
complies with Part 15 of the FCC rules.
Operation is subjected to the following two
conditions: (1) this device may not cause harmful
interference, and (2) this device must accept
any interference received, including interference
that my cause undesired operation.
Products with CE Marking comply with EMC Directive
(2014/30/EU); Low Voltage Directive (2014/35/EU);
RED: Directive 2014/53/EU; ROHS Directive (2011/65/EU)
issued by the Commission of the European
Community. Compliance with these directives implies
conformity to the following European Norms:
EMC: EN 301 489, LVD: EN 60950, Radio: EN 300328

Section HeaderOVERVIEW
The Observer HD+ Monitor which can receive video and audio data from the CWL401S2 CWL401W2
Camera(s) (supports up to 4 cameras), and is able to store received data to the micro SD card. You are
able to view the data in real-time, or at later time. Remotely have live view via mobile device(s) with
Internet connection. The CWL401S2 CWL401W2 Camera(s) is able to wirelessly transfer compressed
video and audio data in digital format which offers efficient, secure and ‘Interference Free’ wireless
connection to the Observer HD+ Monitor. The method of transferring audio and video is secure and
private, and eliminates the need of running cable(s) between the monitor and the cameras, ensures
quick and easy installation with minimum cost at the same time.
BEFORE THE PRODUCT IS INSTALLED
• Please read the operation manual carefully.
• Please unpack all boxes carefully and identify
that all the parts are present.
• Make sure you use only the recommended power supplies.
• Damage caused to the camera or receiver by
incorrect voltage or wiring is not covered by the warranty.
• Cutting any cable will void the warranty.
FRIENDLY REMINDER
The state of Observer HD+ Monitor is capable of deliver high quality video to your smart-mobile
device(s), which would require higher Internet bandwidth. Due to your local Internet environment
condition, your mobile device (s) may display black-screen or temporary disconnect to the
Observer HD+ Monitor.
• For best performance, please keep the camera and monitor minimum 1 meter away form
the receiver and Wi-Fi router.
• Make sure the Monitor is operating with sufcient Internet bandwidth, 1.5Mbps (upload
speed) is suggested.
• For best performance, the smart-mobile device(s) need to be on Wi-Fi or 4G/5G mobile
network in order to receive maximum download speed.
• Your Internet bandwidth is limited. For best performance, avoid more than two users
connecting to the System simultaneously.
• Please make sure the memory card used is CLASS 10 rated. And insert or
remove memory card when the Monitor is power OFF.
• Before using the memory card for recording video, you MUST format the memory card
on the Monitor.

— 2 —
TABLE OF CONTENTS
OVERVIEW ................................................................................ 1
Before the Product is Installed .................................................1
Friendly Reminders .................................................................. 1
GETTING STARTED ..................................................................4
Monitor Location of Controls.................................................... 4
Camera Location of Controls ................................................... 5
Monitor Connectivity ................................................................ 5
Monitor Initial Set Up................................................................ 6
CAMERA MOUNTING............................................................... 7
CAMERA MOTION DETECTION .............................................. 8
CAMERA PAIRING .................................................................... 9
MONITOR ................................................................................10
Monitor Live View Screen Controls......................................... 10
Monitor Main Menu................................................................ 11
Monitor System Setup ........................................................... 12
Monitor Wireless Setup..........................................................13
Camera Audio Customization ................................................14
Recording Set up................................................................... 15
On-screen Video Playback..................................................... 16
Motion Alert Set up................................................................ 17
Motion Area Masking............................................................. 18
Privacy Zone Masking............................................................ 19
Monitor System Information Screens .....................................20
Monitor Firmware Upgrades...................................................21

— 3 —
Section HeaderTABLE OF CONTENTS
MOBILE REMOTE ACCESS ...................................................22
Setting Up Remote Access....................................................22
App LIVE VIEW Instruction..................................................... 23
Remote Access .............................................................................. 24
General Settings .................................................................... 25
Firmware Update ................................................................... 26
Time Settings......................................................................... 27
Individual Camera Settings..................................................... 28
Camera Privacy Zone Settings............................................... 29
MOBILE & MONITOR 2-WAY AUDIO.....................................30
TROUBLE SHOOTING ........................................................... 31
PRODUCT SPECIFICATIONS................................................ 32
WARRANTY....................................................................... 33-34

— 4 —
IN THE BOX
Two
(
2x
)
Outdoor cameras
w
ith Multi-position Stands
Three (3x) 1.8M.
AC Power Adapters
Two (2x) 1.8M. Power
Extension Cables
Quick Start Guide
Screws and
Anchor Kit
32GB MicroSD Card
Three (3x) Antennas
(1x for monitor, 2x for cameras)
Camera Stand
Screw-hole Template
7” Touch Screen
Monitor
Ethernet
Cable
What You Will Need: Philips Screwdriver, access to electric outlets for cameras,
2.4GHz Wi-Fi network, network name and password.
Quick Start Guide
Recording
Indicator Power Indicator
Monitor
Microphone
Monitor Touch Screen
Power Button
Antenna Jack
USB Jack
Monitor Stand
Reset Button
SD Card Slot
Power Jack
Ethernet Port
(Network Jack)
SD Card Slot
TIP: insert SD Card into slot
with gold bars on top of the
straight edge (not curved edge).
7” Touch Screen Monitor
IMPORTANT!
MONITOR MUST BE SETUP FIRST
IMPORTANT! Memory card cannot be inserted
or removed without switching OFF the Monitor.
10 Sec.
Pres
s/hold 3 sec

— 5 —
Section Header
Indoor/Outdoor HD Camera
Monitor Connectivity
Microphone
(behind camera
swivel stand)
Passive Infrared
Motion Sensor
Antenna
Audio Speaker
Antenna
Connector
(rear of camera
)
Adjustable
Camera Stand
Power Status LED
IR LEDs
Light Sensor
Power Cable
*Can use included
1.8 M
AC extension cord if needed
AC Power
Cable A
A
B
C
D
B
Connect the AC/DC adapter to the power input on
the side of the Monitor and plug into an electrical outlet.
Screw the Antenna clockwise into the rear side of the
monitor.
Press/hold 3sec
Power Button
LOCATION OF CONTROLS
Pairing Button
AC Power Cable
Firstly setup the system in your livingroom, to make sure
everything is working. Secondly install the monitor and
camera on it's right location.Note, one time setup. The
memory will stay in the products, even if the power adapters
are disconnect.
Indoor Use only !
Antenna

— 6 —
MONITOR SETUP
Turn on the screen by pressing and holding the
power button for 3 seconds.
When the screen
is turned on, it will show you firstly the welcome page and the quad view.During first time setup, the
language page and wifi settings will pop up automatically.
Select your language.
Select your language by tap on "Language".
When the right language is selected, tap "Next"
Live view of the camera.
For the screen, it's possible to connect 4 cameras.
2x Tap quickly on the small image, to change to full
screen for 1 camera
Setup time zone
Select your timezone and tap "Done"
Choose your internet connection
Do not select a Wifi network. Just tab "Next"
Do not select a Wifi network. Just tab "Next".
No internet:
Wired internet:
You can insert a wired internet cable in the back of the screen.
Wi-Fi:
Tab on your wifi network, then insert your wifi password.
Note, it's our helpdesk problem number 1,that people insert this
password incorrectly.
CANCEL
********
CONNECT
A
B D
C
C
D
A
B

— 7 —
Section Header
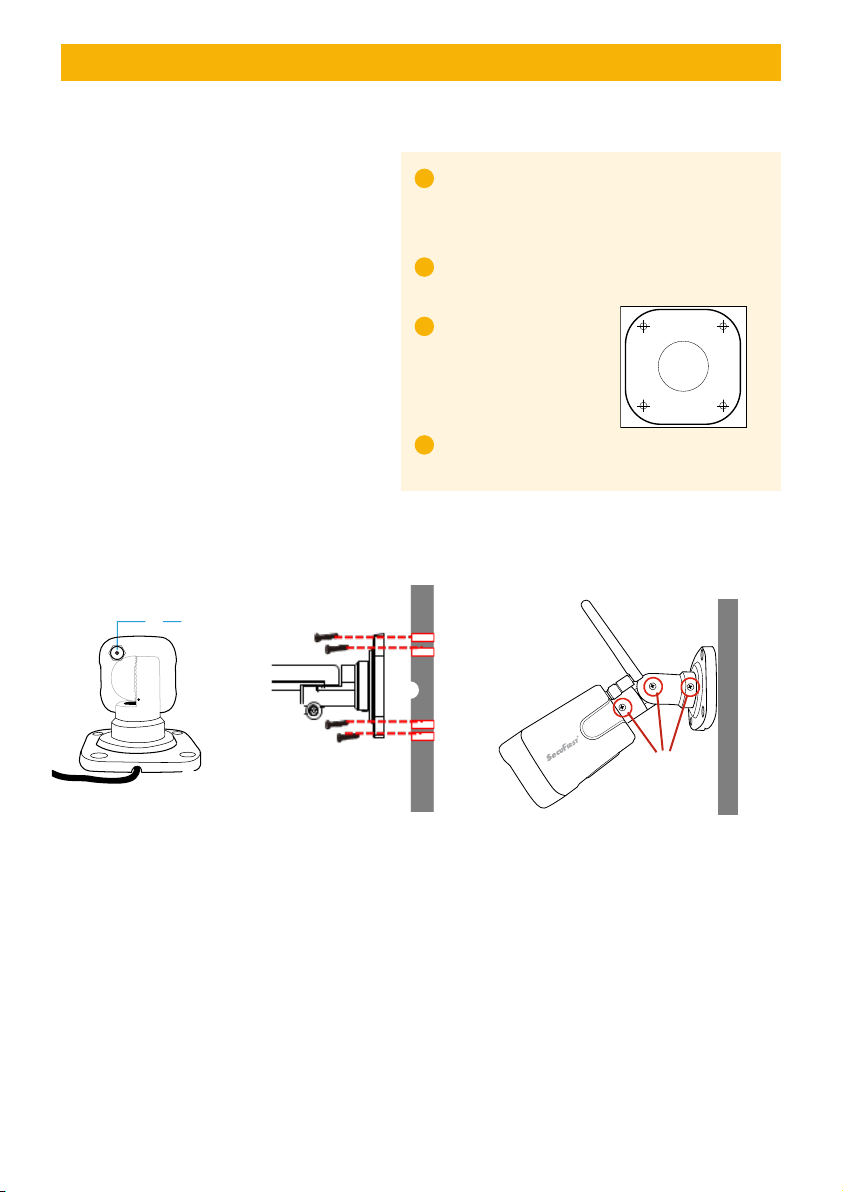
BEFORE MOUNTING THE CAMERAS in
their nal location, plug them into a power
source near the monitor to verify pairing
and live viewing is successful.
The power LED willilluminate RED to
indicate they are already paired and a live
view from each will AUTOMATICALLY
APPEAR on the monitor.
Plan where camera will be positioned. Make
sure there is an electric outlet near by in
order to connect power cable (up to 3.6M.
including extension cord) from the camera.
Screw the antennas clockwise into the back of
each camera and put into the upright position.
Secure the camera to
a stable surface, ceiling
or wall using the screws
included. See screw
hole template provided.
Adjust camera in an upright position
relative to your viewing environment.
Screw the antenna to the camera.
Locate a suitable location to mount the camera
Secure the camera stand to a stable surface,
ceiling or wall using four screws.
Make sure the camera is in an upright position
(relative to your viewing environment).
A
B
C
D
CAMERA INSTALLATION
Camera Mounting
Angle
Adjustments
Antenna Connector
(rear of camera)

— 8 —
Keep active locations in the camera’s eld of
view. The camera has a 90-degree viewing
angle. Position your camera so that the space
that you want to monitor is within the camera’s
eld of view. The best area for motion detection
is 3 to 5 meters from the camera position.
Aiming the camera at windows or glass doors.
Where small animals may enter the detection area.
Where a heat source (sunlight, incandescent light,
car headlights, etc.) may activate motion sensor.
Where sudden temperature changes inside or
around the detection area caused by hot or cold
wind (fans, air conditioners, etc.)
SIDE VIEW
TOP VIEW
Detection Area 90°
• Avoid installing in a location which requires the
wireless signal to pass through cement, concrete and
metal structures. This will reduce the transmission
range.
• Once you position your camera to its desired location,
camera must still be within Wi-Fi range of the monitor.
• Optimized motion detection range is 1.8-5.4 M
• Avoid direct light source in the view of the camera,
including street lights, ceiling or floor lamps.
• Observer HD+ cameras are pre-paired, so they work
out of the box with your Observer HD+ Monitor.
• Periodically, clean the lens glass with a soft cloth
to clean dust, grime and cobwebs.
HELPFUL HINTS
MOTION DETECTION
Camera Viewing Range
Dieses Handbuch passt für folgende Modelle
1
Inhaltsverzeichnis