Oregon Scientific HMS388 Bedienungsanleitung

Music Element
2.1 CD Micro System
Model: HMS388
User Manual
HMS388 Eng Cover R27 OP 7/30/05, 11:08 AM1

1
EN
IMPORTANT SAFETY INSTRUCTIONS
The Music Element 2.1 CD Micro System is designed to give you years of service if handled properly. Ensure that you heed all
warnings to minimi e product malfunction and reduce the chances of incurring personal injury. Before using the unit, observe
the following guidelines to ensure proper care and maintenance.
- TO PREVENT FIRE OR SHOCK HAZARD, DO NOT USE THIS PLUG WITH AN EXTENSION CORD, RECEPTACLE OR
OTHER OUTLET UNLESS THE BLADES CAN BE FULLY INSERTEDTO PREVENT BLADE EXPOSURE.
- TO REDUCE THE RISK OF FIRE OR ELECTRIC SHOCK, DO NOT EXPOSE THIS APPARATUS TO RAIN OR MOISTURE.
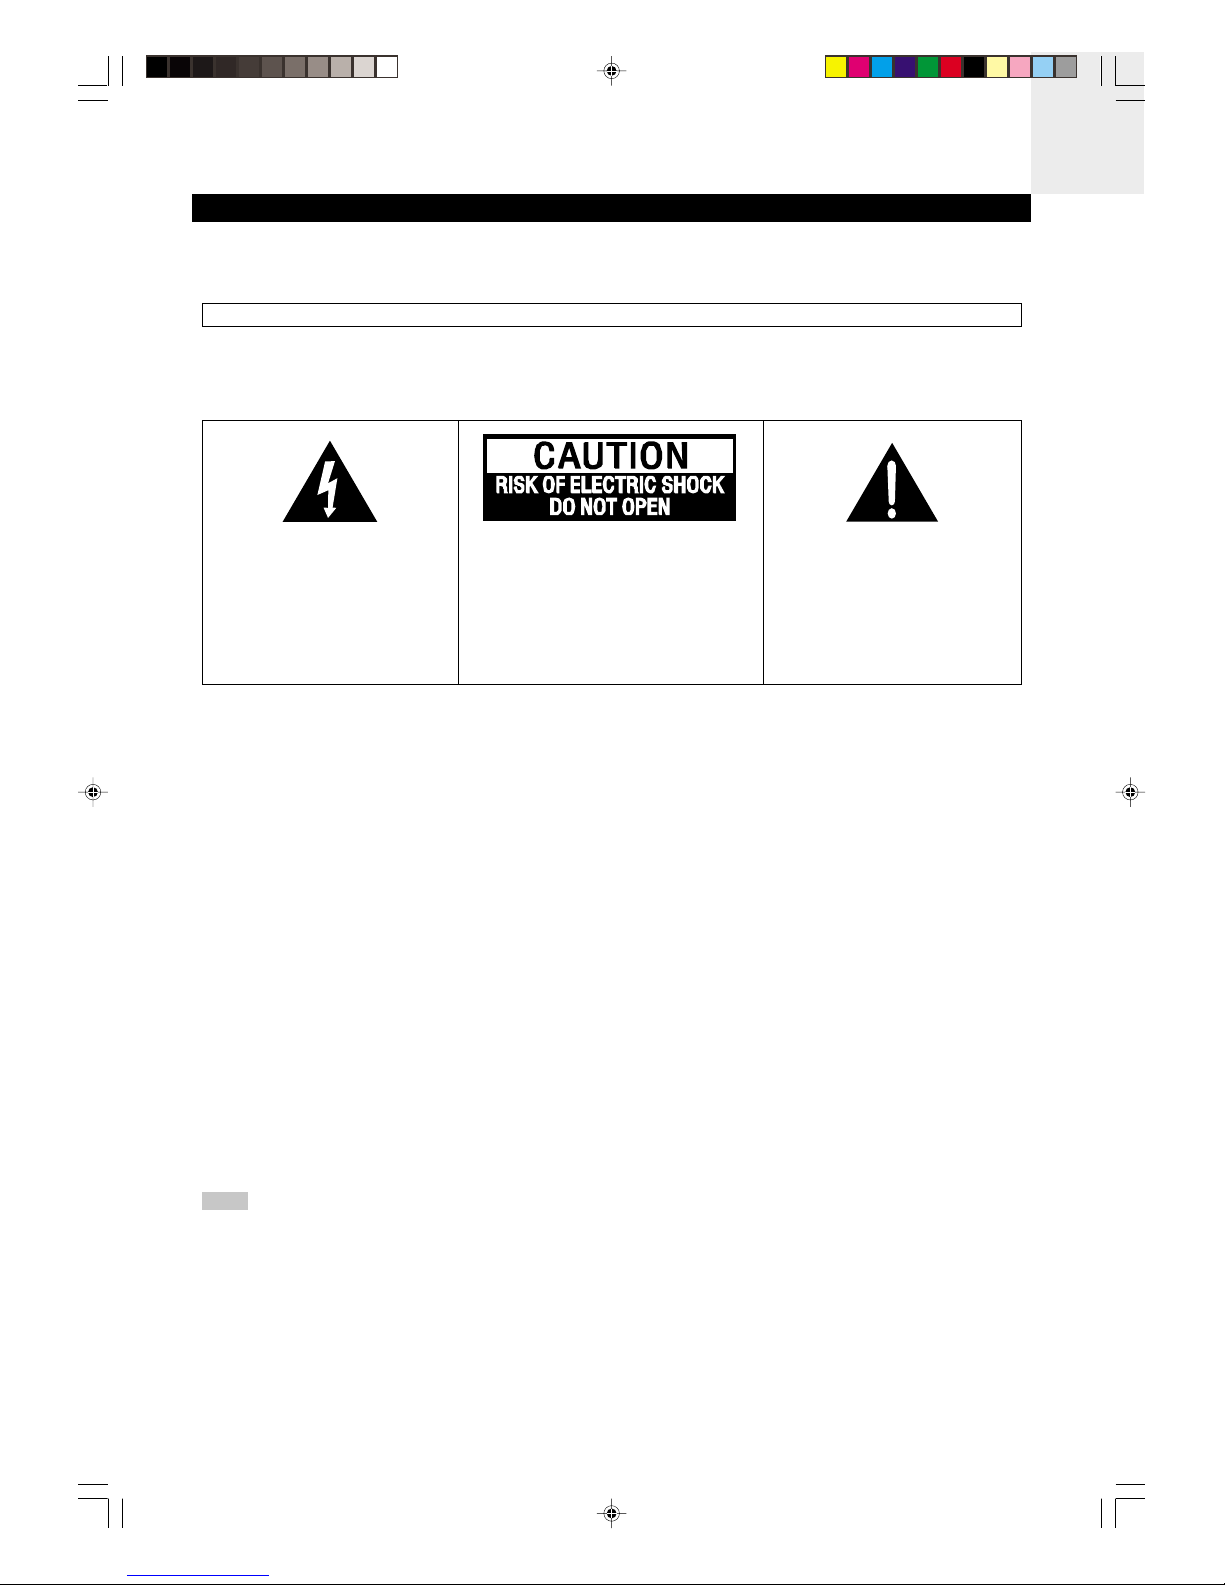
The lightning flash with arrowhead
symbol, within an equilateral triangle,
is intended to alert the user to the
presence of uninsulated “dangerous
voltage” within the products enclosure
that may be of sufficient magnitude
to constitute a risk of electric shock
to persons.
WARNING: TO REDUCE THE RISK OF
ELECTRIC SHOCK, DO NOT REMOVE
COVER (OR BACK) NO USER
SERVICEABLE PARTS INSIDE. REFER
SERVICING TO QUALIFIED SERVICE
PERSONNEL.
The exclamation point within an
equilateral triangle is intended to alert
the user to the presence of important
operating and maintenance
(servicing) instructions in the literature
accompanying the appliance.
1) Read these instructions.
2) Keep these instructions.
3) Heed all warnings.
4) Follow all instructions.
5) Do not use this apparatus near water.
6) Clean only with dry cloth.
7) Apparatus shall not be exposed to dripping or splashing and no objects filled with liquids such as vases, shall be placed on
the apparatus.
8) Do not block any ventilation openings. Install in accordance with the manufacturer’s instructions.
9) Do not install near any heat sources such as radiators, heat registers, stoves, or other apparatus (including amplifiers) that
produce heat.
10) Do not defeat the safety purpose of the polari ed or grounding-type plug. A polari ed plug has two blades with one wider
than the other. A grounding type plug has two blades and a third grounding prong. The wide blade or the third prong are
provided for your safety. If the provided plug does not fit into your outlet, consult an electrician for replacement of the
obsolete outlet.
11) Protect the power cord from being walked on or pinched particularly at plugs, convenience receptacles, and the point where
they exit from the apparatus.
12) Only use attachments / accessories specified by the manufacturer.
13) Unplug this apparatus during lightning storms or when unused for long periods of time.
14) Refer all servicing to qualified service personnel. Servicing is required when the apparatus has been damaged in any way,
such as power-supply cord or plug is damaged, has been exposed to rain or moisture, does not operate normally, or has
been dropped.
The rating label is printed on the bottom casing of the main unit and speaker, and at the back of the subwoofer.
WARNING
NOTE
HMS388 Eng R27 OP 7/30/05, 11:08 AM1

EN
2
Music Element
2.1 CD Micr System
M del: HMS388
USER MANUAL
CONTENTS
Imp rtant Safety Instructi ns ................................................................................................................................................. 1
Intr ducti n .............................................................................................................................................................................. 3
Getting Started ......................................................................................................................................................................... 3
Unpacking ......................................................................................................................................................................... 3
Pr duct Overview .................................................................................................................................................................... 4
CD Player ......................................................................................................................................................................... 4
VFD Display ...................................................................................................................................................................... 4
Remote Control ................................................................................................................................................................. 5
NXT* Satellite Speakers and Subwoofer .......................................................................................................................... 5
Maintenance ............................................................................................................................................................................. 6
Main Unit ........................................................................................................................................................................... 6
Speakers and Subwoofer ................................................................................................................................................. 6
Remote Control ................................................................................................................................................................. 6
Handling and Cleaning Discs / Disc Lens ......................................................................................................................... 7
Cables and Plugs .............................................................................................................................................................. 7
Setting up the System ............................................................................................................................................................. 8
Connecting Speakers / Subwoofer ................................................................................................................................... 8
Connecting the Main Unit ................................................................................................................................................. 9
Inserting Battery into the Remote Control ......................................................................................................................... 9
Wall-mounting the Speakers (Optional) ............................................................................................................................ 9
Additional Connections (Optional) .................................................................................................................................. 10
Basic Operati ns ................................................................................................................................................................... 10
Setting the Clock ............................................................................................................................................................. 10
Loading Discs .................................................................................................................................................................. 11
Playback .......................................................................................................................................................................... 11
Adjusting Volume .............................................................................................................................................................11
Repeat Playback ............................................................................................................................................................. 12
Random Playback ........................................................................................................................................................... 12
Adjusting Sound Effects .................................................................................................................................................. 12
Adjusting Equali er Effects ............................................................................................................................................. 13
Sleep Timer ..................................................................................................................................................................... 13
Tuner ....................................................................................................................................................................................... 13
Auto / Manual Tuning ...................................................................................................................................................... 13
Preset Memory ............................................................................................................................................................... 14
Mono and Stereo ............................................................................................................................................................ 14
RDS Operation (European Models Only) ....................................................................................................................... 14
Tr ublesh ting ..................................................................................................................................................................... 15
Specificati ns ........................................................................................................................................................................ 16
Ab ut Oreg n Scientific ........................................................................................................................................................ 17
C pyright ................................................................................................................................................................................ 17
FCC Statement ....................................................................................................................................................................... 17
Declaration of Conformity ............................................................................................................................................... 17
EC-Declarati n f C nf rmity .............................................................................................................................................. 18
HMS388 Eng R27 OP 7/30/05, 11:08 AM2


3
EN
INTRODUCTION
Thank you for selecting the Oregon ScientificTM Music Element 2.1 CD Micro System HMS388 as your personal product of
choice. The sleek, slimline CD Micro System features a digital amplifier, and includes 2 satellite speakers and a subwoofer that
delivers crisp, clear audio via flat panel speaker technology powered by NXT* SurfaceSound®, delivering total power output
of 55 watts.
The system supports playback on MP3, WMA, CDDA, CD-R and CD-RW discs and features adjustable sound and equali er
effects. The sleek metallic charcoal main unit and slim speakers is an attractive, yet unobtrusive centrepiece to any entertainment
room.
Other features include:
• 7 equali er effects: Rock, Ja , Concert, Club, Pop, Classic and Dance
• Adjustable bass and treble sound effects
• AM / FM digital tuner with 40 preset radio stations (RDS message available on European models only)
• Digital clock
• Bright VFD (Vacuum Fluorescent Display) with LED indicators
• 25W subwoofer with speaker driver
• Wall-mount units for speakers
• Ultra slim remote control with metal tablet buttons
GETTING STARTED
UNPACKING
When you unpack your Music Element 2.1 CD Micro System, make sure to keep all the packing materials in a safe place, in case
you need to later return it for servicing.
In this box you will find:
• Main CD player unit
• 2 NXT* satellite speakers with speaker cable wire attached
• 1 subwoofer with wire attached
• Power cord
• AM loop antenna
• FM pigtail antenna
• 2 wall-mount units
• 8 screws for speaker wall-mount units
• Allen key
• Remote control with 1 CR2025 battery cell
• Lint-free cloth
• User manual
• Quick start guide
• Warranty card
Please observe the local regulations regarding the disposal of packing materials, dead batteries and old equipment.
This equipment has been designed and manufactured to meet international safety standards but, like any electrical
equipment, care must be taken if you are to obtain the best results and safety is to be assured.
NOTE
NOTE
HMS388 Eng R27 OP 7/30/05, 11:08 AM3

EN
4
12
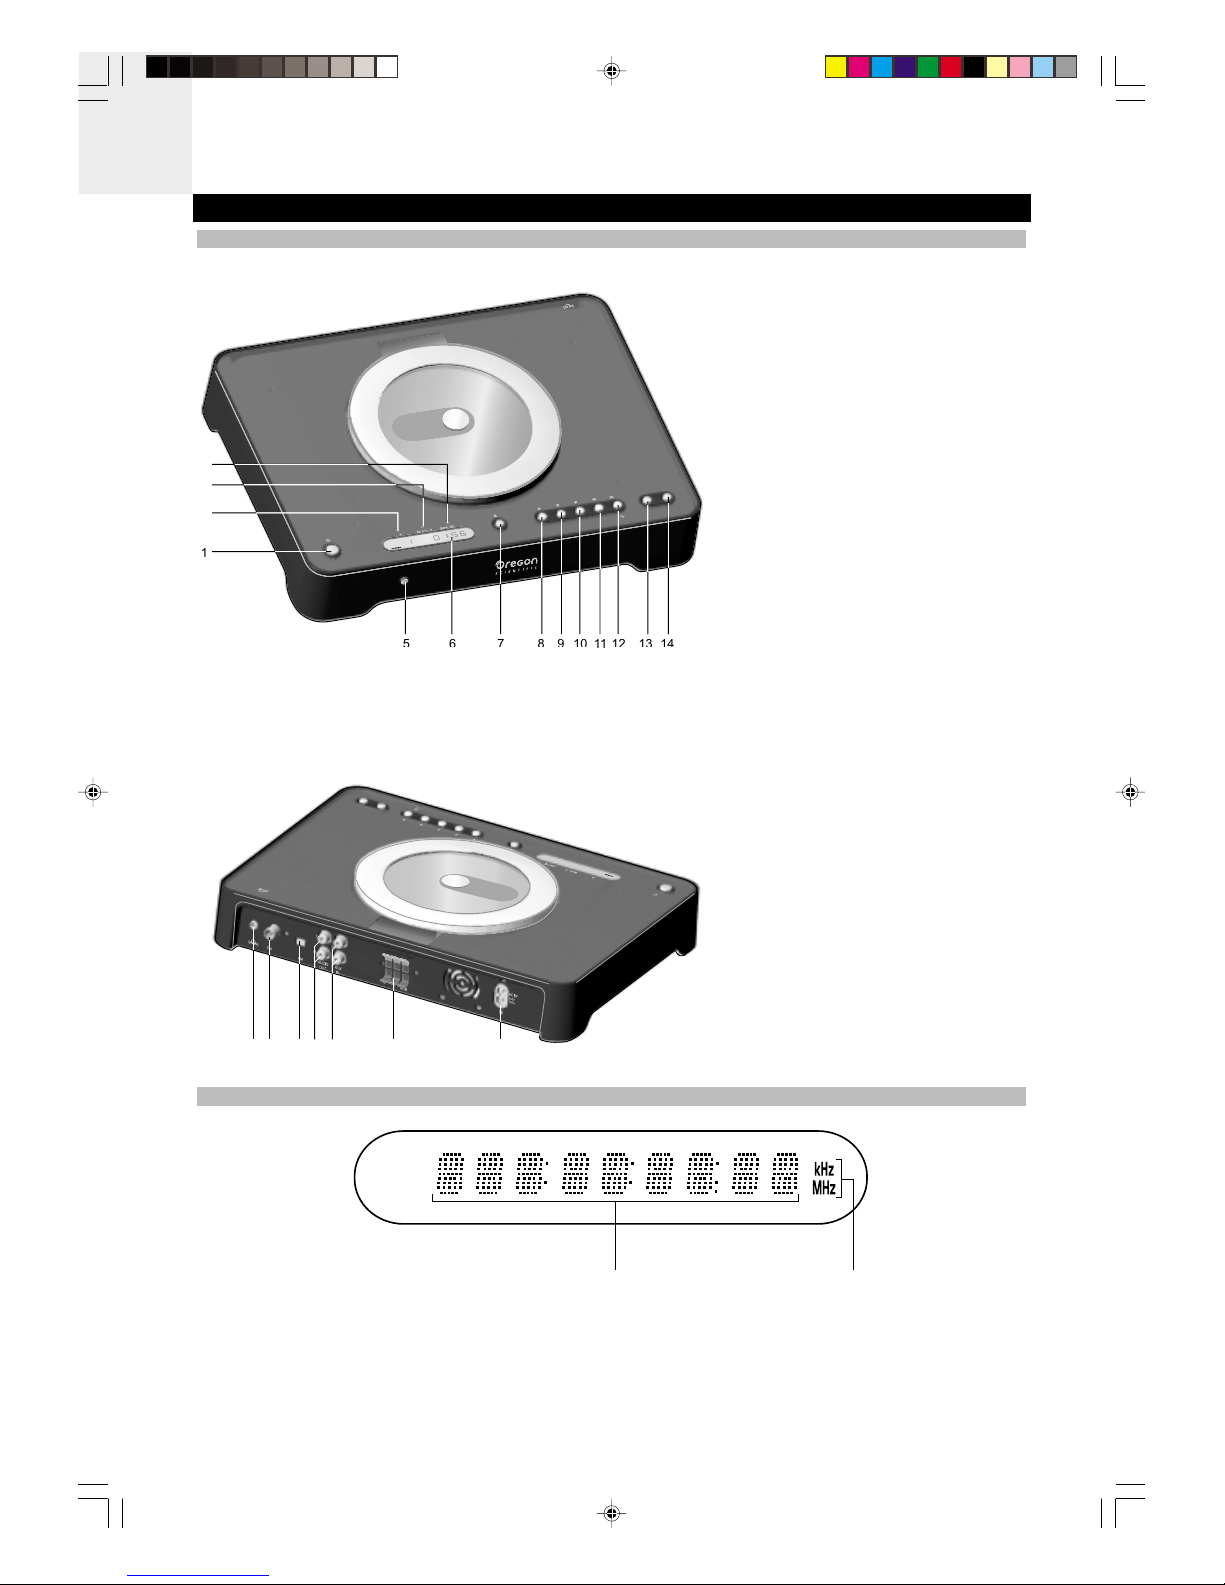
1. Full segment (shows track no., track time, clock, preset radio station)
2. AM (kH ) / FM (MH )
VFD DISPLAY
1
5
5
7
7
8
8
9
9
10
10
1
1
1
1
12
12
13
13
14
14
2
3
4
6
6
PRODUCT OVERVIEW
CD PLAYER
FRONT VIEW / TOP VIEW
1. Standby button
2. Play LED indicator
3. Repeat all / Repeat 1 LED indicator
4. RDS / Random LED indicator
5. Infrared sensor
6. VFD display
7. Disc lid open / close button
8. Play button
9. Pause button
10. Stop button
11. Previous button
12. Next / Clock set button
13. Button for decreasing volume /
decreasing clock hour or minutes in
clock mode
14. Button for increasing volume /
increasing clock hour or minutes in
clock mode
12 34 5 6 7
1. Earphone jack
2. FM antenna jack
3. AM antenna jack
4. Audio out jack
5. Aux in jack
6. Speaker wire connectors (R, L, SUB)
7. AC-IN jack
BACK VIEW
HMS388 Eng R27 OP 7/30/05, 11:08 AM4

5
EN
4
3
5
6
7
8
10 11
12
13
14
15
1
2
9
a
de
bc
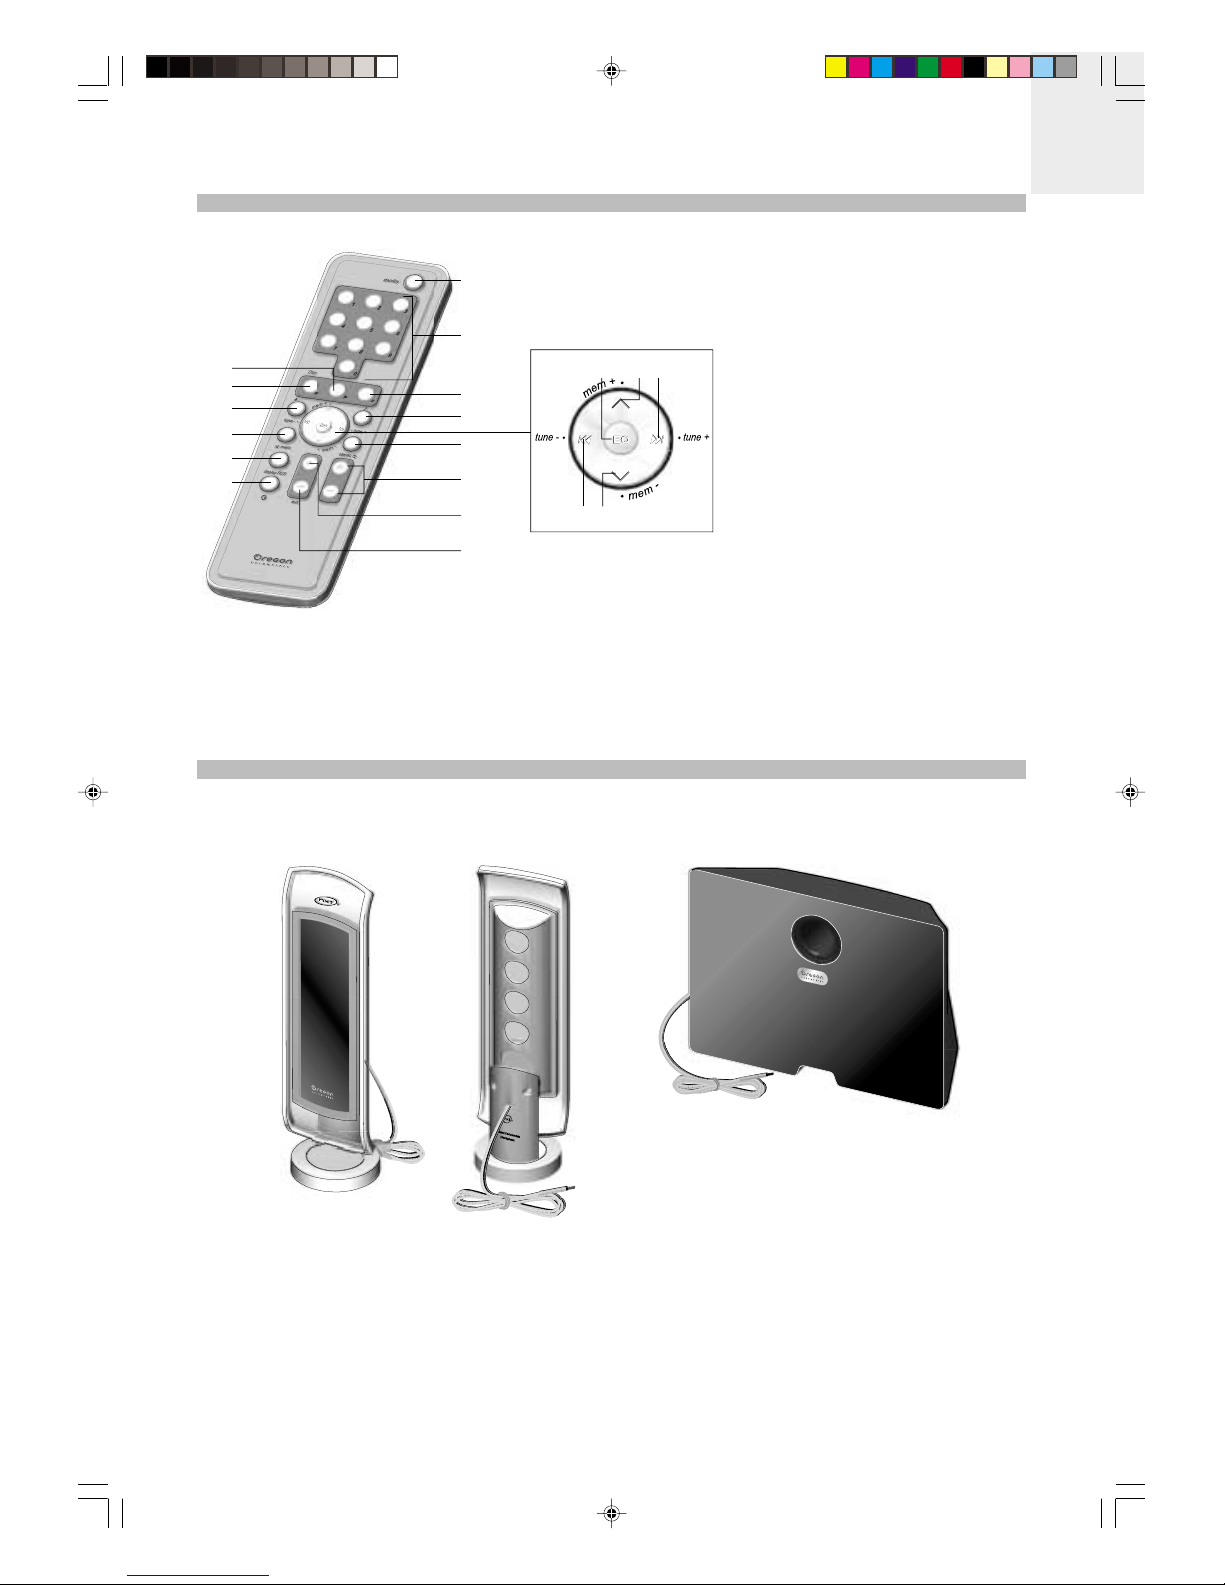
1. Standby
2. Numeric keypad
3. Play
4. Stop
5. Sleep timer
6. Random / Mem
7. Display / RDS
8. Mute / Unmute
9. Pause
10. Sound effects
11. Directional controller
a. EQ
b. mem+
c. tune+ / next
d. tune- / previous
e. mem-
12. Stereo / Repeat all / Repeat 1
13. Increase / Decrease volume and clock
hours / minutes
14. AM / FM
15. Aux
REMOTE CONTROL
NXT* SATELLITE SPEAKERS AND SUBWOOFER
FRONT VIEW FRONT VIEW
BACK VIEW
HMS388 Eng R27 OP 7/30/05, 11:08 AM5

EN
6
MAINTENANCE
MAIN UNIT
• Stains on the unit should be wiped off with a soft, lint-free cloth. If the unit is heavily stained, wipe it with a cloth soaked in
water-diluted neutral detergent and wrung well, then wipe clean. Never use alcohol, solvent, chemical, paint thinner or
ben ene to clean the unit. Remember to unplug the unit from any electrical socket first before cleaning.
• Keep your player in a dry, well-ventilated place to prevent it from molding. Do not use or store the unit in locations that may
adversely affect the product such as rain, snow, moisture, dust or desert.
• Do not subject the unit to extreme impact, shock or fluctuations in humidity.
• Do not forcefully open and close the disc lid by hand as this may damage the lid.
• The unit should not be exposed to dripping or splashing and no objects filled with liquids, such as vases, should be placed
on the unit.
• Do not leave the unit exposed to direct sunlight for long periods. This may deform or discolour the cabinet and may cause
malfunction.
• Keep this unit away from strong magnetic fields and away from a TV or tuner. Exposure to magnetic fields may damage the
unit's internal circuitry and distort the TV picture or cause noisy radio reception.
• This system operates with a laser. It must only be opened by a qualified technician.
• Disconnect the system from the power source before performing any maintenance. Do not make any changes or modifications
to the unit or tamper with internal components. Unauthori ed changes may void your right to use the product and invalidate
the warranty. Any repair or internal adjustment should be made only by a trained technician.
• If any electronic circuitry is exposed, do not, under any circumstances, touch the circuitry as there is a danger of electric
shock.
• Do not insert any foreign objects or drop anything into any of the unit's openings as this could cause serious damage,
possibly resulting in fire.
• The technical specifications for this product and the contents of the user manual are subject to change without notice.
SPEAKERS AND SUBWOOFER
• The speakers and subwoofer should not be immersed in liquid or subjected to fluctuations in humidity. Any openings should
not be exposed to dripping or splashing and be free of dirt and dust build-up.
• Avoid dropping the speakers and subwoofer or subjecting them to extreme impact or shock.
• Do not leave the speakers and subwoofer exposed to direct sunlight for long periods or place them near heat sources.
• Do not disassemble and tamper with internal components as this could damage the units and also cause electric shock
resulting in personal injury.
• Do not use excessive force to press against the NXT* speaker panels as this may hinder audio quality output and cause
damage to the units.
To minimi e interference or disruptions to audio reception, make sure the speaker cable wires are not twisted or tangled
up in knots.
REMOTE CONTROL
• If the remote control will not be used for more than 1 month, remove the battery to avoid possible damage from battery
leakage and corrosion.
• Discard leaky battery immediately as it may cause skin burns or other personal injuries.
• Do not drop any foreign objects into the remote casing, particularly when replacing the battery.
• Dispose of battery in the proper manner, according to provincial and local regulations.
• Any battery may leak electrolyte if mixed with a different battery type, if inserted incorrectly, if batteries are not replaced at
the same time, if disposed of in fire, or if an attempt is made to charge a non-rechargeable battery.
• Do not expose the remote control sensor to direct sunlight or lighting apparatuses. Doing so may cause
the unit to malfunction or discolour the cabinet.
TIP
HMS388 Eng R27 OP 7/30/05, 11:08 AM6

7
EN
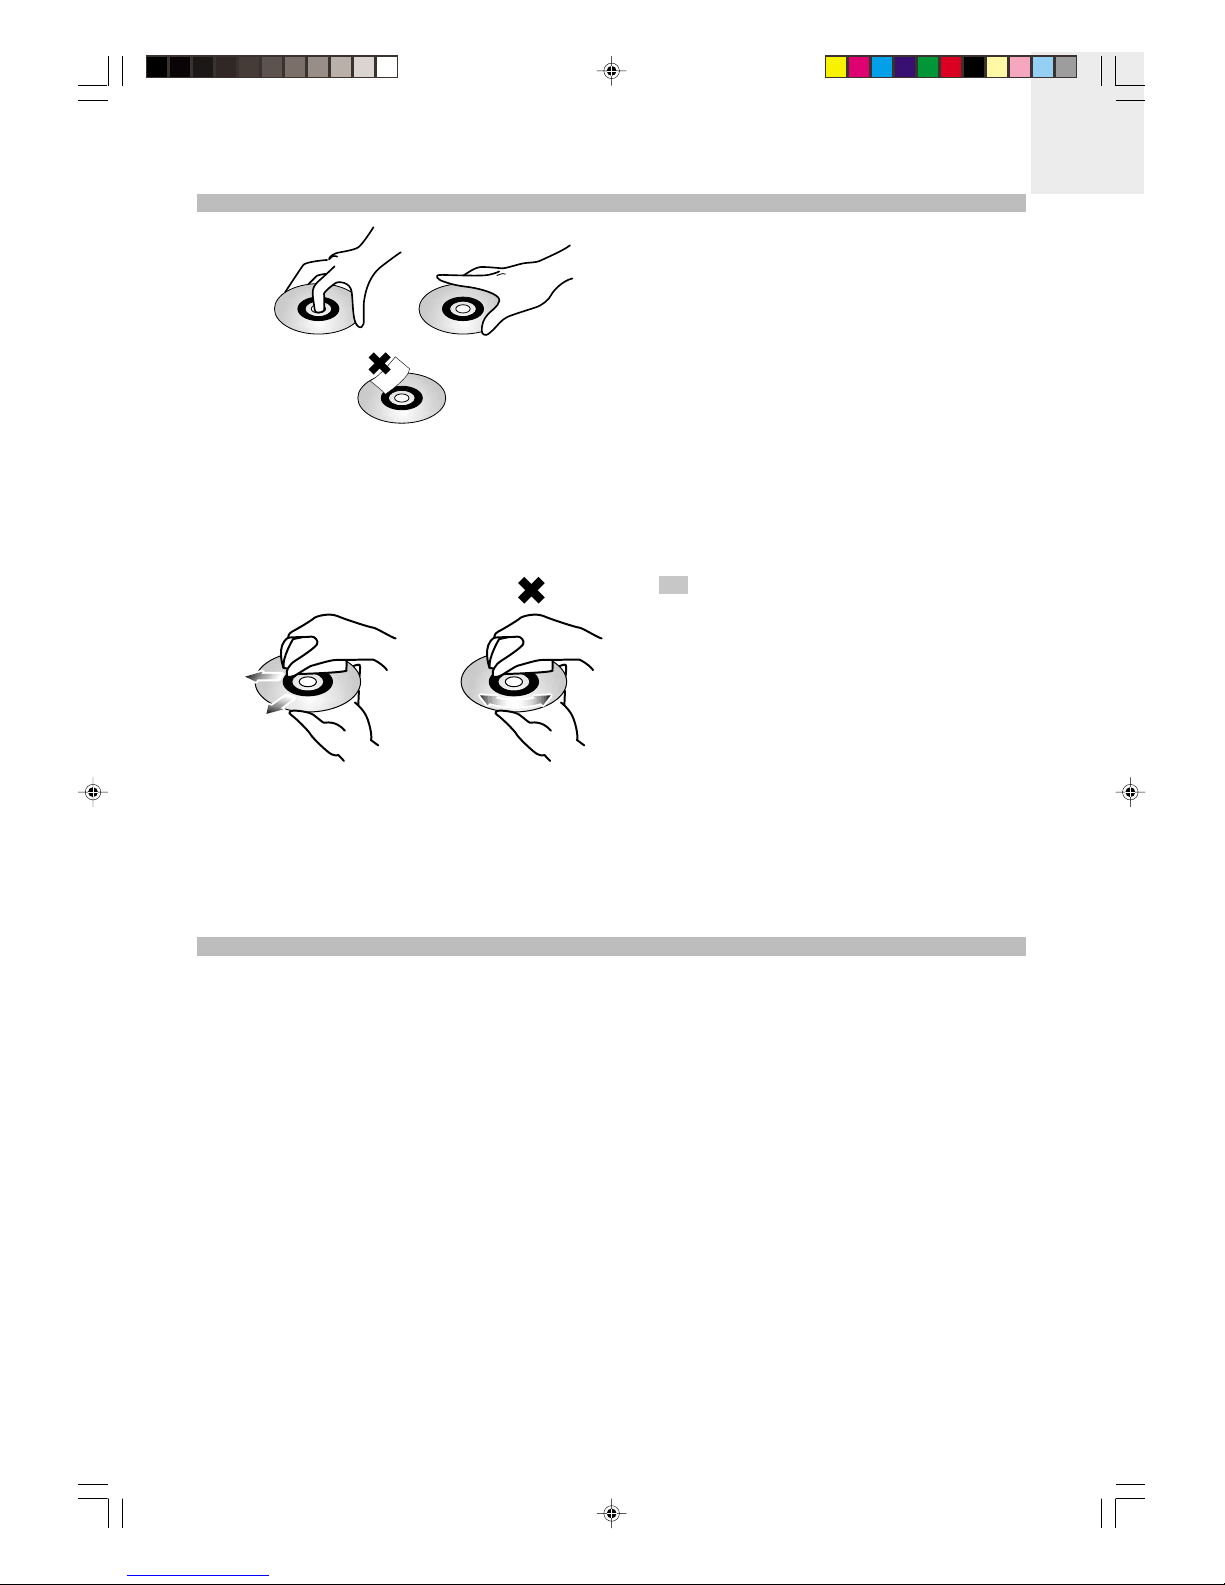
HANDLING AND CLEANING DISCS / DISC LENS
• Hold discs by the edges, or by one edge and the
hole. Do not touch the signal surfaces.
• Do not affix labels or adhesive tapes to the label
surfaces.
• Never put more than one disc on a tray or put a disc slipping out of the guide area.
• Do not scratch or damage the label. Discs rotate at high speeds inside the player. Do not use damaged, warped, or cracked
discs.
• Dirty discs can cause poor sound quality. If a disc becomes dirty, wet a soft cloth in water, wring it out well, wipe the dirt away
gently, and then remove any water drops with a dry cloth.
Always keep discs clean by wiping them gently with
a soft cloth from the inner edge of the disc toward the
outer perimeter. Never wipe the disc in a circular motion
since circular scratches are likely to occur and could cause
noise during playback.
• Do not use record cleaning sprays or antistatic agents on discs. Also, never clean discs with ben ene, thinner, or other
volatile solvents that may cause damage to disc surface.
• Do not touch the pick-up disc lens located inside the disc compartment. To keep dust from collecting on the disc lens do not
leave the compartment lid open for extended periods.
• If the disc lens gets dirty, it can cause the system to produce poor audio quality. Clean it with a soft brush, or use an air
blower brush designed for camera lenses.
• Always remove the disc from the main unit before moving the system.
CABLES AND PLUGS
• Do not connect the unit to the AC power supply until all other connections have been made and the AC voltage (indicated on
the type plate on the back cover) has been checked.
• Do not touch the cables and plugs with wet hands, forcibly bend them in any way, or place heavy objects on top of them.
• Connect only the cables and plugs provided with the unit.
• Unplug this apparatus during lightning storms or when unused for long periods. When unplugging the cables and plugs from
the wall, always pull the plug or connector, not the cord.
TIP
HMS388 Eng R27 OP 7/30/05, 11:08 AM7

EN
8
SETTING UP THE SYSTEM
CONNECTING SPEAKERS / SUBWOOFER
AM antenna
FM antenna
S
pea
k
er
(L
e
ft)
S
pea
k
er
(Right)
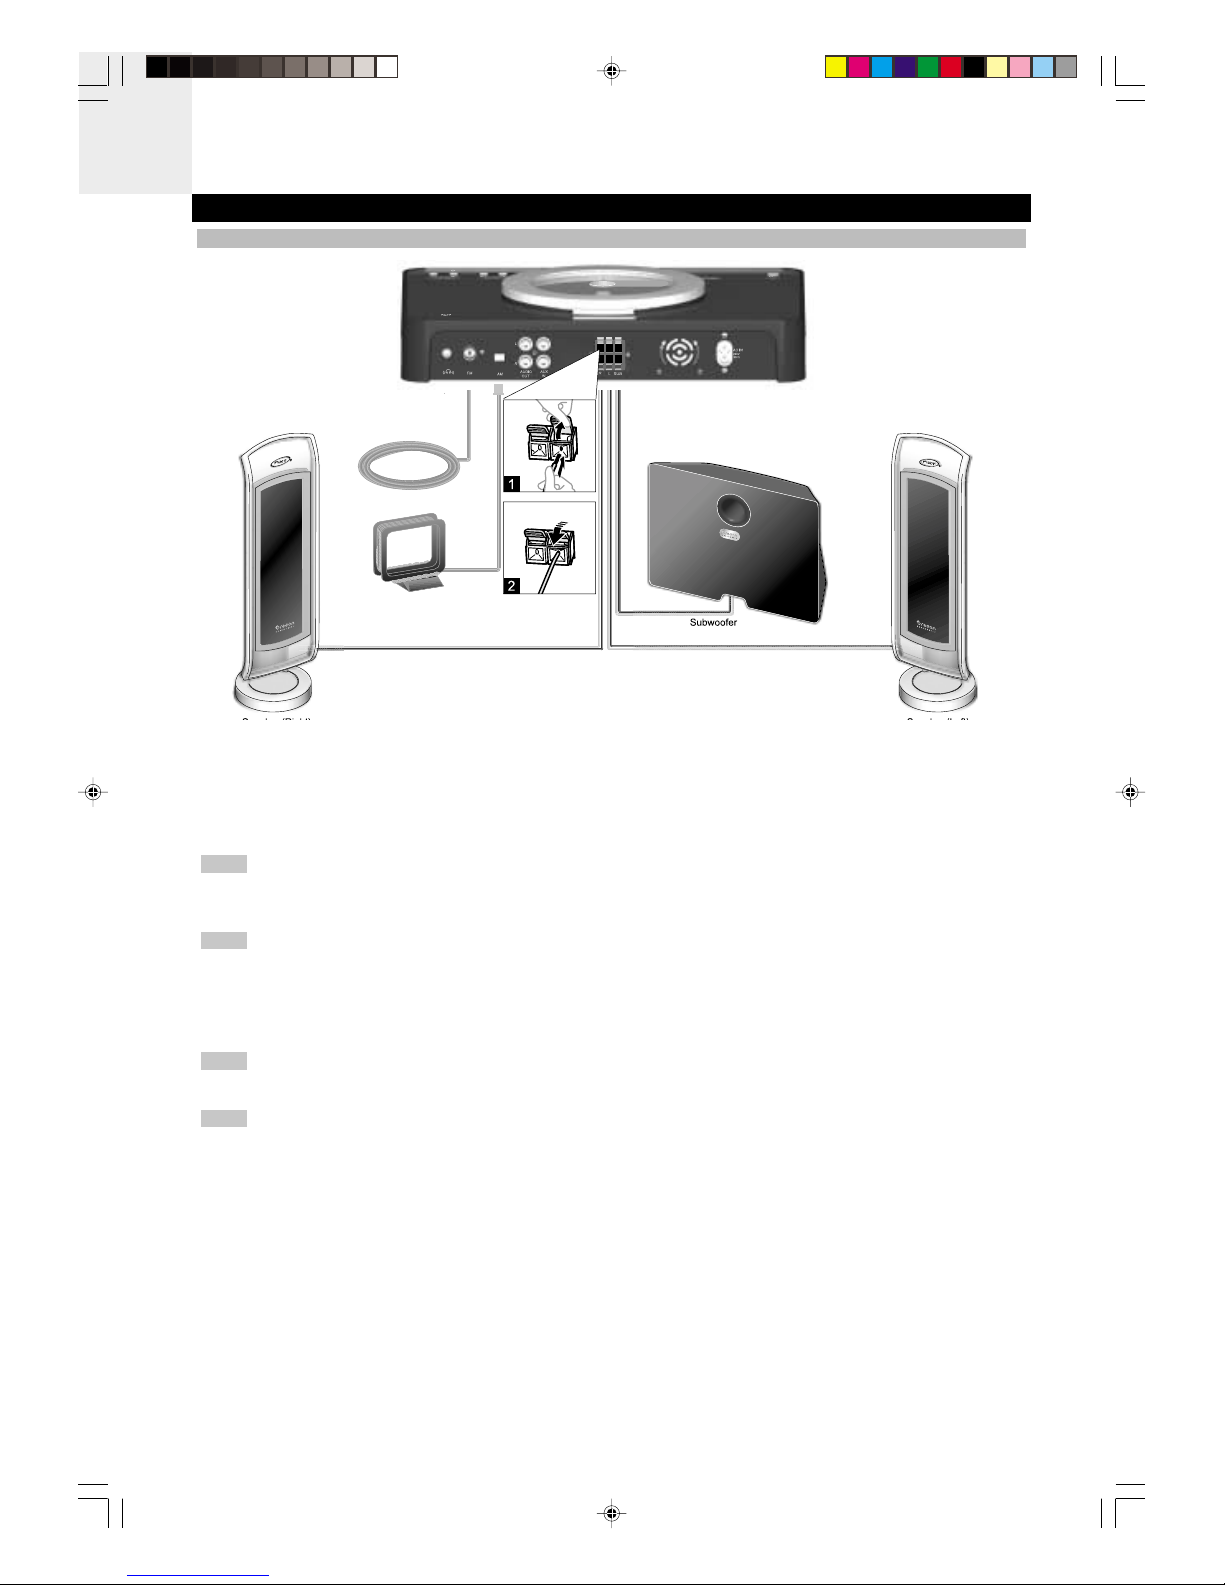
Your unit is supplied with light / dark grey speaker cable wires that are used to connect the speakers and subwoofer to the main
CD player unit's labelled "R" (right speaker), "L" (left speaker) and "SUB" (subwoofer).
1. Push up the corresponding speaker connectors' light / dark grey tabs on the main CD player unit.
2. Insert the light / dark grey speaker cable wires into the respective light / dark grey speaker connectors.
Ensure that the colours of the speaker cable wires match with the colours of the main unit's speaker connectors. That is,
the light-grey speaker cable wire should be connected only to the light-grey terminals and the dark-grey speaker cable wire
connected to the dark-grey terminals.
Never short-circuit light / dark grey speaker cable wires or reverse connections. Incorrect connection can damage the
speakers and subwoofer.
3. For the unit to be able to receive AM / FM radio reception, simply connect the AM loop antenna and FM pigtail antenna to
their respective AM / FM antenna jacks at the back of the player.
A blue translucent sheet protects the aluminium areas of the satellite speakers from scratching. Peel off the sheet to
operate.
Use only the speakers and subwoofer that is supplied with this unit. Using speakers or subwoofers of other types or
brands may short circuit or damage the unit.
NOTE
NOTE
NOTE
NOTE
HMS388 Eng R27 OP 7/30/05, 11:08 AM8

9
EN
CONNECTING THE MAIN UNIT
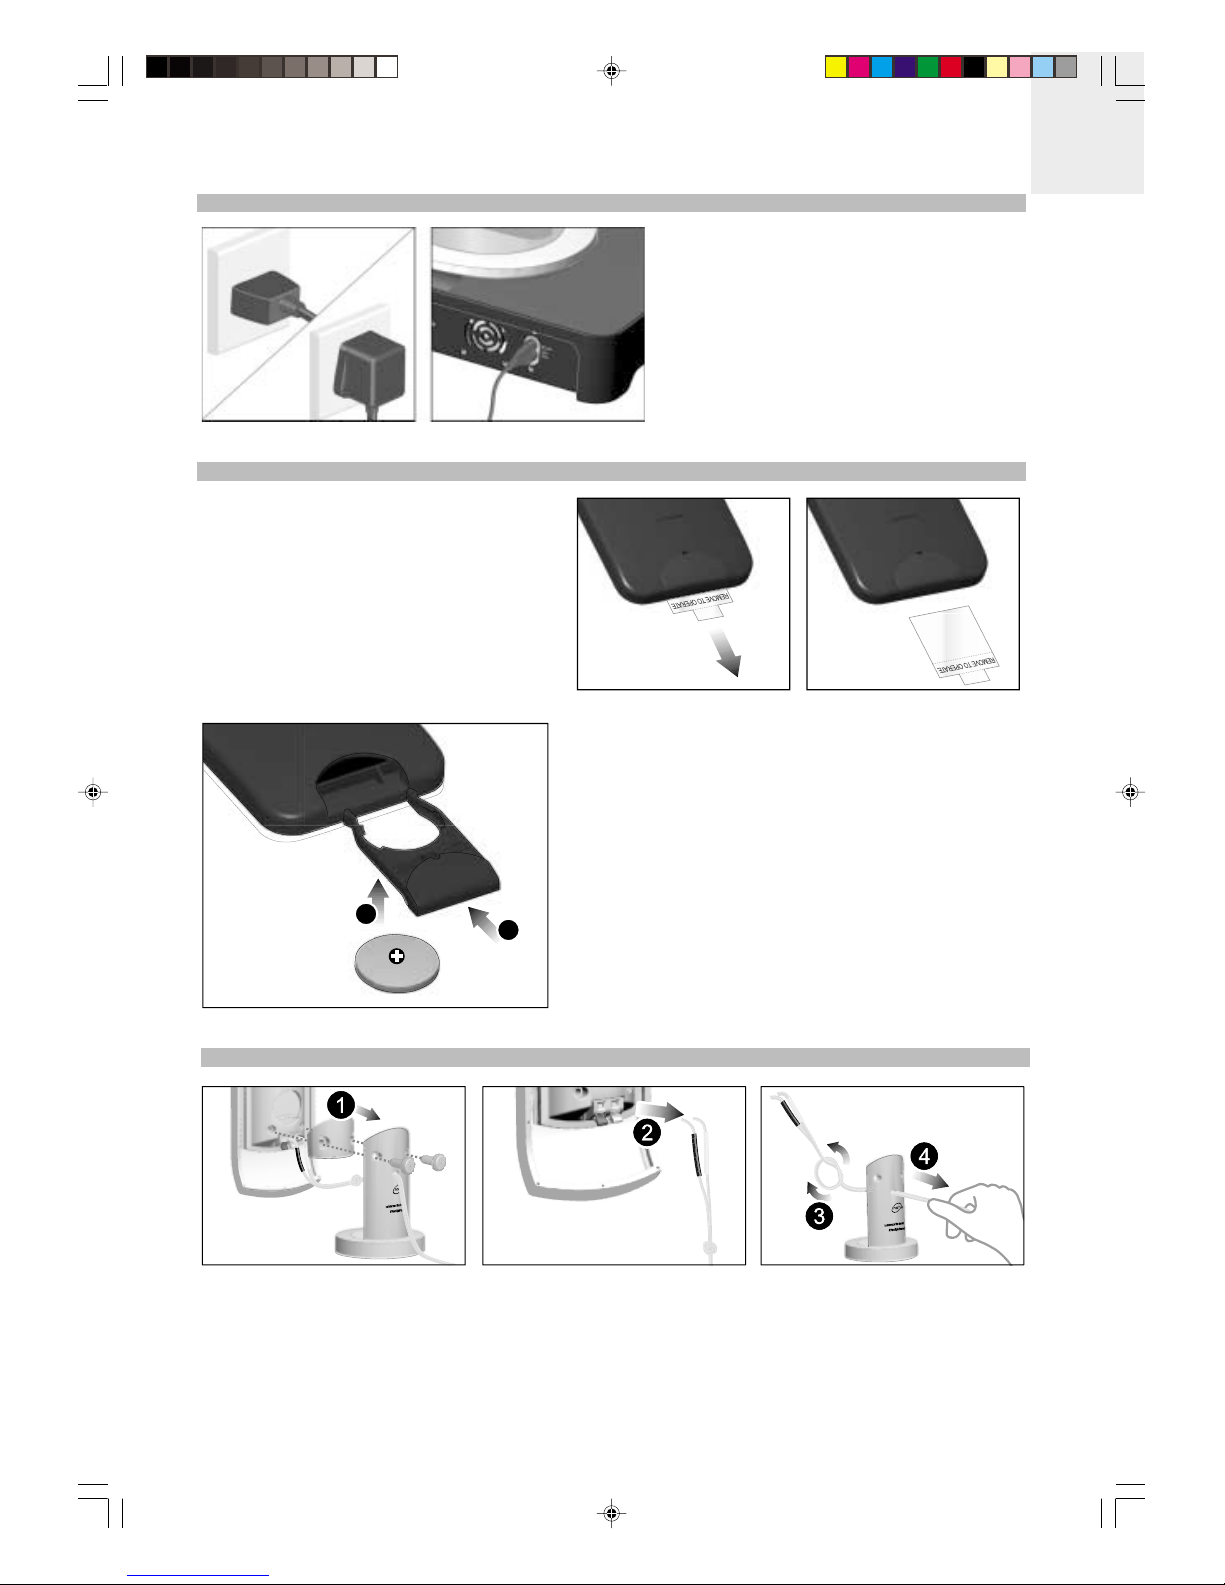
Connect one end of the main unit's cable into the AC IN
jack and plug the other end of the cable into a standard
2-wire or 3-wire power outlet or power strip.
INSERTING BATTERY INTO THE REMOTE CONTROL
With a CR2025 battery cell already installed, the
supplied remote control can be used to control the
system's operations once the system is connected.
Simply pullout and remove the plastic strip that is
wedged in the battery compartment and point the remote
control toward the main unit's infrared sensor to operate.
12
If battery power becomes depleted, install a new battery into the remote
control as follows:
1. Insert a blunt object such as a ballpoint pen into the small hole of
the battery compartment at the back of the remote control and
gently push out until the compartment can be removed from the
device with your hands.
2. Insert a new battery cell into the battery compartment's clip by
matching the "+" and "-" polarity. The "+" of the battery should be
facing upward.
3. Insert the battery compartment back into the remote control until it
is firmly positioned.
4. When using the remote control, point it at the sensor on the front
panel of the system.
WALL-MOUNTING THE SPEAKERS (OPTIONAL)
HMS388 Eng R27 OP 7/30/05, 11:08 AM9
Andere Handbücher für HMS388
1