
Portwell NAR-7070 Bedienungsanleitung

NAR-7070
Communication Appliance
User
′
s Manual
Revision: 020
Item NO: B8980700
Portwell Inc.
6851 Mowry Ave. Newark, CA 94560
TELr: 510-790-9192 FAX: 510-790-9191
http://www.portwell.com
Email: info@mail.portwell.com

NAR-7070 User’s Manual
1
Table of Contents
Chapter 1 Introduction..........................................................................................................3
1.1 About This Manual .................................................................................................... 3
1.2 Manual Organization ................................................................................................. 3
1.3 Technical Support Information .................................................................................. 4
Chapter 2 Getting Started .......................................................................................................5
2.1 Included Hardware .................................................................................................... 5
2.2 Before You Begin ...................................................................................................... 5
2.3 The Chassis .............................................................................................................. 6
2.4 Opening the Chassis ................................................................................................. 6
2.5 Installing or Removing a SODIMM ............................................................................ 7
2.6 Remove and Install CPU ........................................... Error! Bookmark not defined.
2.7 Remove and Install Battery ....................................... Error! Bookmark not defined.
2.8 Remove and Install HDD........................................... Error! Bookmark not defined.
2.9 Remove and Install PCI-X Riser card....................... Error! Bookmark not defined.
2.10 Remove and Install LED cable & LED board ............ Error! Bookmark not defined.
2.10 Remove and Install System FAN ............................................................................ 13
2.10 Remove and Install LCD module & LCD cable .......................................................14
2.10 Product Specifications............................................................................................. 15
2.11 Hardware Configuration Setting .............................................................................. 15
2.12 Install a Different Processor .................................................................................... 18
2.13 Connect to the console............................................................................................ 19
Chapter 3 Operation Guide ...................................................................................................21
3.1 Brief Guide of PPAP-3723....................................................................................... 21
3.2 System Architecture ................................................................................................ 22
Chapter 4 BIOS Setup Information ......................................................................................24
4.1 Entering Setup......................................................................................................... 24
4.2 Main Menu............................................................................................................... 25
4.3 Standard CMOS Feature......................................................................................... 26
4.4 Advanced BIOS Feature ......................................................................................... 28
4.5 Advanced Chipset Features ....................................................................................31
4.6 Integrated Peripherals ............................................................................................. 33
4.7 Power Management Setup...................................................................................... 36
4.8 PnP/PCI Configuration Setup.................................................................................. 38
4.9 PC Health Status..................................................................................................... 39

NAR-7070 User’s Manual
2
4.10 Frequency/Voltage Control...................................................................................... 40
4.11 Default Menu ........................................................................................................... 40
4.12 Setup Supervisor Password ....................................................................................41
4.13 Exiting Seleting........................................................................................................41
4.14 POST Messages ..................................................................................................... 42
4.15 BIOS POST Check Point List ..................................................................................46
4.16 Flash BIOS Utility .................................................................................................... 51
Chapter 5 Appendix ...........................................................................................................52
5.1 Watch Dog Timer Sample Code.............................................................................. 52
5.1 Reset To Default Sample Code............................................................................... 56
Chapter 6 EZIO-100 .............................................................................................................66
6.1 About EZIO-100 ...................................................................................................... 66
6.2 Features .................................................................................................................. 66
6.3 Mechanical Specification......................................................................................... 66
6.4 General Specification .............................................................................................. 67
6.5 Product Outlook....................................................................................................... 67
6.6 Interface Pin Assignment ........................................................................................ 67
6.7 EZIO Function Command........................................................................................ 68
6.8 Character Generator ROM (CGROM)..................................................................... 72
6.9 Sample Code........................................................................................................... 73

NAR-7070 User’s Manual
3
Chapter 1 Introduction
1.1 About This Manual
This manual describes all required information for setting up and using the NAR-7070.
NAR-7070 provides the essential components for delivering optimal performance and
functionality in the high-end communications appliance market segment. This manual should
familiarize you with NAR-7070 operations and functions. NAR-7070 has seven on-board
Ethernet to serve communication appliances, such as Firewall, which needs seven LAN ports to
connect external network (internet), demilitarized zone and internal network.
Feature of NAR-7070 includes:
The most advanced Communication Appliance built on Intel®, latest Netburst™ micro
architecture and Hyper-Threading technology
High computing power of dual Intel®Xeon™ processors
64bit Gigabit Ethernet provides high performance networking capacity
Intel®E7501A chipset with 533MHz PSB
User-friendly LCD control panel
Comprehensive thermal solution for 2U platform
Full-length PCI-X slot support
Standard PMC connecter support
2G PC2100 DDR RAM, upgradeable to 8GB
Two IDE hard disk drives
100V ~ 240V , 8A ~ 4A ,Auto-range
CE NO:C332606
FCC NO:F332606
1.2 Manual Organization
The manual describes how to configure your NAR-7070 system to meet various operating
requirements. It is divided into three chapters, with each chapter addressing a basic concept
and operation of this whole system.
Chapter 1: Introduction. This section briefly talks about how this document is organized. It includes
some guidelines for users who do not want to read through everything, but still helps
you find what you need.
Chapter 2: Hardware Configuration Setting and Installation. This chapter shows how the hardware
is put together, including detailed information. It shows the definitions and locations of
Jumpers and Connectors that you can easily configure your system. Descriptions on
how to properly mount the CPU and main memory are also included to help you get a
safe installation. Reading this chapter will teach you how to set up NAR-7060.
Chapter 3: Operation Information. This section gives you illustrations and more information on the
system architecture and how its performance can be maximized.
Chapter 4: BIOS operation information.
Any updates to this manual, technical clarification and answers to frequently asked questions
would be posted on the web site: http://www.portwell.com

NAR-7070 User’s Manual
4
1.3 Technical Support Information
Users may find helpful tips or related information on Portwell's web site: http://www.portwell.com. A
direct contact to Portwell's technical person is also available. For further support, users may also
contact Portwell’s headquarter in Taipei or your local distributors.

NAR-7070 User’s Manual
5
Chapter 2 Getting Started
This section describes how the hardware installation and system settings should be done.
2.1 Included Hardware
The following hardware is included in your kit:
PPAP-3723L Communication Appliance System Board
One serial port Null MODEM cable
One LCD Modules
2.2 Before You Begin
To prevent damage to any system board, it is important to handle it with care. The following
measures are generally sufficient to protect your equipment from static electricity discharge:
When handling the board, use a grounded wrist strap designed for static discharge elimination
and touch a grounded metal object before removing the board from the antistatic bag. Handle
the board by its edges only; do not touch its components, peripheral chips, memory modules or
gold contacts.
When handling processor chips or memory modules, avoid touching their pins or gold edge
fingers. Put the value communications appliance system board and peripherals back into the
antistatic bag when they are not in use or not installed in the chassis.
Some circuitry on the system board can continue operating even though the power is switched
off. Under no circumstances should the Lithium coin cell used to power the real-time clock be
allowed to be shorted. The coin cell can heat under these conditions and present a burn hazard.
WARNING!
1. "CAUTION: DANGER OF EXPLOSION IF BATTERY IS INCORRECTLY REPLACED.
REPLACE ONLY WITH SAME OR EQUIVALENT TYPE RECOMMENDED BY THE
MANUFACTURER. DISCARD USED BATTERIES ACCORDING TO THE
MANUFACTURER’S INSTRUCTIONS"
2. This guide is for technically qualified personnel who have experience installing and
configuring system boards Disconnect the system board power supply from its
power source before you connect/disconnect cables or install/remove any system
board components. Failure to do this can result in personnel injury or equipment
damage.
3. Avoid short-circuiting the lithium battery; this can cause it to superheat and cause
burns if touched.
4. Do not operate the processor without a thermal solution. Damage to the processor

NAR-7070 User’s Manual
6
can occur in seconds.
5. Do not block air vents. Minimum 1/2-inch clearance required.
6. Please switch off the power, before you install/remove any system components. It can
avoid occurring any damages.
2.3 The Chassis
The system is integrated in a customized 2U chassis (Fig. 2-1, Fig. 2-2). On the front panel you
will find 4-push-button LCD module and seven Ethernet, a COM port and a POWER button and
RESET button. The back panel has two USB ports and two system FAN.
Fig. 2-1 Front View of the Chassis
Fig. 2-2 Rear View of the Chassis
2.4 Opening the Chassis
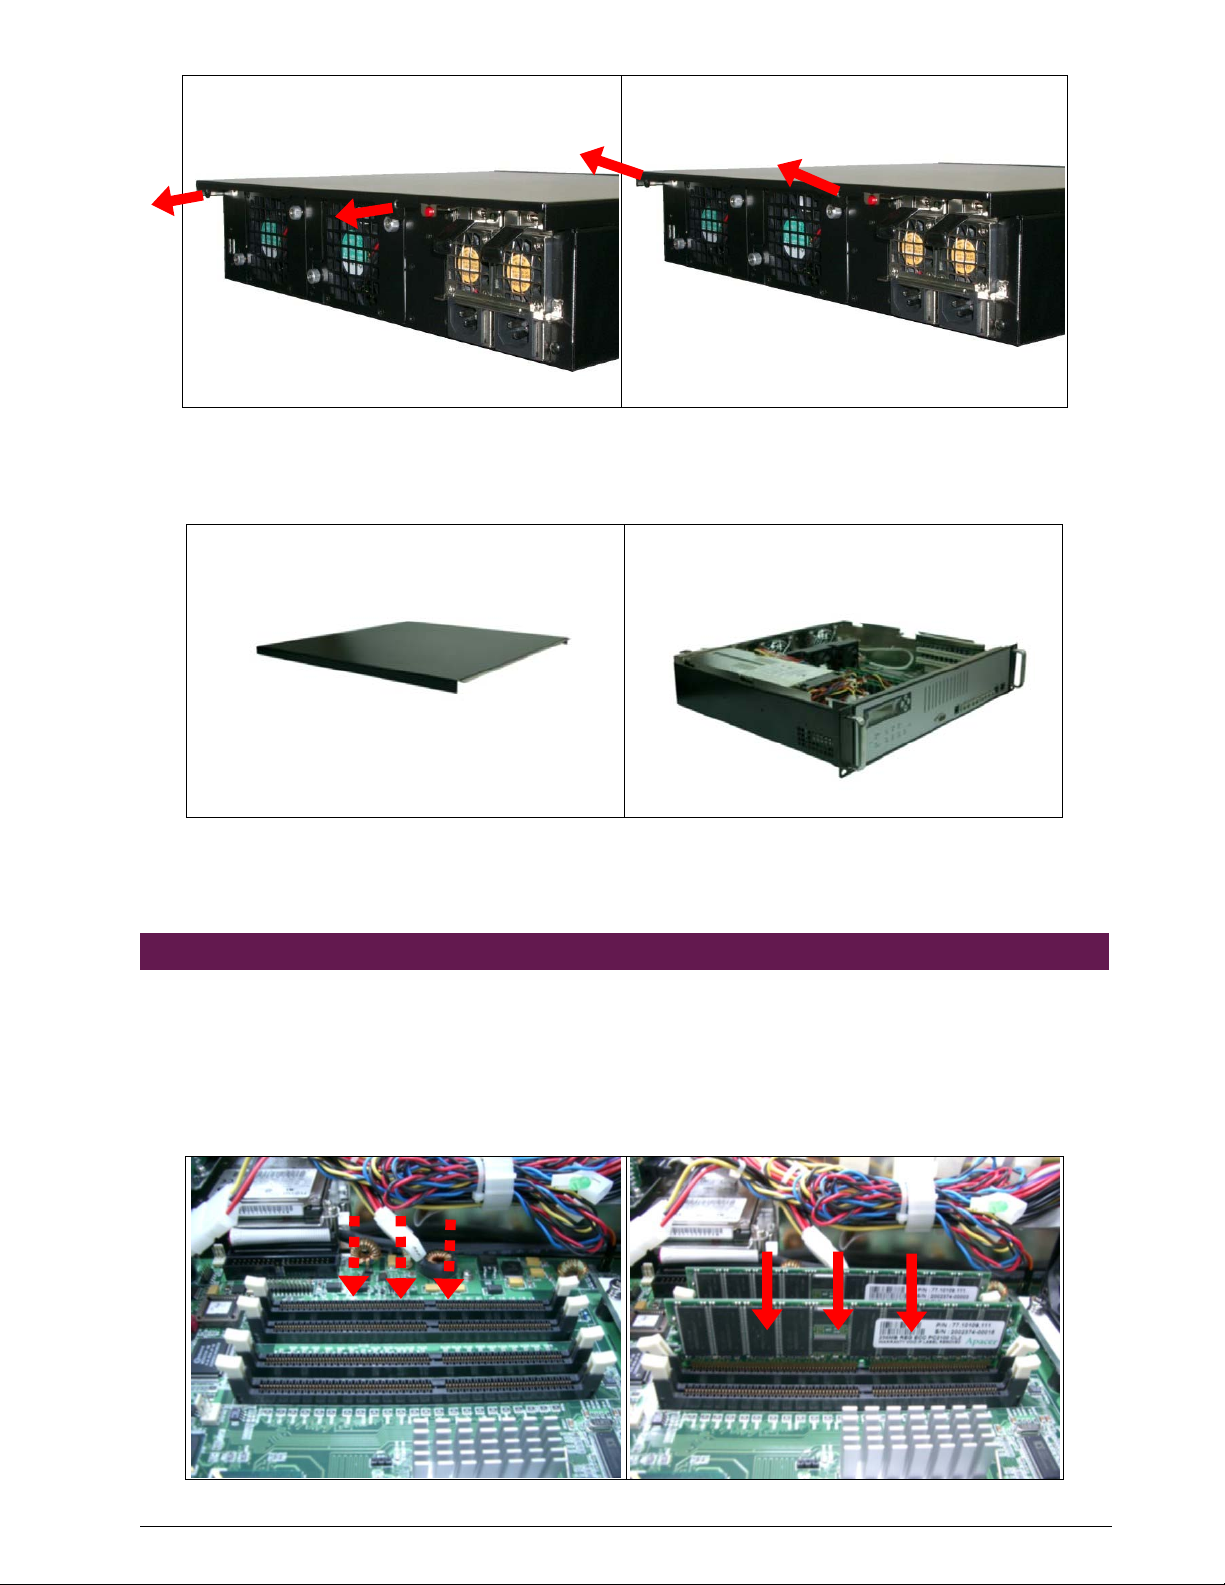
1. Screws out from cover (Fig. 2-3), slide the cover backwards and pull the rear edge upwards.
(Fig. 2-4)
NAR-7070 User’s Manual
7
Fig. 2-3 Screws out from cover Fig. 2-4 Slide the cover backwards and pull the
rear edge upwards
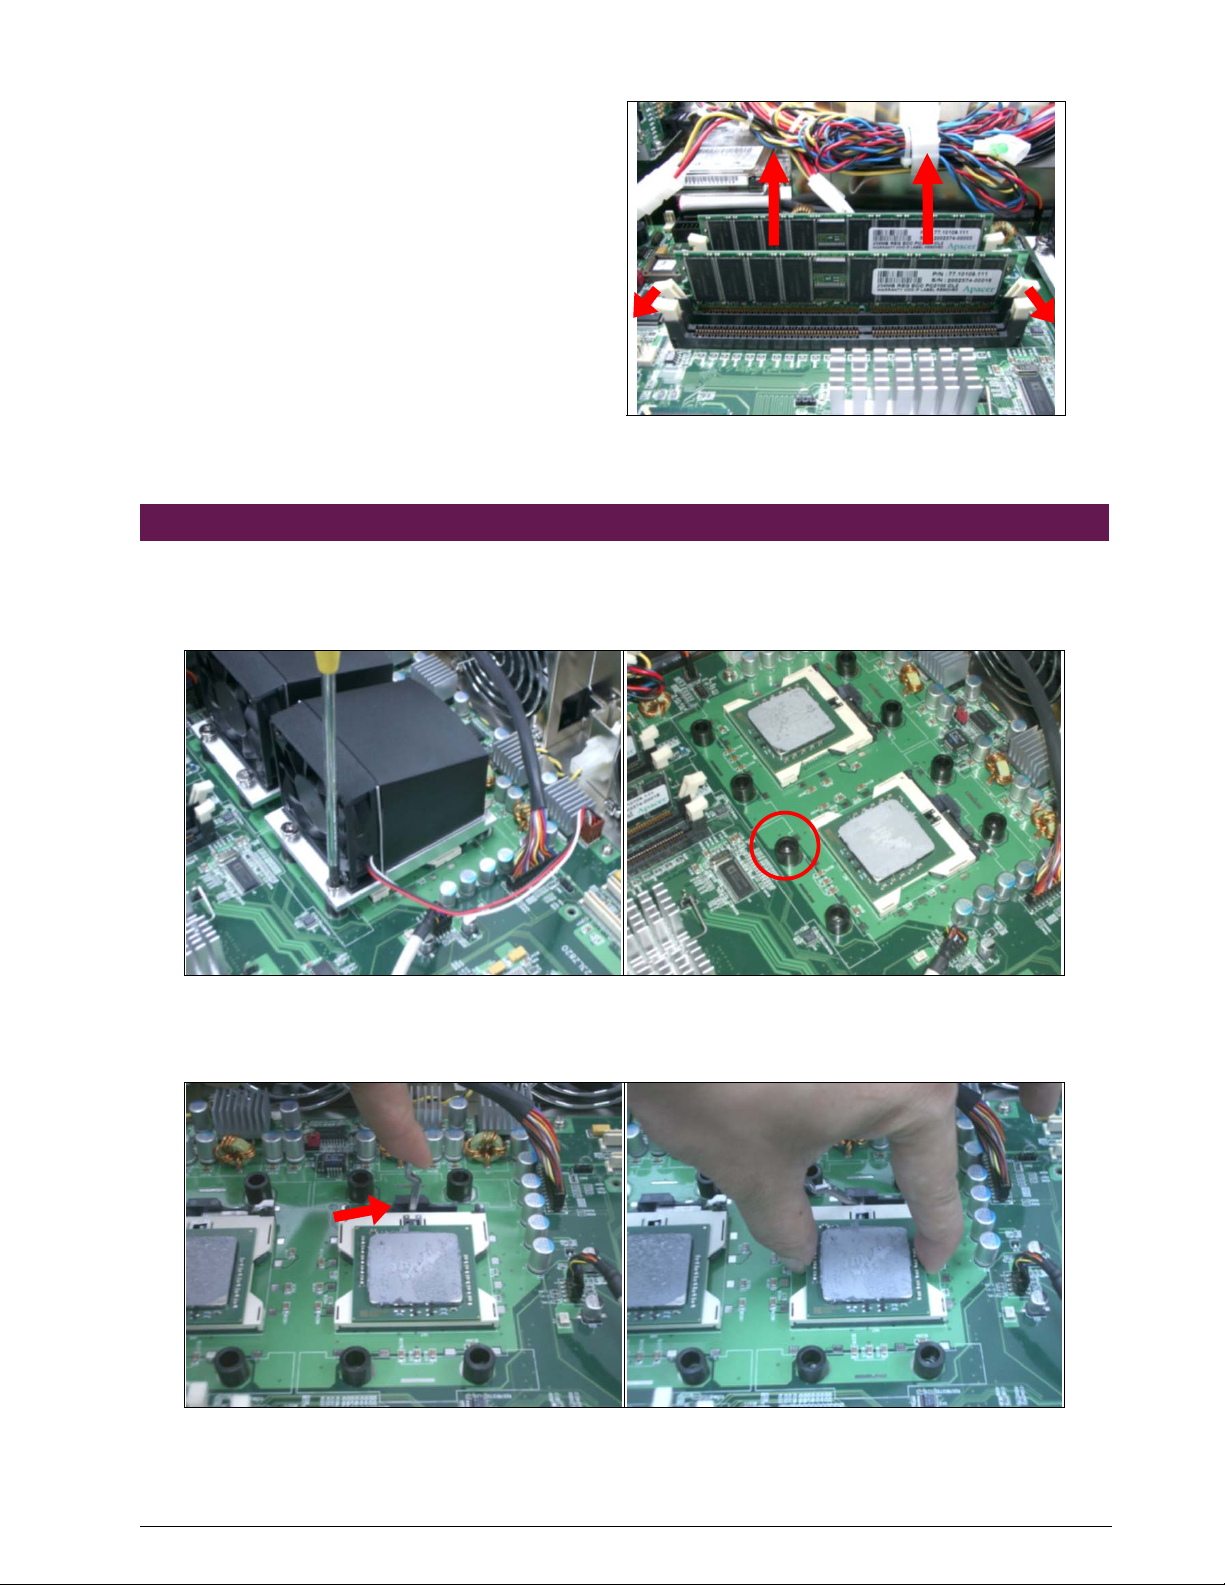
2. The top cover (Fig. 2-5) can be removed from the base stand (Fig. 2-6)
Fig. 2-5 The top cover Fig. 2-6 The base stand
2.5 Installing or Removing a SODIMM
Follow these steps to upgrade RAM module:
1. Install the system memory by push the latches on each side of the DIMM socket down. Align
the memory module with the socket. Press memory module firmly down until it is sealed
correctly. The socket latches are levered upwards and latch on to the edges of the DIMM.
(Fig. 2-7, 2-8) (Slot 2 and 4 or slot 1 and 3 must be populated simultaneously)
Fig. 2-7 The memory slot Fig. 2-8 Install DIMM
NAR-7070 User’s Manual
8
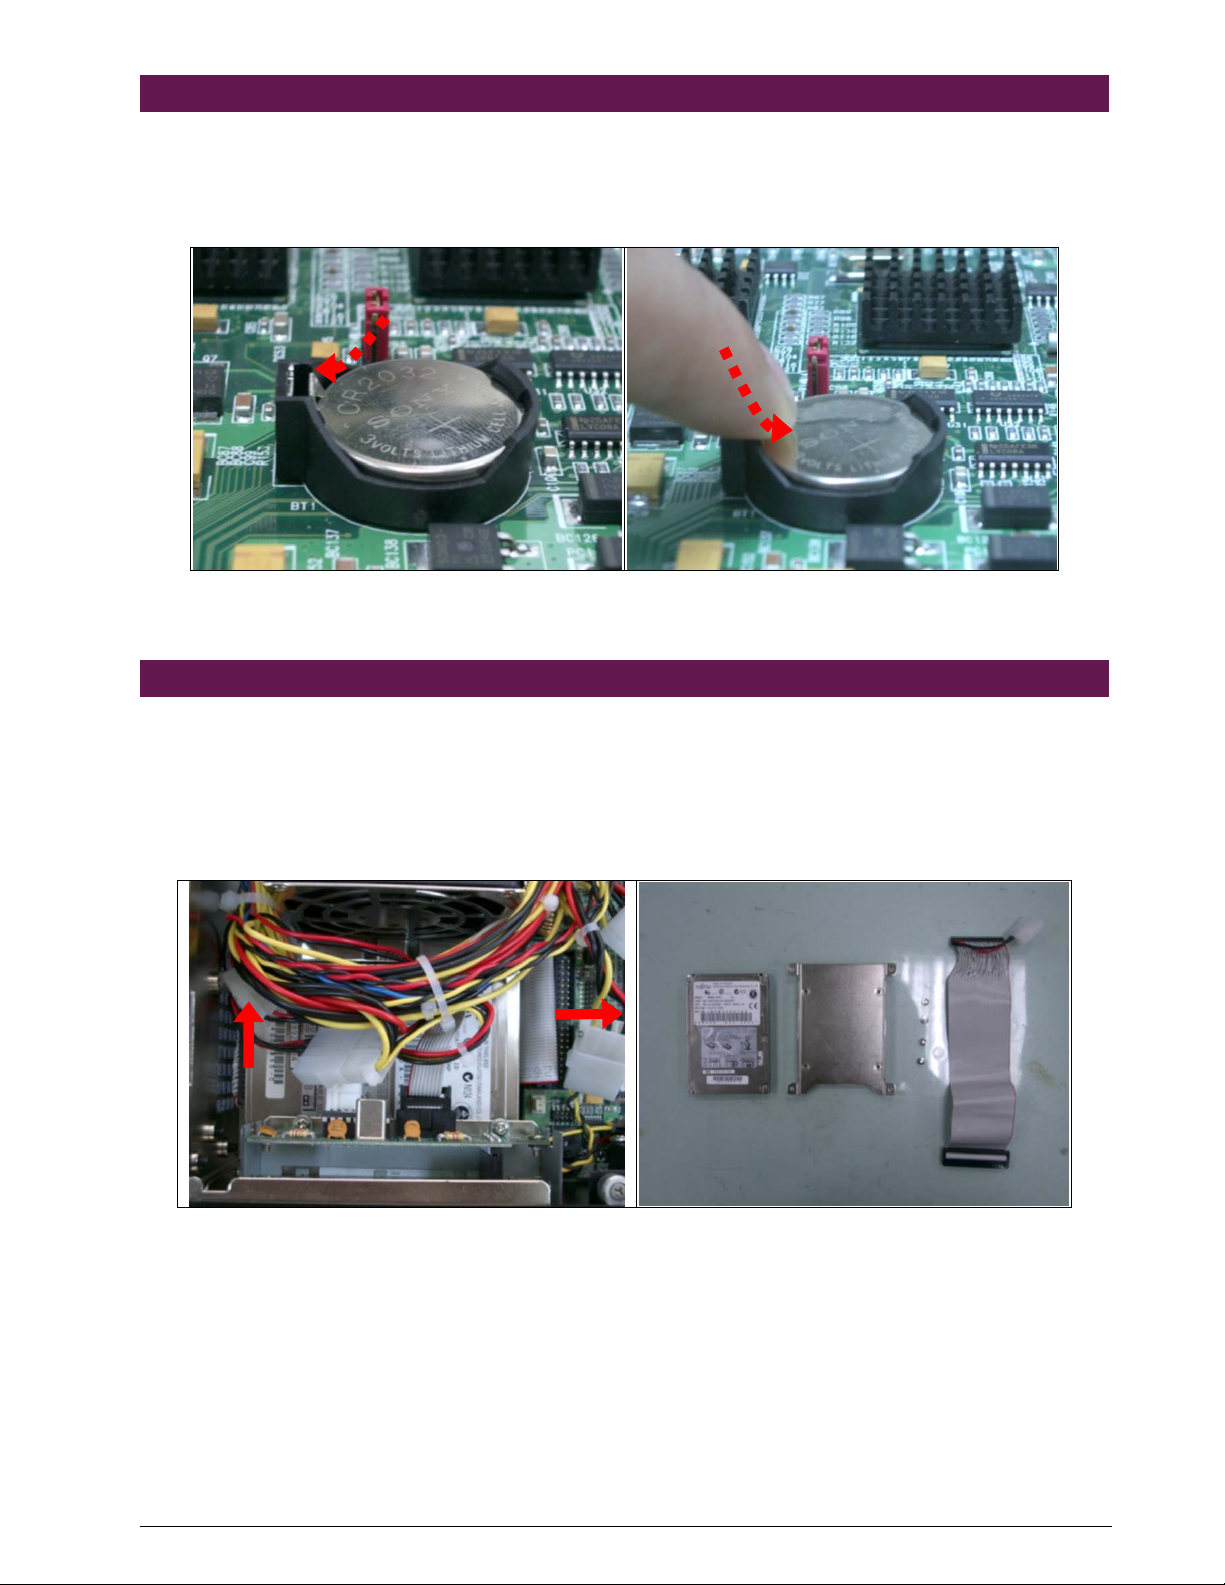
2. Push the latches on each side of the
DIMM socket down to eject the DIMM
(Fig. 2-9)
Fig. 2-9 Eject a DIMM module
2.6 Remove and Install CPU
3. Loosen and then take off the screws on the heat sink (Fig. 2-10).
4. Remove the heat sink and CPU space.(Fig. 2-11).
Fig. 2-10 Loosen the screw Fig. 2-11 Heat sink removed
5. Loosen the CPU socket (Fig 2-12)
6. Take the CPU chip out of the CPU socket (Fig 2-13)
Fig. 2-12 Loosen the socket Fig. 2-13 Take off the CPU
7. Install CPU in opposite order as above
CPU space
NAR-7070 User’s Manual
9
2.7 Remove and Install Battery
8. Press the metal clip down to eject the button battery (Fig. 2-16).
9. Replace a new battery by pressing it with fingertip to restore the battery
(Fig. 2-17).
Fig. 2-16 Eject the battery Fig. 2-17 Restore the battery
2.8 Remove and Install HDD
The system has an internal drive bay for one 2.5" hard disk drive. If the HDD did not pre-
installed, follow the steps below:
Before a HDD can be installed onto NAR-7070.
10. Remove HDD bracket (Fig. 2-18) install HDD into the HDD bracket.
Fig. 2-18 Remove HDD bracket Fig. 2-19 A 2.5” HDD and the HDD bracket
11. Fasten the both screws to lock HDD and bracket together (Fig. 2-20).
Inhaltsverzeichnis
Beliebte Konferenzsystem Handbücher anderer Marken

Kramer
Kramer VIA GO Bedienungsanleitung

AVT
AVT MAGIC AC1 Go Bedienungsanleitung

ProSoft Technology
ProSoft Technology AN-X4-AB-DHRIO Bedienungsanleitung

Sony
Sony PCS-I150 Bedienungsanleitung

Middle Atlantic Products
Middle Atlantic Products VTC Series Bedienungsanleitung

Prentke Romich Company
Prentke Romich Company Vanguard Plus Leitfaden


