QAT MS5 Bedienungsanleitung

1
QAT
MS5 Music Server
USER MANUAL

2
QAT MS5 Music Server
USER MANUAL
Content
1. Product features ..........................................................................................................3
2. Start up and shut down the host ..................................................................................6
2.1 Start up the host ..................................................................................................6
2.2 Shut down the host..............................................................................................6
3. Connect iPad and the host ...........................................................................................6
3.1 Using an external wireless router ...........................................................................6
3.2 Using USB wireless adapter ....................................................................................6
4. Basic operation of QAT Remote....................................................................................7
4.1 Acquire music ........................................................................................................7
4.1.1 Rip CD tracks to hard disc of MS5 ...................................................................7
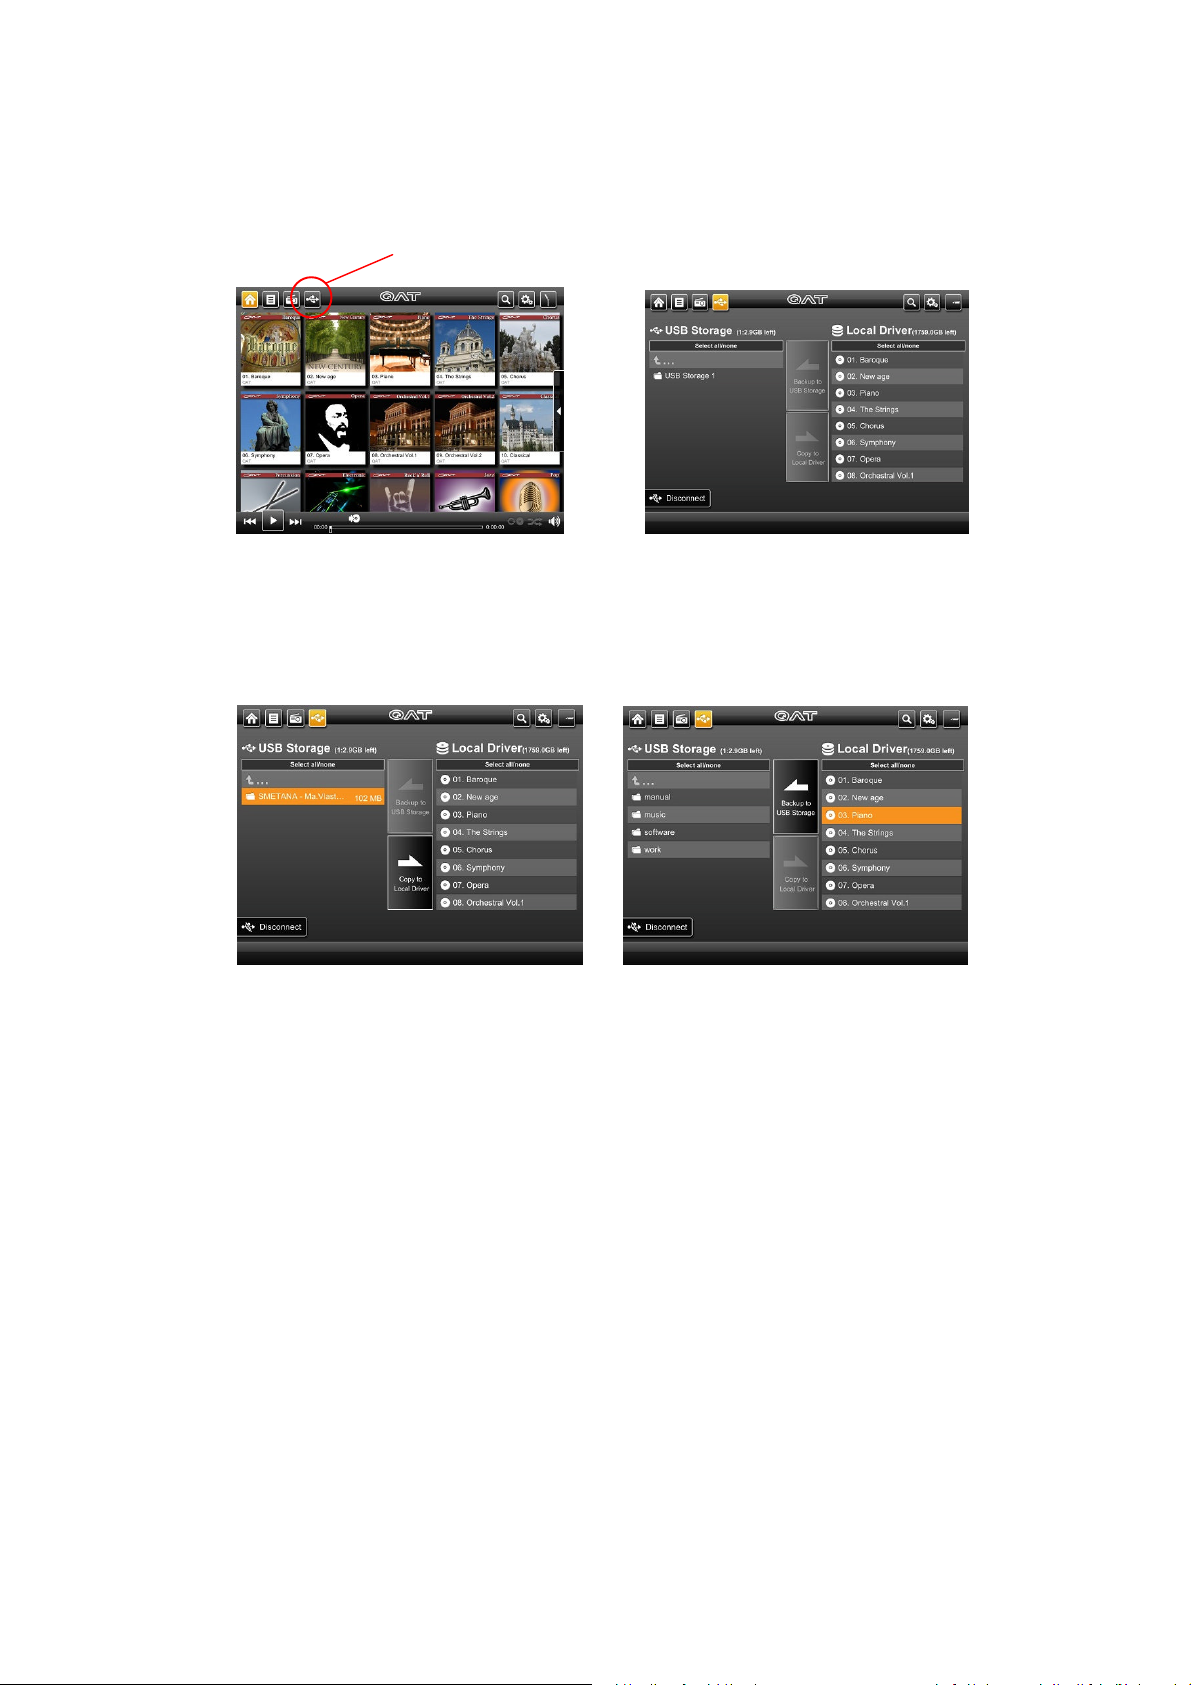
4.1.2 Acquire music from external USB storage .......................................................9
4.2 Play music............................................................................................................10
4.2.1 Play an album ..............................................................................................10
4.2.2 Play selected tracks in an album ...................................................................10
4.2.3 Set music playback mode .............................................................................11
4.3 Edit album............................................................................................................11
4.3.1 View and edit album cover information .....................................................11
4.3.2 Edit Artist ..................................................................................................12
4.3.3 Edit music style..........................................................................................12
4.3.4 Delete music..............................................................................................12
4.4 Use the playlist.....................................................................................................13
4.4.1 Add albums into the playlist.......................................................................13
4.4.2 Add individual music tracks into the playlist...............................................13
4.4.3 Play music from the playlist .......................................................................14
4.4.4 Edit the playlist..........................................................................................14
4.5 Search music........................................................................................................15
4.6 Listen to the Internet radio...................................................................................15
4.7 System settings ....................................................................................................16
5. Package contents .......................................................................................................17
6. IMPORTANT SAFETY INSTRUCTIONS...........................................................................18
7. After-sales Service......................................................................................................19
Thank you for choosing QAT!

3
1. Product Features
TEAC CD drive for ripping
Built-in 2TB 3.5-inch Seagate Enterprise hard drive for music data storage
(Saving up to 3000 music CDs in WAV format or 5000 music CDs in FLAC format)
DAC: Balanced DAC circuitry, 2 Analog-Devices AD1955(192KHz/24Bit)chips
Analog outputs: RCA, XLR
Digital outputs: RCA
Network connection: RJ45
2 USB ports for data transfer
Fully Balanced output with proprietary full discrete OP amplifiers consisting of FET and
Bipolar devices. Very high slew rate with high drive capability.
Supported audio formats: PCM, WAV, APE, FLAC, AIFF, WMA, M4A, MP3, AAC, Ogg Vorbis
etc.
Remote control software tailored for both Android and iOS (for iPad)
Independent intellectual property rights and unique user interface
Aluminum, fan-less chassis design; various colors available
Dimensions (W x D x H): 325×270×165 (mm) / 12.8 x 10.6 x 6.5 (inches)
Weight: 12.7 Kg / 28 lbs.

4
Front Panel
POWER INDICATOR SUCTION-TYPE
CD-ROM DRIVE
EJECT

5
Rear Panel
Fuse Replacement
There is a square slot in the middle top of the tube cabin. Please gently open the tube cabin
with a screwdriver and change the broken tube with a new one. The fuse is without cathode
and anode. Please push the fuse cabin back after installation.
POWERSTANDBY / ON
POWER OUTLET
FUSE
XLR OUTPUT
DIGITAL OUTPUT
ANALOG OUTPUT
RJ45
USB PORT

6
2. Start Up and Shut Down the Host
2.1 Start up the host
1) Use the RCA or XLR cables to connect the host to an amplifier (see “ANALOG OUTPUT” and
“XLR OUTPUT” on the rear panel).
2) Connect the host and the wireless network adapter (see 3.2).
3) Use the power cable to connect the host to the power supply (see “POWER OUTLET” on
the rear panel).
4) Once all necessary connections are made, find the power supply button above the POWER
OUTLET on the rear panel and switch it to the “on” position. Now the host is standing by.
5) Wait for about 5 seconds, then press the round button “STANDBY/ON” to turn on the host,
which is indicated by a white light on the front panel.
2.2 Shut down the host
It is highly recommended to shut down the host by tapping "shut down music server" button in
the QAT Remote software (see details in 4.7). Wait for about 10 seconds until the white light on
the front panel turns off, meaning the host is standing by. Now you can press “STANDBY/ON” to
turn on the host again, or completely shut it down by switching off the power supply. Irregular
operation may cause unexpected data loss or damage to the machine.
3. Connect iPad and the Host
There are two ways to connect iPad and the host:
3.1 Using an external wireless router
If the user has a wireless router network in home, the existing router and the host can be
connected by an Ethernet cable. The user needs to insert one end of the Ethernet cable in the
LAN interface of the wireless router, and the other end into the RJ45 interface on the rear panel
of the host. Then follow the steps below:
1) Tap “Settings” on the iPad screen, and find “WLAN”. Choose the correct network (“QAT-
your S/N”), and type in code “QATQATQAT”, if it is required. Then iPad and the host will be
connected.
2) Back to iPad main screen, and tap “QAT Remote” to operate the host.
Note: If the router is connected to the Internet, the information of the CD album will be
downloaded and saved in iPad during the CD ripping process.
3.2 Using USB wireless adapter
In case that the user has no wireless router network in home, we offer a USB wireless adapter,
with which the user could connect iPad and the host by following the steps below:
1) Connect the USB wireless adapter and the host through the USB port on the rear pane.

7
2) Follow the steps in 3.1
Note: To connect the MS5 to your local network (router) via an Ethernet cable, the DHCP
server must be enabled.
4. Basic Operation of QAT Remote
4.1 Acquire music
4.1.1 Rip CD tracks to hard disc of MS5
1) Tap “QAT Remote” on your iPad and see the main screen. Insert a CD into the CD-Room. A
CD-shaped icon will pop up on the left top corner after a few seconds:
2) Tap . If the host is connected to the Internet, the screen will display the information
of the CD such as its cover, track titles and time, etc., and relevant operational options.
M
ain
S
creen
show main screen
show play list
show online radio
clock
settings
search music
album cover
play bar
CD ripper

8
Note: the manufacturer makes no guarantee that the information of all CDs will be completely
acquired. Most of the successful CDs are from Europe and the US currently.
3) By default, all the CD tracks are selected, which is indicated by the orange boxes in front of
every track title. If the user wishes to rip individual tracks, tap the box in front of the track
title to deselect it, or use the “select all/deselect all” option. Then tap “ripper”, the tracks
will be ripped and imported one by one to the hard disk of MS5, indicated by a progress
bar.
4) After completing the ripping, tap to enter album style (genre) selecting
screen:
Album style selecting screen
Tap the music style tags to label the current album.
Tap to add a new music style tag.
Rip CD tracks to MS5

9
Tap to edit music style tags:
Tap to delete music style tags, or tap the name to edit.
Tap to complete the operation.
5) Tap to eject the CD.
6) If the user re-inserts the CD which is already imported:
The user can choose to:
Overwrite: Repeat the above steps.
Copy duplicate: Repeat the above steps, and establish a duplicated album.
Tap CANCEL to exit.
4.1.2 Acquire music from external USB storage
1) Connect an external USB storage to the host via USB port on the rear panel, and a USB icon
will pop up. Tap the icon to enter:

10
2) Select the folder that you want to copy to the host, and tap “Copy to Local Drive”.
3) The user can also back up the albums in the host to external USB storage by selecting and
tapping “Backup to USB Storage”.
4.2 Play Music
4.2.1 Play an album
1) Press and hold the album cover for one second until you see a CD icon at the tip of your
figure, and then drag it to the “play” button to enter the album playing screen.
2) Or: enter the album playing screen by tapping the album cover in main screen, and then
tap “play” button.
4.2.2 Play selected tracks in an album
1) Tap the album cover in main screen to enter the album playing screen where the
information of tracks and operational options are displayed.
USB storage connected
USB connection
Copy and backup music files
Andere Handbücher für MS5
1
Inhaltsverzeichnis
Andere QAT Server Handbücher
Beliebte Server Handbücher anderer Marken

iRobo
iRobo IPC2U Bedienungsanleitung

Nortel
Nortel 1000 Con?guration guide Bedienungsanleitung

Asus
Asus AP7500 Bedienungs- und Wartungshandbuch

Avid Technology
Avid Technology AirSpeed 5000 Bedienungsanleitung

HP
HP Integrity rx2600 Installationsanleitung

Milestone
Milestone Husky IVO 350T Bedienungsanleitung


