
Rainbow Colour Changers 15" Plus Bedienungsanleitung

15" Plus – Operators Manual
Operatos supplemet to
Two-16 manual

Congratulations on choosing a Rainbow Colour Changers product! We thank you for your custom.
Please note that this product has been designed and made with total quality to ensure excellent
performance and best meet your expectations and requirements.
It is essential to know the information and comply with the instructions given in this manual in order
to ensure the fitting is installed, used and serviced correctly and safely.
Carefully read this instruction manual in its entirety and keep it safe
for future reference! Please hand this manual over if you sell or give this
product to somebody else.
General
Rainbow Colour Changers products are intended for professional use and should only be used by
qualified personnel or under their supervision.
Follow all cautions and warnings indicated on the unit.
After unpacking this product, please check if the device is intact. If this is not the case, please
contact the support service.
Rainbow Colour Changers
An der Talle 26-28
D-33102 Paderborn, Germany
Phone: +49 (0)52 51/14 092-28
Fax: +49 (0)52 51/14 092-90
Installation
Make sure all parts for fixing the colour changer are correct.
Make sure the fixture is stable before positioning the Colour Changer.
Do not fix this device on or near flammable surfaces.
Usage
This product is designed for indoor use only. For the fitting to operate well and reliably, it should
not be used in humid environments. The ambient temperature should not exceed 40°C (104°F) or
fall below 0°C (32°F).
Avoid any liquids or metallic items entering the unit.
Ensure adequate ventilation and do not block or cover any ventilation slots in the device – they
guarantee the reliable functioning of the unit and protect it against overheating.
The scroller may only be used in its standard position, which is +/- 60° from horizontal.
The colour changer may only be put into operation with original Rainbow Colour Changer power
supply units (PSU).
Check that the mains frequency and voltage correspond to those for which the PSU is designed as
given on the surface label of the PSU. Refer to the manual about the max. amount of scrollers to be
connected
Maintenance
All service work should be exclusively performed by qualified personnel.
Do not dismantle the scroller or modify it yourself.
Before starting any maintenance work or cleaning the scroller, remove the power from the PSU.
The surface of the device may heat up due to the luminaire used. Please let the scroller cool down
before touching it.
Rainbow Colour Changers GmbH disclaims all liability for damage to the fitting or to other property or
persons deriving from installation, use and maintenance that have not been carried out in conformity
with this instructions manual, which must always accompany the fitting.
Rainbow Colour Changers GmbH reserves the right to modify the characteristics stated in this
instructions manual at any time and without prior notice.
Revision 1 - Printed
A
pril 10, 1997
15" Plus Manual 5
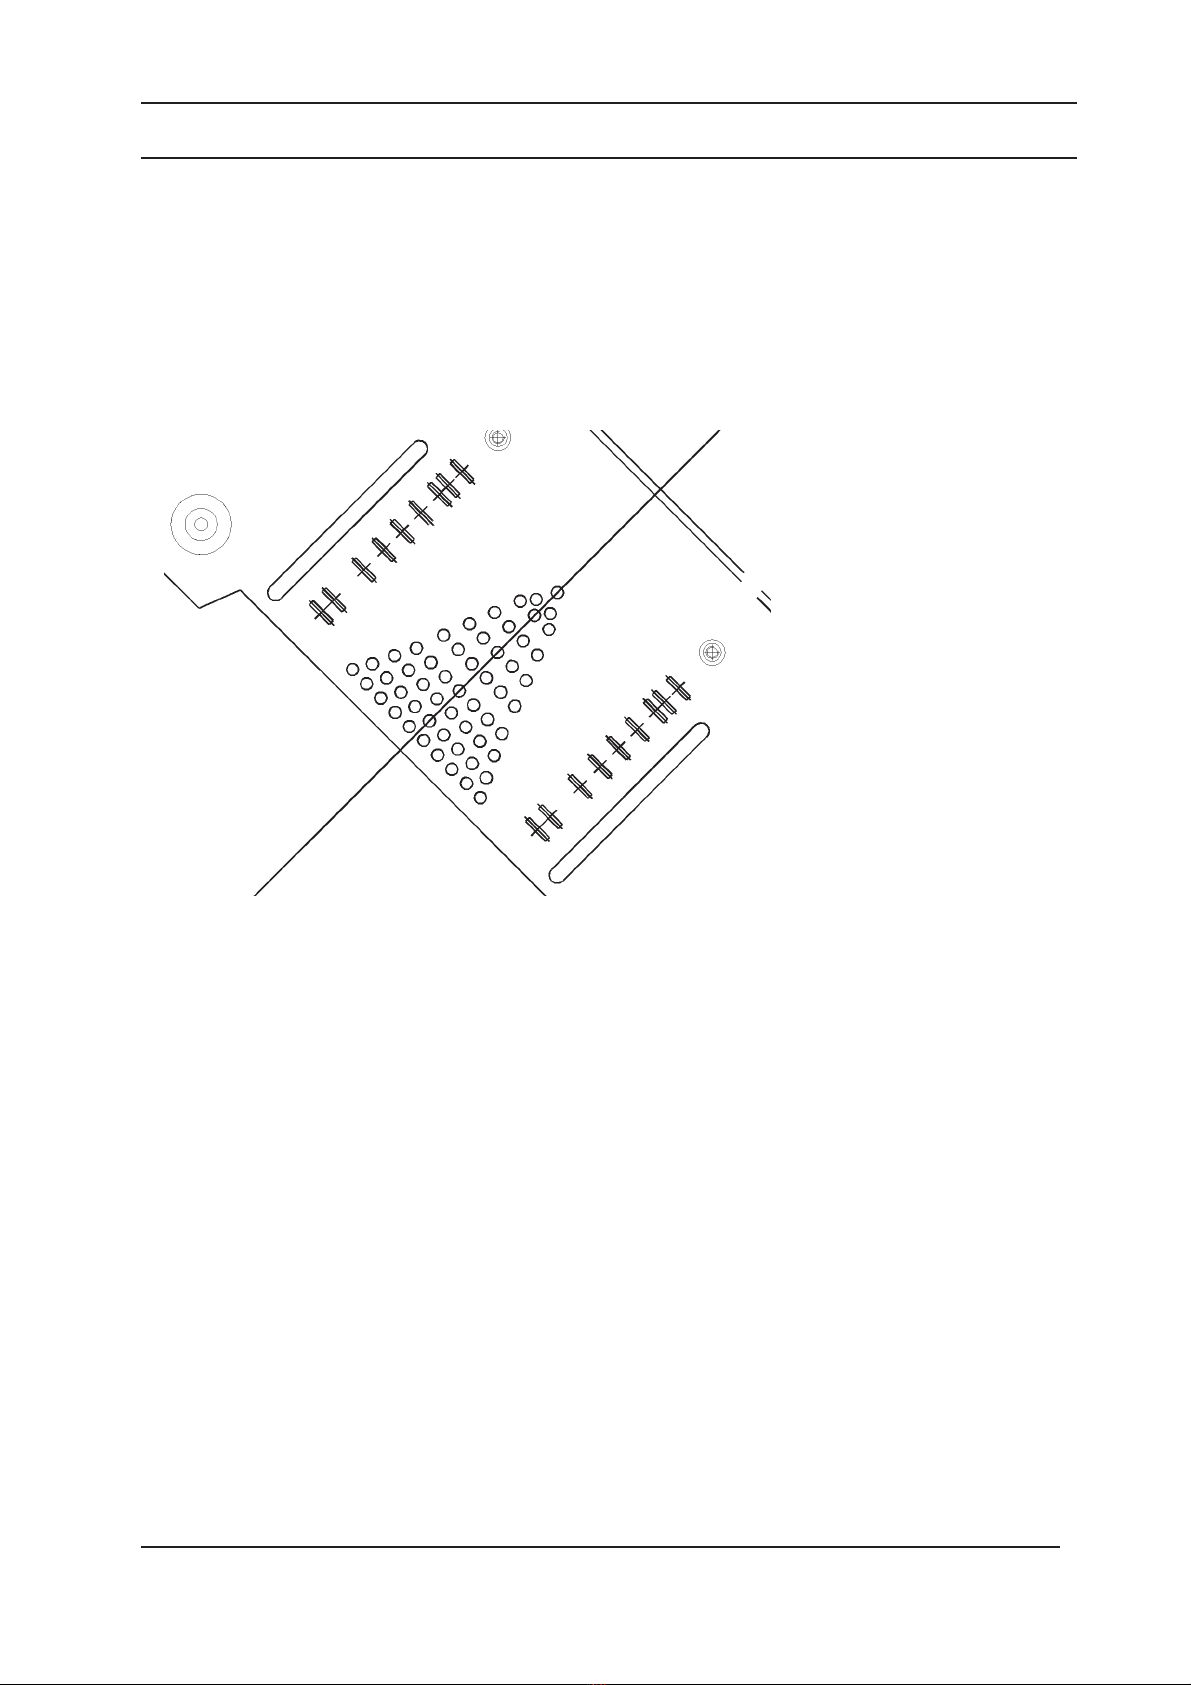
SETTING THE HOOKWING POSITIONS - Adaptor Mk.II
The 15" Plus Colour Changer for Fresnel Luminaires is supplied with a universal
adaptorwhichallowsfittingtoavarietyofdifferentlanterns.Thefourhookwingscan
be mounted on the plate in either diagonally or the 0,90,180,270o positions for pole
operated or manual lamps. The positions are set by loosening the retaining screws
holding the hookwings and sliding until the correct number of holes are visible in the
slot. Where the configuration is to be changed from x to +, the hookwings can be
slid off and easily repositioned. The table below and over the page gives a full
summary of the of luminaires and their Barndoor slide-in dimensions.
1
2
3
4
5
6
7
8
9
10
Fitting Positions:
Posn Ref: Dims: To Fit: Luminaire: Hook angle
1 412 ARRI Studio 5kW x
Compact 4kW MSR +
2 402 Strand Pollux 5kW x
Pollux 2.5/5kW x
Vega 10kW x
Sirio 2.5, 4, 6 kW HMI x
ADB 5kW Studio SH50S, SP50 +
2x2500W SH25S, SP25S +
3 396 Desisti 5kW Studio x
Leonardo 4kW HMI +
4 382
5 370 Lee 'Twister' +
6 355 Sachtler Director 2025H, 3750H, 1225D 2550D x
7 343 Arri Studio 2kW x
Junior 5kW x
Compact 2.5kW MSR +
ADB 2kW Studio SH20S, SHF20S, SP20, SPF20 +
5kW Baby CH50S,CP50 +
2x1250W Fresnel SH12S, SP12S +
9 322 Strand
10 313 Desisti Studio 2kW x
Revision 1 - Printed April 10, 199715" Plus Manual 6
PREPARING THE GEL STRINGS
The manufacture of a good gel string is important for the smooth and quiet running
of the colour changer. Rainbow Colour Changers offer a rapid scroll making service
please contact your local dealer for this facility.
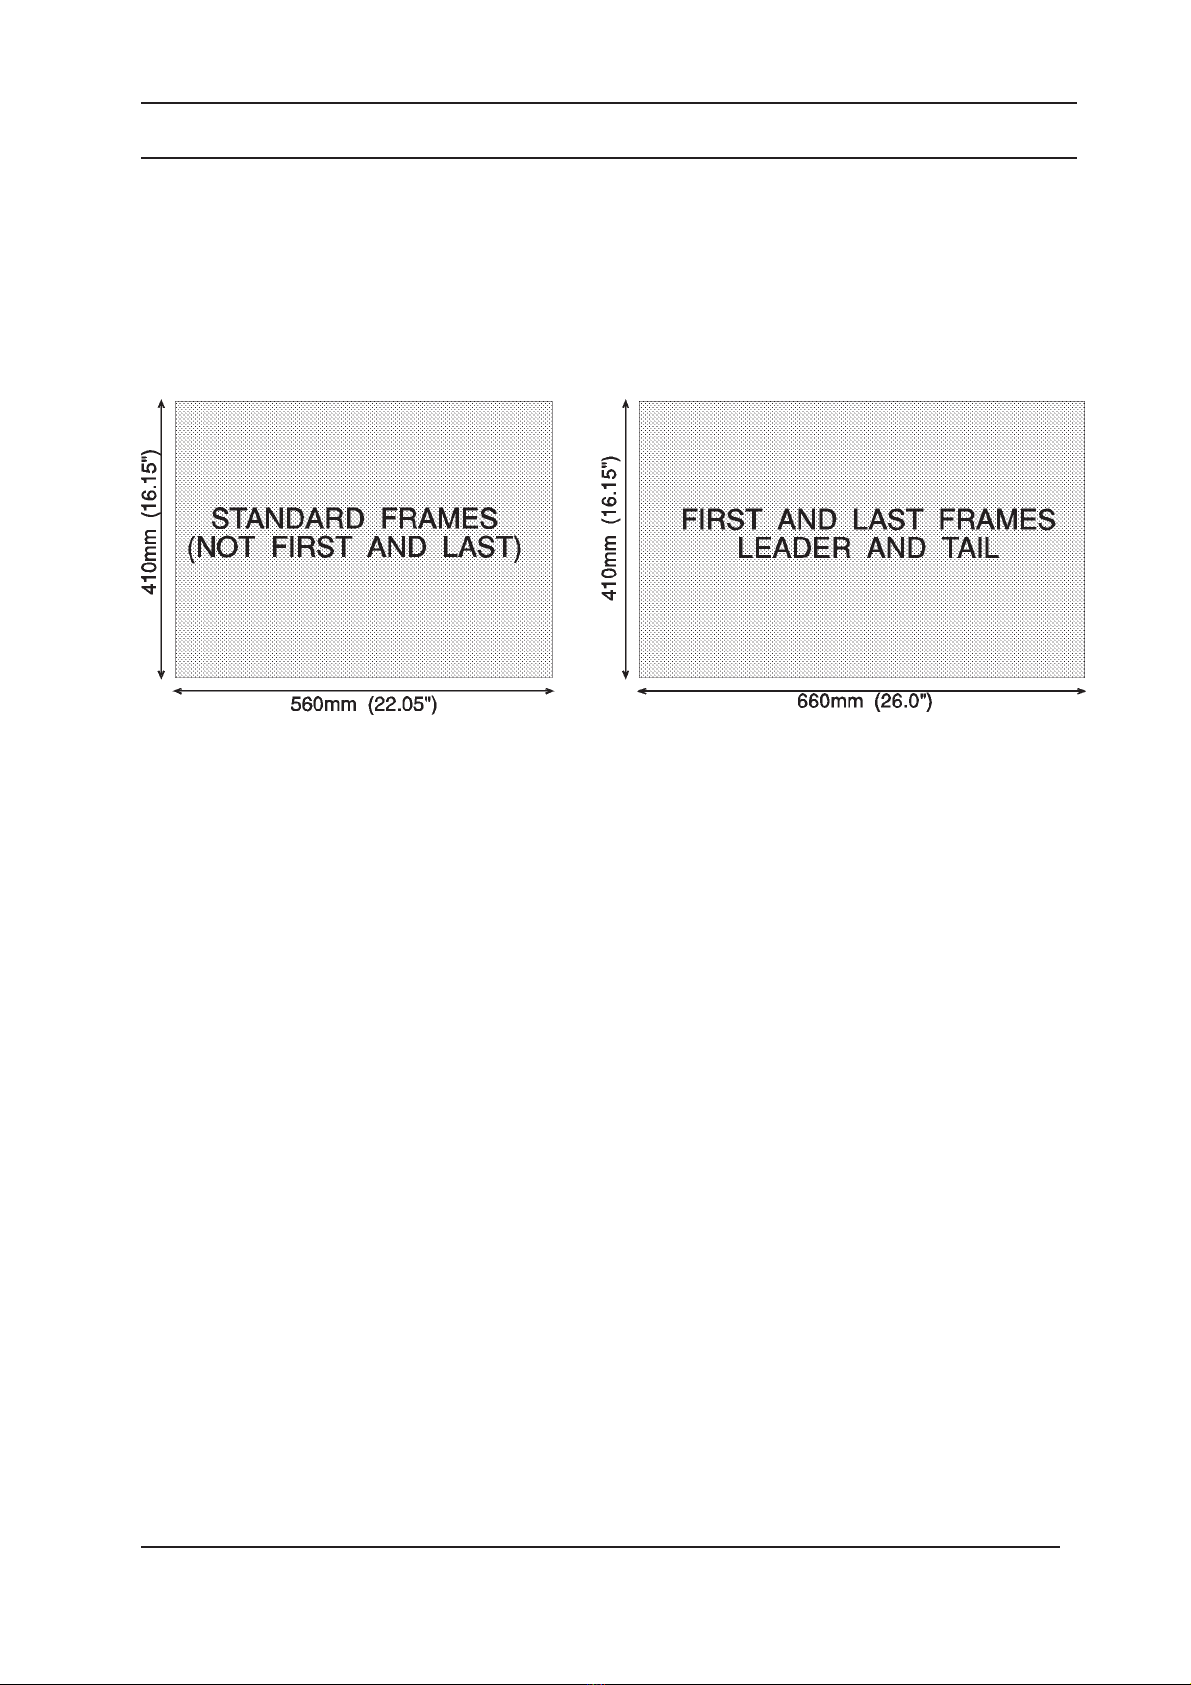
If you are manufacturing your own gel strings, they should be cut as follows:
Good quality colour scrolls ensure the smooth and quiet running of the colour
changers.
Frames should be connected together with Special High Temperature Tape
connectedto the front sideofthefilter.Tape canbeorderedfrom
Rainbow Colour Changers.
Ensure that sides are parallel and the bottom edge is straight. The frames
should be taped edge to edge, avoiding overlapping the colours.
We suggest that you avoid mixing polyester and polycarbonate gels because
they expand at different rates and will cause uneven travel.
THERMAL MANAGEMENT
The 15" Rainbow is fitted with a tangential fan for efficient cooling across the full
width of the filter frame. The fan can be controlled from either the HIGH/ LOW
switch or the proportional fan control on the PlusCards. The filter life is dependent
on many factors such as the lamp, colour type and whether heatshield is fitted:

Revision 1 - Printed
A
pril 10, 1997
15" Plus Manual 7
FITTING THE GEL STRING
The Gel String is fitted from the front of the unit. This allows the RCC to be loaded
without removing from the unit, or laid on the bench. Access is easy by removing the
interchangeable front housing. The PlusCard has position and speed control for
simple loading without the need for a console or control signal. The gel string is fitted
and calibrated using the PlusCard as follows:
1. The 15" Plus RCC should be powered up.
2. Remove front cover by pressing side catches in and slide the front housing up.
3. Set Mode switch to F, and the Frames to 2.The rolls will position themselves to
the zero position. Once the rolls have stopped, set the Frames switch to 0.
4. The 15" Rainbow is trimmable between two and sixteen colours using the
Range Trim 15 turn potentiometer on the front of the analog pcb. The RCC is
factory trimmed to 11 colours.
5.. Lay the colour across the red roller and tape the leading edge of frame zero to
the Blue roller. Line up the edge of the filter with the marked line on the scroll.
6. Holding the filter loosely, set the Mode switch to D. The frames switch controls
theloadingspeed (0=Stopto3= Fast).Setthe Framessettingto 1 andthe filter
will load onto the blue roll, using the red roll as a guide. Regulate the speed using
the Frame selector. At the end, one of the following will occur:
If the unit is under trimmed: The RCC will stop at full before the filter has
been fully loaded on the blue roll. Turn the RANGE TRIM potentiometer
clockwise to wind the extra filter onto the blue roll.
If the unit is over trimmed: The RCC will try to wind on more filter than
there is on the roll. At the last frame, stop the RCC by setting the Frame
selector to 0. Turn the Range trim anti-clockwise to pay out more filter and then
use the Frame control to wind the filter onto the roll. Repeat until the last frame
is wound on to the roll.
7. Apply a small amount of tension to the scroll. This is performed by pushing and
turning the gold inner knob anticlockwise whilst holding the Black outer knob.
8. Move the scroll back to the zero point by setting the Mode to F and controlling
the speed on the Frames switch.
9. Set the zero position, by pushing the Gold and Black knobs together and
positioning the seam between Frames 0 and 1 to align to the outer edge of the
roll.
10. Set the scroll tension further by pushing the gold inner knob anticlockwise
whilst holding the Black outer knob. The correct scroll tension varies with different
scroll lengths and it is best to recheck scroll tension at 50% when the scroller has
been set. (This can be done by setting the Mode to E, the address to 050, and
controlling the speed on the frames selector). Approximately 6 turns will give the
correct tension for a 11 colour 15" scroll. ......cont

Revision 1 - Printed
A
pril 10, 1997
15" Plus Manual 8
11. Move the scroll back to the full point by setting the Mode to D and controlling
the speed on the Frames switch.
12. Use the Range Trim potentiometer to accurately set the end position of the
scroll. This position is correct when the final seam is aligned with the outer
edge of the Rainbow.
13. Set the Mode/Frames switch on the PlusCard to the required setting
The scroll is now correctly installed with a scroll and trimmed. From experience,
we suggest that you:
i Run the colour changers end to end a few times. This allows the filter to find
its natural position on the spindle. It will also show any noise problems due to
badly made scrolls;
ii Where many units are to run together, run the colour changers to 95% and
confirm alignment of all units. Retrim where necessary ;
iii Check the scroll tension at 50% control input; (Mode=E, Addr.=050).
FITTING THE GEL STRING .....continued
FITTING A BARNDOOR TO THE FRONT OF THE UNIT
The removable front panel is fitted with four wheels for fitting a rotatable barndoor.
The barndoor is fitted by rotating the top left wheel on its bracket and inserting the
barndoor as below:
Step 1 Loosen Screw A until the bracket rotates
The screw is captive and will not come out
Step 2 Rotate the bracket
Step 3 Insert the barndoor so that it freely rotates within the other three wheels
Step 4 Rotate the bracket back to its original position, and retighten Screw A
Revision 1 - Printed
A
pril 10, 1997
15" Plus Manual 9
CONNECTION AND CABLING
The Colour changers can be operated from either and analog or DMX digital signal.
The interconnecting cables which connect the Rainbows carry both power and data
and should be rated for both. The connection of the units is as follows:
POWERING THE UNITS
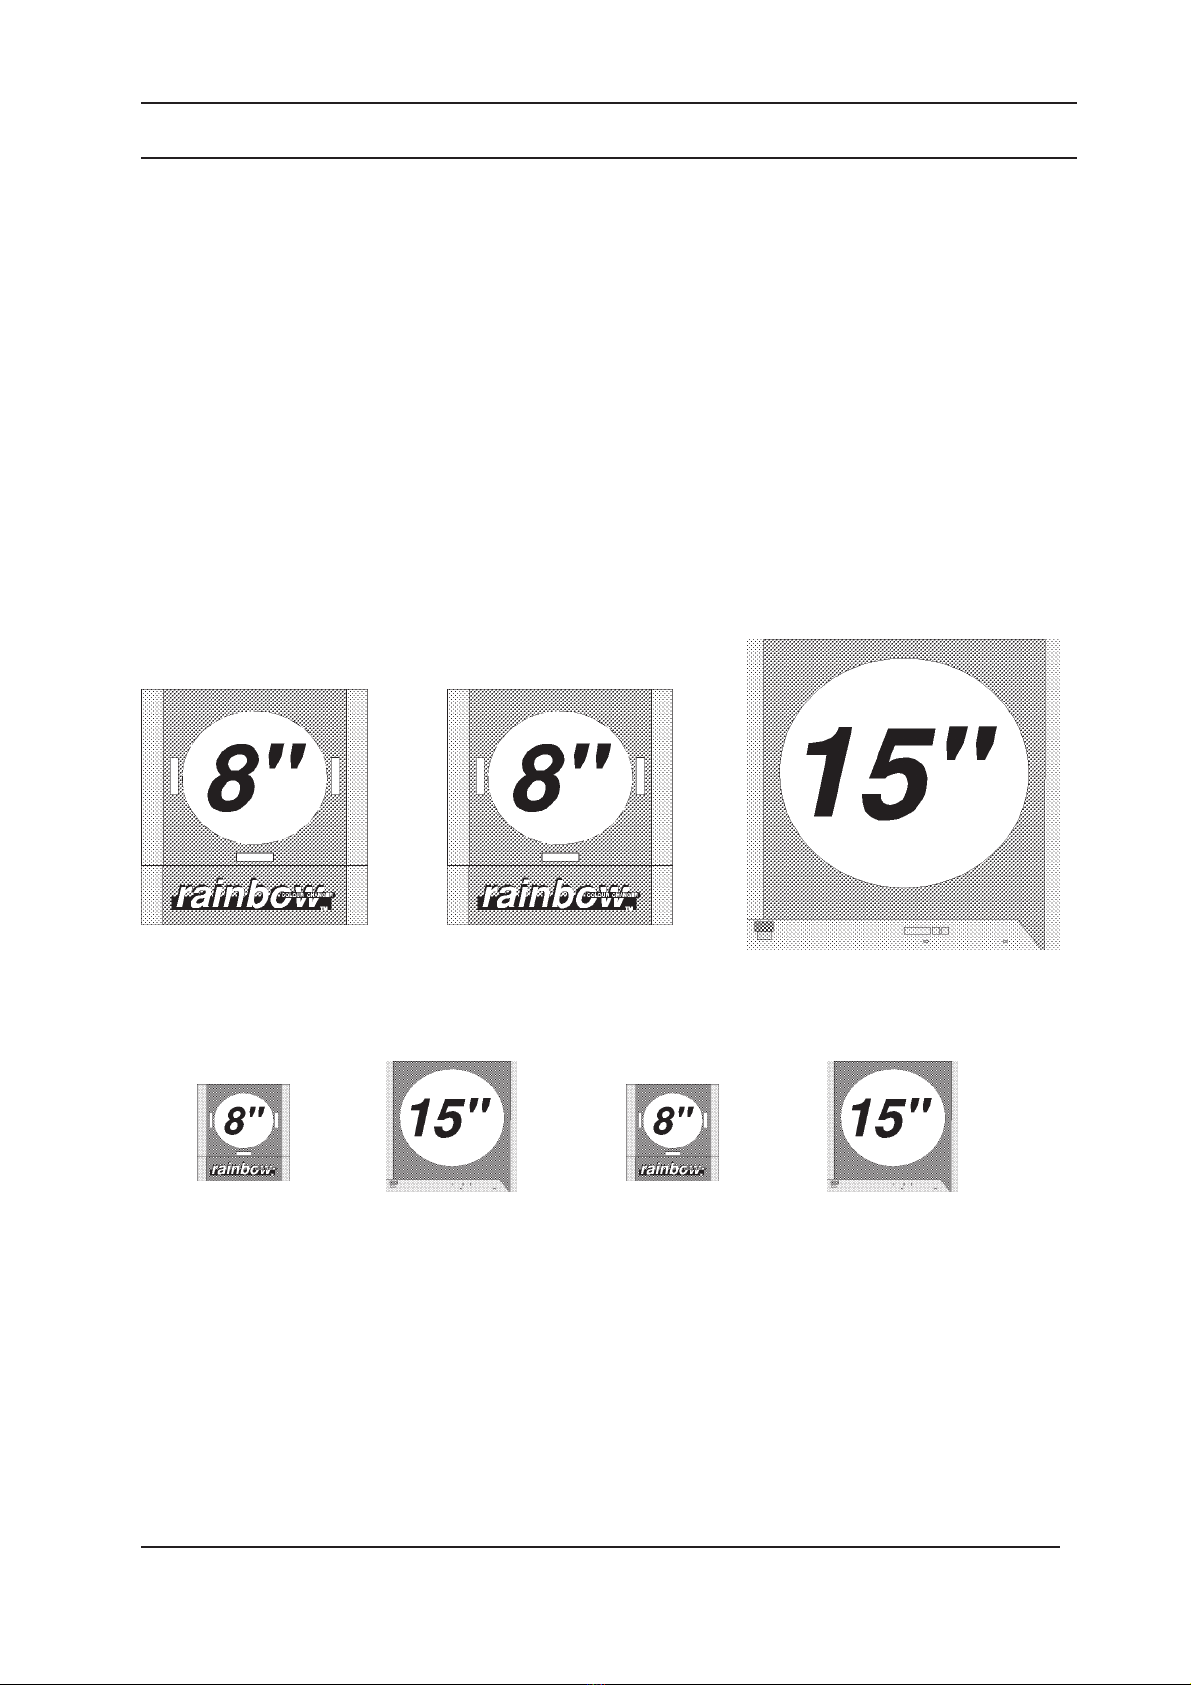
Rainbow Colour Changers are powered by a 24V DC supply which is derived from
a central power supply. This can either be a Maxi combined Power Supply/Splitter
or separate power supply/splitter combination. Traditionally the PSUs have been
rated in terms of the number of 8" RCC units which can be driven from one supply.
This does not apply to the larger Rainbows which take approximately twice
the current of the 8" colour changer. One 15" RCC counts as two units.
+ =
So a 24 unit PSU or a Maxi PSU/Splitter can supply:
24 x ,or 12 x , or 14 x and 5 x .
This also applies to the other scrollers as follows:
8" TWO-16 1 UNIT
8" ALFRESCO 1.5 UNITS
15" PLUS 2 UNITS
8-LITE 2 UNITS
20" INCH 2 UNITS
Light Curtain 2 UNITS

Revision 1 - Printed April 10, 199715" Plus Manual 10
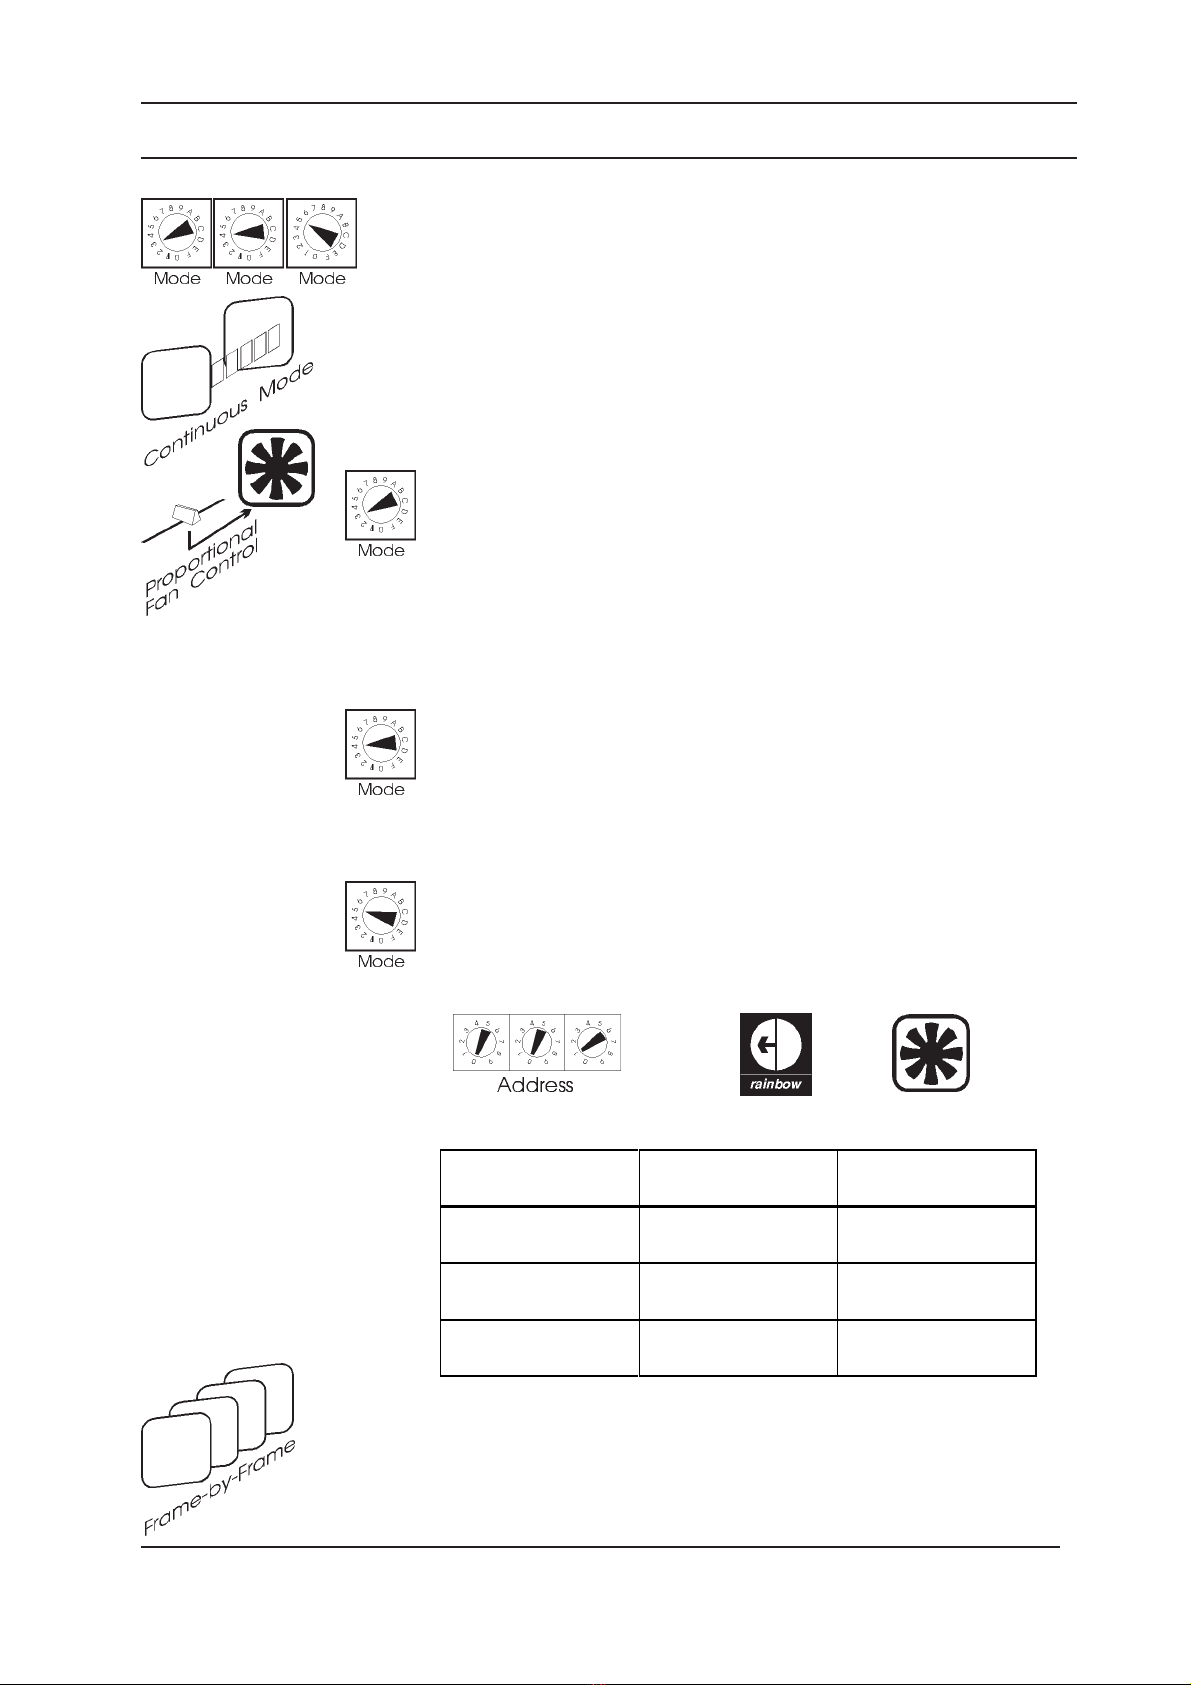
MODE 0 - STANDARD OPERATION
Mode 0 - Standard Operation / Continuous Gel Position
With Mode 0 selected and the Frame switch set to zero, the
RainbowoperatesasastandardDMXdecoder,withproportional
control. The user selects the DMX address for each individual
colourchangerusingthethreeaddressselectors .
The gel speed is set by the speed of control input and the
Rainbow type. The fan is controlled by the standard HI / LO fan
speed switch on the rear of the Rainbow.
In modes 0-2, the internal tangential fan is controlled from the HI/
LO switch on the front panel of the pcb housing.
Mode 0 - Standard Operation / Frame by Frame Mode
Frame by Frame Control can be selected in this mode. Set the
Frame rotary switch to the number of frames excluding Frame 0.
See Page 17 for further instructions.

Revision 1 - Printed April 10, 199715" Plus Manual 11
MODES 1 & 2 - STANDARD MODE,PRESET GEL SPEEDS
Modes 1 & 2 - Standard Control with Preset Gel Speeds
In many cases, standard Rainbow features may be required, but
high speed end to end changes are not necessary. In Modes 1 & 2,
the PlusCard can be set to limit the maximum gel speed for longer
gel life, even lower noise levels, and smoother crossfades. The
speeds of the fans are still controlled by the HI/LO switch on the
rear of the Rainbow.
Mode 1 - Medium Speed
Mode 2 - Slow Speed
The crossfades are calculated using 12 bit counters - resulting in
smoother crossfades, especially critical on the longer gel string
fitted to the 15" Plus
Frame by Frame Mode
Frame by Frame Control can be selected in this mode. Set the
Frame rotary switch to the number of frames excluding Frame 0.
See Page 17 for further instructions.
Revision 1 - Printed April 10, 199715" Plus Manual 12
Modes 3-5 - Fan Control with preset Gel Speeds
Modes 3 - 5 allow an operator to control the filter position and
thefan speed of individual Rainbows in therigwithtwo sequential
DMX addresses. Three preset maximum gel speeds are available
for up to 12 bit resolution on slow crossfades (limited by console
fade time):
Mode 3Address nnn =Gel Position
nnn+1 =Fan Speed
Gel speed =Max speed (Dependent
on model / no of Frames
15" RCC= 4.5s)
Resolution =As DMX (8 Bit)
Mode 4Address nn =Gel Position
nn+1 =Fan Speed
Gel speed =Medium
Resolution =Up to 12 bit
Mode 5Address nn =Gel Position
nn+1 =Fan Speed
Gel speed =Slow
Resolution =Up to 12 bit
MODES 3 TO 5 - 2 CHANNEL CONTROL
Frame by Frame Mode
Frame by Frame Control can be selected in this mode. Set the Frame
rotary switch to the number of frames excluding Frame 0.
Address Position Fan Speed
21 21 22
23 23 24
25 25 26
Inhaltsverzeichnis
Andere Rainbow Colour Changers Beleuchtungsausrüstung Handbücher

Beliebte Beleuchtungsausrüstung Handbücher anderer Marken


Qazqa
Qazqa Suplux SL 3 Black 103062 Bedienungsanleitung

Commercial Electric
Commercial Electric 54568141 Bedienungsanleitung

CREE LIGHTING
CREE LIGHTING 304 Series Bedienungsanleitung

Goobay
Goobay 49867 Bedienungsanleitung

ECOMAN ITALIA
ECOMAN ITALIA LED T8 Bedienungsanleitung

Alkalite
Alkalite Krypton KT-81 Bedienungsanleitung


