
reelanx V1 Bedienungsanleitung


Contents
I. Safety Instruction and Important Tips 1
II. Appliance Structure and Control Panel Interface 3
III. How to Make a Bag from A Vacuum Roll 5
IV. How to Vacuum Seal with Vacuum Bags 6
V. How to Vacuum Seal with Vacuum Container 7
VI. Guidelines for Vacuum Packaging 8
VII. Storage Guide for Various Foods 10
VIII. Trouble-Shooting 12
IX. 1 Year Limited Warranty 15
Notes:
1.When appliance is not in use for a long period, unlock the Vacuum Lid to prevent
Gaskets from being compressed.
2.To achieve the best results, use vacuum accessories (Bags, Rolls, Containers etc.).
Model
V1
Voltage
120V ~
Frequency
60Hz
Rate Power
140W
Vacuum Degree
-50~ -60Kpa
Seal Line Width
4mm
Safety Protection
Yes
Sealing Length
≤30cm
Dimension
378*145*66mm
Net Weight
1.22Kg

1
I. Safety Instruction and Important Tips
Safety Instructions
For your own safety, always follow these basic precautions when using a Vacuum
Sealer.
1. Read the User Manual carefully for operating instructions.
2. Do not use appliance on wet surfaces or in a humid environment.
3. To protect against electric shock, do not immerse any part of appliance,
power cord or plug in water or other liquid. Unplug from outlet when not in use and
before cleaning.
4. To disconnect, unplug power cord from electrical outlet. Do not disconnect
by pulling on cord.
5. Do not operate appliance with a damaged power cord or plug. Do not
operate appliance if it malfunctions or is in any way damaged. If any damages
occurred, contact an authorized party or the manufacturer for solutions.
6. Use appliance only for its intend use.
7. Closely supervise children when using any electric appliance. Do not allow
appliance to be used as a toy.
8. An extension cord may be used when marked electrical rating is no less than
that of this appliance. Mind children from being tripped over a long cord.
9. Do not place on or near a hot gas or electric boiler, or heated oven. Extreme
caution must be used when moving products containing hot liquids.
Important Tips
1. Safety Protection: When the Vac Seal or Seal indicator flashes, it means the
appliance start the Safety protection and forced to stop for 2 minutes before it can
resume normal use. The Vac Seal and Seal function will start safety protection every
15 complete working cycles (continuous working interval is no more than 60

2
seconds).
2. Vacuum Sealing is not a substitute for the heat process of canning.
Perishables still need to be refrigerated or frozen.
3. For best results, use only with Vacuum Bags, Rolls, Containers and
Accessories.
4. During the vacuum packaging process, small amounts of liquids, crumbs or
food particles can be inadvertently pulled into the Vacuum Channel. Empty the Drip
Tray after each use.
5. Please leave 5-7cm space between open end of the bag and bag contents to
avoid overfilling and prevent the bag from slipping off from the Vacuum Channel.
6. Please leave at least 3cm space between the container lid and contents when
using the Vacuum Container.
7. Do not create your own side seams for a Vacuum bag. These bags are
manufactured with a special side seam, which is sealed all the way to the outer edge
8. To prevent wrinkles in the seal when vacuum packaging bulky items, gently
stretch the bag flat while inserting bag into Vacuum Channel and continue to hold
bag until vacuum pump starts.
9. Due to the risk of anaerobic bacteria, fresh mushrooms, onions, garlic and
soft cheese should never be vacuum packaged.
10. All vegetables (including broccoli, Brussels sprouts, cabbage, cauliflower, kale,
turnips) naturally emits gases and swells the vacuumed bag after a few days, it is
recommended to pre-freeze them and keep them refrigerated after vacuum
packaging.
11. When you are vacuum packaging items with sharp edges or corners, please wrap
them in soft cushioning material to protect bag from punctures.
Please keep the User Manual in a proper place for future reference.
3
II. Appliance Structure and Control Panel Interface
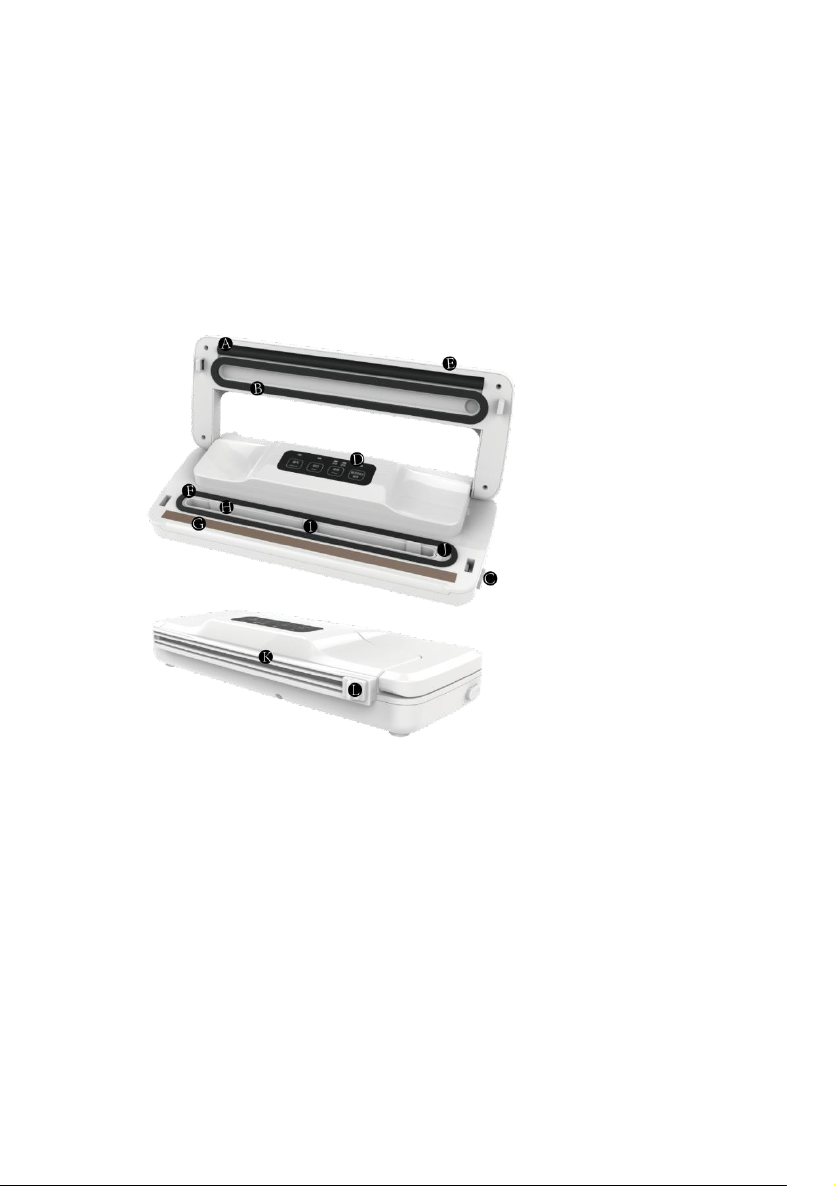
Appliance Structure
A: Sealing Bar B: Upper Foam Gasket
C: Lock D: Control Panel
E: Appliance Lid F: Lower Foam Gasket
G: Sealing Strip H: Drip Tray
I: Vacuum Channel J: Vacuum Nozzle
K: Roll Cutter L: Cutter Button

4
Control Panel Interface
Vacuum: Press to only vacuum package.
Seal
1. Press to create a bottom seal when making bags from Vacuum Roll.
2. Press to create a seal on Mylar bags (i.e. a potato chip bag) to keep food
sealed airtight.
Vac Seal / Cancel
1. Press to vacuum package and seal food airtight. Appliance shuts off
automatically.
2. Press to pause vacuum or seal process at any point.
Food
Optional dry and moist two modes, the default mode is dry, the led indicator turns
on under the current working mode.
Dry: Suitable for dry food without soup, water or oil.
Moist: Suitable for food with soup, water or oil, the sealing time will be longer.
5
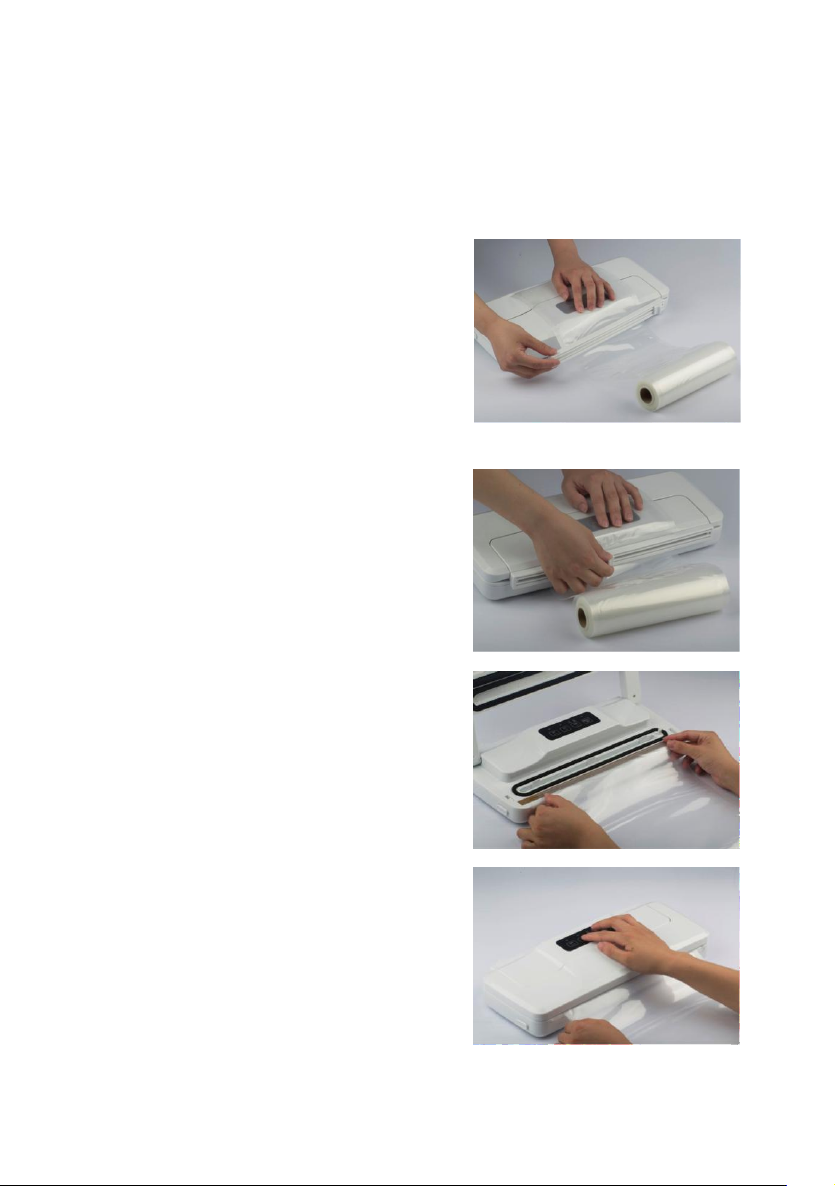
III. How to Make a Bag from a Vacuum Roll
1. Open one end of the roll cutter, put
the vacuum bag roll between the roll cutter
and appliance
2. Hold the bag with your left hand, and
slide the cutter button from left to right with
your right hand to get a bag with open ends
3. Open appliance lid and place one end
of the bag across sealing strip.
4. Close and lock the lid, please make
sure lid is well closed. Then press seal button,
when Seal Indicator Light turns off, unlock
the lid and remove bag. Now you are ready to
vacuum package with your new bag.

6
IV. How to Vacuum Package with Vacuum Bags
1. Place item(s) in bag, allowing at least
5-7cm of space between bag contents and
top of bag.
2. Open appliance lid and place open end
of bag into Vacuum Channel. Make sure you
stretch the bag flat.
3. Close and lock the lid. Press Vac Seal
button to begin vacuum and sealing process.
Appliance will automatically complete the full
process.
4. When Vac Seal Indicator Light turns
off, unlock, lift the lid and remove bag.
Refrigerate or freeze if needed.

7
V. How to Vacuum Seal with Vacuum Container
1. Place the item you wish to seal inside
the Container, leaving at least 3cm space
between the contents and the top rim of the
Container.
Insert the Accessory Hose into the Vacuum
Sealer Nozzle on your appliance.
2. Insert another end of the Accessory
Hose into the Vacuum Valve on the Container
lid and press firmly on all corners to ensure
lid is properly closed.
3. Press Vacuum Button to start vacuum
sealing process. Once the air has been removed
from the Container, the Vacuum Sealer will
stop automatically.
4. To release the vacuum in the
Container, simply lifting the Vacuum Valve
gently.
VI. Guidelines for Vacuum Packaging

8
Vacuum Packaging and Food Safety
The vacuum packaging process extends the life of foods by removing most of the air
from the sealed container, thereby reducing oxidation, which affects nutritional value,
flavor and overall quality. Removing air can also inhibit growth of microorganisms,
which can cause problems under certain conditions:
Mold – Easily identified by its fuzzy characteristic. Mold cannot grow in a low oxygen
environment, therefore vacuum packaging can slow the growth of mold.
Yeast – Results in fermentation, which can be identified by smell and taste. Yeast
needs water, sugar and a moderate temperature to grow. It causes also survive with
or without air. Slowing the growth of yeast requires refrigeration, while freezing stops
it completely.
Bacteria – Results in an unpleasant odor, discoloration and/or soft or slimy texture.
Under the right conditions, anaerobic bacteria such as Clostridium botulinum (the
organism that causes Botulism) can grow without air and sometimes cannot be
detected by smell or taste. Although it is extremely rare, it can be very dangerous.
To preserve foods safely, it is critical that you maintain low temperatures. You can
significantly reduce the growth of microorganisms at temperatures of 4°C (40°F) or
below. Freezing at -17°C (0°F) does not kill microorganisms, but stops them from
growing. For long-term storage, always freeze perishable foods that have been vacuum
packaged, and keep refrigerated after thawing.
It is important to note that vacuum packaging is NOT a substitute for canning and it
cannot reverse the deterioration of foods. It can only slow down the changes in quality.
It is difficult to predict how long foods will retain their top-quality flavor, appearance
or texture because it depends on age and condition of the food on the day it was
Inhaltsverzeichnis


