
Rossato Panel CSC TS Referenzhandbuch


Panel CSC TS 7” - Manual of installation and use
Following instructions are addressed both to the installer and to the final user who need respectively to install and to use the
product. Failure to observe the indications present in this manual involves the customer in exclusion from warranty.
Following instructions contain essential and important information for a safe and perfect installation and are an integral and
essential part of the product. Therefore the entire technical documentation must be always kept close to the product.
All data and instructions contained in the present manual are referred to actual technology level. Please always consult the
instructions contained in the present manual when installing the unit.
The activities described in this manual need specialistic knowledge and professional experience in installation. By
consequence it is necessary that mounting operations described are made only by personnel with indicated technical
requirements.
Schemas used are only a rough guide, have no pretensions to be complete and cannot replace the project.
Even if this manual has been realized with maximum care, mistakes and updates are possible; Rossato Group Srl will not be
responsible for inaccuracies and omissions.
© The contents, images, texts and layout of this document are the property of Rossato Group srl and may not be reproduced
in whole or in part without written permission.
The data and warnings in the Technical Documentation are not intended to be complete and do not replace the professional
design. Subject to technical changes and errors.
TRANSLATION OF ORIGINAL IN ITALIAN LANGUAGE
Panel CSC TS 7”
_EN_1.00 Pag. 2 di 16
Rossato Group Srl

Panel CSC TS 7” - Manual of installation and use
Table of contents
1.Introduzione
1.1 Informazioni generali
1.2 Contenuto del manuale
1.3 Garanzia
1.4 Descrizione dei simboli
1.5 Norme di servizio
2. Installazione
2.1 Installazione pannello remoto a muro
2.2 Collegamento alimentazione
3. Istruzioni d’uso
3.1 Schermata principale
3.1.1 Zone climatiche
3.1.2 Stato della connessione
3.1.3 Data e ora
3.1.4 Meteo
3.1.5 Impostazioni generali
3.1.6 Impostazione della stagione
3.1.7 Programmazione oraria
3.1.8 Impianto ON/OFF
3.2 Zona climatica
3.2.1 Nome zona
3.2.2 Icone di configurazione
3.2.3 Monitor di zona
3.2.4 Icone di stato
3.2.5 Impostazioni
3.2.6 Icona
4. Informazioni tecniche
4.1 Dati tecnici
5. Dismissione
5.1 Scollegamento
5.1.2 Direttiva CE RAEE
6. Varie
Panel CSC TS 7”
_EN_1.00 Pag. 3 di 16
Rossato Group Srl

Panel CSC TS 7” - Manual of installation and use
1.General instructions
1.1 General information
Maintenance
Provide for periodic inspections and maintenance to avoid and limit repair costs.
Disconnect the voltage before any intervention.
Modifications
Any type of modification to the unit will void the manufacturer's warranty and liability.
Fault or malfunction
Immediately turn the component off in case of failure or malfunction.
Contact an authorized service center or the local dealer.
Using the sensor when there is a failure or malfunction:
❏voids the warranty.
❏can compromise system safety
❏can increase cost and repair time
Data update
Continuous product improvements may cause variations in the data shown in this manual.
Refer to www.rossatogroup.com for updated data.
1.2 Content of the manual
The user and installation manual describes the installation and connection procedures for the 7" LCD
touch screen remote control panel with 800x480 pixel resolution to manage the thermoregulation of
several climate zones from a single control point.
The bus communication of the control unit integrates the panel into a complete thermoregulation
system capable of managing all heating and cooling control systems with humidity and air quality
control.
The user can set the set point values from the various zones and the time schedules for each zone.
1.3 Warranty
Unit is warranted in accordance with contractual agreements made at sale. The warranty certificate is
supplied with the unit in paper format and is available at www.rossatogroup.com.
1.4 Description of symbols
Panel CSC TS 7”
_EN_1.00 Pag. 4 di 16
Rossato Group Srl
DANGER:
This symbol indicates rules to prevent users from accidents. Failure to observe these
instructions can result in serious damage to humans, objects, plants or animals and to the
device itself.
CAUTION:
Failure to observe these instructions can result in serious damage to the device and to the
system.
NOTE:
This symbol indicates useful information.

Panel CSC TS 7” - Manual of installation and use
1.5 Service regulations
The service regulations described in this manual are an integral part of the supply.
Furthermore, these standards are intended for the operator who has already been specifically trained
to operate this type of unit and contain all the information necessary and indispensable for the safe
operation and optimum use of the unit.
Hasty and deficient preparations force improvisation and this is the cause of many accidents.
Please read the following instructions carefully and respect them:
❏When installing or servicing the unit, be sure to follow the instructions in this manual and take all
necessary precautions;
❏do not remove or deteriorate protections, labels, and markings, especially those required by law,
and replace them if they are no longer legible.
The laws, regulations, prescriptions, ordinances, directives in force for such devices have been
observed.
The materials used and the equipment parts, as well as the manufacturing, quality assurance and
control procedures meet the highest demands for safety and reliability.
Using them for the purposes specified in this owner's manual, operating them with due care and
performing thorough maintenance and overhaul in a workmanlike manner will help maintain the units'
continued performance and service life.
Panel CSC TS 7”
_EN_1.00 Pag. 5 di 16
Rossato Group Srl
DANGER:
Initial start-up must be performed only by the dealer or by qualified personnel authorized
by the manufacturer.
CAUTION:
All operators must comply with international accident prevention regulations and those of the
country of destination of the unit in order to avoid possible accidents.

Panel CSC TS 7” - Manual of installation and use
2. Installation
2.1 Remote wall panel installation
In the flush-to-wall version, the 7" TS comes with the appropriate recessed housing. This structure
should be properly placed in the wall and is equipped with the necessary plugs for the passage of
electrical and communication preparations.
2.2 Power connection
The remote control panel has a terminal block at the rear for connection to the 24 Vdc line.
Panel CSC TS 7”
_EN_1.00 Pag. 6 di 16
Rossato Group Srl
DANGER:
Make the electrical connections before inserting the Touch Panel into the wire-wall housing.
DANGER:
Be sure to observe the polarities-black (-), red (+)-when connecting to the power supply.

Panel CSC TS 7” - Manual of installation and use
3. Operating Instructions
3.1 Main screen
The main screen shows a summary of the entire control system where all configured climate zones,
icons for general settings, date time and weather are displayed.
3.1.1 Climate zones
Each zone is defined by a rectangular area identified by its assigned name and a synthetic preview of
that zone, where the status (on/off), temperature and efficiency level is displayed.
In this way you can always have an overview of all zones, turn them on or off quickly, compare the
temperatures of each room at any time, compare through the function "leaf" the level of efficiency of
each.
To access the climate zone, simply press in the rectangular area of the chosen zone.
3.1.2 Connection status
In the upper right corner there is the connection status indicator: a green dot if the device is connected
to the control unit, otherwise a red dot.
3.1.3 Date and time
The top panel shows the extended date and current time. The data is always up-to-date and does not
need to be set by the user, in case of temporary power failure, the control panel will update the values
to the current data.
3.1.4 Weather
The top panel shows the current weather for the geographical area set during system configuration.
Panel CSC TS 7”
_EN_1.00 Pag. 7 di 16
Rossato Group Srl

Panel CSC TS 7” - Manual of installation and use
From firmware version 0.31 the external temperature via external sensor is also supported. If no
external sensor is present, the temperature continues to take information from the internet. In the
absence of an internet connection, if the sensor is present, it will read the temperature.
3.1.5 General Settings
The general settings are accessed by pressing the icon , then press "settings" to configure all
aspects of the control panel functionality.
3.1.6 Season setting
To set the operating mode of the temperature control system in heating or cooling mode, access the
settings from the icon , then press "Season" and select winter or summer.
3.1.7 Hourly scheduling
To edit and manage hourly temperature schedules for all zones, access the hourly temperature
schedule from the icon , from the Schedule item.
Once the hourly programming is accessed, the set point temperatures are displayed for the different
time slots of each day of the week, which can be programmed separately for each controlled zone:
●Press on per modificare il valore della temperatura di set.
●Press on to delete the time slot.
●Slide your finger along the dividing line between two successive time slots to change the time
that marks the transition from one time slot to the next.
●Press on to save your changes.
●Press on the arrows to switch to time programming of other zones, or on to return to the
Home screen.
Panel CSC TS 7”
_EN_1.00 Pag. 8 di 16
Rossato Group Srl

Panel CSC TS 7” - Manual of installation and use
3.1.8 ON/OFF system
This feature is compatible from touch version 2.4 and you must have a firmware version greater than or
equal to 0.31. If you do not meet the requirements this functionality will not be present. With the same
functionality it will also be possible to turn off or on the zones of the system.
This option is especially convenient if you want to turn all zones on or off simultaneously in one click.
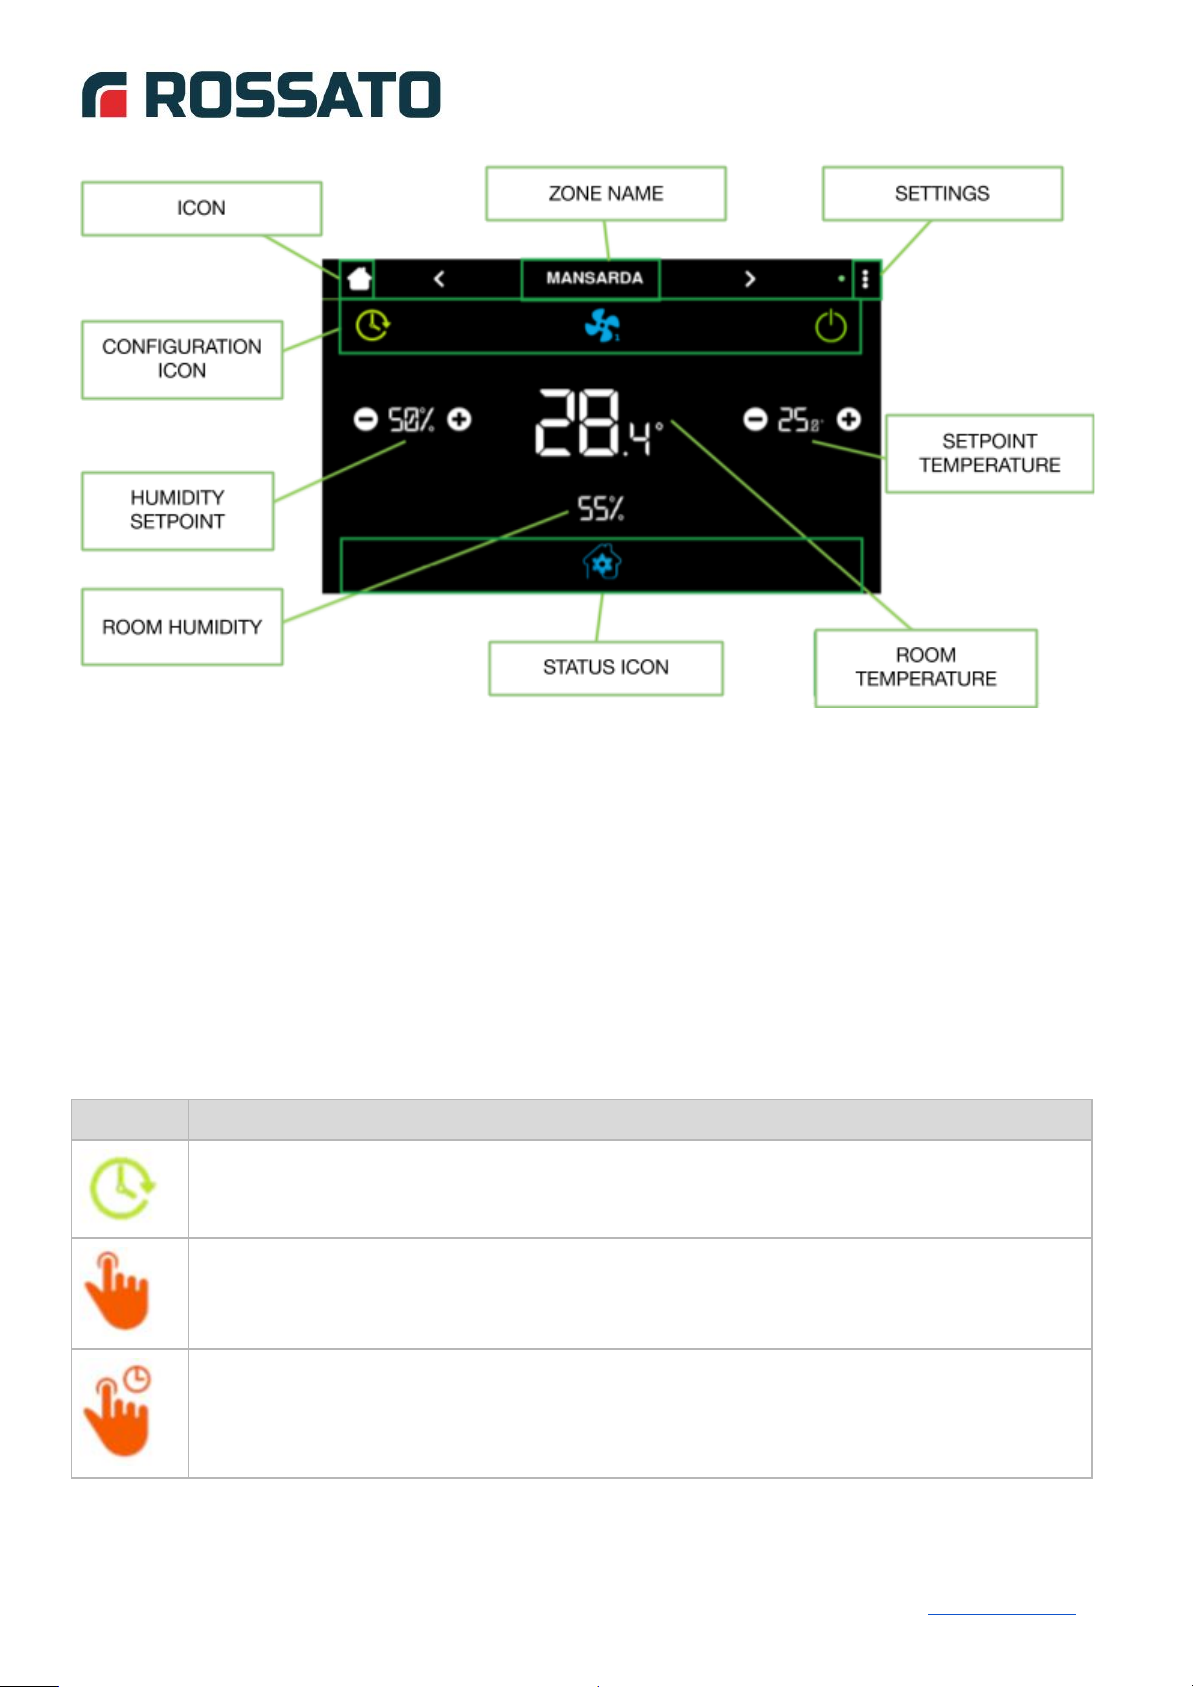
3.2 Climatic zone
This screen is the zone control page where all the parameters that manage the thermo-hygrometric
well-being of the environment are shown.
The main elements that make up the page are:
●Icon
●Zone name
●Settings
●Configuration icons
●Zone monitoring (Temperature/Humidity)
●Status icons
Panel CSC TS 7”
_EN_1.00 Pag. 9 di 16
Rossato Group Srl
Panel CSC TS 7” - Manual of installation and use
3.2.1 Zone name
During the start-up phase, all climate zones configured by the installer are named "Zone 1", "Zone 2"
by default. "Zone n" (where "n" is the total number of zones).
You can change the name of each zone by clicking on the name. A popup will open where you can
choose the name of the zone. When you are finished, press "OK" to save or "Cancel" to cancel.
3.2.2 Configuration icons
In addition to the zone name, you can edit and configure the operation of the system using the zones
shown in the tables below.
Operating mode
Panel CSC TS 7”
_EN_1.00 Pag. 10 di 16
Rossato Group Srl
Icon
Description
Automatic Mode: Hourly temperature programming is active; the zone temperature set
point value is set automatically as defined in the Hourly Programming.
Manual mode: the zone temperature set point value is set by the user, no hourly
programming is active
Temporary Manual Mode: the zone temperature set point value is modified by the user
with respect to the set time programming, but at the end of the current programming
period the mode switches back to automatic. This mode is activated every time the set
point value of the Climate Zone is changed while in Automatic Mode..
Inhaltsverzeichnis


