Ruark Audio R1 mk4 Bedienungsanleitung

R mk4 Bluetooth Radio
R1 mk4 Bluetooth Radio
User guide

EN
DA
DE
ES
FR
IT
JA
KO
NL
NO
PL
RU
ZH
Important information
about the AC power adapter
Model DYS824-140150W-K
Input 100-240V~50/60Hz, 0.7A MAX
Output 14.0VDC 1.5A
Class II, Eciency Level VI
•This AC adapter is for audio & video equipment use
only and complies with IEC 62368 safety standard.
•The supplied 3-pin plug adapter complies with
BS 1363-1 and the supplied 2-pin plug adapter
complies with EN 50075.
•Before using the AC adapter, ensure the mains
voltage is within the rated supply voltage range.
•The output power taken from this AC adapter must
not exceed its rated output power.
•DO NOT disassemble or modify the AC adapter.
•DO NOT drop or throw the AC adapter.
•The external exible cable cannot be replaced and
if the cord is damaged, the AC adapter must be
replaced.
•DO NOT expose the AC adapter to dripping or
splashing water, and do not place objects lled with
liquids, such as vases, on or near the device.
•DO NOT leave the AC adapter in a hot location, such
as near re or under strong sunlight.
•DO NOT cover ventilation openings on the device.
•Unplug the AC adapter during lightning storms or
when unused for long periods of time to prevent
damage.
•Ensure that the AC adapter is readily accessible when
plugged into the mains. If an abnormal condition
occurs while using it, immediately turn off the
connected device and disconnect the mains adapter
from the mains.
•DO NOT dispose this AC adapter as general
household waste or unsorted municipal waste,
dispose of it according to local regulations.

1
2
3
4
5 6
7 8 9 10 11

EN
DA
DE
ES
FR
IT
JA
KO
NL
NO
PL
RU
ZH
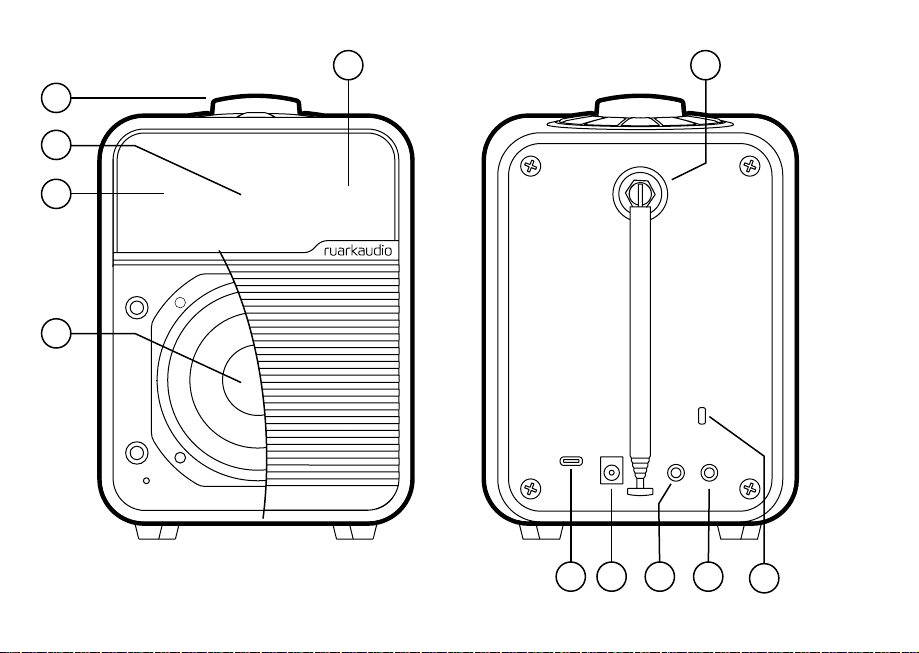
1. Controls
2. OLEDdisplay
3. Remotereceiver
4. 75mmNS+driver
5. Ambientlightsensor
6. DAB-FMantenna
7. USBC
8. DCinput
9. Lineinput
10. Headphoneoutput
11. Securityslot
1. Kontroller
2. OLED-skærm
3. Fjernbetjeningsmodtager
4. 75mmNS+højttaler
5. Lysdetektor
6. DAB-FM-antenne
7. USBC
8. DC-indgang
9. Linieindgang
10. Hovedtelefonudgang
11. Sikkerhedsplads
1. Kontrollen
2. OLED-Anzeige
3. Fernbedienungsempfänger
4. 75mmNS+Lautsprecher
5. Lichtdetektor
6. DAB-FM-Antenne
7. USBC
8. Gleichstromeingang
9. Leitungseingang
10. Kopfhörerausgang
11. Sicherheitsschlitz
1. Controles
2. PantallaOLED
3. Receptordecontrolremoto
4. AltavozNS+de75mm
5. Detectordeluz
6. AntenaDAB-FM
7. USBC
8. EntradadeCC
9. Entradadelínea
10. Tomadeauriculares
11. Ranuradeseguridad
1. Contrôles
2. ÉcranOLED
3. Récepteurdetélécommande
4. Haut-parleurNS+75mm
5. Détecteurdelumière
6. AntenneDAB-FM
7. USBC
8. EntréeCC
9. Ligned'entrée
10. Sortiecasque
11. Fentedesécurité
1. Controlli
2. DisplayOLED
3. Ricevitoretelecomando
4. AltoparlanteNS+da75mm
5. Rilevatorediluce
6. AntennaDAB-FM
7. USBC
8. IngressoCC
9. Ingressodilinea
10. Presapercue
11. Slotdisicurezza
1. コ ントロ ー ル
2. OLEDディスプレイ
3. リモコン受信機
4. 75mmNS+スピーカー
5. 光検出器
6. DAB-FMアンテナ
7. USBC
8. DC入力
9. ライン入 力
10. ヘッドフォンソケット
11. セ キ ュリティス ロ ット
1. 통제 수단
2. OLED디스플레이
3. 원격 제어 수신기
4. 75mmNS+스피커
5. 빛 감지기
6. DAB-FM안테나
7. USBC
8. DC입력
9. 라인 입력
10. 헤드폰 소켓
11. 보안 슬롯
1. Besturing
2. OLED-scherm
3. Afstandsbedieningontvanger
4. 75mmNS+luidspreker
5. Lichtdetector
6. DAB-FM-antenne
7. USBC
8. DC-ingang
9. Lijningang
10. Koptelefoonuitgang
11. Beveiligingssleuf
1. Kontroller
2. OLED-skjerm
3. Fjernkontrollmottaker
4. 75mmNS+høyttaler
5. Lysdetektor
6. DAB-FM-antenne
7. USBC
8. DC-inngang
9. Linjeinngang
10. Hodetelefonutgang
11. Sikkerhetsspor
1. Sterownica
2. Wyświetlacz OLED
3. Odbiornik pilota
4. Głośnik 75 mm NS+
5. Detektor światła
6. Antena DAB-FM
7. USB C
8. Wejście DC
9. Wejście liniowe
10. Wyjście słuchawkowe
11. Gniazdo bezpieczeństwa
1. Управление
2. OLED-дисплей
3. Удаленныйприемник
4. 75ммNS+динамик
5. Детекторсвета
6. АнтеннаDAB-FM
7. USBC
8. DCвход
9. Линейныйввод
10. Выходнанаушники
11. Слотбезопасности
1. 控制项
2. OLED显示器
3. 遥控接收器
4. 75毫米NS+扬声器
5. 光探测器
6. DAB-FM天线
7. USBC
8. 直流输入
9. 线路输入
10. 耳机输出
11. 安全插槽

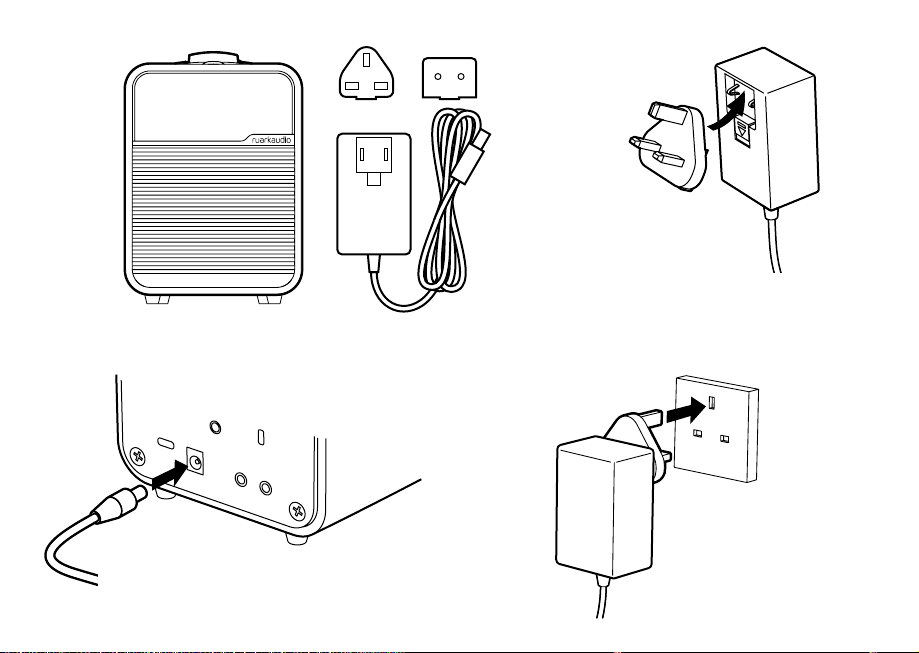
1 2
3 4
100-240V AC
50/60Hz
14V DC 1.5A

EN
DA
DE
ES
FR
IT
JA
KO
NL
NO
PL
RU
ZH
5
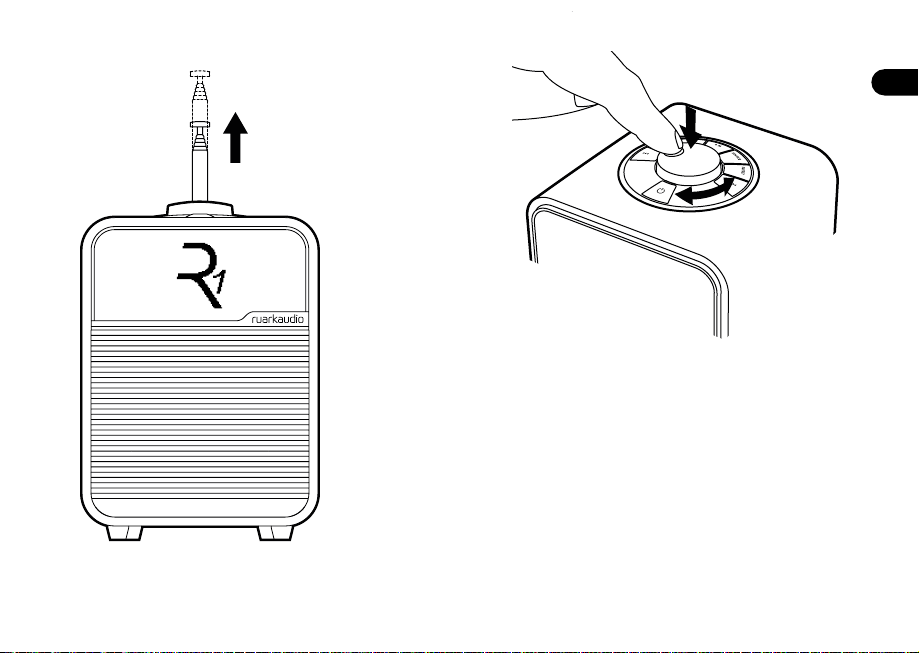
Setup wizard
Follow the setup wizard to congure your R1.
Rotate the CONTROL KNOB until your preferred choice is
shown, then press the CONTROL KNOB to SELECT.
If you live in a region without DAB/DAB+, you can choose to
disable DAB. To enable it again, simply reset the system and
enable DAB during the setup wizard.
Need more help?
For more information, see www.ruarkaudio.com/support
6

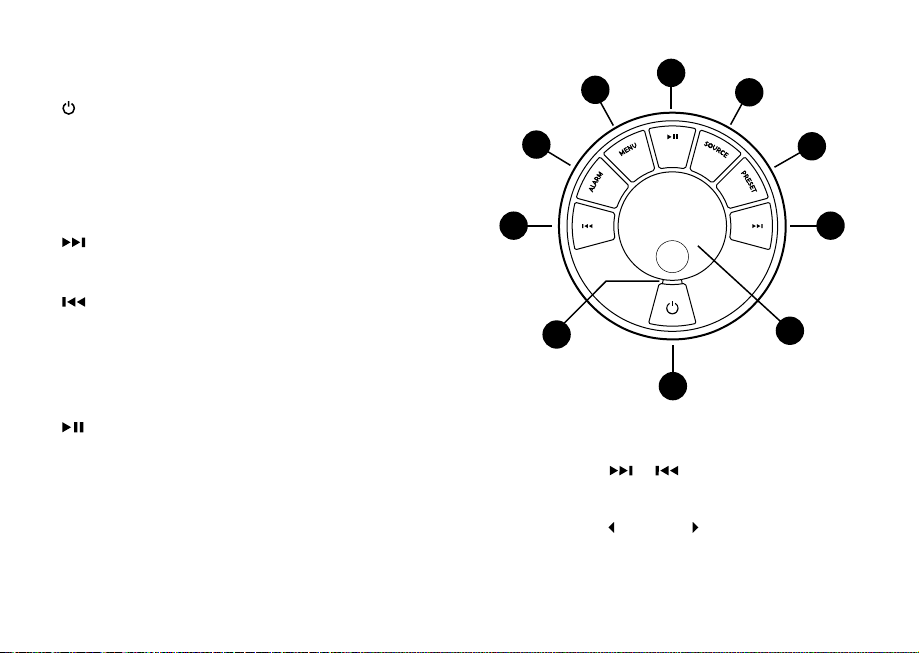
Controls
1. – STANDBY
2. CONTROL KNOB / SELECT
Rotate to adjust volume from a Now Playing screen.
Rotate to browse menus or station lists.
Press to SELECT.
Press to SNOOZE a sounding alarm. Press it again to
increase the snooze time or press and hold to cancel.
3. – press to skip to next station or track, press and
hold to fast forward a track or seek next FM station.
In standby, press to increase display brightness.
4. – press to skip to previous station or track, press and
hold to rewind a track or seek the previous FM station.
In standby, press to decrease display brightness.
5. PRESET – press to recall a saved DAB/FM station or
press and hold for two seconds to save a radio station.
6. SOURCE – press to change audio source.
7. – press to play/pause a track or mute audio.
8. MENU – press to view the options menu, press to go
back to previous screen when already in a menu.
9. ALARM / SLEEP – press to set an alarm or timer, press
and hold to set sleep timer.
10.LED – indicates radio is on and ashes when Bluetooth
is ready to connect or pair.
8
1
10 2
3
6
7
5
4
9
Tips
You can also press or to browse menus,
sources or station lists.
Currently saved settings are highlighted with solid
angle brackets, eg Radio text .
Press = tap or press and immediately release.
Press and hold = press and release after two seconds.

EN
DA
DE
ES
FR
IT
JA
KO
NL
NO
PL
RU
ZH
Specications
Amplier and driver
75mm Ruark NS+ driver
9W Class AB amplier
Connectivity
DAB, DAB+
Multiregional FM Tuner with RDS
Bluetooth V4.2 SBC, AAC, BLE, A2DP
Line input 3.5mm jack (1.4Vrms max)
Headphone 3.5mm output jack (6Ω)
USB C 2.0, (5V 1A) MP3, AAC up to 48kHz 320kbps,
FLAC up to 24-bit 96kHz, WAV up to 24-bit 96kHz,
WMA up to 44.1kHz 320kbps
Features
High-contrast OLED with auto dimming
Real time clock with internal battery backup
Kensington compatible security slot
Power adapter
100-240V AC, 50-60Hz input, 14V DC 1.5A output
Dimensions
H175 x W130 x D135mm (6.9 × 5.1 × 5.3in)
1.4kg (3.1lbs)
Specication and design subject to change.
Troubleshooting
For help with your product, please refer to the FAQ
(Frequently Asked Questions) page in the support area
of our website www.ruarkaudio.com/support.
If you accidentally select the incorrect language you
can factory reset your radio by pressing and holding
the standby key for 10s with your radio in standby.
(Quick reset not available on all models.)
Regulatory information
This device is labelled in accordance with European Directive
2012/19/EU concerning waste electrical and electronic
equipment. This symbol indicates that the product or
associated batteries should not be disposed of as general
household waste. As with any electrical equipment, please dispose of
it according to local regulations.
CE COMPLIANCE INFORMATION
This product conforms to all EU Directive requirements as
applicable by law. Hereby, Ruark Audio, declares that this device
complies with the essential requirements and other relevant
provisions of the European Radio Equipment Directive 2014/53/
EU. You can download the full CE Declaration of Conformity at
www.ruarkaudio.com/doc/R1mk4doc.pdf
UK CONFORMITY ASSESSMENT INFORMATION
This product conforms to all UK Conformity Assessment regulations
as applicable by law. You can download the full UKCA Declaration of
Conformity at www.ruarkaudio.com/doc/R1mk4UKCA.pdf

Common functions
Switch on and standby
Press STANDBY to turn your radio on from standby.
Press again to switch back to standby.
Now Playing screen
Unless you’re adjusting a setting, the screen will look
like the example below.
2
4
1
5
6
3
1. Clock
2. Alarm icon
3. Sleep timer icon
4. Station / track info
5. Battery status *
6. Mute icon
Menu screens
To change a setting, press MENU to display the list of
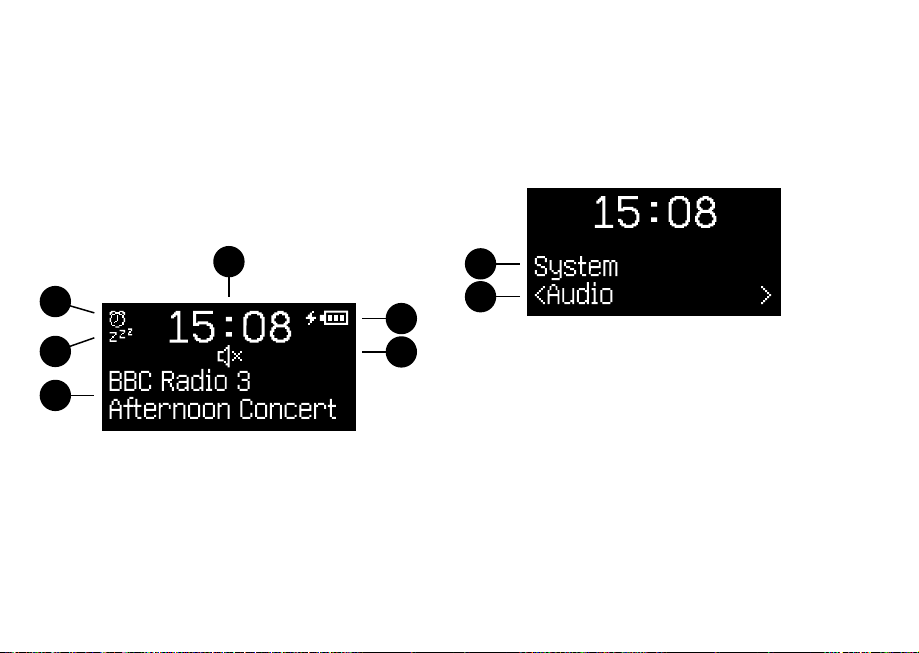
available options, rotate the CONTROL KNOB to scroll
through the list, and then press the knob to conrm
your selection.
7
8
7. Menu title
8. Menu option
To change settings –press MENU
To scroll through options – rotate CONTROL KNOB
To select option – press CONTROL KNOB
To go back or exit – press MENU to go back to the
previous screen until you get back to the Now Playing
screen, or wait for a few seconds
*Only shown when the optional BackPack
battery is tted

EN
DA
DE
ES
FR
IT
JA
KO
NL
NO
PL
RU
ZH
Adjust volume
Rotate the CONTROL KNOB from any Now Playing
screen.
Speaker volume and headphone volume are adjusted
separately, so when headphones are plugged in, the
volume is shown as “Volume ”.
Please note that rotating the CONTROL KNOB when a
menu or station list is displayed will scroll through the
options or stations and not change the volume.
Change audio source
Press SOURCE to view the current source, rotate the
CONTROL KNOB to scroll through the list of sources,
then press the CONTROL KNOB to select one. (You
can also press SOURCE repeatedly to cycle through
the list of sources instead of rotating the knob.)
Change DAB or FM radio station
Press or to scroll through the stations in the
station list, then press the CONTROL KNOB to tune to
the selected station.
In FM, you can also press and hold or to seek
the next or previous station.
Save DAB or FM preset
Press and hold PRESET for two seconds, rotate the
CONTROL KNOB to choose a preset number, then
press the CONTROL KNOB to save the current
station. Presets are either marked with the station
name, frequency or as “[Not set]”.
If you save a station over an existing preset, the new
station will replace it.
Recall DAB or FM preset
Press PRESET, rotate the CONTROL KNOB to scroll
through the preset station list, then press the
CONTROL KNOB to select one.
Connect a Bluetooth device
Your R1 will attempt to automatically connect to the
last connected device. If you have not yet paired your
device or the previous device is not available, your R1
will enter into pairing mode. See Bluetooth section
for more details.
Station or track information
MENU > Info
Select the type of station / track information shown.
Andere Handbücher für R1 mk4
2
Inhaltsverzeichnis
Sprachen:
Andere Ruark Audio Radio Handbücher

Ruark Audio
Ruark Audio R1mk3 Bedienungsanleitung

Ruark Audio
Ruark Audio R2 mk3 Bedienungsanleitung

Ruark Audio
Ruark Audio R1S Smart Bedienungsanleitung

Ruark Audio
Ruark Audio R2i Bedienungsanleitung

Ruark Audio
Ruark Audio R1 mk4 Einrichtungshandbuch

Ruark Audio
Ruark Audio R1 Bedienungsanleitung

Ruark Audio
Ruark Audio R1 mk4 Bedienungsanleitung

Ruark Audio
Ruark Audio R1 Bedienungsanleitung

Ruark Audio
Ruark Audio R7 Bedienungsanleitung

Ruark Audio
Ruark Audio R1 mk3 Bedienungsanleitung