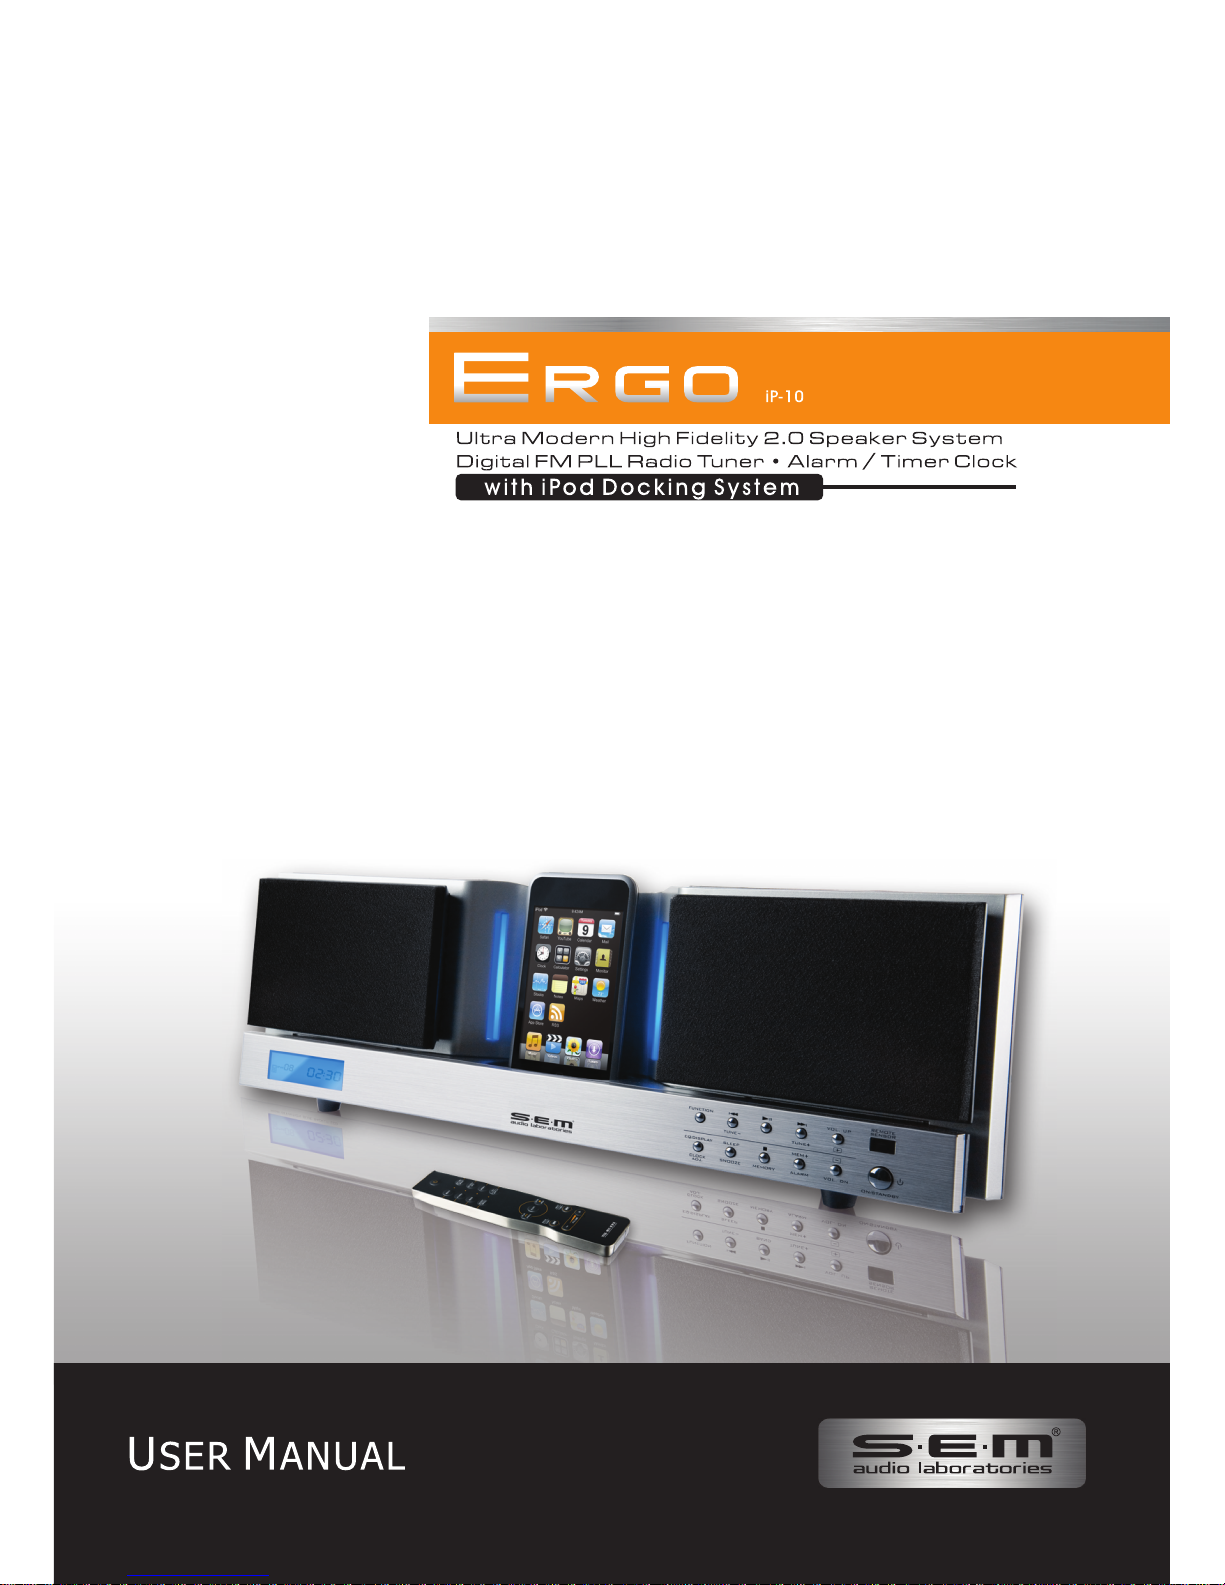
S.E.M. Ergo IP-10 Bedienungsanleitung


CONTENTS
IMPORTANT SAFETY & NOTICE
.............................................................................................. E-1
SYSTEM BASICS
Location of Controls - Main Unit ......................................... E-2
Location of Controls - Remote ............................................. E-3
Power Supply AC Operation ................................................ E-3
iPod OPERATION
Preparation of iPod Dock ...................................................... E-4
Operation with iPod .............................................................. E-5
DIGITAL CLOCK
Digital Clock Functions......................................................... E-6
How to Set Correct Time....................................................... E-6
Alarm Function .................................................................... E-7, 8
GENERAL FUNCTIONS
Snooze Function.................................................................... E-9
Mute Function ....................................................................... E-9
Automatic Power off Sleep Function..................................... E-9
Electronic Volume Control .................................................... E-9
Music Equalizer..................................................................... E-9
Using the Audio Line in Connection ..................................... E-10
Dimmer Function .................................................................. E-10
Night Function....................................................................... E-10
Connecting an External Powered Subwoofer ........................ E-10
RADIO
Operation of Radio ............................................................... E-11
Manual Frequency Adjustment ............................................. E-11
Automatic Frequency Adjustment ......................................... E-11
Radio Memory ...................................................................... E-11
SPECIFICATIONS
Specifications ....................................................................... E-12

E-1E-1
The lightning flash and arrowhead within the triangle is a warning sign alerting you of “dangerous
voltage” inside the product.
CAUTION
RISK OF ELECTRIC SHOCK
DO NOT OPEN
WARNING:
To reduce the risk of electric shock, do not remove cover (or back). No user-serviceable
parts inside. Refer servicing to qualified service personnel.
CAUTION:
The exclamation point within the triangle is a warning sign alerting you of important instructions
accompanying the product.
Grounding or polarization. The precautions should be taken so that the wider blade of the AC plug
must match the slot in receptacle “wall socket”.
Do not expose to dripping or splashing liquids!
Invisible laser radiation when open and interlocks defeated. Avoid exposure to beam.
WARNING:
To reduce the risk of fire or electric shock, do not expose this appliance to dripping or splashing liquids.
NOTE:
Caution symbols are printed on rear of unit. Please refer to instruction manual.
PLEASE NOTE:
You will find the caution rating label for this product located on the rear of the unit.
To ensure safe use of this product, please follow the advice below:
1. The apparatus should not be exposed to dripping or splashing and no objects filled with liquids should be
placed on the apparatus.
2. The marking and rating label is located at rear enclosure of the apparatus.
3. The mains plug is used as the disconnect device and it shall remain readily operable. to be completely
disconnected the power input, the mains plug of the apparatus shall be disconnected from the mains
completely. the mains plug should not be obstructed or should be easily accessed during intended use.
4. Under the influence of electrostatic phenomenon, the product may malfunction and user to power reset.
5. Excessive sound pressure from earphones and headphones can cause hearing loss.
6. Danger of explosion if battery is incorrectly replaced. replace only with the same or equivalent type.
7. Battery should not be exposed to excessive heat such as sunshine, fire or the like.
8. Electrostatic discharge (ESD) precaution
When electrostatic discharge (ESD) occurs at the front surface (whether metal or plastic) or near any
part or any button of this unit, or at the USB port and/ or SD-card slots (if they exist on this product),
there may be a possibility that the product may stop operation and/ or shut down immediately. this is a
normal condition and intended to protect the unit and internal components against damage. In such a case,
please reset the unit (by disconnecting and reconnecting AC-power source) to revert the unit to normal
operation.
IMPORTANT SAFETY & NOTICE

E-2
SYSTEM BASICS
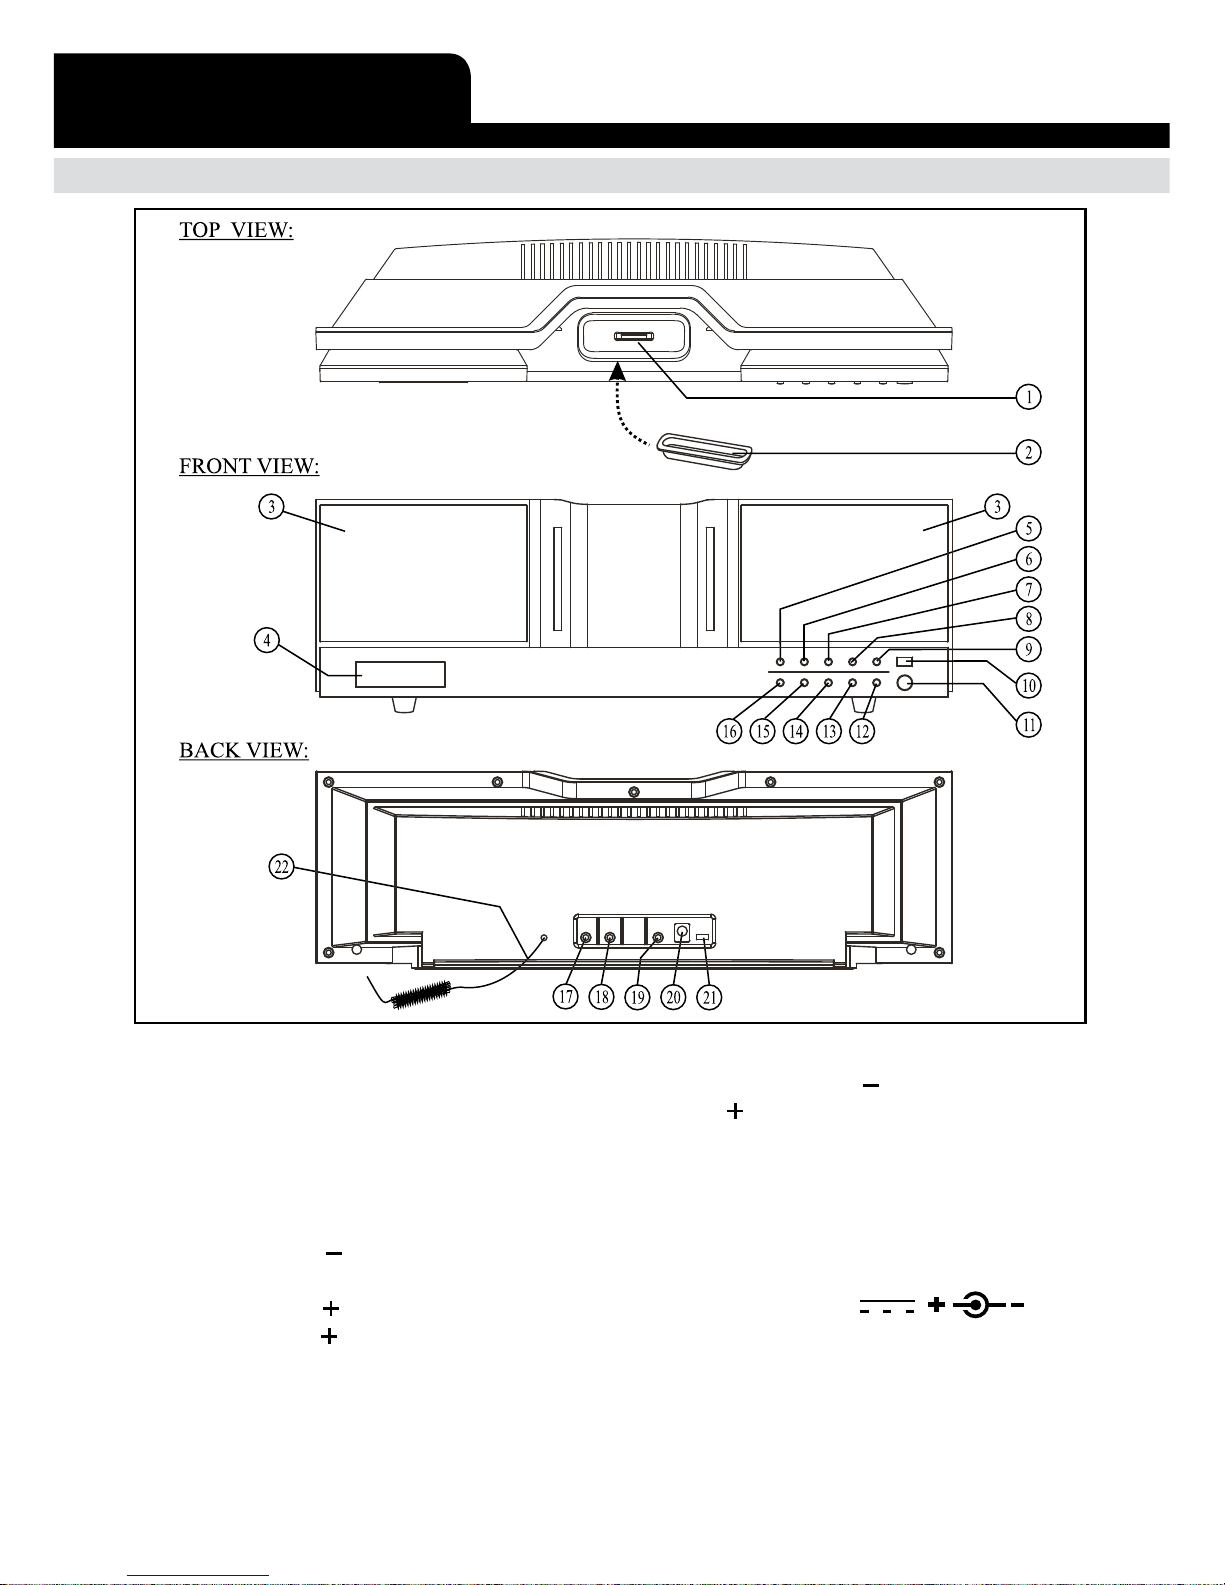
LOCATION OF CONTROLS - MAIN UNIT
1. CAVITY FOR DOCK ADAPTOR
2. DOCK ADAPTOR FOR iPod
(SEVERAL DIFFERENT ADAPTORS ARE
PROVIDED)
3. SPEAKERS (LEFT & RIGHT)
4. BLUE BACKLIT DISPLAY
5. FUNCTION KEY
6. BACK/ TUNE ( ) KEY
7. PLAY/ PAUSE KEY
8. NEXT/ TUNE ( ) KEY
9. VOLUME UP ( ) KEY
10. REMOTE CONTROL SENSOR
11. ON/ STANDBY KEY
12. VOLUME DOWN ( ) KEY
13. MEM / ALARM KEY
14. STOP/ MEMORY KEY
15. SLEEP/ SNOOZE KEY
16. EQ/ DISPLAY/ CLOCK ADJUST KEY
17. AUX INPUT SOCKET
18. SUBWOOFER OUTPUT
19. HEADPHONES SOCKET
20. DC JACK (DC 12V )
21. DIMMER SWITCH (MAX/ MID/ MIN)
22. FM ANTENNA WIRE

E-3
SYSTEM BASICS
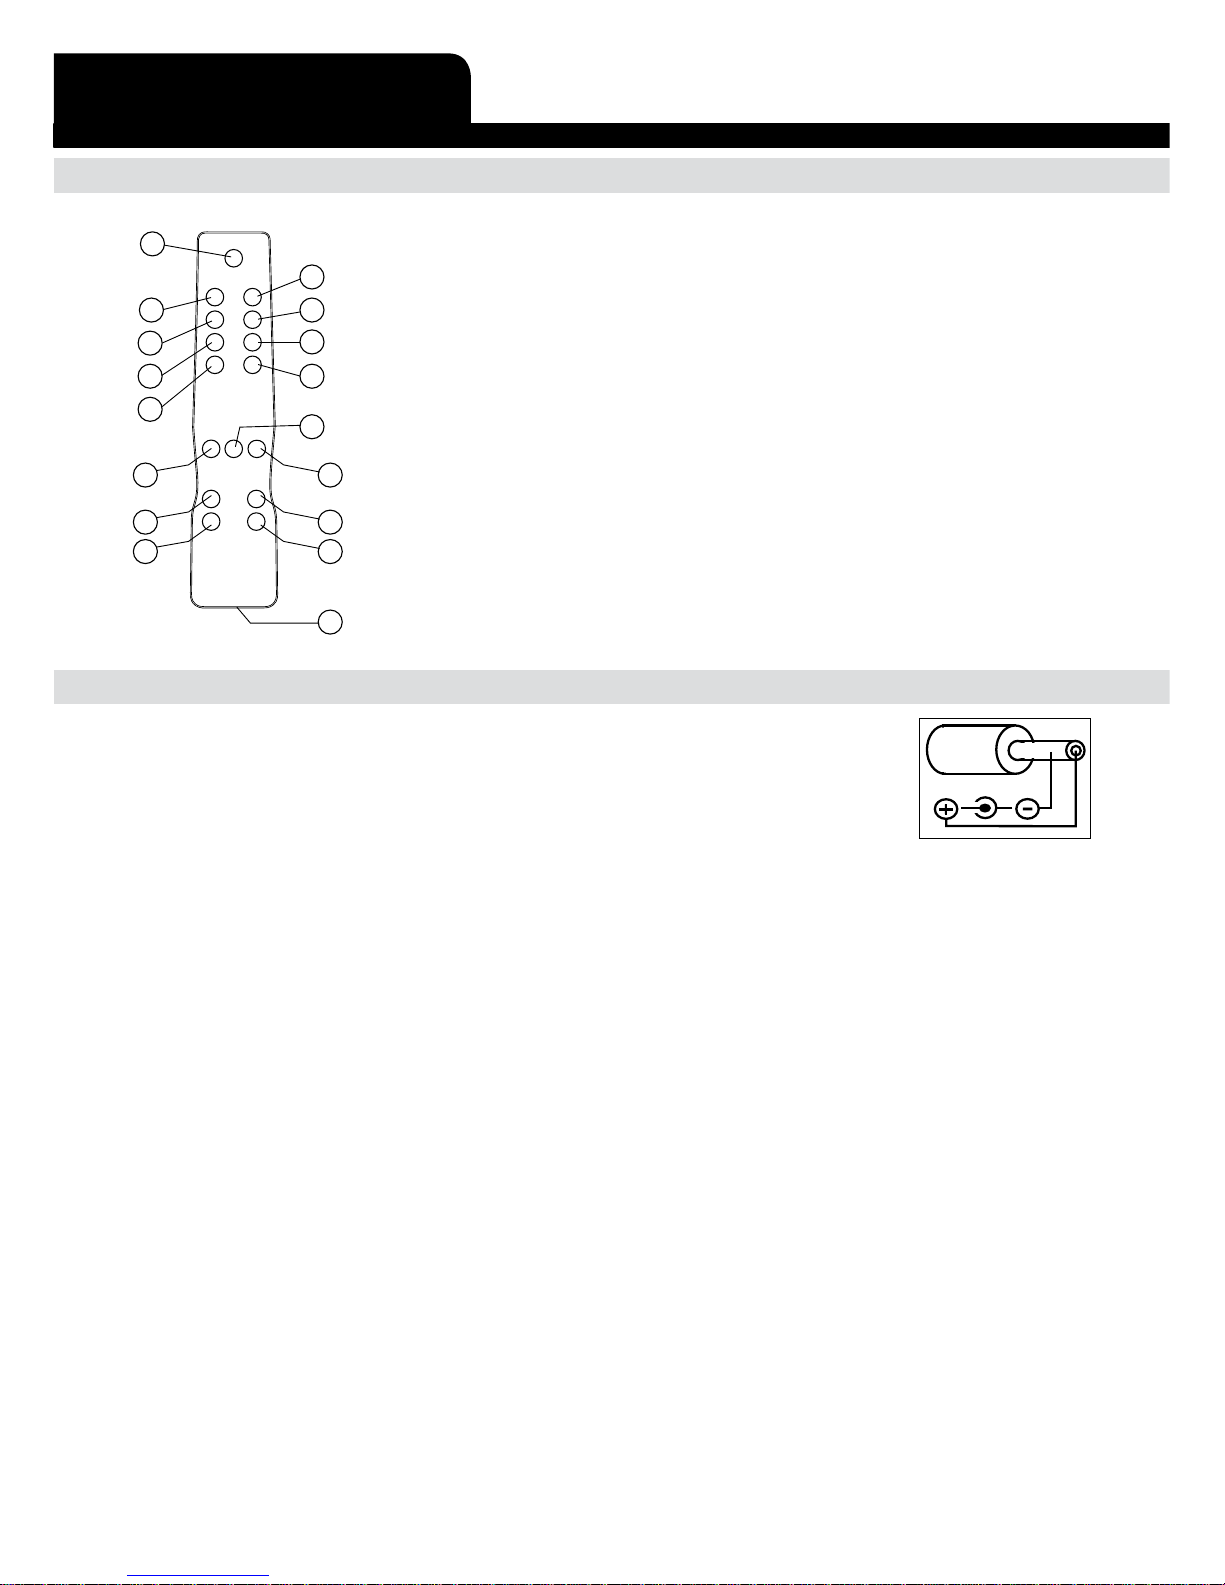
LOCATION OF CONTROLS - REMOTE CONTROLS
1. ON/ STANDBY KEY
2. MUTE KEY
3. ALARM KEY
4. MEM. - KEY
5. SLEEP/ SNOOZE KEY
6. PLAY/ PAUSE KEY
7. BACK/ TUNE - KEY
8. VOLUME - KEY
9. ST./ MO./ NIGHT KEY
10. CLOCK ADJ. KEY
11. MEM. + KEY
12. EQ/ DISPLAY KEY
13. FUNCTION KEY
14. STOP/ MEM. KEY
15. NEXT/ TUNE+ KEY
16. VOLUME + KEY
17. BATTERY COMPARTMENT
POWER SUPPLYAC OPERATION (EXTERNALAC-DC POWER ADAPTOR)
- This set is equipped with a “DC-jack” capable of accepting AC-
adaptors with a rating of DC = 12V, 1.5A, and with a plug with the
following polarities as shown (center positive) :
- Please use only the supplied AC-adaptor to operate the unit. use of
other adaptors may damage the unit or cause it to malfunction.
- Plug the tail end of the AC-adaptor into the DC-jack (socket) on the rear of the unit.
- Insert the plug of the AC-adaptor into a wall outlet with AC-power.
- Press the “On/ standby” key to switch on the unit.
- This unit is designed to operate without ever being totally powered “off”. It will either be
“on” or in “standby mode”.
- In standby mode, the blue back-light of the digital display will be dimmed but the display
will show the current time (clock function).
- Anytime during standby mode, you can switch “on” the unit by pressing the “On/ standby”
key (on remote control or front panel of the main unit).
- Save energy by switching the system to “Standby” mode when not in use.
2
3
4
5
9
10
11
12
13
6
14
17
1
8
16
7
15

E-4
PREPARATION OF iPod DOCK
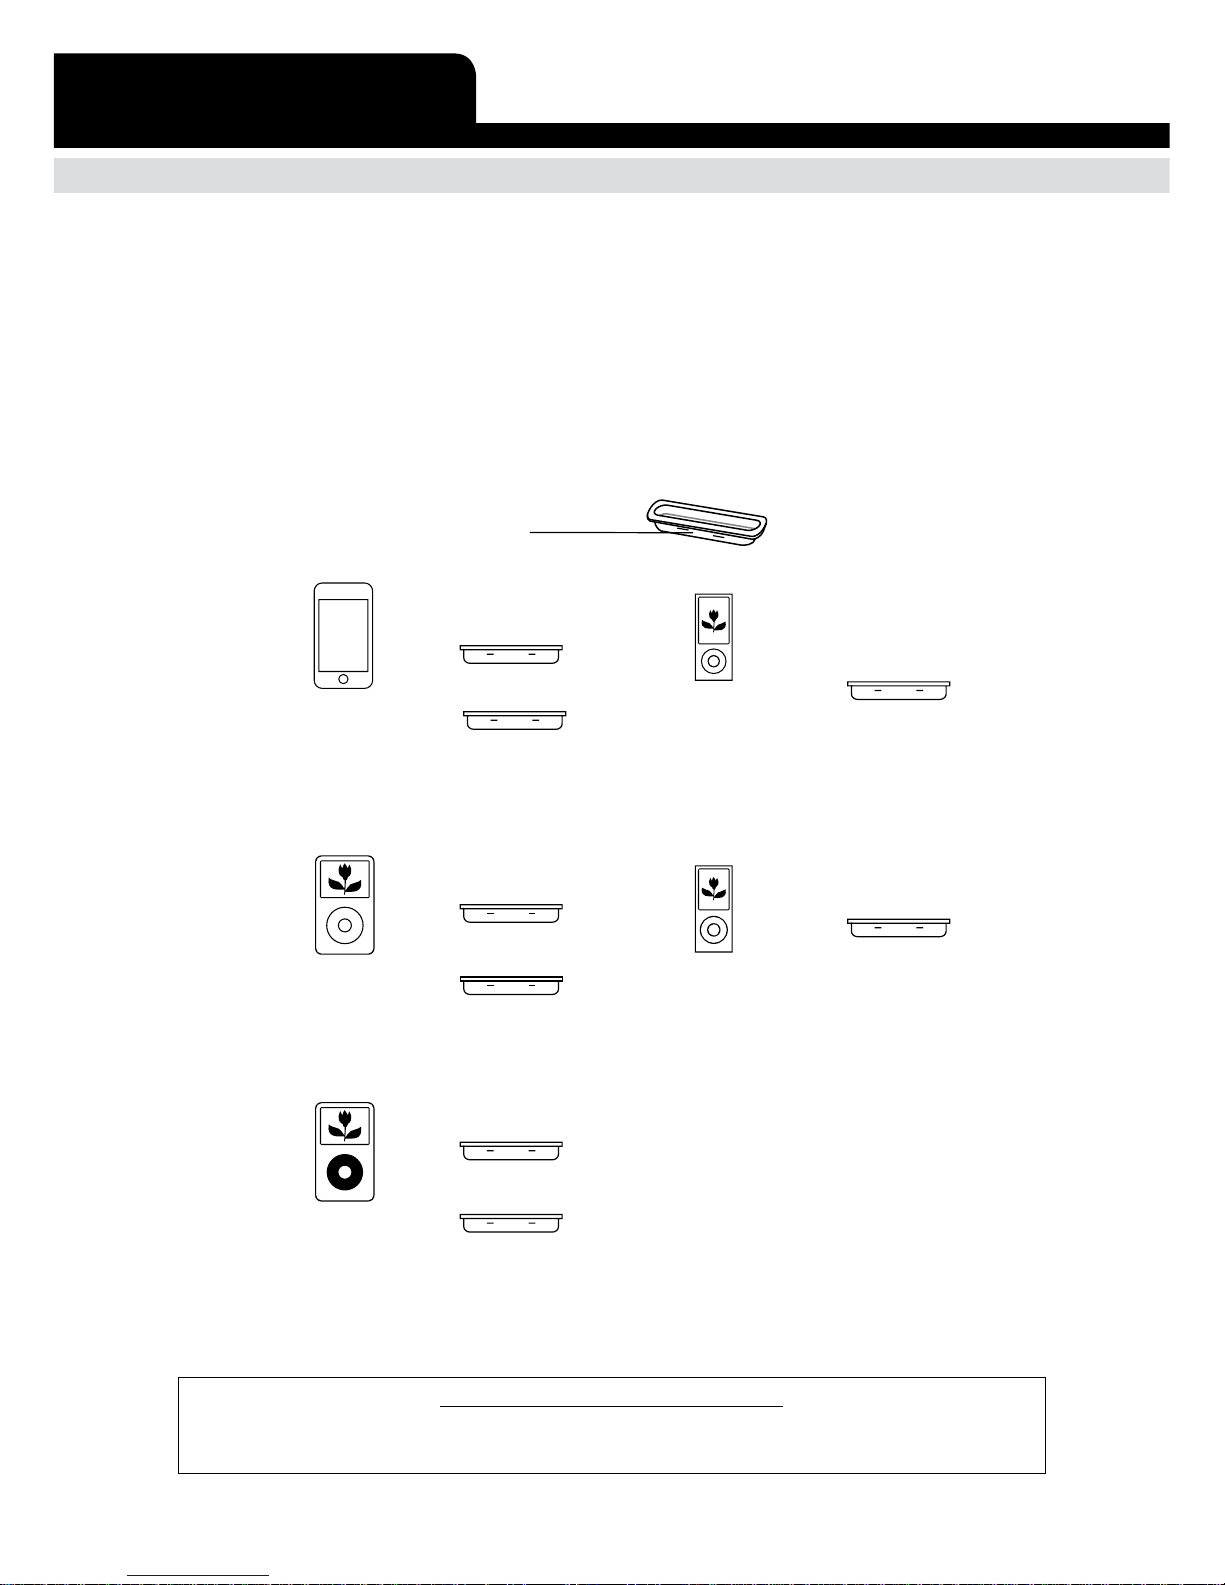
To connect an iPod with a dock connector to this unit, first insert the dock adaptor that fits
your iPod, and then connect your iPod. Your Hi-Fi includes dock adaptors that work with
several models of iPod with dock connectors. If you want to connect a different model of
iPod at a later time, you can easily remove the dock adaptor from your hi-fiusing a fingernail,
and insert the adaptor that fits the new iPod. If there is no dock adaptor for your model of
iPod included with your Hi-Fi, an adaptor may have been included with your iPod. Please
check inside the box of the iPod you purchased for a plastic dock adaptor.
Dock adapters: Choose the dock adapter that fits your iPod.
Your iPod fits snugly into the correct adapter.
THE NUMBER
SHOWS WHICH iPod FITS
10
OR
9
iPod classic
80GB 120GB 160GB
10
OR
9
iPod
5th generation
(video)
30GB 60GB 80GB
17
iPod nano
4th generation (video)
8GB 16GB
18
iPod nano
5th generation
(video camera)
8GB 16GB
14
16
OR
iPod touch
1st generation
2nd generation
FOR OTHER iPod MODELS:
If there is no dock adapter for your model of iPod included, you can also
use the dock adapter which was included in the box with your iPod itself.
iPod OPERATION

E-5
OPERATION WITH THE iPod
- Turn on both the unit and the iPod.
- Connect the iPod to the unit as described.
- Press the “function” key repeatedly until the display shows “iPod”.
- Press the Play/ Pause key on the unit, then the first song will start playing.
- The iPod display will indicate the information of the current song.
- At anytime during playback, press the Play/ Pause key to pause playback. Press
Play/ Pause key to resume playback of the same song & position.
- At anytime during playback, press the stop key to stop operation of the set.
- At anytime during playback, press and release the Next or Back key to skip
forward or backwards by one song, as desired.
- At anytime during playback, press and hold the Next or Back key to fast-
forward (cue) or fast-reverse (review) the specific song, which is currently playing.
- You can operate the iPod using either the unit’s buttons, remote control or directly with
the iPod itself.
- When the iPod has been connected with the unit, it will start charging the battery of the
iPod.
- Never remove (or unplug) the iPod from the set during playback, always press “stop”
first and then press the function key to switch to another source (eg. “Radio” or
“Aux”) before removing or unplugging the iPod, to prevent damage to your song files or
memory devices.
IMPORTANT
Please note that when connecting a iPod video, the error message “the currently attached accessory
is not supported by this iPod.” Will be displayed as there is no video input/output. However, all audio
functions will operate normally as outlined above.
iPod OPERATION

E-6
DIGITAL CLOCK FUNCTION
- The set has a built-in digital clock, which is displayed in 2 situations:
(1)When the set is in “Standby mode”. (The display will continuously show the current
time). In this situation the blue backlight is normally off (to save electricity) but you
can switch on the blue display light by pressing any key, (on the set or remote control)
except the “On/ Standby” key. This will activate the blue light for approximately 5
seconds.
(2)When the set is in “on mode” (the blue light of the display is “on” in this mode, to
indicate that the set is powered “on”). In this situation the LCD display normally does
not automatically show the current time. But you can press & hold the “EQ/DISPLAY/
CLOCK ADJ.” key for 2 seconds at any time to see the current time. Each time you
press & hold the “EQ/DISPLAY/CLOCKADJ.” key for 2 seconds the current time will
be displayed on the LCD screen for 5 seconds.
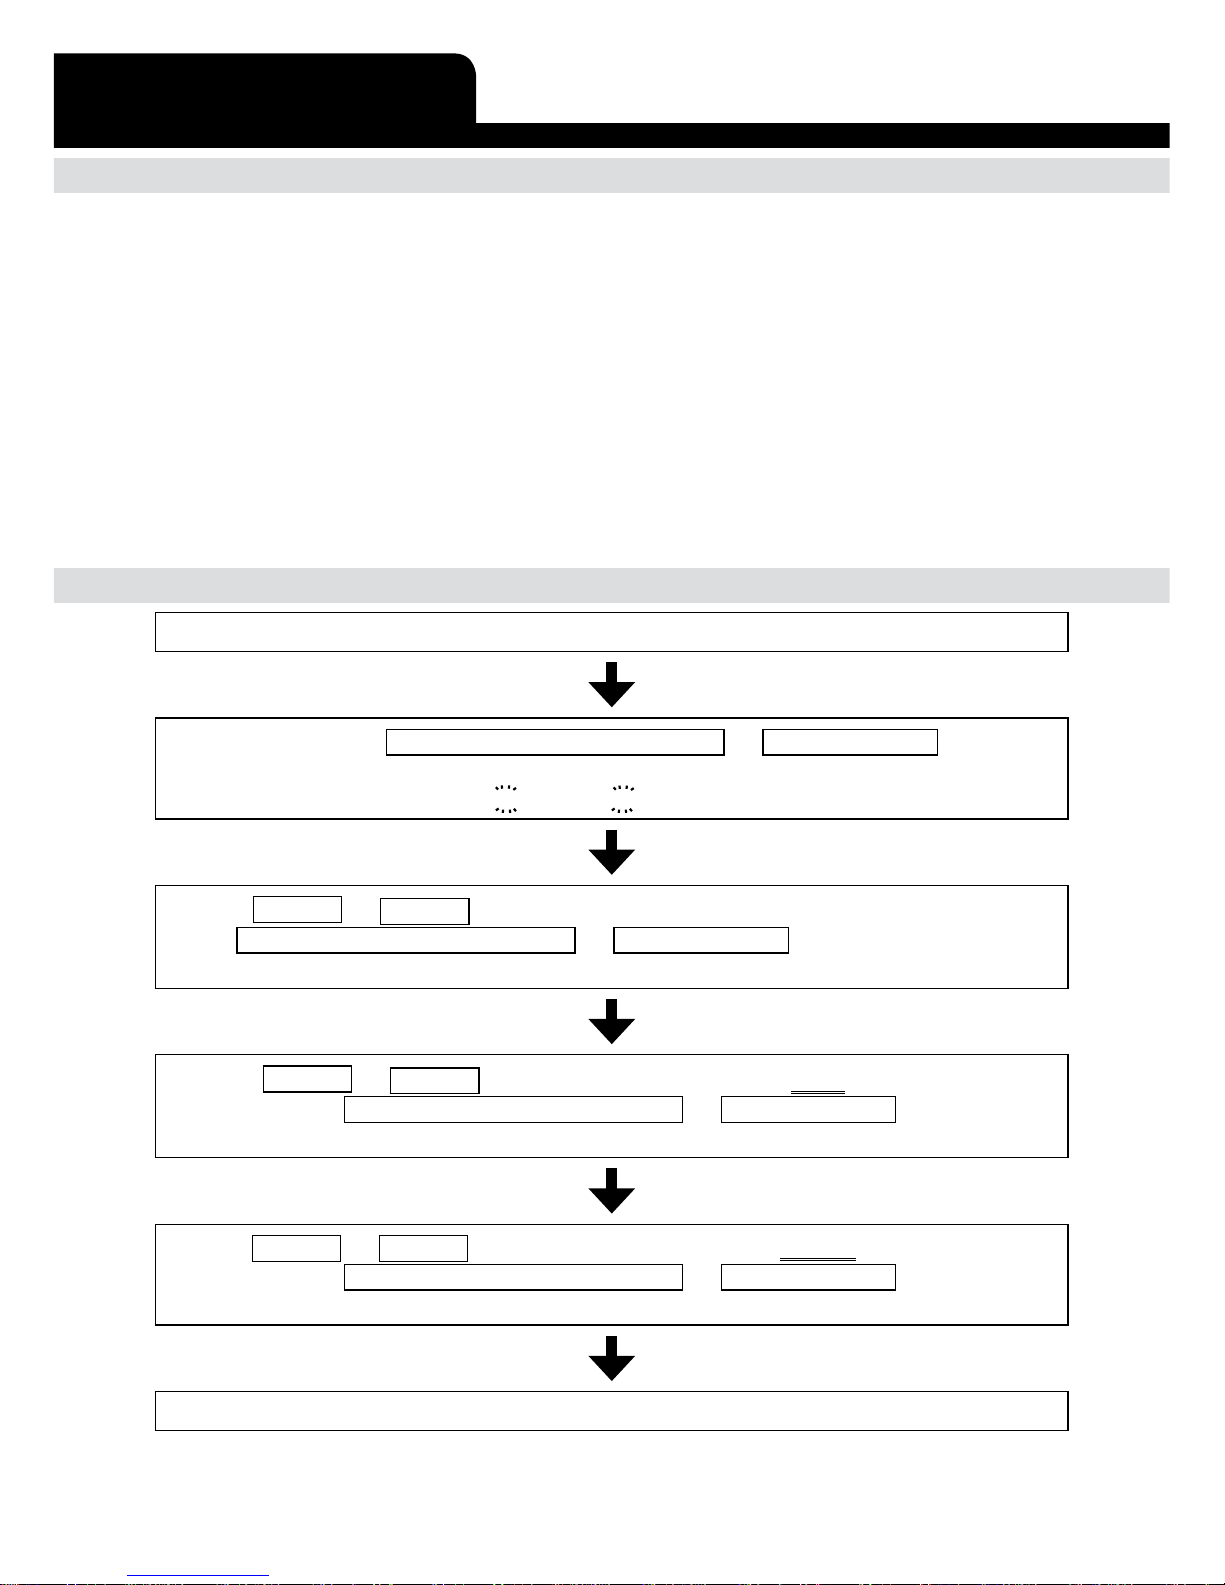
HOW TO SET CORRECT TIME:
Switch unit to “Stand-by” mode (Display light = off)
Press & hold EQ/DISPLAY/CLOCK ADJ. or CLOCK ADJ. key
(on remote control) for 3 seconds display
shows 12 hour or 24 hour (flashing)
Press NEXT or BACK to select 12-hour or 24-hour clock display system &
press EQ/DISPLAY/CLOCK ADJ. or CLOCK ADJ. key (on remote control)
to confirm your selection
Press NEXT or BACK repeatedly to set the correct Hour in the display &
press EQ/DISPLAY/CLOCK ADJ. or CLOCK ADJ. key
(on remote control) to confirm
Press NEXT or BACK repeatedly to set the correct Minute in the display &
press EQ/DISPLAY/CLOCK ADJ. or CLOCK ADJ. key
(on remote control) to confirm
Correct time is now set & will be shown in the display.
DIGITAL CLOCK

E-7
ALARM FUNCTION
- This set is equipped with 3 alarm modes: buzzer, radio and iPod. Before setting the alarm,
make sure to set the clock (see “digital clock function” in the pervious section) .
PREPARE FOR THE ALARM SETTINGS
Press the ON/STANDBY key to switch on the set (display blue light will be “on”).
1. FOR iPod : Connect the iPod as described.
Select the song or the desired playlist to play at the “wake up” time.
Start and pause playback of the song/playlist at the point from which
you want playback to begin at the “wake up” time.
FOR RADIO : Tune in the desired station.
2. Adjust the volume level as desired by pressing VOL. UP + or VOL. DN - key.
“ALARM” TIME SETTING
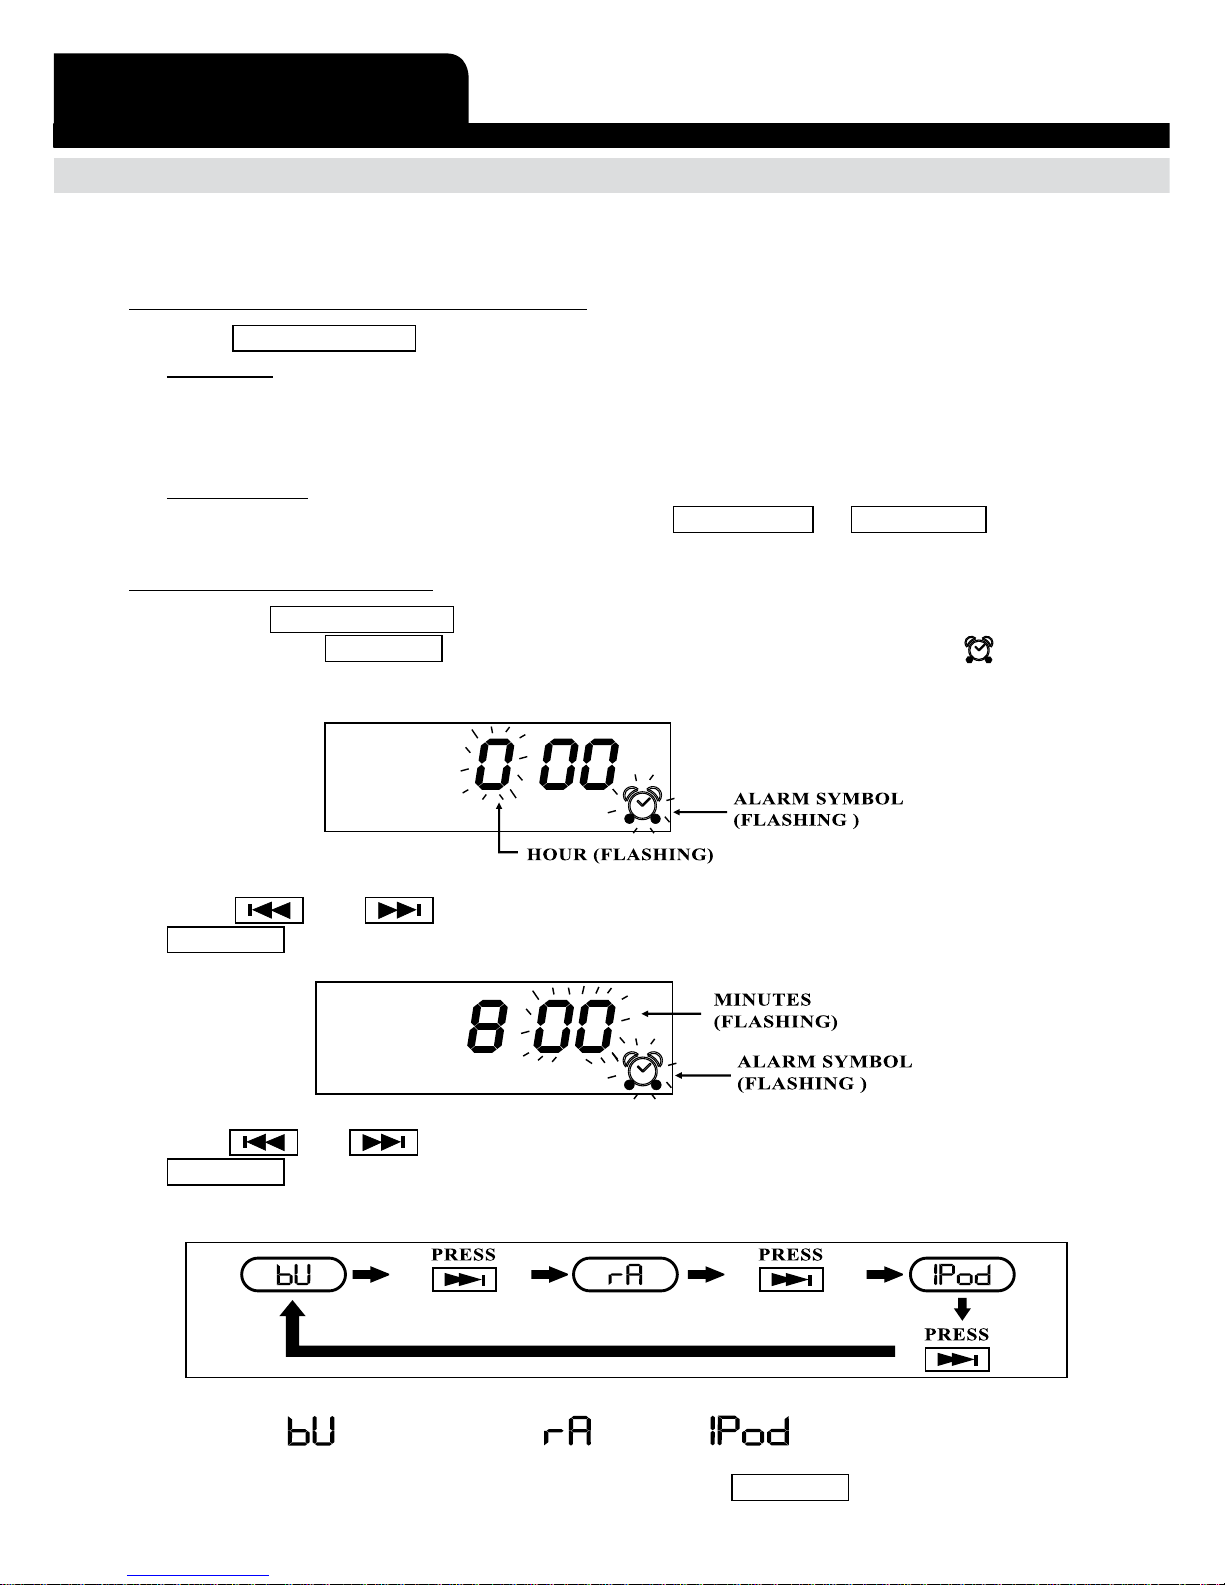
1. Press the ON/STANDBY key to put the set into “Standby” mode (blue light off).
2. Press and hold ALARM key (on remote control) until the alarm symbol “ ”appears
in the display. The display will now show:
3. Press and to reach the hour of the desired wake up time then press
ALARM key to confirm. The display will now show:
4. Press and to reach the minutes of the desired wake up time, then press the
ALARM key to confirm.
5. Now select the source that you wish the unit to play at the “wake up” time as below:
*Remark: = Buzzer Alarm / = Radio / = iPod
Once the desired source has been selected, press the ALARM key to confirm.
DIGITAL CLOCK
Inhaltsverzeichnis