
Scag Power Equipment SE-3.5BS Bedienungsanleitung

MODEL SE-3.5BS
OPERATORS MANUALOPERATORS MANUAL
OPERATORS MANUALOPERATORS MANUAL
OPERATORS MANUAL
THISMANUALCONTAINSTHEOPERATING
INSTRUCTIONS AND SAFETY INFORMA-
TION FOR YOUR SCAG EDGER. READING
THIS MANUAL WILL PROVIDE YOU WITH
MAINTENANCEANDADJUSTMENTPROCE-
DURES TO KEEP YOUR EDGER PERFORM-
ING TO MAXIMUM EFFICIENCY. THE SPE-
CIFIC MODELS THAT THIS BOOK COVERS
ARE CONTAINED ON THE INSIDE COVER.
BEFORE OPERATING YOUR MACHINE,
PLEASEREADALL THE INFORMATIONEN-
CLOSED.
PART NUMBER 03070

FAILURE TO FOLLOW SAFE OPERATING PRACTICES
MAY RESULT IN SERIOUS INJURY.
* Keep all safety shields in place.
* Beforeperforminganymaintenanceorservice,stopthemachineand
remove the spark plug wire.
* Ifamechanismbecomesclogged,stopthe engine before cleaning.
* Keephands,feetandclothingawayfrompower-drivenparts.
* Readthismanualcompletely.
* Keepothersawayfrom the edger while operating.
REMEMBER - YOUR EDGER IS ONLY AS SAFE AS THE OPERATOR!
Hazard control and accident prevention are dependent upon the awareness,
concern, prudence, and proper training of the personnel involved in the op-
eration, transport, maintenance, and storage of the equipment.
WARNING
Thismanualcovers theoperatinginstructions
andillustratedpartslistfor:
SE-3.5BS with a serial number of 4800001- 4809999
Alwaysusetheentireserialnumber listed on the serial number
tagwhenreferringto this product.

SUBJECT PAGE
Introduction..............................................................................................................1
Safety and Operating Instructions...........................................................................1-3
Setup & Operation...................................................................................................4-5
Maintenance ............................................................................................................6-8
Troubleshooting Guide.............................................................................................9
Illustrated Parts List.................................................................................................10-11
LimitedWarranty Statement...................................................................Inside Back Cover
®
TABLE OF CONTENTS
I
WE SUPPORT OPE
TECHNICIAN
CERTIFICATION
Equipment & Engine
Training Council
c
MEMBER

1
INTRODUCTION
This manual has been prepared to provide the
information you need to correctly assemble, operate,
and maintain this edger. Read it carefully and keep it
for future reference.
The replacement of any part on this product by other
than the manufacturer's authorized replacement part
may adversely affect the performance, durability or
safety of this product.
USE OF OTHER THAN ORIGINAL SCAG
REPLACEMENT PARTS WILL VOID THE
WARRANTY.
If additional information or service is needed that is
not outlined in this manual, please contact your Scag
Power Equipment dealer. Scag dealers are trained in
the latest service methods and carry a full line of Scag
replacementparts.
When ordering parts, always provide the complete
model and serial number of your edger.
All information provided in this manual is based upon
information available at the time of printing. Scag
Power Equipment reserves the right to make changes
at any time without notice or obligation.
SAFETY AND OPERATING
INSTRUCTIONS
To avoid personal injury, it is imperative
that all safety instructions be observed.
nn
nn
n Read This Operator's Manual
Areplacementmanualisavailablefromyourauthorized
Scag Service Dealer or by contacting: Scag Power
Equipment, Service Department at P.O. Box 152,
Mayville, WI 53050. Please indicate the complete
model and serial number of your Scag product when
orderingareplacementmanual.
Your edger is only as safe as YOU, the operator. As
with any power equipment, carelessness or error can
resultinserious bodily injury. Impropermaintenance
can also result in injury. To reduce the potential for
injury,followthese instructions onsafeoperation.
nn
nn
n How To Use This Edger
1. Be thoroughly familiarwith the controlsand the
proper use of the machine.
2. Know how to stop the edger and disengage the
controlsquickly.
3. Use the edger only on flower beds and lawns.
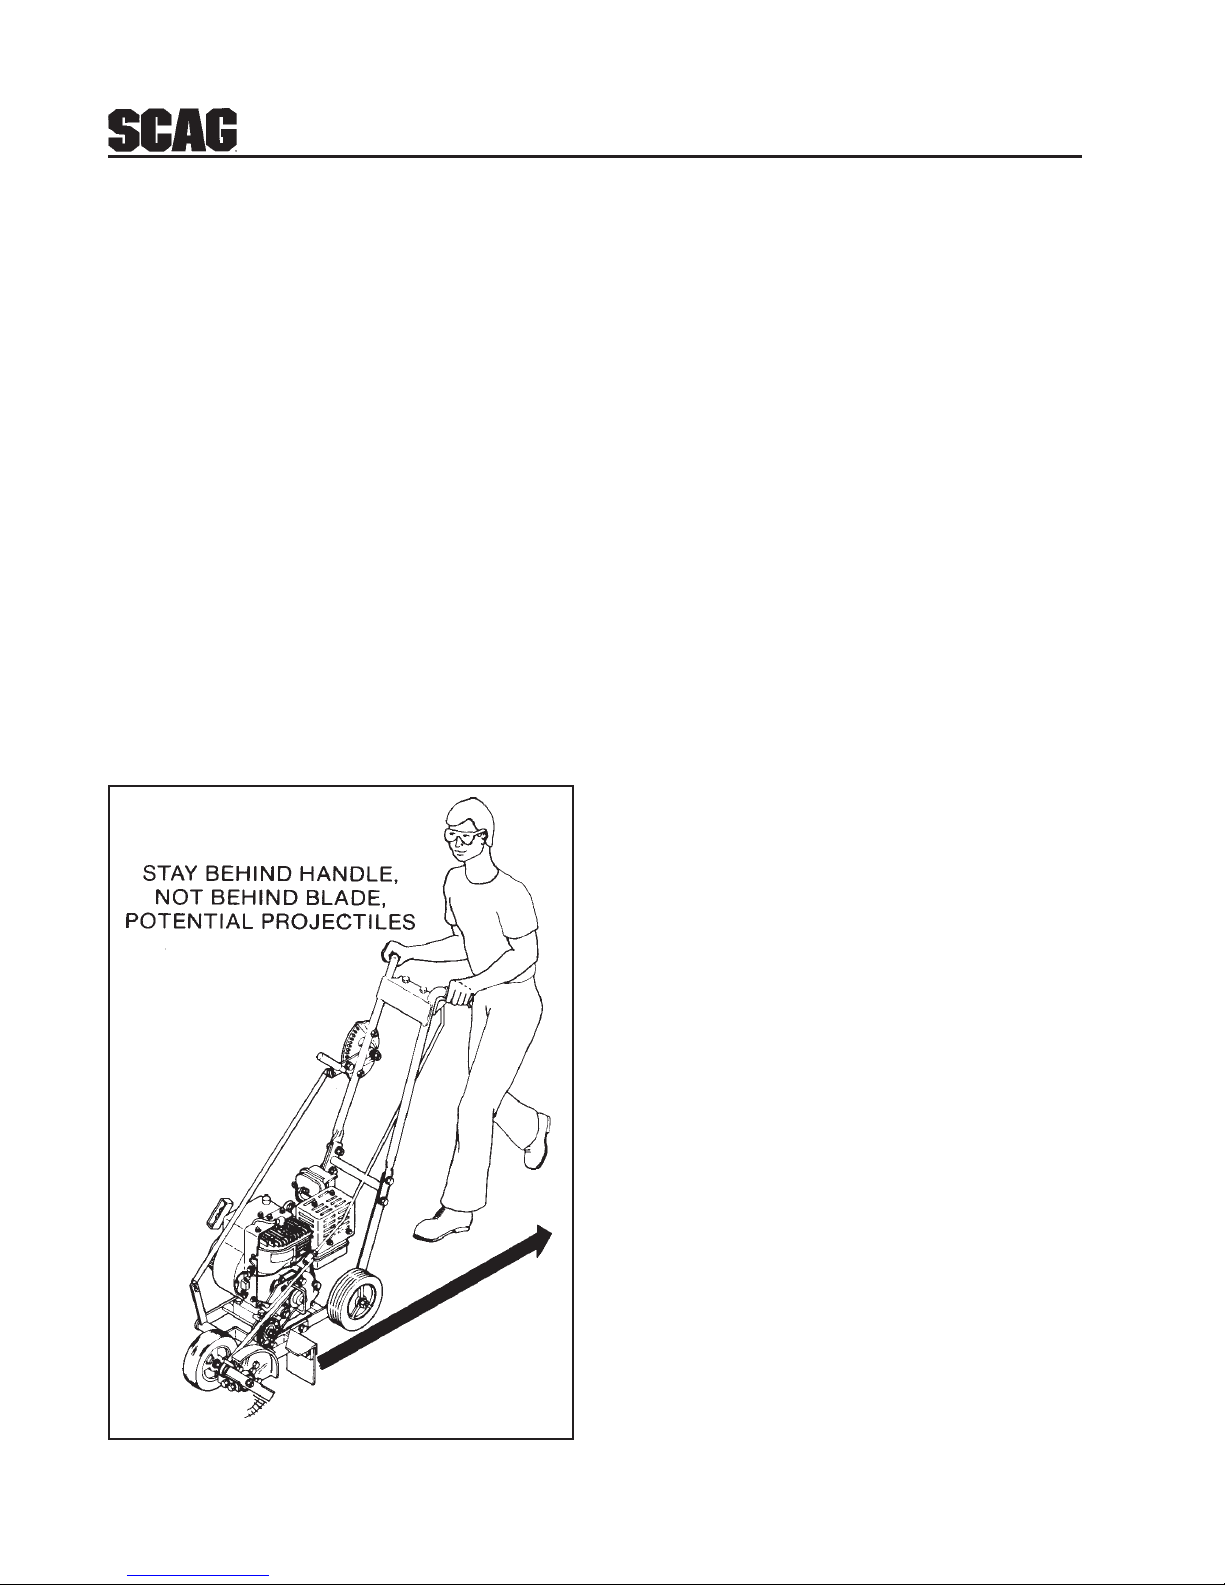
4. Always stay behind the handles. Stones and other
items thrown by the blade can cause serious injury
(See Figure 1, page 2).
5. Do not modify or alter any component of the edger.
nn
nn
n Dress Properly
1. Wearsafetyglassesorgoggles.
2. Do not wear loose clothing or jewelry; they can be
caughtin moving parts. Always wear long pants
that cover your legs.
nn
nn
n Direction Reference
The "Right" and "Left", "Front" and "Rear" of the
machine are referenced from the normal operating
position.
nn
nn
n Servicing The Engine
The detailed servicing of the engine is not covered in
this manual. For service of the engine it is important
to contact your Scag Dealer or an authorized servicing
agent of the engine manufacturer. Any unauthorized
work performed on the engine will void the
warranty.
CAUTION:
2
SAFETY AND OPERATING
INSTRUCTIONS (CONT'D)
nn
nn
n Dress Properly, cont.
3. Sturdy gloves and safety footwear are
recommended.
nn
nn
n Check The Edger Before Use
1. Never operate the edger unless guards and other
protectivedevicesare in place.
2. Before you use the edger, make sure all nuts,
bolts, and screws are installed and properly
tightened.
3. Whereapplicable,checkpulleysetscrewsandall
fastenersfortightnessandlubricateperiodically
as described in the maintenance section on pages
6 and 7.
nn
nn
n Stay Alert
1. Watch what you are doing. Use common sense.
2. Do not operate the edger when you are fatigued or
under the influence of alcohol or drugs.
nn
nn
n Operate With Care
1. Keep hands, feet, and clothing well away from the
bladeandmoving parts.
2. Don't overreach or stand on unstable ground.
Keepgood footing and balance at all times.
3. Start the engine carefully. Stop the engine when
leavingtheedgerunattended.
4. Do not operate the edger with a damaged or
excessivelywornblade.
5. Never attempt to make adjustments when the edger
isrunning.
6. Neverdirect discharge of materialtowardpeople.
Usecareindirectingdischargetoavoidglass
enclosuresorautomobiles.
7. Neveroperatetheedgerwithoutgoodvisibilityor
lightofday.
8. Stay alert for uneven sidewalks, holes in the
terrain,orothersimilarconditionswhenusingthe
edger. Alwayspush slowly over rough ground.
9. Always keep the throttle in the STOP position
when the edger is not in use.
10. If the edger strikes a foreign object:
(1) stop the engine.
(2) disconnect the spark plug lead.
(3) inspect for damage.
(4) repair any damage before restarting and
operating the edger.
Figure 1, Proper Operating Position
Projectile Path
3
PROPERLYPROPERLY
PROPERLYPROPERLY
PROPERLY
SERVICESERVICE
SERVICESERVICE
SERVICE
ENGINEENGINE
ENGINEENGINE
ENGINE
WITHWITH
WITHWITH
WITH
OILOIL
OILOIL
OIL
ANDAND
ANDAND
AND
FUEL.FUEL.
FUEL.FUEL.
FUEL.
SAFETY AND OPERATING
INSTRUCTIONS (CONT'D)
nn
nn
n Keep Hands And Feet From Blade
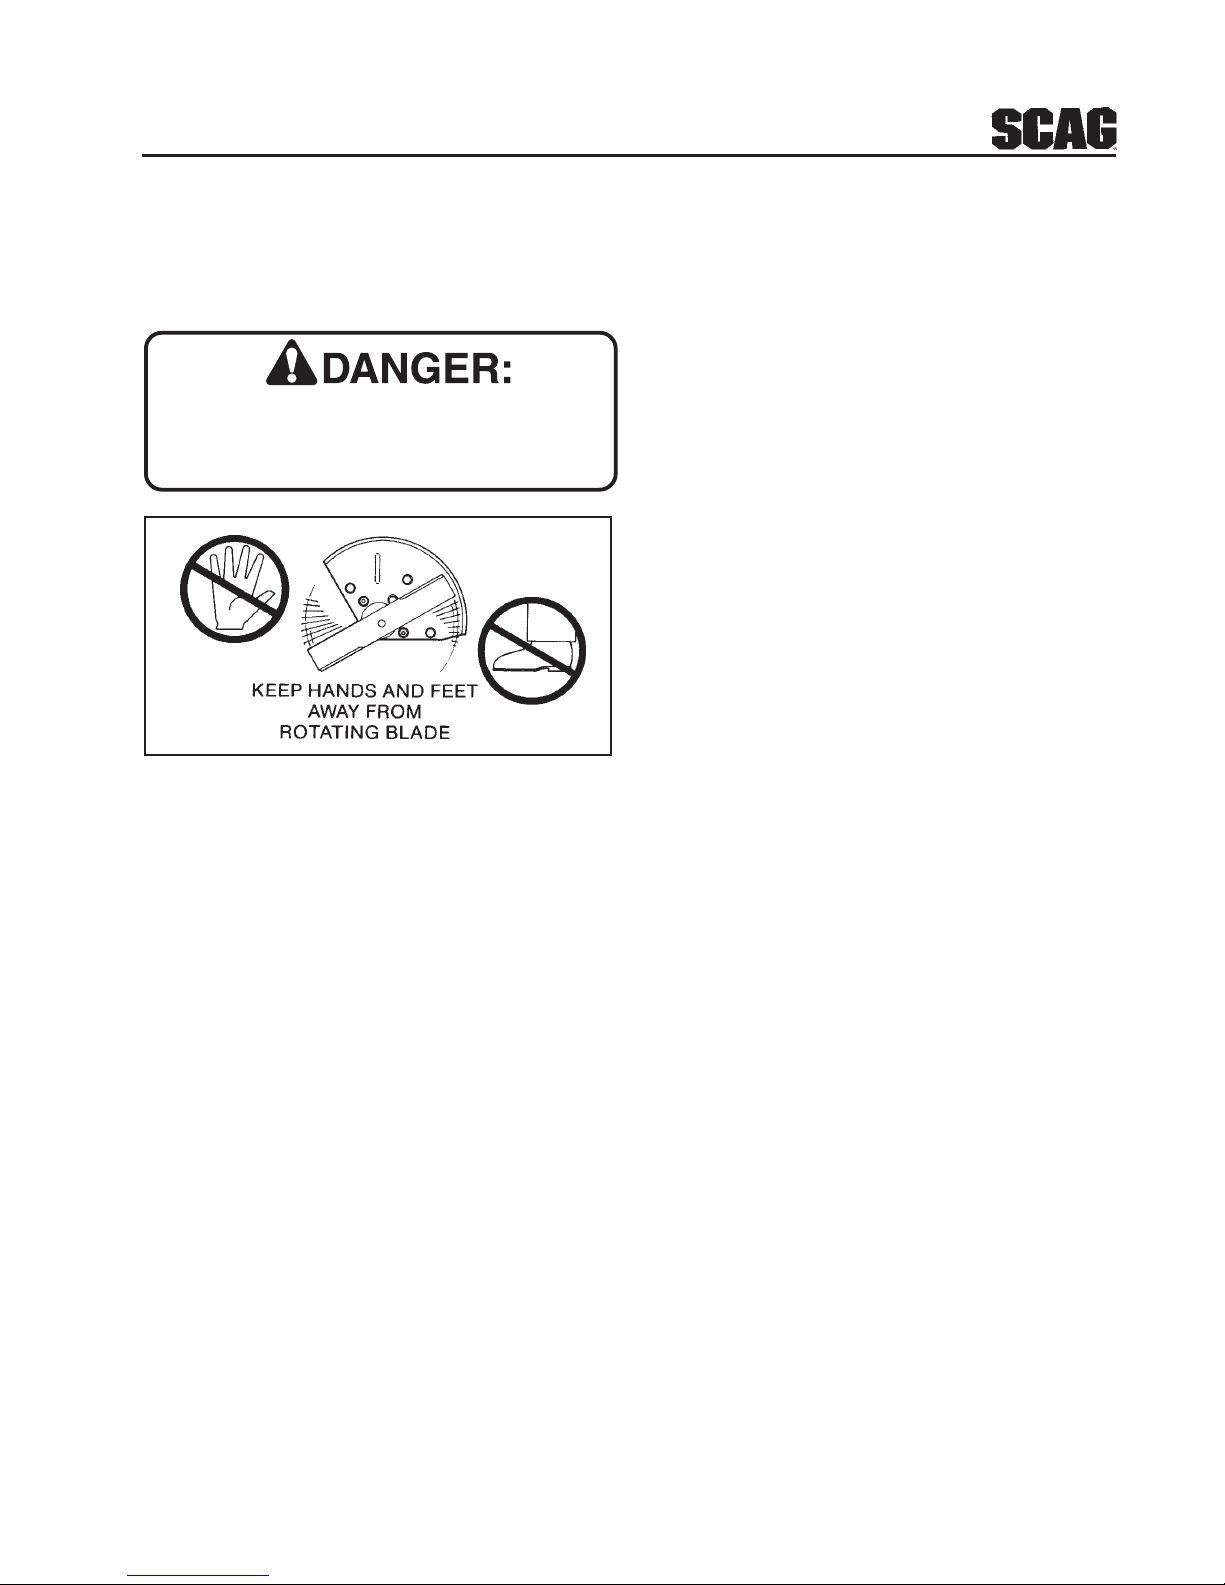
The rotating blade is sharp and can severely cut
body parts. The blade coasts after the edger is
turned off (See Figure 2).
Figure 2, Protect Hands And Feet
1. Keep both hands on the handles when the blade
isrotating.
2. Keep your feet and hands away from the cutting
area.
3. Do not attempt to remove cut material or hold
material to be cut when the engine is running or
thebladeismoving.
4. Make sure the spark plug wire is disconnected
whenclearing jammedmaterial from the blade or
cutter head.
5. Disengage the blade and stop the engine when the
edger is transported or not in use.
nn
nn
n Handle Gasoline With Care
1. Gasoline is highly flammable. Never add
gasoline to a running or hot engine.
2. Refuel outdoors in an open area only. Never fill
thegasolinetankindoors.
3. After operating the edger, stop the engine and
allow the engine to cool before refueling.
4. To reduce the risk of fire, replace the gasoline cap
securely after adding fuel to the tank.
5. Useanapprovedgasolinecontainer.
6. Do not store gasoline in a house.
7. If gasoline is spilled on the ground, move the edger
and the gasoline container from the area and do
not create a source of ignition.
8. Ifgasolineis spilledon clothing, remove the
stained clothes and replace them with clean, dry
clothes before operating the edger.
nn
nn
n Follow Maintenance Instructions
Carefully
1. Disconnectthe spark plugleadbeforeservicingany
part of the edger.
2. To reduce the risk of fire, do not allow excessive
grass, leaves, lubricants or gasoline to accumulate
on the edger.
3. Do not attempt to make repairs other than those
identified in this manual. Repairs not detailed in
this manual should be performed by an authorized
Scag dealer. See that only identical replacement
parts are used.
4. Whencleaning,repairing,orinspectingtheedger,
make certain the blade and all moving parts have
stopped. Disconnect the spark plug wire.
5. Whenliftingortransportingtheedger,firmlygrasp
a solid part of the frame. Do not lift the edger by
the clutch or height adjustment assemblies. Blade
is sharp! Be careful of the blade when lifting.
6. Do not run the edger indoors; exhaust fumes are
dangerous.

4
SAFETY AND OPERATING
INSTRUCTIONS (CONT'D)
nn
nn
n Protect Operators
1. Keep a safe distance between two or more
operators when working with a cutting crew at
the same site.
SETUP & OPERATION
nn
nn
n Assembly
1. Install the upper handle assembly with hardware
as shown in Figure 3 using (4) 5/16-18 x 1" bolts,
and (4) 5/16-18 elastic stop nuts.
2. Attach the height adjustment index to the upper
handle assembly using (2) 5/16-18 x 1-1/2" hex
head bolts, (2) 5/16 flat washers and (2) 5/16-18
elasticstopnuts.
3. Install the tube-type control rod on right hand side
between the front wheel height lever and the
index quadrant using (4) hair pin cotters to secure
the control rod.
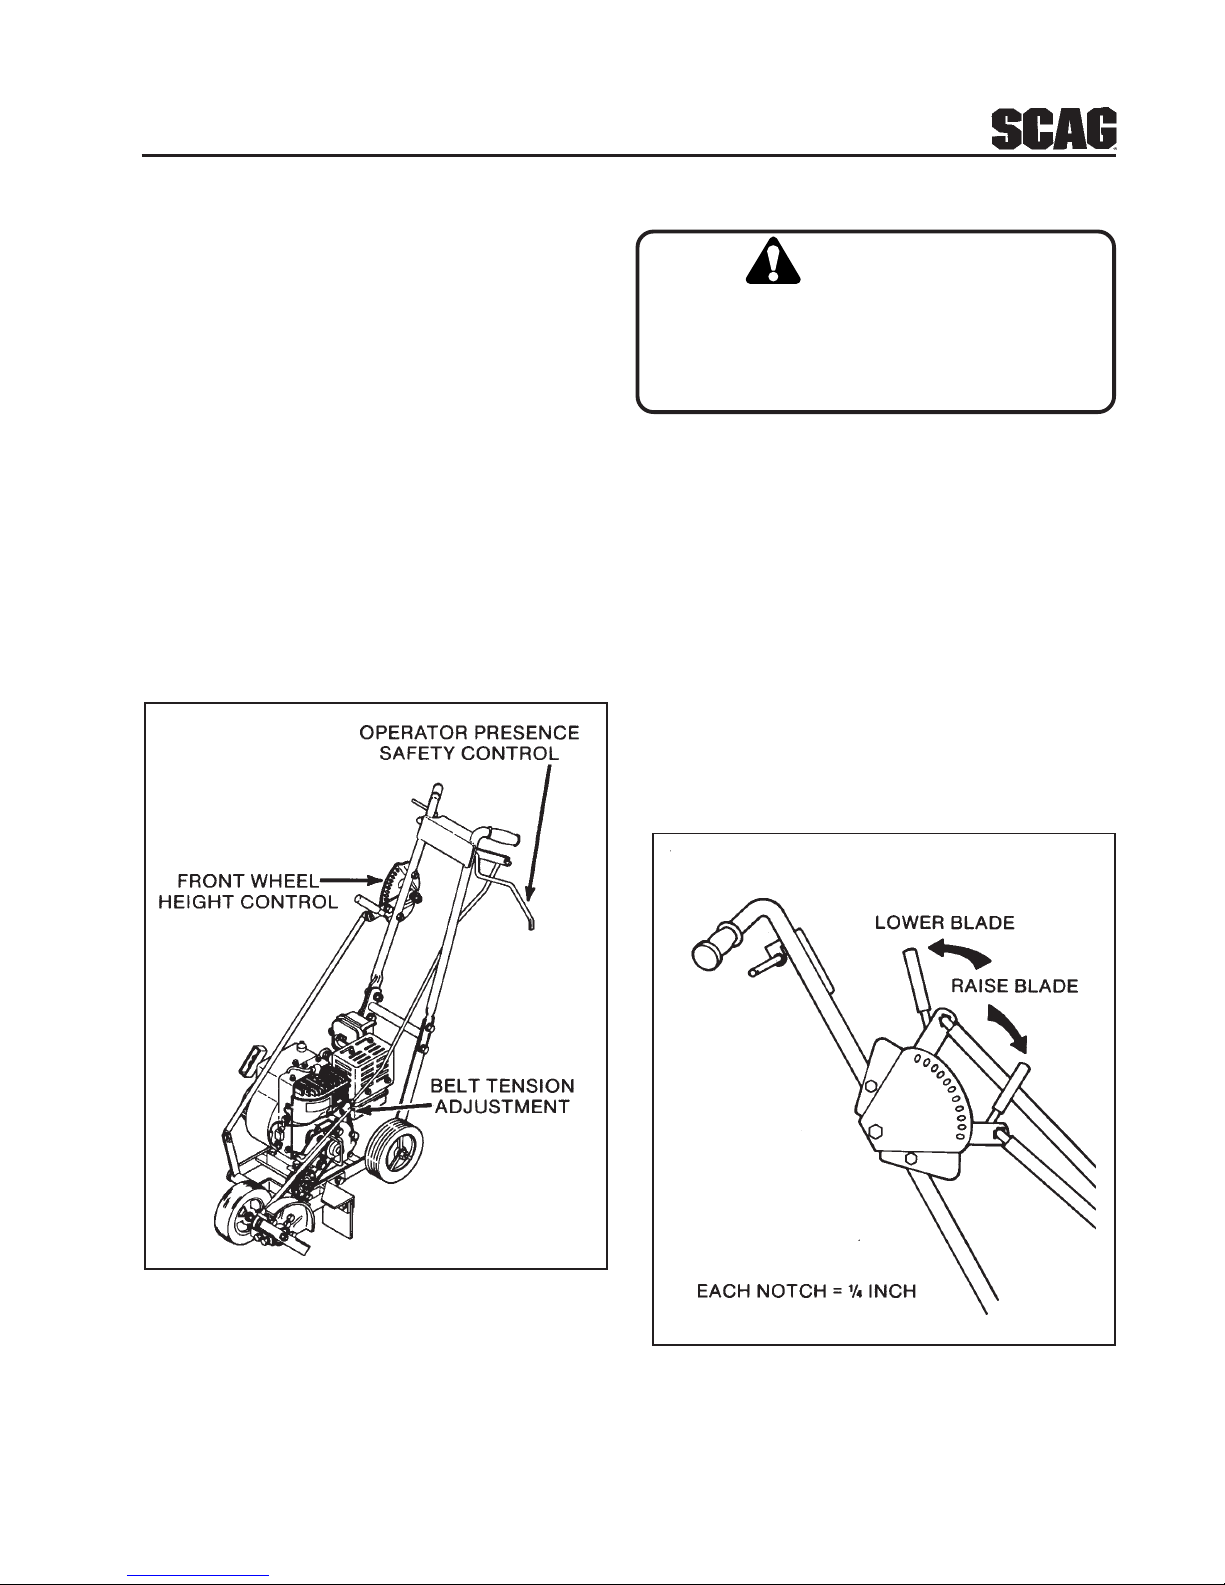
4. Install the operator presence safety control rod
with the long rod at the top and the short rod at
the idler pulley arm using (4) hair pin cotters.
Adjust the length of the rod for normal belt
tension (See Figure 4).
5. Fill the engine with oil as described in the engine
operator's manual. Lubricate all grease fittings
withlithium-basedgrease.
6. Fill the engine fuel tank with fresh unleaded
gasoline that has a minimum octane rating of 87.
Figure 3, Handle Setup
Figure 4, Operator Presence Controls
Operatorpresenceshown
separatedforillustration
purposeonly.
5
SETUP & OPPERATION (CONT'D)
nn
nn
n Operating Instructions
Figure 5 is a general view of the edger.
Note: The right or left side of the edger refers to
the view from the normal operating position,
behind the handles.
nn
nn
n Before Operation
1. Check the engine oil level as detailed in the
engine operator's manual.
2. Before starting the engine, be sure the blade has
a free arc of travel and the blade is fully raised.
Damage to the blade can result if the blade is not
in the highest position (See Figures 5 and 6).
Figure 5, Edger Controls
nn
nn
n Starting The Engine
Be sure no one is standing near the blade.
Keep body parts away from the blade. Before
starting, clear operating area of foreign
objects, sticks, stones, etc.
Refer to the engine operator's manual for starting
instructions.
nn
nn
n Operation
1. Move the edger to the working area.
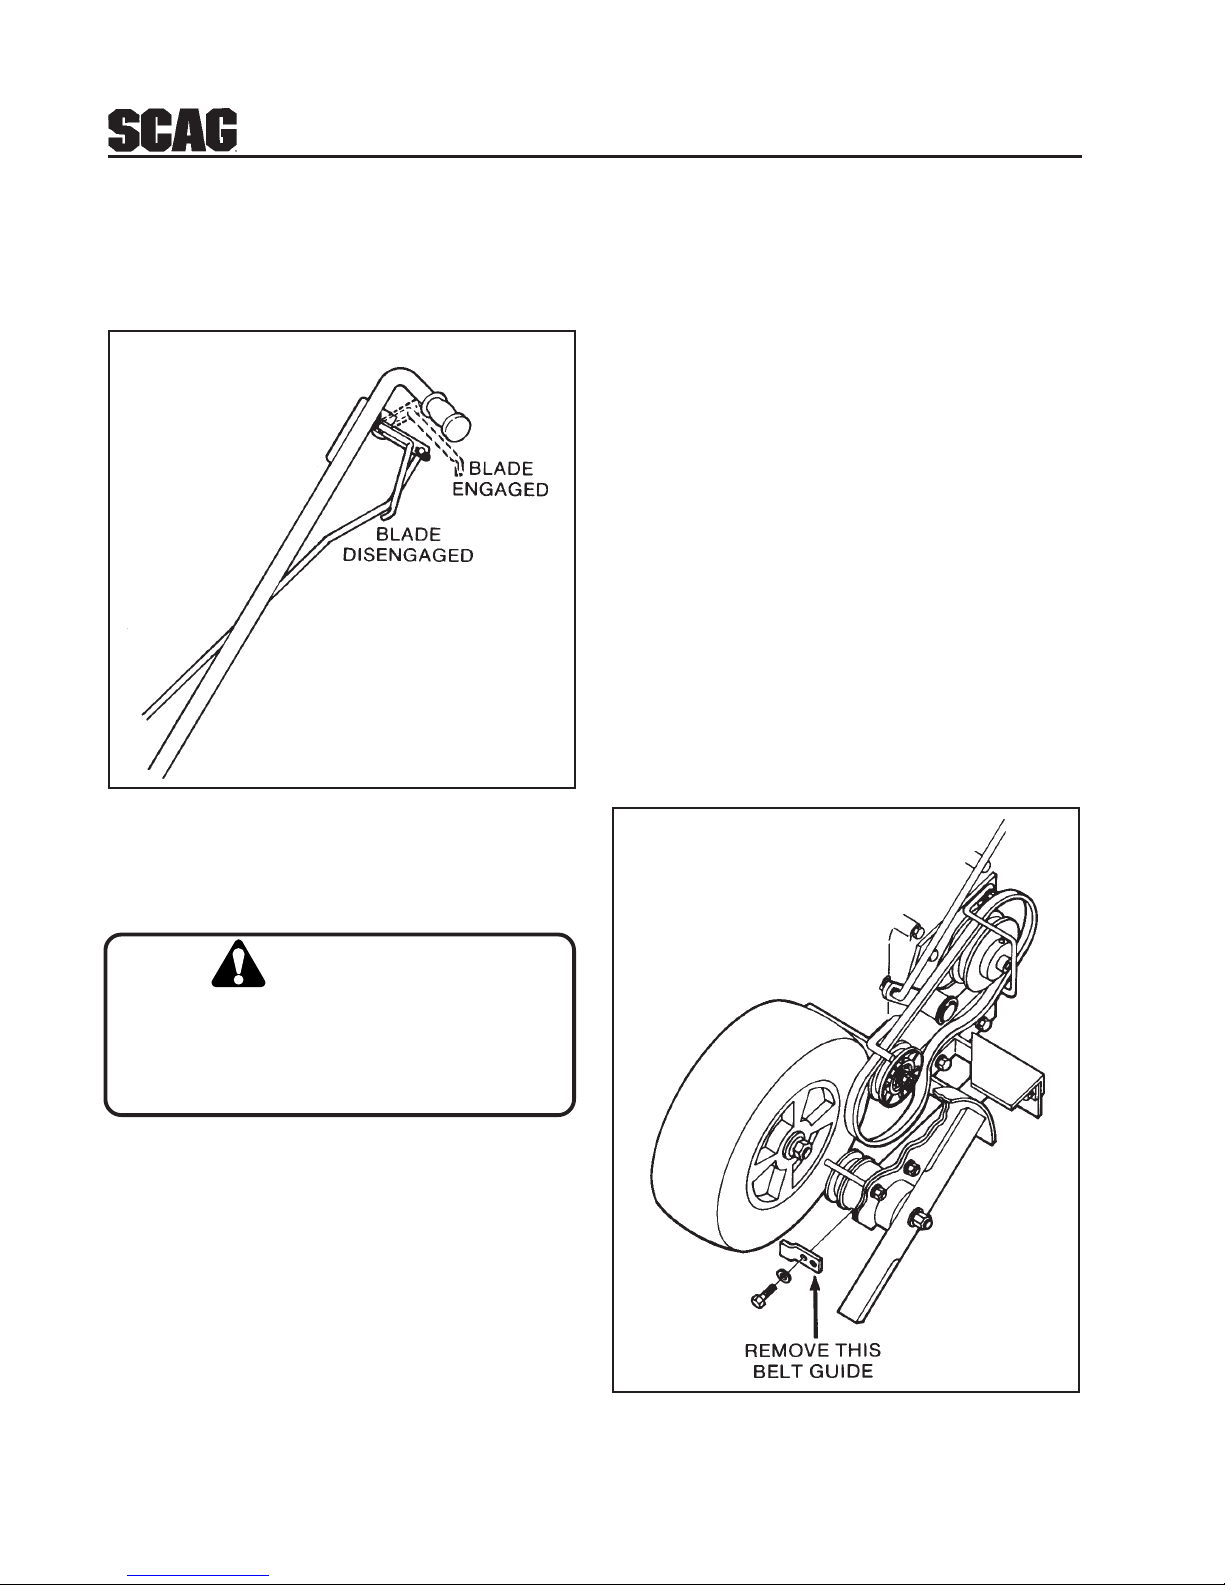
2. Pull the operator presence safety levers up to
engage the blade (See Figure 7) and carefully
raise the front wheel until the blade is at the
desired cutting depth. When the height adjustment
lever is all the way forward, the blade is 1/2 inch
from the ground. The blade is lowered
approximately 1/4 inch for each notch in the
heightadjustmentindex.
Figure 6, Edger Blade Controls
CAUTION:
6
4. Remove the oil drain plug and drain the oil into
an appropriate container.
5. After the oil is drained, replace the drain plug
and refill the crankcase to the level specified in
the engine owner's manual.
6. Replace the oil cap.
7. Dispose of the used oil properly.
nn
nn
n Changing The Belt
1. Remove the flat bar belt guide at the front of the
spindle boom assembly (See Figure 8).
2. Remove the old belt.
3. Install the new belt. Do not attempt to pry or
force the belt into the pulley grooves as this may
damage the belt.
4. Replace the front belt guide.
Figure 8, Belt Replacement
SETUP & OPPERATION (CONT'D)
3. Push the edger forward slowly, adjust your pace
to the engine's capacity.
MAINTENANCE
To prevent injury from rotating parts turn the
engine stop switch to OFF and disconnect the
spark plug wire from the engine before
attemptingany maintenance.
nn
nn
nChanging Engine Oil
Oil should be changed after the first 20 hours of use
and then after every 50 hours of use.
1. Start the engine and allow it to warm up.
2. Turn the engine switch to OFF. Make sure the
blade has stopped turning. Disconnect the spark
plugwire.
3. Carefully clean all debris from around the oil
filler cap. Remove the cap.
CAUTION:
Figure 7, Engaging The Blade

7
MAINTENANCE (CONT'D)
nn
nn
n Belt Tension
Always adjust the belt tension after changing the
belt. New belts may stretch. Excess tension on the
belt will make holding the clutch difficult and cause
the belts to wear.
To adjust belt tension (See Figure 9):
1. Remove the cotter pin from the lower control rod
and disconnect the lower control rod from the
idlerpulleyassembly.
2. To increase the belt tension, loosen the hex nut
and turn the lower control rod to shorten the rod.
Retighten the nut after the rod is reinstalled.
Figure 9, Belt Tension
nn
nn
n Changing the Blade
The blade is sharp! Wear gloves when
changing the blade. Do not operate the edger
with a damaged or excessively worn blade.
Note: Blades must be balanced before installation
to prevent vibration and wear to the edger.
1. While holding the hex bolt head by the spindle
pulley, remove the nut and washer and carefully
remove the blade from the assembly (See Figure
10).
2. Install the new blade.
3. Replace the nut and washer.
4. Tighten the nut securely. Keep the spindle shaft
from rotating with a wrench on the hex nut located
on the pulley.
Figure 10, Blade Replacement
CAUTION:
Inhaltsverzeichnis
Andere Scag Power Equipment Kantenschneider Handbücher


