Schonberg Leipzig Bedienungsanleitung

MT-RT1806
Preparations
11
Cleaning & Maintenance
1. Use general liquid detergent and soft cloth for daily cleaning. Don't use detergent that
with acetone or ammonia. Disinfector with formic acid and formaldehyde is forbidden
during disinfection.
2. If there is scratch on the bathtub surface, use 2000# waterproof abrasive paper to
polish it and lay toothpaste on. Then use soft cloth to furbish it.
3. Scale deposit can be wiped off with warm citric acid or vinegar by a soft cloth.
4. Screw off the Water Circulation and jets for cleaning when plug up by litter, such as hair
5. Frequent cleaning is not necessary for the parts gilded and silver-gilt
6. Don't clean the tub with hard or coarse material to avoid any scratches; and don't clean
the tub by detergent with chemical menstruum to avoid any damages.
7. Be sure to drain off the water and disconnect the power supply after use
8. Don't hit and score the bathtub by hard or keen-edged material. And don't touch the
bathtub by cigarette end or heat source that over 70
9. Water massage system cleaning: fill the bathtub with 40 hot water, and add
detergent(2g/L). Then run the water massage system for 5 minutes. After that, stop the
pump and drain the water. Fill the bathtub with cold water, and run the water massage
system for 3 minutes. Clean the bathtub after stopping the pump and draining off the
water.
1. The installation should be carried out by a qualified technician, and should be according
to the manual.
2. The appliance electric parameter should be tally with the National Safety Standard. And
there should be creepage protector on the power supply. Make sure the ground wire is
safe. Don't touch the switch, electrical outlet and plug with water.
3. Don't use overheated water. Put cold water first, then hot water. Don't run the appliance
until the water level is higher than the jets.
4. The rated voltage of this appliance is 220V. Don't run it when the voltage is over 235V
or under 190V.
5. Disconnect the power supply after use
6. Don't take a bath for a long time. Recommended time: less than 30 minutes
7. Please restart the appliance for occasional system halt
8. If the supply cord is damaged, it must be replaced by the manufacturer, its service
gent or similarly qualified persons in order to avoid a hazard.
9. This manual is attached with the product. Before installation, please read it carefully.All
he installation and use should conform to this manual, to avoid damage or other accident.
Precautions
Caution:
1. When the bathtub can't work, please check according to the troubleshooting list. If you can't judge
the reason or unable to repair it, please contact the seller or Bellagio Luxury's maintenance center
2. To insure the customers' safety, the installation should be carried out by a qualified technician.
Please use eligible creepage protector. The ground wire should be well connected to the ground.
Leipzig
www.schonbergbathrooms.com

Pillows: 2pcs
Dear Customer,
Thank you for choosing our product. For your safe concern, please take a few
minutes to read this manual before installation and use.
WARNING
1. Ensure that the installation is in the correct zone and that equipotential bonding is
carried out.
2. The new hose-sets supplied with the appliance are to be used and that old hose-
sets should not be reused.
3. This appliance is not intended for use by persons (including children) with reduced
physical, sensory or mental capabilities, or lack of experience and knowledge,
unless they have been given supervision or instruction concerning use of the
appliance by a person responsible for their safety.
Children should be supervised to ensure that they do not play with the appliance.
4. Pay attention to the drop height when go in or out of the appliance, to avoid
stumbling. Watch out the appliance with suds
5. Don't use acidic and strong alkaline detergent, acetone, ammonia and so on.
Clean with alkalescent detergent and soft cloth
6. Put on fluid sealant once it shed, to avoid water leakage.
7. Settings, configurations and details of the products are subject to be changed
or upgraded without prior notice.
8. For the maintenance, please contact the technicians appointed by the dealer and
don't disassemble and fix by yourself, or the supplier will be free from any
consequences that may occur.
Preparations
02
01
Please use tools to open the packing;
Make sure all accessories are in the packing
Drain 1pcs Handheld shower
hose 1pcs
Accessory Box 1:
Handheld shower 1pcs Waterfall faucet 1pcs Drain cover 1pcs
Plastic Connect Part 12pcs
Accessory Box 2:
8X50 Hexagonal Screw 6sets 4X12 flat Head Self-tapping Screw 36pcs
A: Gradient B: Sealant C: Adjustable spanner D: Screwdriver F: Thread sealing tape
Installation Tools:(no included)

A: Waterfall Faucet
B: Handheld Shower
C: Switch of Handheld Shower and Faucet
D: Water Regulator
E: Water Inlet(Cold/Hot)
6Waterfall Faucet
7Big Jets
8Handheld Shower
9Water Circulation
Air Jets
10
Small Jets
Pillow
Wood Skirt
11
12
13
14 Base Angle of Skirt
04
03
Preparations
620mm
1400(1800)mm
1400(1800)mm
700mm
550mm 500mm
Drain hole
Cold
Hot
700mm
Bathtub Configuration
Installation of Electric Appliance
Rated Voltage Rated Frequency Max Rated Power Rated Current
220V 50Hz 3500W 16A
1. Electric Parameter
2. There should be creepage protector on the power supply. Earthed appliances must be
permanently connected to the fixed wiring with well protective ground wire.
The section of the electrical wire should not be less than 2.5 . The power supply
appliance should be tally with the National Safety Standard. And connect the protective
ground wire to the bathtub frame with groundwire sign (The creepage protector is
prepared and connected by yourself)
Installation of Water Supply
1. Hose Connecting Way
The fittings of bathtub were already connected before shipment. You only need to
connect the cold/hot water hose to the corresponding water supply tube, which should
be in the shadow of the bathtub back.
Water Inlet Faucet Connecting
2. Water Supply Chart
Hot Water
Cold Water
Water Regulator Switch Valve
Handheld shower
Waterfall Faucet
Preparations
1Divider
2Regulator
3Water Inlet Switch
4Underwater Light
5Control Panel A B CD E

06
05
Installation Process Installation Process
Installation of Bathtub
1. Overturn the bathtub(backside upturned), and wrap the drain hole with Thread sealing
tape. Then fasten the drain tube.
As picture show:
C
Sealant
2. As the picture show:install the waterfall faucet and handheld shower,then connect to the
water hose. Put on the pillows and move the bathtub to the wall corner. Then put the
downcomer to the cloaca and seal it up with the sealant. Afterwards,adjust the anchor
screw to make the bathtub horizontal.

Installation Process
08
07
3. Put the wood skirts around the bathtub, and seal the gap between the bathtub side and
wall with sealant.
MAIN CONTROL BOX
LEAKAGE
PROTECTOR
GND
HEATER WATER
PUMP
WIND
PUMP
HM M
O3SENEOR
ANT
PANEL
CTRL LINE
SKIRT LAMP
SPEAKER
WATER DETECT
Power
Switch
RADIO
Switch
Air Pump
Switch
Channel Selecting
Switch
MEMORY/TAKE
Programs Switch
Ozonizer
Switch Water Light
Switch
Water Pump
Switch
Heater
Switch
Frequency Display ScreenTemperature Display Screen
RADIO VolumeRADIO Volume
Exterior Description
System Installation Sketch
Instruction of Using Our Products

10
09
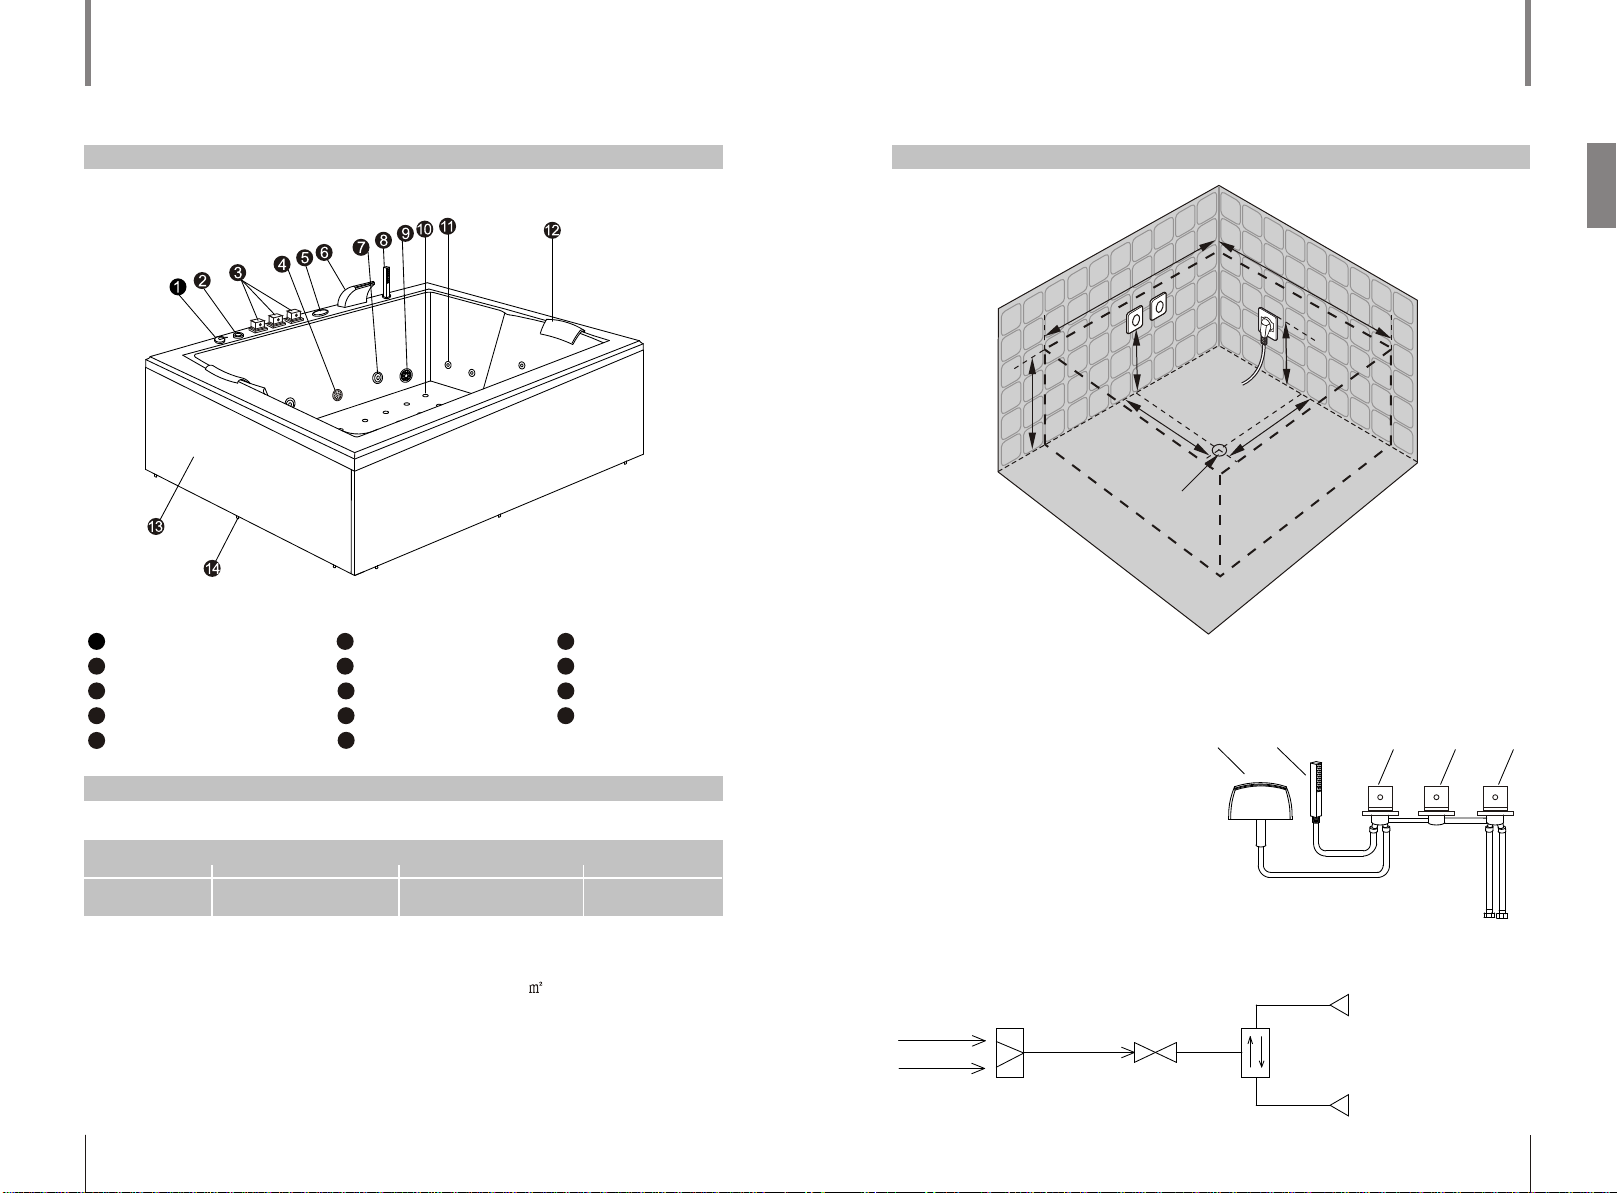
Instruction of Using Our Products Instruction of Using Our Products
1. Power: AC110V/220V
2. Underwater Lamp: AC12V
3. Water Pump: AC110V/220V
4. Heater: AC110V/220V
5. Air Pump: AC110V/220V
1. ( )Power on/off key, Other function can be used only when power is on.
3
2. ( )O on/off key 3
Other key will be no action except for the power key when the O is on.
33
O will be stopped in 15 minutes when O is on.
3
O key will be no action when other function key is pressed.
3
O key can be action only when the power key is off and then is on .
3. ( )Heater control
The heater can be work normally only when the water pump is open.
( )Temperature can be set when the heater key is on .
Temperature can be adjusted from 10 to 50 .
Temperature display window will flash when the temperature is set.
And will display current water temperature in five seconds.
4. ( )FM Radio on/off key
( )Radio volume up and down key.
They can select mem channel when mem key is on the select station state or on the
mem store state.
( )They can turn the radio step by step when they are pressed on short time.
They can search the station when they are pressed on long time.
( )It can select mem channel when it is pressed on short time.
It can be the storing station state when, it is pressed on long time.
And it can store station when it is pressed again.
5. ( )Air pump on/off key
Air pump can be opened only when the water level is at the set position.
And will be automatically closed when the water level is low.
6. ( )Water pump on/off key
Water pump can be opened only when the water level is at the set position.
And will be automatically closed when the water level is low.
7. ( )Underwater lamp on/off key
8. Outlet valve control, it will outlet water for 3 minutes after 10 minutes.
When it detects the anhydrous state from the having water state.
Operation Manual
Run Condition
1. Switch on the power supply
2. Turn on the cold/hot water switch, and adjust to the suitable temperature. Use the switch
to choose the faucet or handheld shower to let water in.
3. Don't press the water pump switch unless the water level in the bathtub reach to or
higher than the jets position.
4. Use air regulator to adjust the massage power.
5. Rotate the handheld shower to adjust the massage effection.
6. Use light switch to turn on/off the underwater light.
7. Press water pump switch, turn off the pumps, and drain the water after use.
8. Turn off the power supply.
Usage
Troubleshooting
Trouble Possible Reason Try this to solve
Water pump
Don't work.
Power supply is not well connected,
the creepage protector disconnect . Turn on the power supply, and connect
the creepage protector.
Clean the water pump impeller.
Water pump impeller was stuck
by sundries. Press the water pump switch.
The water pump switch is off.
Plug the power supply in.
Power supply plug don't insert or no
enough power supply.
Repair or replace the water pump.
Water pump trouble.
Air pump don't
work.
No enough power supply. Check the circuitry and plug the power
supply in.
Press the air pump switch.
Switch is off.
Plug the power supply in.
Power supply plug don't insert.
Massage power
can't be adjusted.
Voltage problem. Check voltage.
Adjust switch is off or has problem.
Water Circulation is blocked.
Check, replace the switch.
Clean the water circulation.
Bathtub don't
stand horizontally. Adjustable foot is not well-adjusted. Adjust the Adjustable foot.
Water leakage.
Obturating ring is not good. Replace the obturating ring.
Nut is loose.
Connect part is not well connected.
Screw down the nut.
Pay attention to the connect part
conglutination
Inhaltsverzeichnis
Andere Schonberg Badewanne Handbücher
Beliebte Badewanne Handbücher anderer Marken

Lyons
Lyons Elite ETLxx663219 Series Bedienungsanleitung

Woodbridge
Woodbridge BJ500 Montageanleitung

Whirlpool
Whirlpool Ariel ARL-702 Bedienungsanleitung

TEIKO
TEIKO EXCELLENT DUO Bedienungsanleitung

American Standard
American Standard Colony 5-1/2' x 32" Bedienungsanleitung

American Standard
American Standard 3052OD.X0X Kurzanleitung


