Scitex Dijit 5000 Series Bedienungsanleitung

Scitex Digital Printing, Inc.
Dijit 5000 Series Printers
FLUSH KIT INSTRUCTIONS
Flush Kit 0177491

FCC Compliance Statement
This equipment has been tested and found to comply with the limits for a Class A digital device, pursuant to Part 15 of the FCC Rules. These limits are
designed to provide reasonable protection against harmful interference when the equipment is operated in a commercial environment. This equipment gener-
ates, uses, and can radiate radio frequency energy and, if not installed and used in accordance with the instruction manual, may cause harmful interference to
radio communications. Operation of this equipment in a residential area is likely to cause harmful interference, in which case the user will be required to cor-
rect the interference at his own expense.
Note: Good quality, shielded (braided shielded) cables must be used for the RS-232-C and Centronics interfaces.
Canadian EMI Compliance Statement
Le présent appareil numérique n’émet pas de bruits radioélectriques dépassant les limites applicables aux appareils numériques de la classe A prescrites dans
le Règlement sur le brouillage radioélectrique édicté par le ministère des Communications du Canada.
This digital apparatus does not exceed the Class A limits for radio noise emissions from digital apparatus set out in the Radio Interference Regulations of the
Canadian Department of Communications.
EMI-CISPR 22/EN 55 022/CE Marking
Warning: This is a Class A product. In a domestic environment, this product may cause radio interference in which case the user may be required to take ade-
quate measures.
Dijit 5000 Series Printers Flush Kit Instructions
© Copyright 2001. Scitex Digital Printing, Inc. All rights reserved.
3000 Research Blvd., Dayton, OH 45420-4099
This document contains proprietary information of Scitex Digital Printing, Inc. or its licensors and is their exclusive property. It may not be reproduced with-
out a written agreement from Scitex Digital Printing, Inc. No patent or other license is granted to this information.
The software described in this document is furnished under a license agreement. The software may not be used or copied except as provided in the license
agreement.
Scitex Digital Printing, Inc. makes no warranty of any kind with regard to the contents of this document, including, but not limited to, the implied warranties
of merchantability and fitness for a particular purpose. Scitex shall not be liable for any errors or for compensatory, incidental or consequential damages in
connection with the furnishing, performance, or use of this document or the examples contained herein. Information concerning products not manufactured by
Scitex Digital Printing, Inc. is provided without warranty or representation of any kind, and Scitex Digital Printing, Inc. will not be liable for any damages
resulting form the use of such information.
SCITEX VersaMark is a trademark of Scitex Digital Printing, Inc. Scitex and the Scitex logo are trademarks of Scitex Corporation, Ltd. or its subsidiaries and
may be registered in certain jurisdictions. FaxBack is a trademark of FaxBack, Inc. All other trademarks are property of their respective owners.
0113921 7/2001 Printed in U.S.A.
Part Number Revision Date Description ECN
0113921-002 001 07/2001 PDF document revision for 5122 PKG1017
Previous Releases
Part Number Revision Date Description ECN
0113921 002 07/2001 Revision for 5122 PKG1017
0113921 001 02/1998 Revised for current 5240 TES271
0113921 00 01/1998 Part of FLUSH KIT 5120/5240 (0177491) 09513

Flush Kit Instructions iii
Scope
These instructions describe how to flush ink from the fluid system and printhead
of a Dijit®5000 Series printer using kit 0177491. The ink flush procedure is
required when changing ink types or ink colors. This procedure should be
performed only by a Scitex field engineer or a service technician who has been
trained by Scitex Digital Printing, Inc.

Scope
iv Dijit 5000 Series Printers
Text Notations This manual uses the following typographical conventions.
Safety Notations The following definitions indicate safety precautions to the operator.
Note: Information that needs to be brought to the reader’s attention.
Caution: A situation where a mistake could result in the destruction of data or system-type
damage.
!WARNING
A potential hazard that could result in serious injury or death.
!DANGER
An imminent hazard that will result in serious injury or death.
This style Refers to
Ready
Text displayed by the software.
go
Anything you type, exactly as it appears, whether referenced in text or at a
prompt.
ENTER Special keys on the keyboard, such as enter, alt, and spacebar.
[NEXT] Buttons and lights on the printer operator panel.
Save Software command buttons and sections of dialog boxes, such as
group boxes, text boxes, and text fields.
File →Open A menu and a specific menu command.
ALT+F1Pressing more than one key at the same time.
ALT, TAB Pressing more than one key in sequence.
xx,yy Variable in error messages and text.
jobfile.dat File names.

Scope
Flush Kit Instructions v
Service and Support Technical equipment support is available 24 hours a day, 7 days a week.
Software and applications support is available 8:00 a.m. to 5:00 p.m. EST/EDT,
Monday through Friday.
Phone Fax
U.S.A. and Canada
Field/Telephone support 1-800-4SCITEX
(1-800-472-4839) +1-937-259-3808
Europe
Field/Telephone support +4121-806-0404 +4121-806-1920
Asia/Pacific Rim
Field/Telephone support +65-744-6400 +65-744-6700
Japan
Field/Telephone support +81-3-3256-2613 +81-3-3256-2616
Worldwide Technical support,
order placement, documentation,
and product information requests
+1-937-259-3739 +1-937-259-3808
Worldwide Automated FaxBack™
Information Line +1-937-259-3520
Internet
Updated service information http://www.scitexdpi.com
The above telephone number listing is accurate as of the publication date. On the Internet,
go to http://www.scitexdpi.com/support for updated telephone numbers.


Flush Kit Instructions 1
Flush Procedure
Use the following procedure to flush any of the following 5000 series
printers:
•5120
•Early 5240
•Current 5240 (see note below)
•5122.
Apply the following general guidelines to the flush procedure:
•Visually inspect the printer lines for residual ink before refilling the
system with new ink.
•For high-contrast color changes, such as black to yellow, repeat the
procedure until the system lines are completely clear. Even very small
amounts of residual dark ink will discolor the lighter ink.
•The ink draining and purge procedures are repeated several times
during the flush procedure. This repetition is deliberate and ensures
proper flushing of the fluid lines. Perform all steps ofthe procedure as
described.
•Take precautions against ink spills and have materials on hand to
clean up spilled ink.
Caution: Prevent garments and exposed skin from having prolonged contact with
ink. Clean up spilled in promptly.
•Read through the entire procedure completely before starting.
•If you have problems with the procedures, contact technical support
(see “Scope”).
Note: The current model of 5240 is also called the 5240N.

Flush Procedure
2 Dijit 5000 Series Printers
Kit Inventory 1. Inventory kit 0177491. It should contain all the items shown in Figure
1.
Figure 1. Fittings and connectors, flush kit 0177491
2. If any items are missing, contact technical support.
3. Set aside any items not required for the type of printer you are
flushing.
Extra bypass filters are provided for the different printer models only
one is required. Fitting F1 is used only when flushing a 5120 printer.
4. Continue with “Printer Setup”.
Printer Setup 1. Turn on the printer with the POC test bypassed.
Press and hold OPEN EYELID while pressing PRINTER ON. When
the operator panel lights come on, release OPEN EYELID. The
printer on button indicator light stays lit.
F10
F9
F1
F2
F3
F4
F6
F5
F8
F7
Main filter
Fluid bypass
Inline
Fluid filters (2)
assemblies (3)
assembly
Fitting F1 for
5120 only
Flush Procedure
Flush Kit Instructions 3
2. Press STANDBY to deactivate the fluid system (or power up the
printer with the fluid system bypassed).
3. Turn the system controller (host).
4. Start Diagnostics by typing GO DIAG at the DOS prompt.
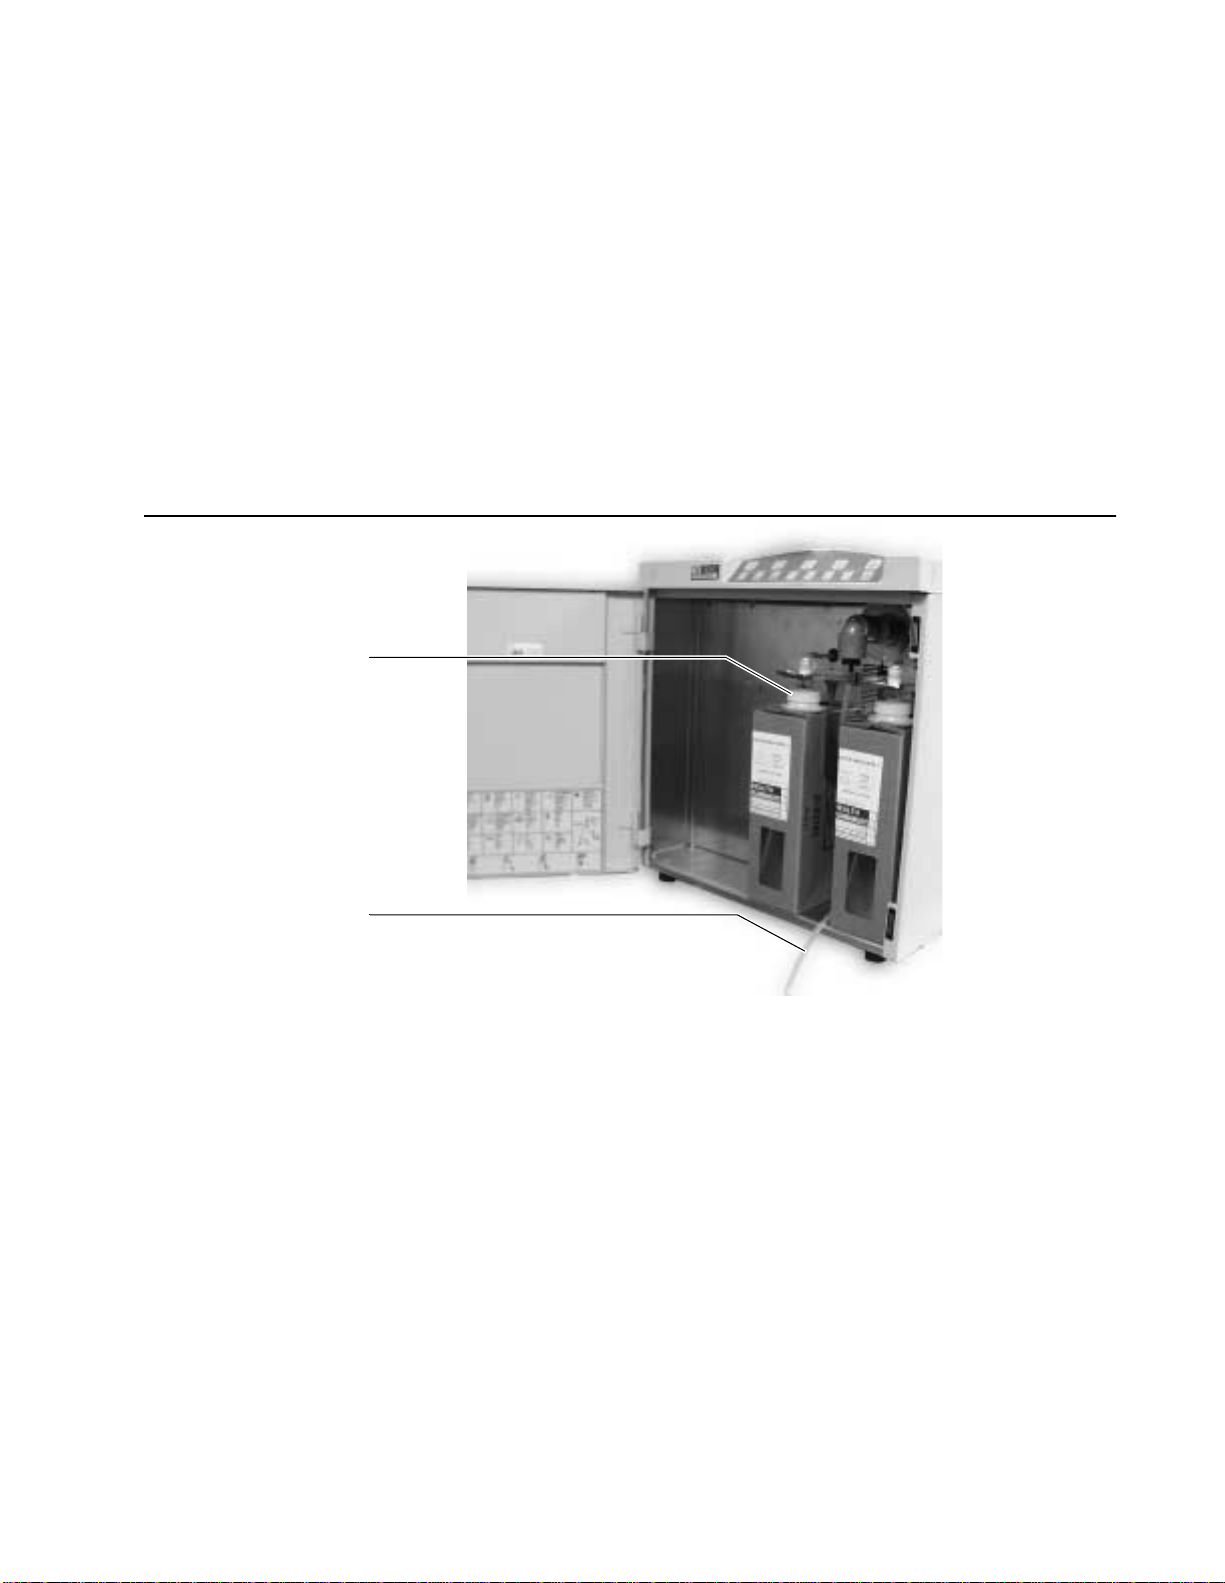
5. Remove the replenisher bottle and the ink bottle.
6. Connect one end of F3 to the system drain quick disconnect on the
back of the fluid compartment behind and between the bottle location.
See Figure 2..
7. Place and connect purge bottles in place of the removed replenisher
and ink bottles.
Figure 2. Drain line and purge bottles - Steps 6 and 7
8. Remove the printhead front and rear covers.
9. Pull the printer out and remove the printer cover. See the Service
Guide for detailed procedures.
Note: Use the correct printhead procedure for the type or printer being flushed.
Step 7.
Install purge bottles
Step 6.
Connect F3 to drain

Flush Procedure
4 Dijit 5000 Series Printers
5120 Printhead Emptying 10. To empty a 5120 printhead use the following procedure. (To empty a
5240 or 5122 printhead, go to step 12.)
Note: To open a quick disconnect fitting, press the release button and gently
separate the two parts of the fitting. Be careful to avoid jamming the
release button, or ink will leak.
a. Select Fluid System →Select State Table Type →Purge →
Save.
b. Select Fluid System → Printhead To State # 3 →Start.
c. Disconnect the printhead filter from its clip.
d. Disconnect the catcher quick disconnect.
e. Disconnect the twist connector on the inlet tube.
f. Wait a few minutes to allow the printhead ink to drain into the ink
supply.
5120 Printhead Isolation 11. To isolate the 5120 printhead use the following procedure.
a. Reconnect the catcher quick disconnect.
b. Disconnect the twist connector on the outlet tube.
c. Connect the manifold sides of the ink inlet tube and the ink outlet
tube to bypass tube F1.
d. Connect the open end of bypass tube F1 to the catcher tube.
e. Connect the printhead sides of the ink inlet tube and ink outlet
tube together. For the 5120 go to Step 14.
Inhaltsverzeichnis
Andere Scitex Drucker Handbücher


