Sierra Video SP-14 Bedienungsanleitung

SIERRA VIDEO
SP-14 SETUP GUIDE
User´s Manual

1
SP-14 Setup Guide
Version S 1.0

2
Contents
Introduction 3
The Basic System 4
Flexible Connectivity 5
Control via Front Panel Buttons 6
Set Scaler Functions 7
Input resolution and Frame Rate 7
Output Resolution and Frame Rate 7
Lock Mode (Genlock Timing) 8
Aspect Ratio Mode 9
MEMC (Motion Compensation) Mode 10
MEMC Cadence 13
MEMC Mask 14
Input Adjustments 15
Input Select Button Allocation 17
Audio Channel source selection 18

3
Introduction
This guide is a non-technical introduction to operating The SP-14 for up/down/cross standards
conversion with MEMC motion compensation.
The guide describes how to setup, scale, adjust for the best pictures.
This guide does not replace the product user manual and covers only the essential functions to get
started. For further information refer to the user manual.
Video Source Video Recorder
Monitor
SP-14
REF
4
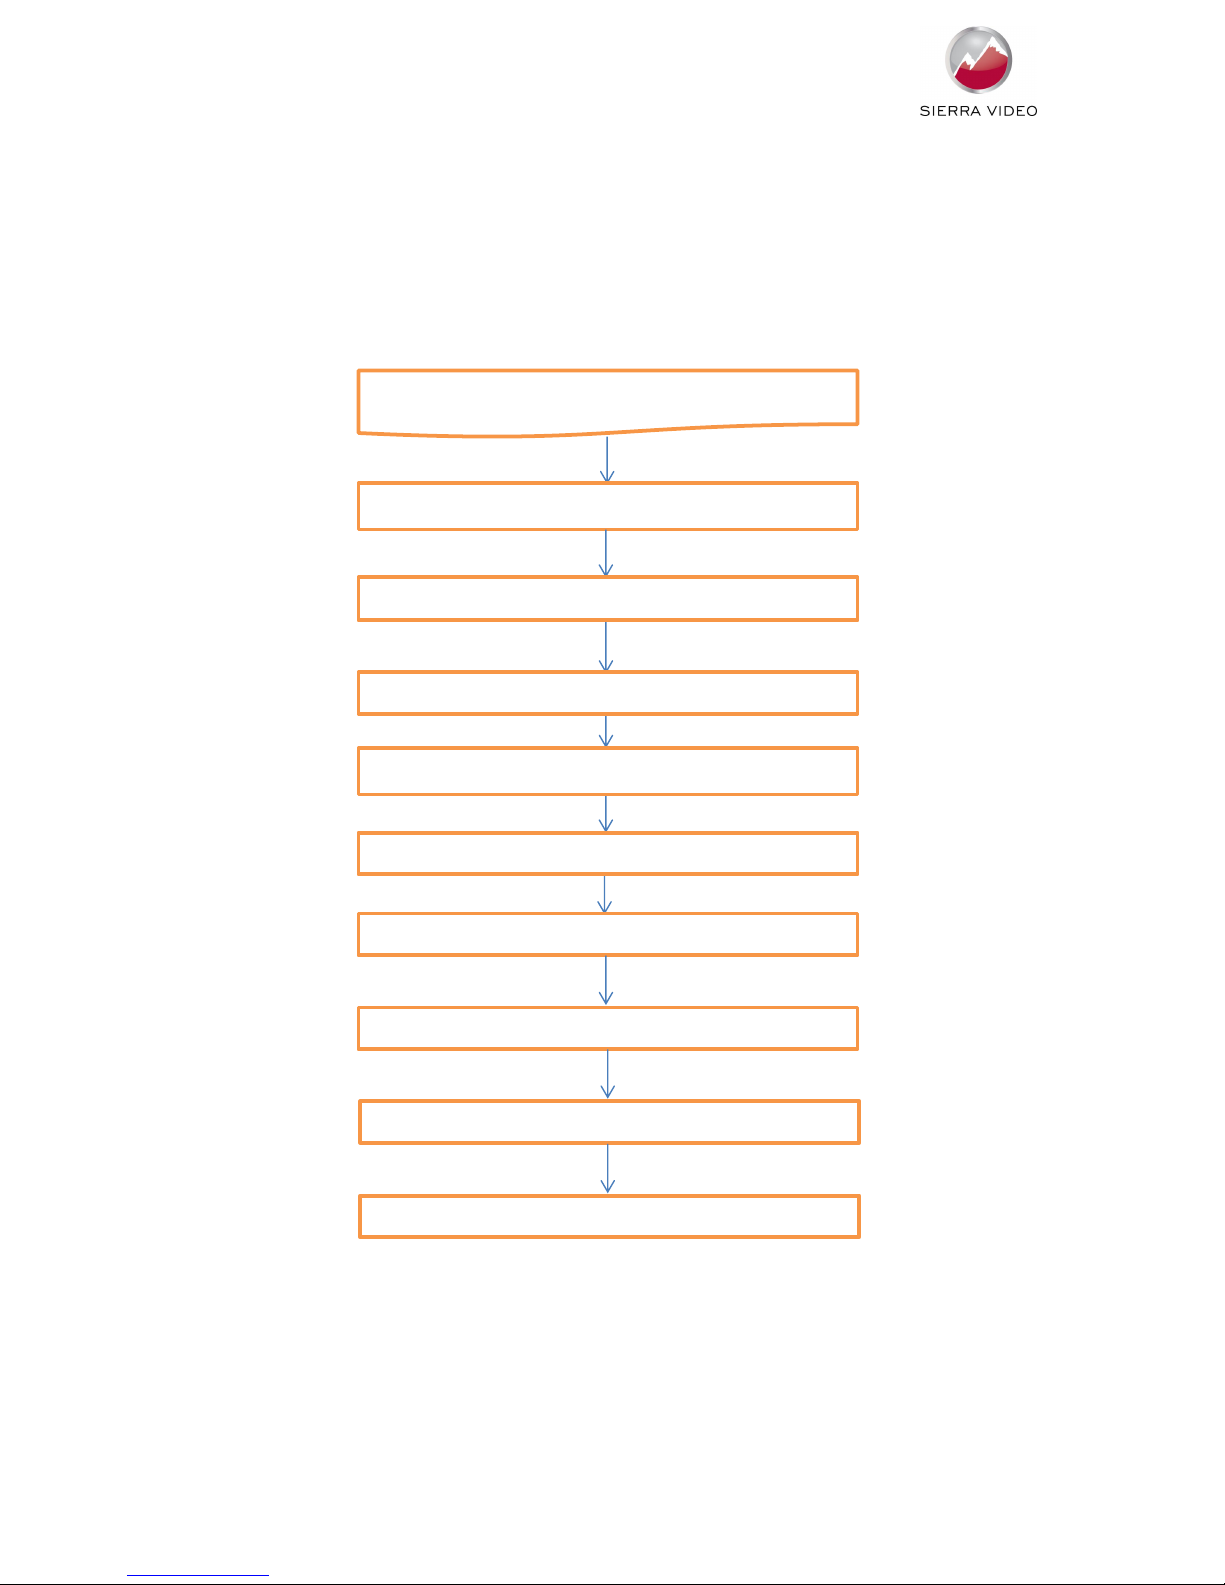
The Basic Setup
The flowchart below represents the basic setup, additional information can be found further in this
guide.
Setting up SP14
Connect Inputs and outputs
Set Output resolution and Frame Rate
Set Lock Mode (Genlock reference)
Set Motion Compensation modes
Set Exclusion zone
Set input characteristics
Input Adjustments and Video Filters
Input Button assignment
Audio Input Select and channel swap

5
Flexible Connectivity
The SP-14 can be used as a routing switcher and universal interface for connecting many up-to-date
and legacy formats
Inputs
2x 3G-SDI with automatic cable EQ, (HD-SDI & SD-SDI compatible) with embedded audio capability
for 3G, HD & SD
1x HDMI with audio & deep colour, HDCP compatible
1x DVI-D, HDCP compatible
1x VGA Analogue graphics via 5 BNCs, supports RGBHV & RGsB
2x Composite Video via BNC (NTSC/PAL/SECAM)
1x S-Video via 2x BNC (NTSC/PAL/SECAM)
1x Component video YPbPr via BNCs
4x AES 48KHz digital audio pairs via BNCs
Outputs
1x 3G-SDI (HD-SDI/SD-SDI compatible) with embedded audio for 3G, HD & SD
1x DVI-D, HDCP compatible, HDMI deep colour capable, dual-function output automatically switches
between DVI or HDMI depending on device connected to output
1x Component Analogue YPbPr
4x AES 48KHz digital audio pairs via BNCs
NB: For non-HDCP input signals all outputs can be used simultaneously but if the input signal is HDCP
encrypted then only the DVI/HDMI output is available due to HDCP licensing rules.
SP-14 Rear Panel
Control via Front Panel LCD and Menu Buttons

6
The SP-14 has front panel LCD display which gives status information and access to the in-built menu
system.
Sierra Video
SP-14
Software Ver:
Safe Operation
SP-14 features safe operating conditions
1) The front panel Standby button must be pressed and held for 4 seconds to activate
2) The front panel channel select and menu buttons are locked by default; to activate the front panel
press the menu button and then the input button
IN: 1920x1080i @50.00 Hz 3G-SDI 1
OUT:1920x1080i @59.94 Hz Free Run Mode
>>> Now press’INPUT’key to unlock <<<
3G-SDI 1 C-YPbPr HDMI Test Pat
Attempting to operate menu when keypad is locked will prompt this message in the summary screen
IN: 1920x1080i @50.00 Hz 3G-SDI 1
OUT:1920x1080i @59.94 Hz Free Run Mode
Unlocked Keypad Preset 1
3G-SDI 1 C-YPbPr HDMI Test Pat
When the keypad is un-locked this message will show in the summary screen
This feature can be disabled in Menu>Miscellaneous>Unit Configuration
All menu items can be accessed via the front panel
1) Press ‘Select/Enter’ to access the menu
2) Use the ‘up & down’ keys to navigate the required menu item to the top of the screen
3) Press ‘Select/Enter’ to access that item
4) Repeat 2) and 3) to reach the item of choice
5) Use ‘left and right’ keys to select chosen mode
6) Press ‘Menu/ESC’ to back out of menu items

7
Setting Scaler Functions
Default Settings
The SP-14 comes with default setting that should give good results on most content but you do need
to decide on some parameters for your application. As you get used to the unit you can be more
adventurous
Input resolution and frame rate
The input resolution and frame rate is recognised automatically and displayed on top line of the
status menu screen
IN: 1920x1080i @50.00 Hz 3G-SDI 1
OUT:1920x1080i @59.94 Hz Free Run Mode
Unlocked Keypad Preset 1
3G-SDI 1 C-YPbPr HDMI Test Pat
In this example the input is 1920x1080P at 50Hz from the 3G-SDI input 1
Set Processor Output Resolution and Frame Rate
Set the processor output resolution and frame rate you require in the Output Settings menu
Using the up and down arrow keys move Output Settings to the top of the window and press select
[Output Settings ]↑
Audio
Closed Captioning
Information
Using the up and down arrow keys move Output Format to the top of the window and press select
[Output Format 1080i50]↑
Arc Mode Side Panels/Ltrbox 25%
Arc Custom N/A
Process Mode Full Processing ↓
Press select, use the left and right arrow keys to choose the output format, press select
Output Format > 1080i50<
Arc Mode
Arc Custom
Process Mode

8
Set Lock Mode
In this same section of menu set the reference mode for the output of the SP-14.
Using the up and down arrow keys move Output Settings to the top of the window and press select
[Output Settings ]↑
Audio
Closed Captioning
Information
Press select, use the left and right arrow keys to choose the Lock Mode, press select
[Lock Mode Auto Format]
Reference Source Off
Reference Offset
Output Format 1080i50 ↓
Free Run mode uses the SP-14’s in-built clocks to provide sync timing.
Note that if you choose Auto Format mode then the output resolution and frame rate will be
determined by the external Genlock reference.
Note that if you choose Frame Synchronize mode the resolution is set in the ‘Output Format’ but the
frame rate is synchronised to the Genlock signal when the genlock signal and frame rate of the mode
set under Output Format are identical. This is for applications such as using a standard definition
(SD) reference when outputting a high definition (HD) signal or vice versa.
If the genlock signal and the Output Format are both HD or SD then the output format and genlock
signal format need to be identical to obtain a lock. Cross lock combinations that are not supported
are reported in the menu status screen as not available (NA).
Genlock Reference
Item 2 on this section of menu ‘Reference Source’ enables the choice of either Bi/Tri Level Analogue
reference or Digital SDI reference. Note these have separate input sockets on the back panel
Item 3 on this section of menu ‘Reference Offset’ enables full broadcast genlock timing adjustment

9
Set ARC Mode
If you are converting the Aspect Ratio of the picture there are pre-set modes to choose from or a
custom mode, if you choose Custom Mode then you will also need to set the ARC Custom on the
next line of the menu
Using the up and down arrow keys move Output Settings to the top of the window and press select
[Output Settings ]↑
Audio
Closed Captioning
Information
Using the up and down arrow keys move Arc Mode to the top of the window and press select
[Arc Mode Side Panels/Ltrbox 25%]↑
Arc Custom N/A
Process Mode Full Processing
3G-SDI Data Map 10bit 4:2:2 YCbCr ↓
Press select, use the left and right arrow keys to choose the Arc Mode, press select
Arc Mode > Panels/Ltrbox 25% <
Arc Custom
Process Mode
3G-SDI Data Map
Inhaltsverzeichnis
Andere Sierra Video Schalten Handbücher


