Silonn SLIM02 Bedienungsanleitung

Thank you for choosing this Silonn product! At Silonn we strive to
provide you with the best quality products and services in the industry.
Should you have any issues, please don't hesitate to contact us at
Technical Support: 877-546-8603 Mon-Fri 8am - 8pm (CST)
Model: SLIM02
V1.0 (A)
Ice Maker Instruction Manual

- 1 -
TABLE OF CONTENTS
IMPORTANT SAFETY INSTRUCTIONS ......................................... 2-4
SAFETY INFORMATION (FOR GROUNDING INSTRUCTIONS) ....................... 5
PRODUCT DESCRIPTION .................................................................... 6
CLEANING AND MAINTAINING YOUR ICE MAKER
BEFORE FIRST USE .................................................................................. 7
AFTER LONG-TERM USE ..................................................................... 7-8
STORAGE ................................................................................................. 8
OPERATION PANEL AND DISPLAY AREA ........................................ 9
USING YOUR ICE MAKER
PREPARING FOR USE ............................................................................. 10
ICE MAKING OPERATION ................................................................. 10-13
TROUBLESHOOTING ........................................................................ 14
TECHNICAL PARAMETERS & CIRCUIT DIAGRAM
TECHNICAL PARAMETERS .................................................................... 15
CIRCUIT DIAGRAM ................................................................................ 15

PERSONAL SAFETY IS VERY IMPORTANT.
To reduce the risk of fire, explosion, electrical shock, or injury when using
the ice maker, follow these basic safety precautions.
READ AND FOLLOW ALL INSTRUCTIONS BEFORE USING THE ICE
MAKER.
This is the safety alert symbol:
All safety messages will follow the safety alert symbol and the word
“DANGER” or “WARNING”.
- 2 -
IMPORTANT SAFETY INSTRUCTIONS
DANGER
WARNING
These words mean:
You could possibly be fatally injured if you do not follow these
instructions.
All safety messages will indicate the potential hazard, the way to avoid
injury and the consequences of failure to follow the instructions.
• DANGER - Risk of FIRE or EXPLOSION. Flammable refrigerant used. DO
NOT use mechanical devices to defrost the Ice Maker. DO NOT puncture
refrigerant tubing.
• DANGER - Risk of FIRE or EXPLOSION. Flammable refrigerant used. DO
NOT use mechanical devices to defrost the Ice Maker. DO NOT puncture
refrigerant tubing.
• CAUTION - Risk of FIRE or EXPLOSION. Flammable refrigerant used.
CONSULT repair Manual/Owner’s guide before attempting to install or
service this product. All safety precautions must be followed.
• CAUTION - Risk of FIRE or EXPLOSION. Dispose of property in accor-
dance with federal or local regulations. Flammable refrigerant used.
• CAUTION - Risk of FIRE or EXPLOSION due to Ppuncture of refrigerant
tubing; FOLLOW Instructions Carefully. Flammable Refrigerant used.
WARNING

- 3 -
• Do not operate the ice maker, or any other appliance with a damaged
cord. Connect to properly polarized outlets only. Do not plug other
electrical appliances into the same outlet. Be sure that the plug is fully
inserted into the plug socket.
• Do not run the power cord over carpeting or other heat insulators. Do
not cover the cord. Keep the cord away from high traffic areas, and do
not submerge it in water.
• Due to potential safety hazards under certain conditions, we strongly
advise against the use of an extension cord. However, if you must use
an extension cord, it is absolutely necessary that it is a No.14 AWG
minimum size and rated no less than 1875 watts.
• Unplug the ice maker before cleaning or making any repairs or servicing.
• Exercise caution and use reasonable supervision when the ice maker is
used near children.
• The ice maker must be properly installed and located following the
installation instructions before it is used. The ice maker is for indoor
household use only. Do not use outdoors. Place the ice maker away
from direct sunlight and make sure that there is at least 6 inches of
space between the back of your ice maker and wall. Keep a minimum
distance of 6 inches on each side of your ice maker free.
• To avoid a hazard due to instability of the ice maker, it must be placed
on a even or flat surface.
• Do not use other liquids to make the ice cubes other than water.
• Do not clean your ice maker with flammable fluids. The fumes can
create a fire hazard or explosion.
• Do not tip over.
• If the ice maker is brought in from outside in the wintertime, give it a
few hours to warm up to room temperature before plugging it in.
• Do not allow children to climb, stand, or hang on the ice maker. Serious
injury may occur.
• Do not use water that is micro-biologically unsafe or of unknown quali-
ty.
• Do not place the power cord in such a way it could be pulled on by
children or cause a tripping hazard.
• Do not place the power cord in such a way that it is in contact with hot
surfaces.

- 4 -
• Do not operate if any component, including the cord or plug, is dam-
aged.
• Unplug the ice maker before cleaning by hand and when not in use.
• Do not immerse any part of the ice maker in water.
• Do not plug or unplug the ice maker with wet hands.
• WARNING: The ice maker must be grounded.
• The ice maker should be installed in accordance with the safety stan-
dard for Refrigeration Systems, ASHRAE15. The ice maker shall not be
installed in corridors or hallways of public buildings.
• To minimize the risk of possible ignition due to incorrect parts or
improper service, only the factory-authorized service personnel are able
to repair the ice maker. Do not attempt to disassemble, repair, modify,
or replace any part of the ice maker.

- 5 -
1. The ice maker must be properly grounded for your safety. The ice maker
requires a standard 110-120volt, 60Hz electrical outlet. Plug three-prong
plug of the ice maker into an exclusive, properly installed, grounded wall
outlet. Do not under any circumstances cut or remove the third (ground)
prong from the power cord. Any questions concerning power and/or
grounding should be directed toward a certified electrician.
2. The power cord of the ice maker is equipped with a three-prong plug
which mates with standard three prong wall outlets (like figure A) to mini-
mize the possibility of electric shock.
3. If you do not have a three-slot grounded receptacle (like figure B): Please
buy a 2 to 3 prong converter (available on your local electronics store or
online supplier for connecting 3-prong grounding-type plugs to 2-prong
plug socket).
SAFETY INFORMATION (FOR GROUNDING INSTRUCTIONS)
* Improper use of the grounded plug can result in the risk of electrical
shock. If the power cord is damaged please call our customer service.
DANGER
Grounding Pin
Cover of Grounded Outlet Box
2 to 3 Prong Converter
Grounding Lug
Metal Screw
Cover of Grounded Outlet Box
A
B
The wires in this main lead are colored in accordance with the following
code:
Green or Green with a strip yellow: Grounding
White: Neutral
Black: Live
IMPORTANT:

- 6 -
PRODUCT DESCRIPTION
1. Control Panel
2. Ice Basket
3. Evaporator
4. Water Separator Pipe
5. Top Cover
6. Cover For Water Reservoir
7. Support Seat For Water Bottle (Optional, Special For The Unit Supplied
By Bottled Water)
8. Hot Air Outlet
9. Water Draining Cap: To Draining Out The Water From The Ice Maker
10. Ice Scoop
①
②
③
④
⑤
⑥ ⑦ ⑧ ⑨ ⑩

- 7 -
Before using the ice maker, it is highly recommended to clean it thor-
oughly.
1. Remove the exterior and interior packaging. Check that the ice basket
and ice scoop are included. If any parts are missing, please contact
our customer service.
2. Take out the ice basket and clean it with hot water, detergent and a
non-abrasive sponge.
3. Clean the interior with diluted detergent, warm
water and a soft cloth. Then use the water to rinse
the inside parts, Unplug the water drainage cap on
the bottom of the ice maker to empty the water in
the water tank. If you need to empty the water in
the reservoir, you need to plug the power but not
turn on it, then unplug the water drainage cap to
empty the water.
4. Wipe the outside of the ice maker with a mild
detergent solution and warm water.
5. Dry the interior and exterior of the ice maker with a soft cloth.
CLEANING AND MAINTAINING YOUR ICE MAKER
BEFORE FIRST USE
After using the ice maker for a long time, we also suggest you should
clean it. In particular, you must clean the water separator pipe and the
water filters periodically.
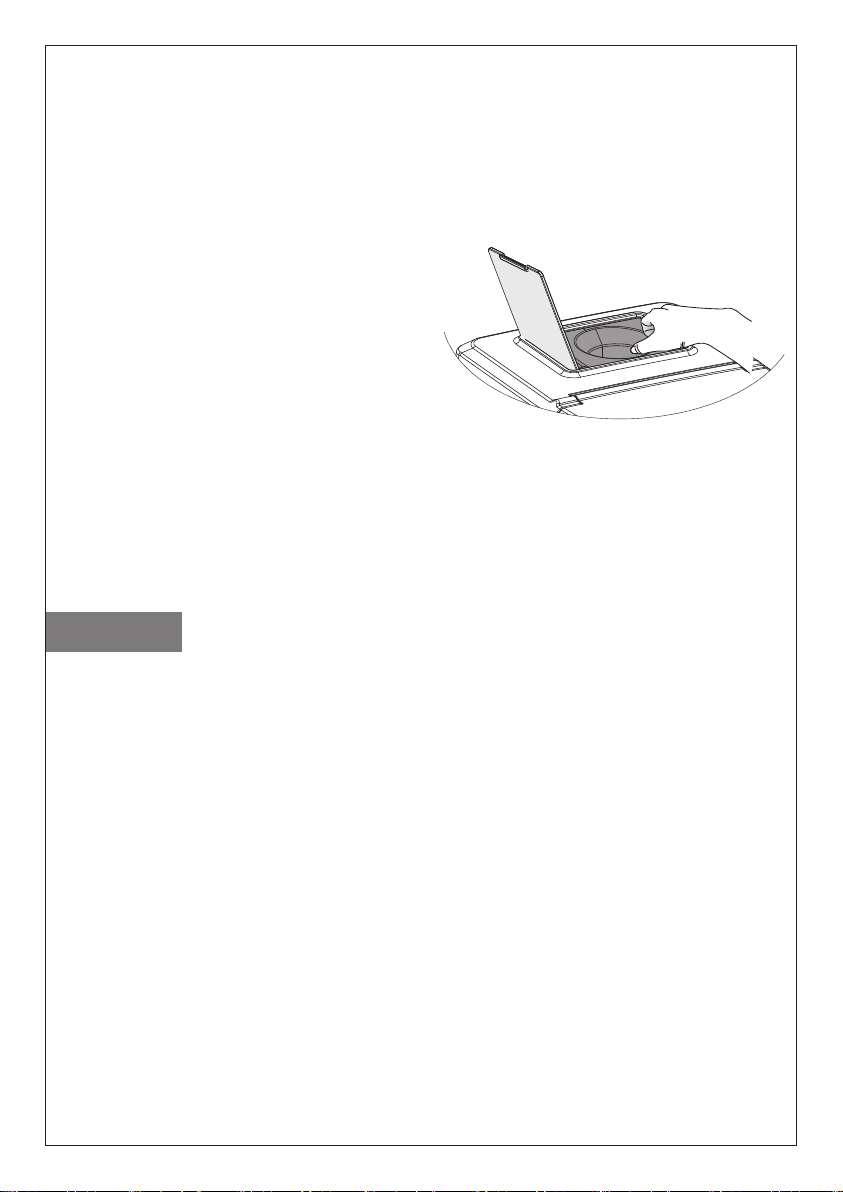
Cleaning the Separator Pipe:
If the compressor and water pump work normally, but there is little or no
water running down from the separator pipe, please remove the separator
pipe to check if it is blocked.
1. Press the ON/OFF button to
turn off the ice maker.
2. Pinch the left end of the
separator pipe and pry it out.
3. Clean each holes on the
separator pipe.
4. Connect the separator pipe
to the hose on the right side,
then clip the left end of the
separator pipe into the slot
on the left side. Please make
sure the holes point to down.
AFTER LONG-TERM USE
Water Drainage Cap
Water Separator
Pipe

1. The outside of the ice maker should be cleaned regularly with a mild
detergent solution and warm water.
2. When the ice maker is not in use for a long time, drain out the water.
Clean the Water Tank and the Water
Reservoir:
1. Clean them with diluted detergent,
warm water and a soft cloth.
2. Then use the water to rinse the
inside, and drain out the water. It
will help you keep the ice maker
and ice cube hygienically, and also make the ice maker work normally.
Please Note: When cleaning, if find that the ice cubes left on the evapo-
rator and can not be taken out easily, you can turn on the ice maker to let
it enter the ice making process, then press “ON/OFF” button for more
than 5 seconds to let the ice maker starts ice harvest process to melt the
ice cubes. It will help you remove the hard ice cubes.
STORAGE
Take out the support seat
for water bottle
- 8 -
How to drain out the water from the water tank and water reservoir
completely?
Because the water in the water reservoir is blocking to drain port by the
draining plug, if you want to drain away all the water, please plug in the
ice maker and but don’t turn on it, then remove the water draining cap at
the bottom. Wait a few minutes while all of the water is let out.

- 9 -
A. TIMER/CLEAN button
Short press this button once to enter the timer setting program; Long
press this button for more than 5 seconds to start the self-cleaning
function.
B. ON/OFF button
When the ice maker is off, press this button to turn on the ice maker;
When the ice maker is making the ice cubes, long press this button for
more than 5 seconds and the ice maker will switch to ice harvest
process by force.
C. LCD Display window
1. Countdown symbol for ambient temperature and ice-making: When
the display shows <M>, it means the countdown for ice-making;
when the display shows <℉>, it means ambient temperature.
2. Ice cube symbol: When the symbol is rotating, the ice maker is
making ice cubes; When the symbol flashes, the ice maker is har-
vesting ice cubes.
3. Automatic self-cleaning symbol display.
4. ON/OFF symbol.
5. The error code:
E1: Failure of the ambient temperature sensor.
E2: Failure of the water temperature sensor.
E: Ice formation anomaly or refrigerant leaked.
6. Lack water warning symbol.
7. Ice full warning symbol.
8. Time setting display area. When the screen window shows <H>,
timer unit ON/OFF; When the screen window shows <M>, setting
ice-making time.
D. Ice making and timer reduce
E. Ice making and timer increase
OPERATION PANEL AND DISPLAY AREA
1 2 3 4
8 7 6 5
A B C CD E
OPERATION PANEL AND DISPLAY AREA
Inhaltsverzeichnis
Andere Silonn Eiswürfelbereiter Handbücher


