SimpliSafe Base Station Bedienungsanleitung

Owner’s Manual
The Keychain Remote contains the SimpliSafe
Easy Setup Wizard – a software program that
provides animated instructions and lets you
customize your system most easily.
•Insert the Keychain Remote into a USB port on a
computer. No software will be installed.
•The Easy Setup Wizard will automatically appear.
Tip: If the welcome screen does not appear,
open “My Computer” on your desktop and look
for the “SimpliSafe” drive. On the drive, open the
“SimpliSafe” application.
•Follow the on-screen instructions.
If you don’t have access to a computer, just follow
the instructions in this Owner’s Manual.
Two options for getting started:
1
2
visit www.simplisafe.com or call 1-888-95-SIMPLI (957-4675) for additional assistance
2
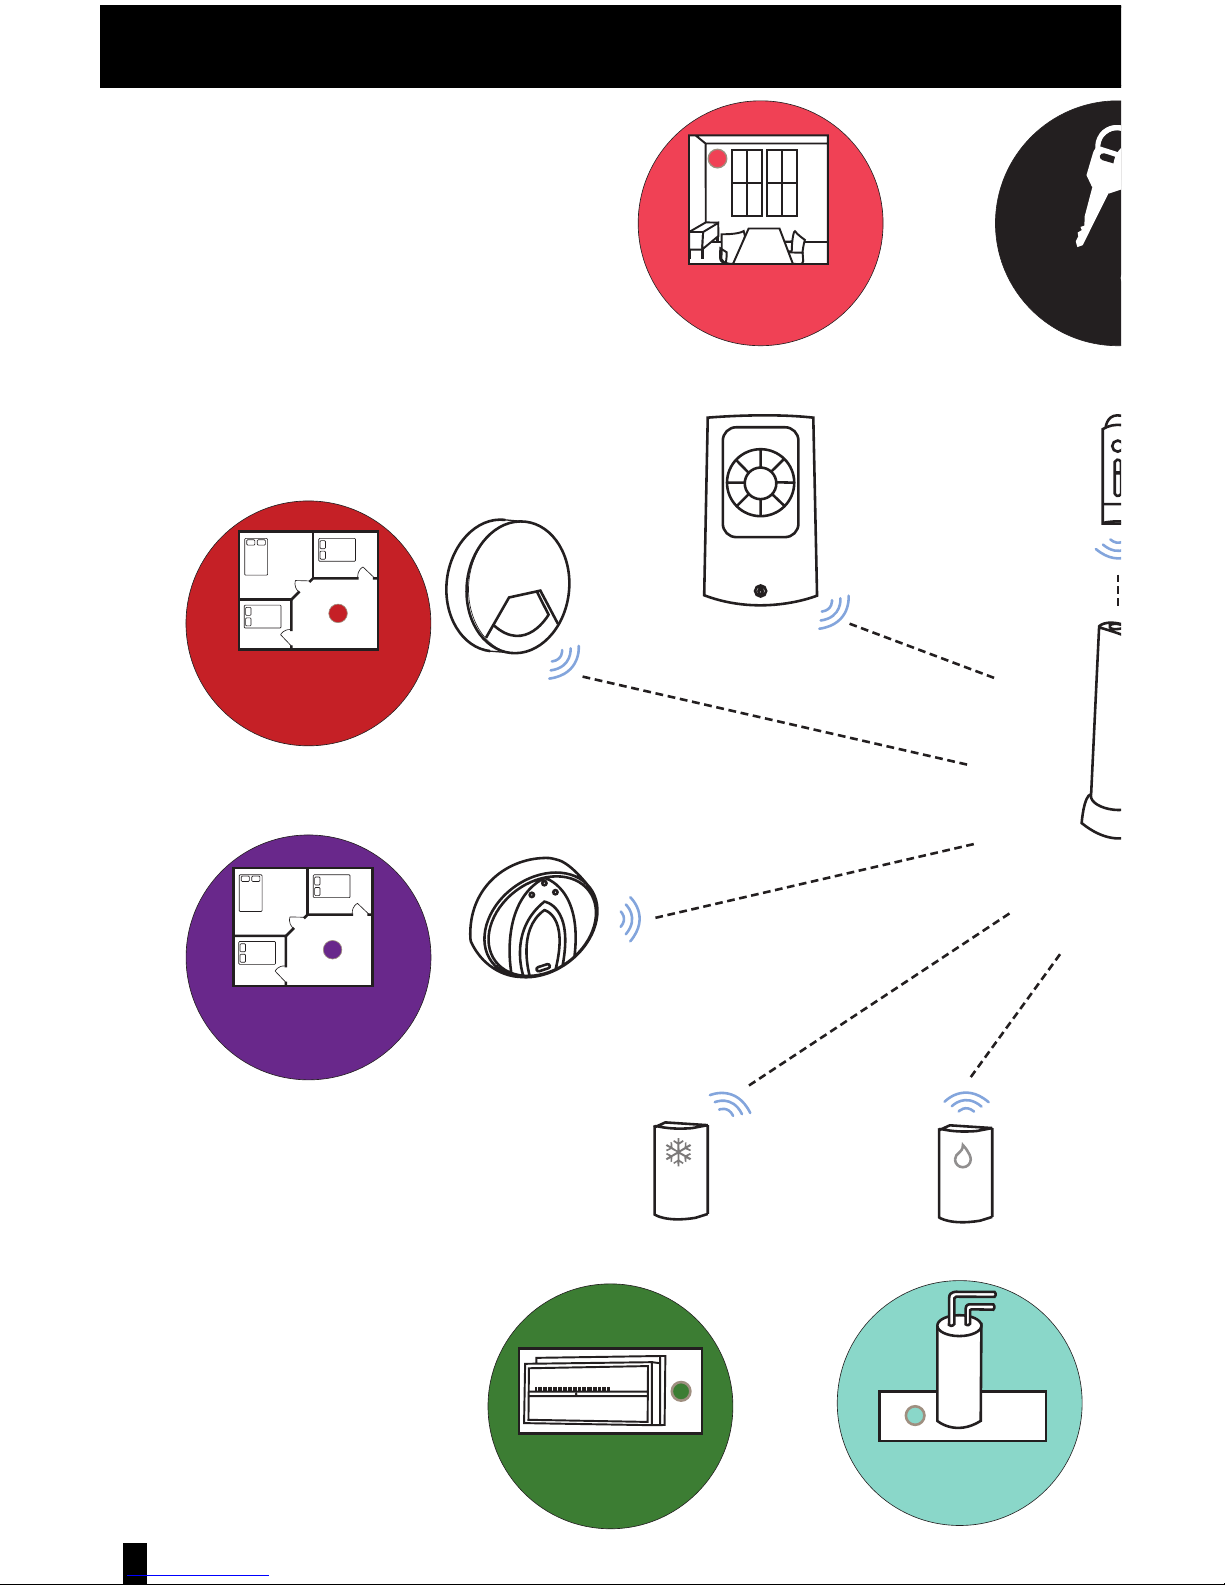
Plan Your Installation
60 8070
install near
thermostat
Extra Siren
Carbon
Monoxide
Detector
Keychain Remote
Smoke
Detector
Water Sensor
load onto
keyrin
install near
sleeping areas
install near
water heater
Freeze Sensor
install in central
location
install near
sleeping areas
Base Statio
install in centra
location
visit www.simplisafe.com or call 1-888-95-SIMPLI (957-4675) for additional assistance 3
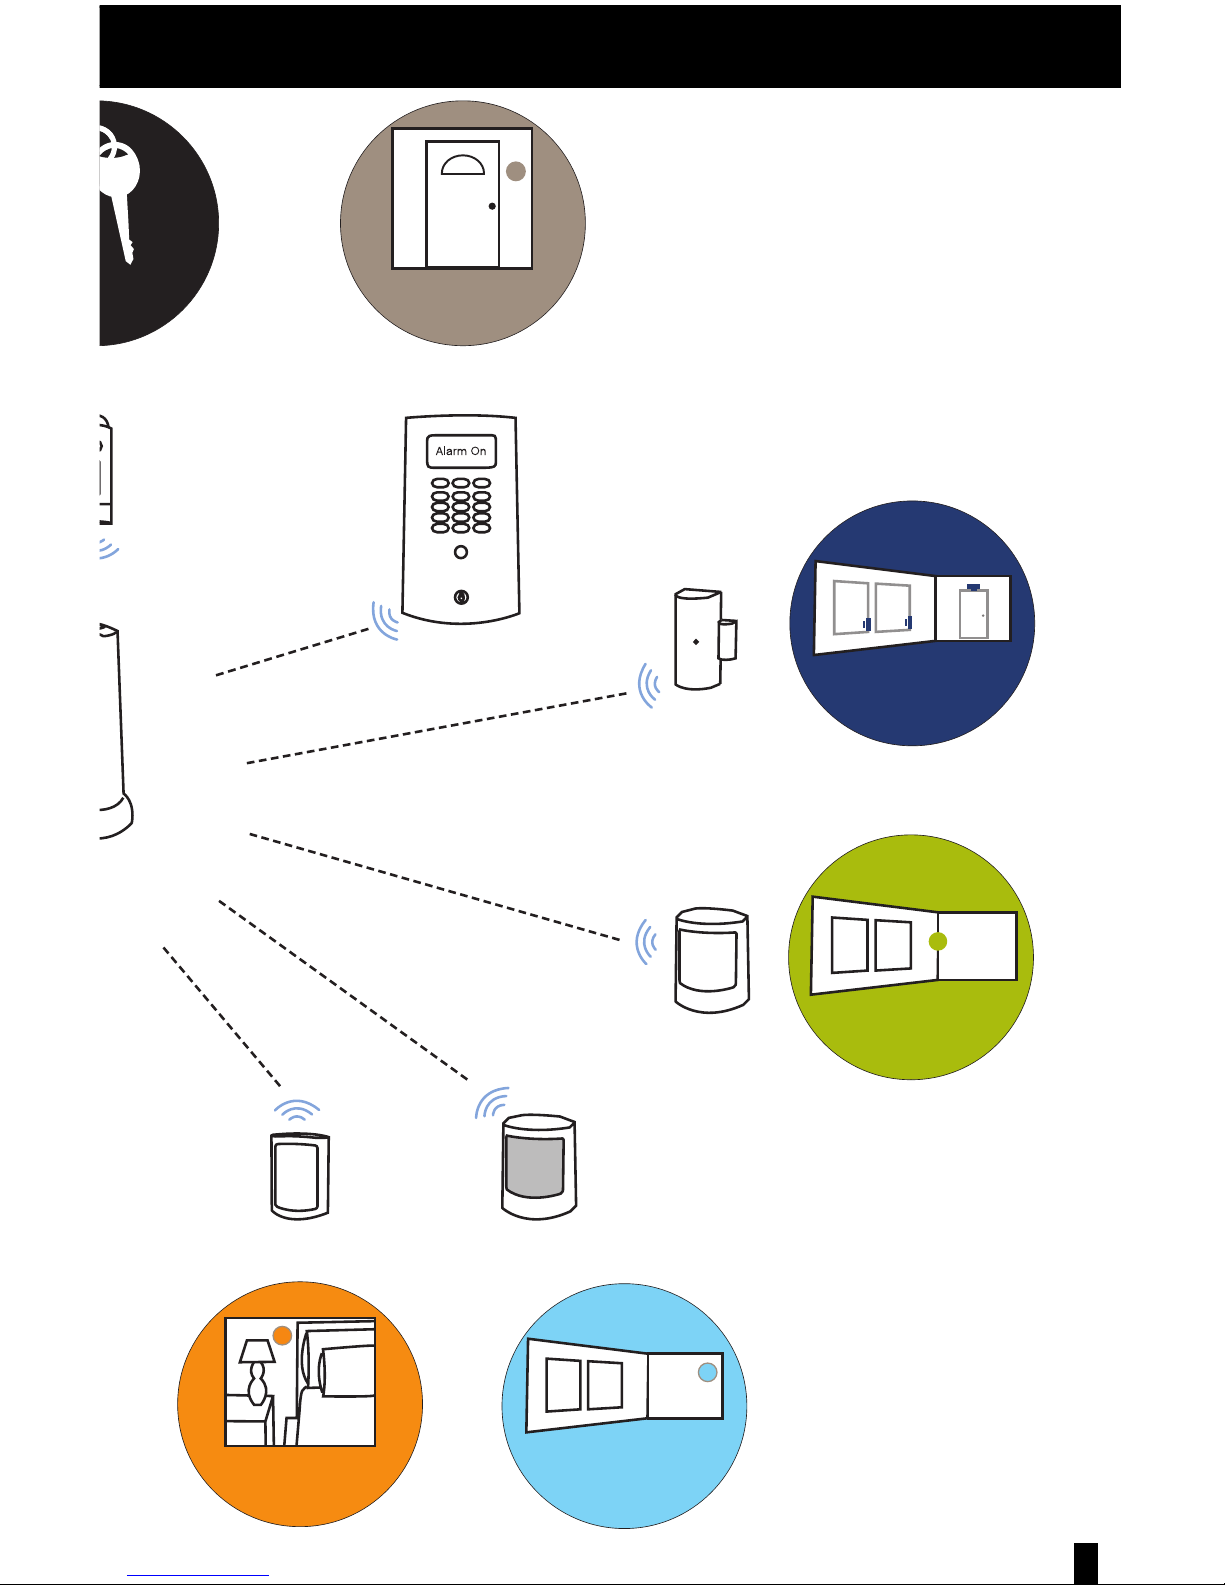
Motion
Sensor
Keychain Remote
Entry
Sensor
install near
windows
Glassbreak Sensor
Keypad
load onto
keyringinstall next to
front door
install on doors
and windows
Panic Button
install in master
bedroom
install 4-5ft high
in a corner
Base Station
install in central
location

visit www.simplisafe.com or call 1-888-95-SIMPLI (957-4675) for additional assistance
4
1. Install your Security System: Base Station
•Set up your Base Station in a central
location in your house. Tip: don’t install it
on the floor.
•Plug the Base Station into a power outlet
using the included power cord.
Helpful Information about your Base Station
•It’s the control center of your system, communicating with
all of your wireless sensors.
•It has a built in cellular alarm transmitter that will send us
your alarm signals when you activate your SimpliSafe alarm
monitoring service (see page 15).
•Your Base Station’s blue light has 4 modes:
a) Off when your system is off
b) Glowing steady when your system is armed
c) Flashing when there is an error or warning message on the
Keypad
d) In test mode it will glow bright blue, when your Base Station has
good cellular reception.
Tip: make sure the power outlet
is not controlled by a light switch
which could accidentally cut
power to the Base Station

visit www.simplisafe.com or call 1-888-95-SIMPLI (957-4675) for additional assistancevisit www.simplisafe.com or call 1-888-95-SIMPLI (957-4675) for additional assistance 5
Install your Keypads
•Remove the battery activation strip.
•Adhesive tape has already been installed
on the back of the Keypad – just peel and
stick. If you make a mistake, see “How do
I move a sensor?” on page 19.
•Adhere the Keypad to the wall by your
main entrance.
Helpful information about your Keypad
•Your default PIN is 1234. We’ll help you change that when we
personalize your system in just a few minutes.
Tip: Your alarm system has 3 modes:
Away, Home and Off. Turn your alarm on
by putting it in Away or Home mode. Turn
your alarm off by putting it in Off mode.
Mode buttons
Mode icons
off away home
Tip: before applying the adhesive tape make
sure the surface is clean and dry.
Tip: for the most reliable wireless connection,
install the Keypad between 10 and 100 feet of
the Base Station.

visit www.simplisafe.com or call 1-888-95-SIMPLI (957-4675) for additional assistance
6
Install your Motion Sensors
•Remove the battery activation strip.
•Place the Motion Sensor on a shelf or
adhere it to a wall, approximately 4 to 5 feet
off the ground.
Helpful Information about your Motion Sensor
•If you have large pets, weighing more than 30 lbs, you can
install your motion sensors upside down. This way they’ll
ignore any movement underneath them.
•By default, all Motion Sensors will be active in the Away mode
only. Put the alarm in the Home mode and you can move
freely about your home without setting off an alarm.
Tip: Your Motion Sensor looks
straight ahead and 90° to the left
and right. It also looks downward at
a 45° angle. Mount it in a corner for
maximum coverage of your room.
•Avoid placing the Sensor near a heater, air conditioner,
lamp, or electronics (such as a WiFi router).
•When placed 5 feet off the ground the Motion Sensor
should not detect pets under 30 pounds, as long as the pet
cannot get within 5 feet of it.

visit www.simplisafe.com or call 1-888-95-SIMPLI (957-4675) for additional assistance 7
Install your Glassbreak Sensors
•Remove the battery activation strip.
•Adhere the Glassbreak sensor close to a
bank of windows or on a wall facing your
windows.
•You can install it up to 20 feet away from the
windows you’d like to protect.
Helpful Information about your Glassbreak Sensor
•Glassbreak Sensors are programmed to “listen” for the
specific frequency of glass breaking.
•Avoid placing your Glassbreak Sensor in the kitchen, as
glasses knocking into each other could trigger a false alarm.
Tip: Curtains can dull the sound of glassbreaking.
If your windows are covered in heavy curtains,
place your Glassbreak Sensor within 5-10 feet of
your windows.
Max Distance: 20 Feet

visit www.simplisafe.com or call 1-888-95-SIMPLI (957-4675) for additional assistance
8visit www.simplisafe.com or call 1-888-95-SIMPLI (957-4675) for additional assistance
Install your Entry Sensors
`
•Remove the battery activation strip.
•Align the magnet with the sensor’s grooves
so the two pieces are less than 2 inches
apart when the door or window is closed.
Tip: Test the alignment before you adhere each piece.
The blue light should flash once when the door or
window opens and twice when it closes.
•Adhere the Sensor on the door and the
magnet on the doorframe, or the other way
around. There is no “right side up.”
Sensor Magnet
Grooves
Closed—magnet is within 2
inches of the sensor, aligned
between the sensor grooves.
Window Example
Door Example

visit www.simplisafe.com or call 1-888-95-SIMPLI (957-4675) for additional assistance 9
Install your Panic Buttons
•Remove the battery activation strip.
•Adhere the Panic Button to a wall.
•Most people install one in their master
bedroom.
Helpful Information about your Panic Button
•To trigger a panic alarm you must firmly press your Panic
Button for 1-2 full seconds.
Tip: install the Panic
Button within easy reach
in your Master Bedroom
visit www.simplisafe.com or call 1-888-95-SIMPLI (957-4675) for additional assistance
10
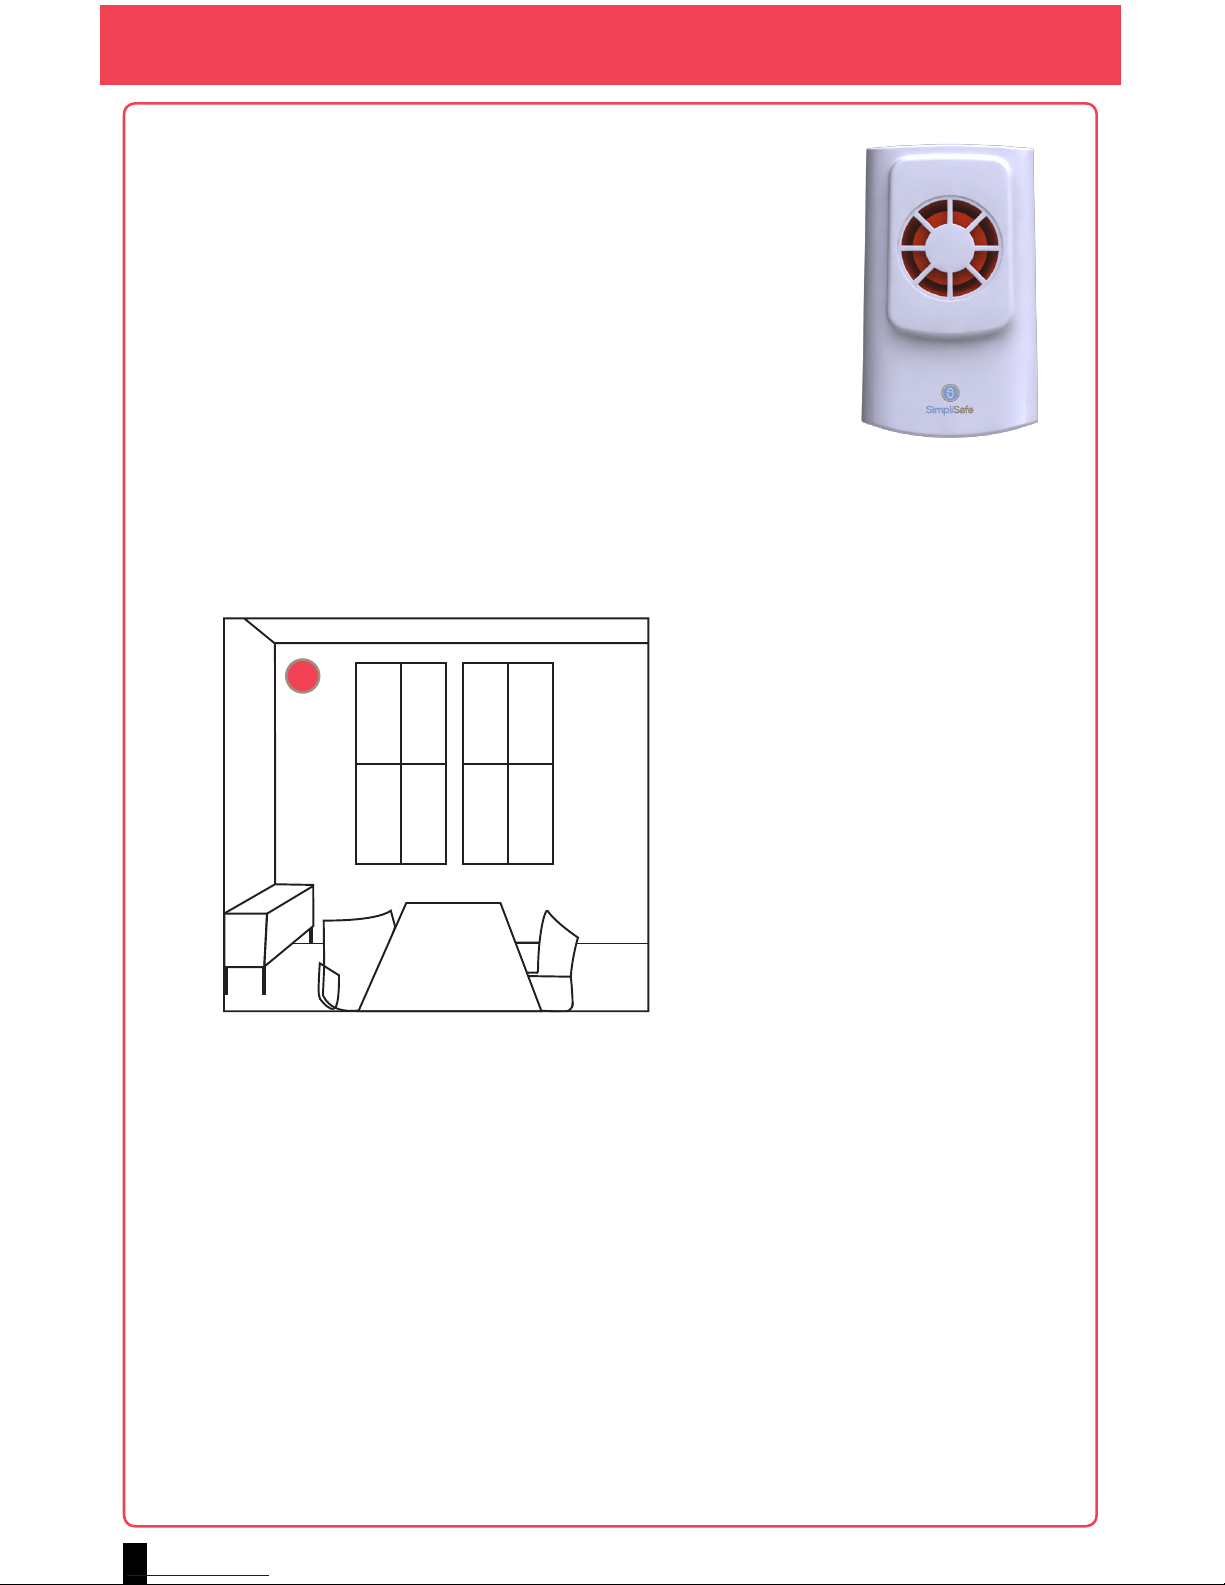
Install your 105 Decibel Sirens
•Remove the battery activation strip.
•Indoor Installation: Adhere Siren in a central
location within 100 ft. of the Base Station.
•Outdoor Installation: Install within 100 ft of
your Base Station. Slip the backing bracket
off of your Siren and use the included screws
to mount the backing under an eve or an
awning. Then slide the Siren back onto its
backing.
Helpful Information about your Siren
•Be cautious when testing your Siren indoors. Prolonged
exposure to a 105 decibel siren can cause hearing damage.
We recommend you use ear plugs or stand 5 feet away.
•When your alarm system has been triggered, the Siren will
beep during the entry delay peroid. You can disable the
entry delay beeps by removing the backing and pressing the
programming button 5 times. You will hear one long tone to
confirm the beeps have been disabled.
Tip: Install in a cental location.
Andere Handbücher für Base Station
1
Dieses Handbuch passt für folgende Modelle
12
Inhaltsverzeichnis
Andere SimpliSafe Sicherheitssystem Handbücher


Beliebte Sicherheitssystem Handbücher anderer Marken


EDM
EDM Solution 6+6 Wireless-AE Bedienungsanleitung

Highway Safety Group
Highway Safety Group EA401 Bedienungsanleitung

Siren
Siren LED GSM Bedienungsanleitung

Detection Systems
Detection Systems 7090i Montageanleitung

Se-Kure Controls
Se-Kure Controls MicroMini SK-4841 Bedienungsanleitung

Siemens
Siemens FDM273 Bedienungsanleitung