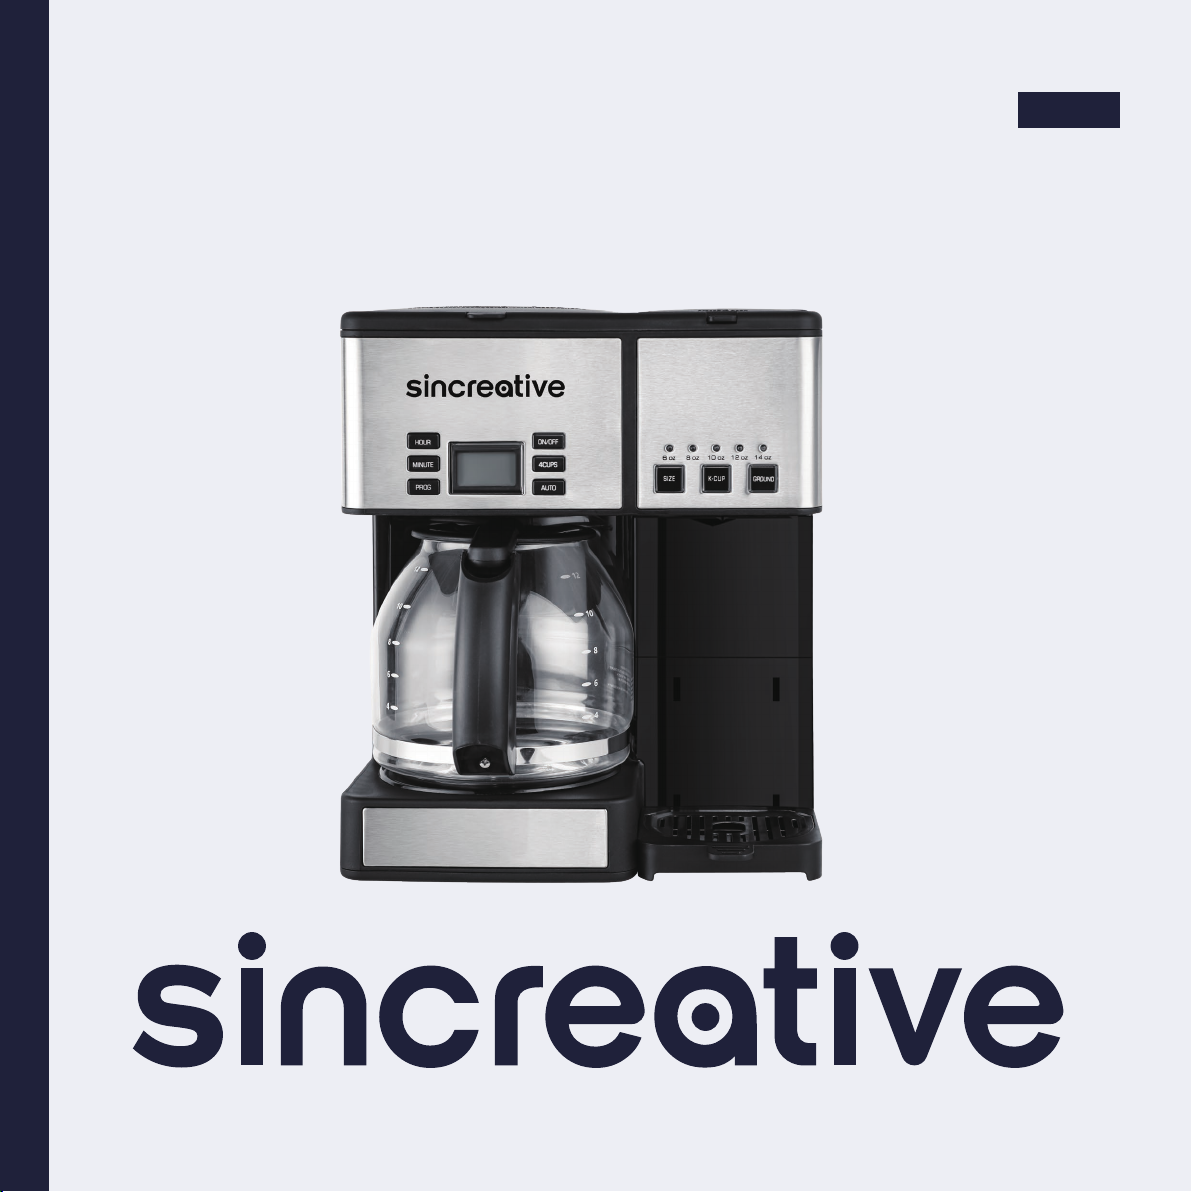
Sincreative KCM218 Bedienungsanleitung

INSTRUCTION MANUAL
COFFEE MAKER
HOUSEHOLD USE ONLY
Please read all instructions carefully before using the product
love · life
Model: KCM218
Rev 1.0

Contents
IMPORTANT SAFEGUARDS ........................................................................................................
USER MAINTENANCE INSTRUCTIONS ...................................................................................
POLARIZED PLUG ...........................................................................................................................
LINE CORD SAFETY TIPS ...............................................................................................................
UNPACKING ....................................................................................................................................
KNOW YOUR COFFEEMAKER ...................................................................................................
SETTING UP YOUR CUP COFFEEMAKER ...............................................................................
PROGRAMMING YOUR CUP COFFEEMAKER ..................................................................
SETTING UP YOUR SINGLESERVE BREWER .......................................................................
SINGLESERVE BREWER CLEANING AND MAINTENANCE ..............................................
TROUBLE SHOOTING .............................................................................................................

When using electrical appliances especially when children are present, basic safety
precautions should always be followed to reduce the risk of fire, electric shock, and/or
injury to persons, including the following:
01. READ ALL INSTRUCTIONS.
02. Do not touch hot surfaces. Use any handles or knobs.
03. To protect against fire, electrical shock, or injury to persons DO NOT immerse cord, plug or appliance in water or
other liquid.
04. Close supervision is necessary when any appliance is used by or near children.
05. Unplug from outlet when not in use and before cleaning. Allow to cool before putting on or taking o parts and
before cleaning the appliance.
06. Do not operate any appliance with a damaged cord or plug, or after the appliance malfunctions or has been
damaged in any manner. Return appliance to the nearest authorized service facility for examination, repair or
adjustment.
07. The use of accessory attachments not recommended by the appliance manufacturer may result in fire, electric
shock or injury to persons.
08. Do not use outdoors.
09. Do not let cord hang over edge of table or counter or touch hot surfaces.
10. Do not place on or near a hot gas or electric burner, or in a heated oven.
11. Extreme caution must be used when moving an appliance containing hot food, hot oil, water or other hot liquids.
12. Do not use appliance for other than intended use.
13. To disconnect, turn O, then remove plug from wall outlet.
IMPORTANT SAFEGUARDS

14. The glass container is designed for use with this appliance. It must never be used on a range top. Do not set a hot
container on a wet or cold surface. Do not use a cracked container or a container having a loose or weakened
handle. Do not clean container with cleansers, steel wool pads or other abrasive materials. Do not place in micro
wave oven.
15. The lid on the glass carafe must be closed for brewing.
16. Fill the water reservoir of this appliance with water only. Do not fill with other liquids or foods.
17. Scalding water may occur if the lid is removed during the brewing cycle.
18. See illustration on page 7 for instructions on placement and removal of the carafe lid.
19.
SAVE THESE INSTRUCTIONS
FOR HOUSEHOLD USE ONLY
DO NOT PLACE A MUG OR CUP DIRECTLY UNDERNEATH THE WATER OUTLET.
WARNING
TO REDUCE THE RISK OF FIRE OR ELECTRIC SHOCK, DO NOT REMOVE THE
BASE PANEL. NO USER-SERVICEABLE PARTS ARE INSIDE.
REPAIR SHOULD BE DONE ONLY BY AUTHORIZED PERSONNEL.

SPECIFICATION:
This appliance contains no user serviceable parts. Do not try to repair it yourself. Refer it to qualified service personnel if
servicing is needed. The Coee Maker should be cleaned on a regular basis to prolong the life of the machine and to
guarantee optimal brewing results.
TO CLEAN:
Remove paper filter and coee grounds from the filter basket.
Fill the coee carafe with cool water and pour into the water reservoir.
Press the ON / OFF button to run a brew cycle with only clean water.
Turn o the Coee Maker and unplug from the wall outlet.
Wipe down the outside surfaces of the Coee Maker with a damp cloth and dry thoroughly.
NEVER use harsh chemicals or abrasive cleaning pads. NEVER immerse the Coee Maker in water or any other liquid
and NEVER place the appliance under running water.
Remove the filter basket, and carafe and wash in warm soapy water. Do not use harsh chemicals or abrasive cleaners.
Dry thoroughly prior to use.
- FOR A MORE THOROUGH CLEANING, pour one cup of white vinegar into carafe.
Add cold water until carafe is filled to the MAX marking. Pour water and vinegar mixture into water reservoir. Place a
filter in the filter basket and place the carafe on the warming plate and press the ON / OFF button. Allow to steam and
drip until carafe is half full. Turn Coee Maker o, remove carafe from warming plate and let it sit for 15 minutes.
When carafe is cool, pour liquid back into water reservoir, place carafe back on warming plate, and press the ON /
OFF button again. Allow all liquid to drip into carafe. Turn Coee Maker OFF, and discard the liquid in the carafe.
Allow Coee Maker to cool for 10 minutes; then rinse by filling the water reservoir with clean, cold water, inserting a
new filter and allowing water to drip into carafe. Turn Coee Maker OFF and discard water. Wash and dry carafe and
filter basket. When Coee Maker has cooled, wipe with a dry cloth.
USER MAINTENANCE INSTRUCTIONS

This appliance has a polarized plug (one blade is wider than the other). To reduce the risk of electric shock, this plug is
intended to fit into a polarized outlet only one way. If the plug does not fit fully into the outlet, reverse the plug and try
again. If it still does not fit, contact a qualified electrician. Do not attempt to modify the plug in any way.
POLARIZED PLUG
TO STORE:
Be sure all parts are clean and dry before storing. Store appliance in its box or in a clean, dry place. Never store it while
it is hot or wet. Never wrap cord tightly around the appliance; the line cord should be inserted into the cord storage on
back of coee maker.
ALWAYS store the Coee Maker in an upright position.
This appliance is for HOUSEHOLD USE ONLY. It may be plugged into an AC electrical outlet (ordinary household
current). Do not use any other electrical outlet.
DO NOT OPERATE APPLIANCE IF THE LINE CORD SHOWS ANY DAMAGE, OR IF APPLIANCE WORKS
INTERMITTENTLY OR STOPS WORKING ENTIRELY.
A short power-supply cord is to be provided to reduce risks resulting from becoming entangled in or tripping over a
longer cord. Longer detachable power-supply cords or extension cords are available and may be used if care is exercised
in their use. If a longer detachable power-supply cord or extension cord is used:
01. The marked electrical rating of the detachable power-supply cord or extension cord should be at least as great as
the electrical rating of the appliance, and;
02. The longer cord should be arranged so that it will not drape over the countertop or tabletop where it can be pulled
on by children or tripped over unintentionally.

01. Carefully unpack the Coee Maker and all parts. Remove any tape, labels or packaging materials.
02. Wash filter basket, glass carafe and carafe lid with warm, soapy water. Rinse well and dry thoroughly.
03. Wipe exterior surfaces of the product with a soft, moist cloth to remove dust particles collected during packing and
handling. NEVER IMMERSE THE COFFEE MAKER, CORD OR PLUG IN WATER OR ANY OTHER LIQUID.
04. Place Coee Maker on a solid, level, heat-resistant surface.
Save all packing materials in case you have to ship the machine in the future.
KEEP ALL PLASTIC BAGS AWAY FROM CHILDREN.
UNPACKING
WARNING
To reduce the risk of fire or electric shock, do not remove the bottom cover. No user serviceable
parts inside. Repair should be done by authorized service personnel only.
01. Never pull or yank on cord or the appliance.
02. To insert plug, grasp it firmly and guide it into outlet.
03. To disconnect appliance, grasp plug and remove it from outlet. Do not pull on the line cord.
04. Before each use, inspect the line cord for cuts and/or abrasion marks. If any are found, this indicates that the
appliance should be serviced and the line cord replaced.
05. Never wrap the cord tightly around the appliance, as this could place undo stress on the cord where it enters the
appliance and cause it to fray and break.
IMPORTANT!
During the first few minutes of initial use, you may notice smoke and/or a slight odor. This is normal and should quickly
disappear. It will not recur after appliance has been used a few more times.
LINE CORD SAFETY TIPS

1
2
3
4
5
6
7
8
9
10
11
12
13
14
15
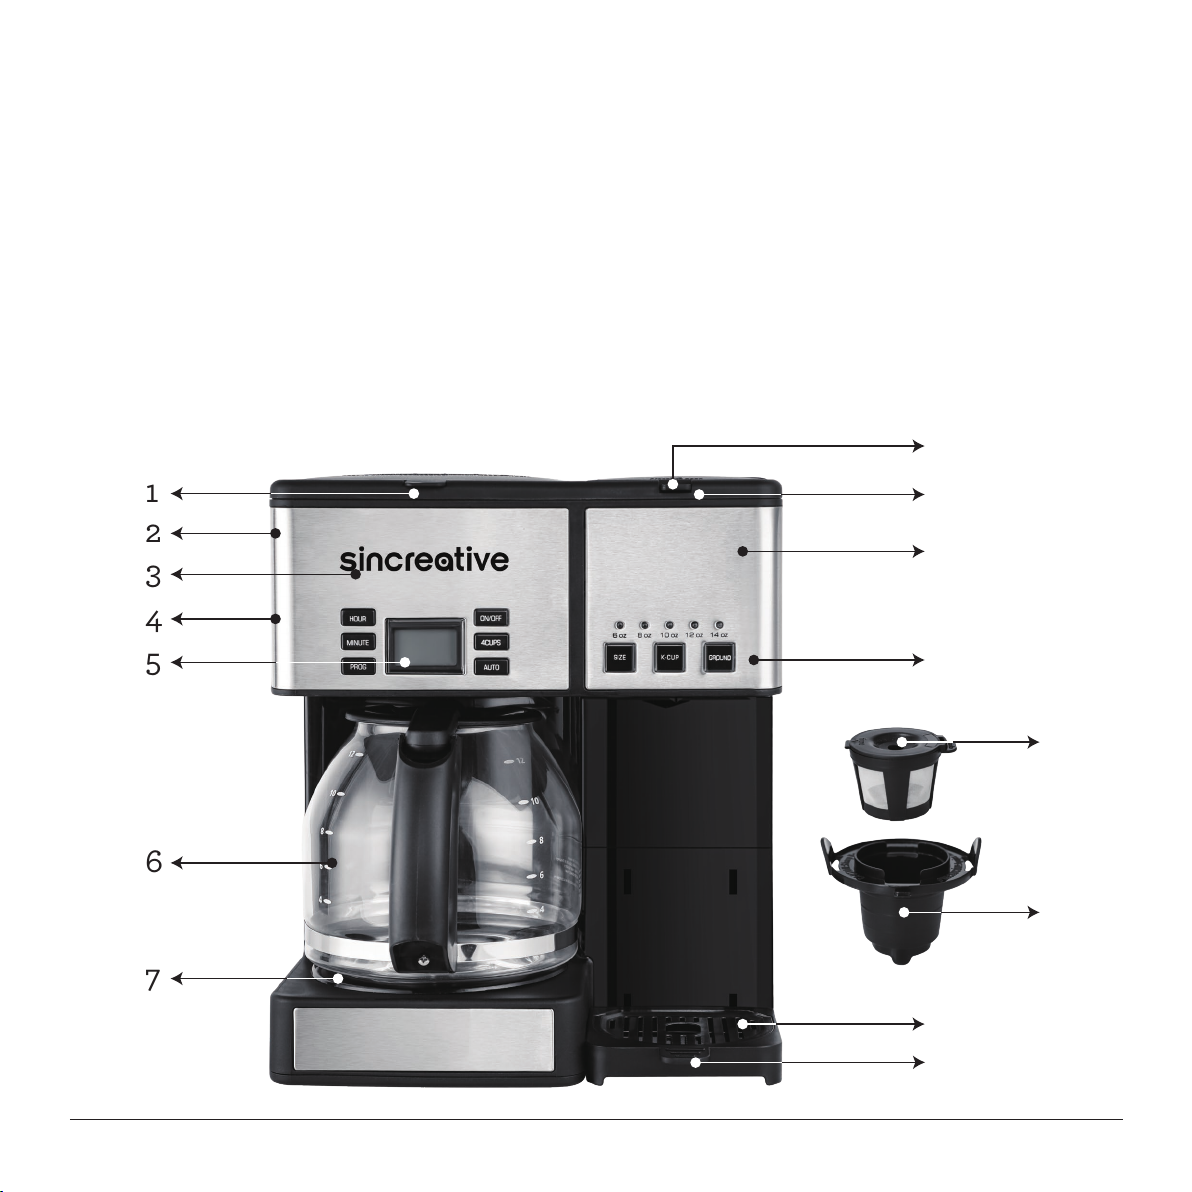
KNOW YOUR COFFEEMAKER
1. Coeemaker Reservoir Cover
2. Showerhead (not shown)
3. Coee Ground Filter (not shown)
4. 60oz Build-in Water Reservoir
5. Control Panel
6. 12-cup Carafe
7. Keep-warm Plate
8. Brew Handle
9. Brew Head
10. Brewing Chamber
11. Control Panel
12. Removable Filter Basket
13. Removable Capsule Holder
14. Removable Drip Tray Plate
15. Removable Drip Tray

18
17
16
252423
26
19 20 21 22
3:23
PM
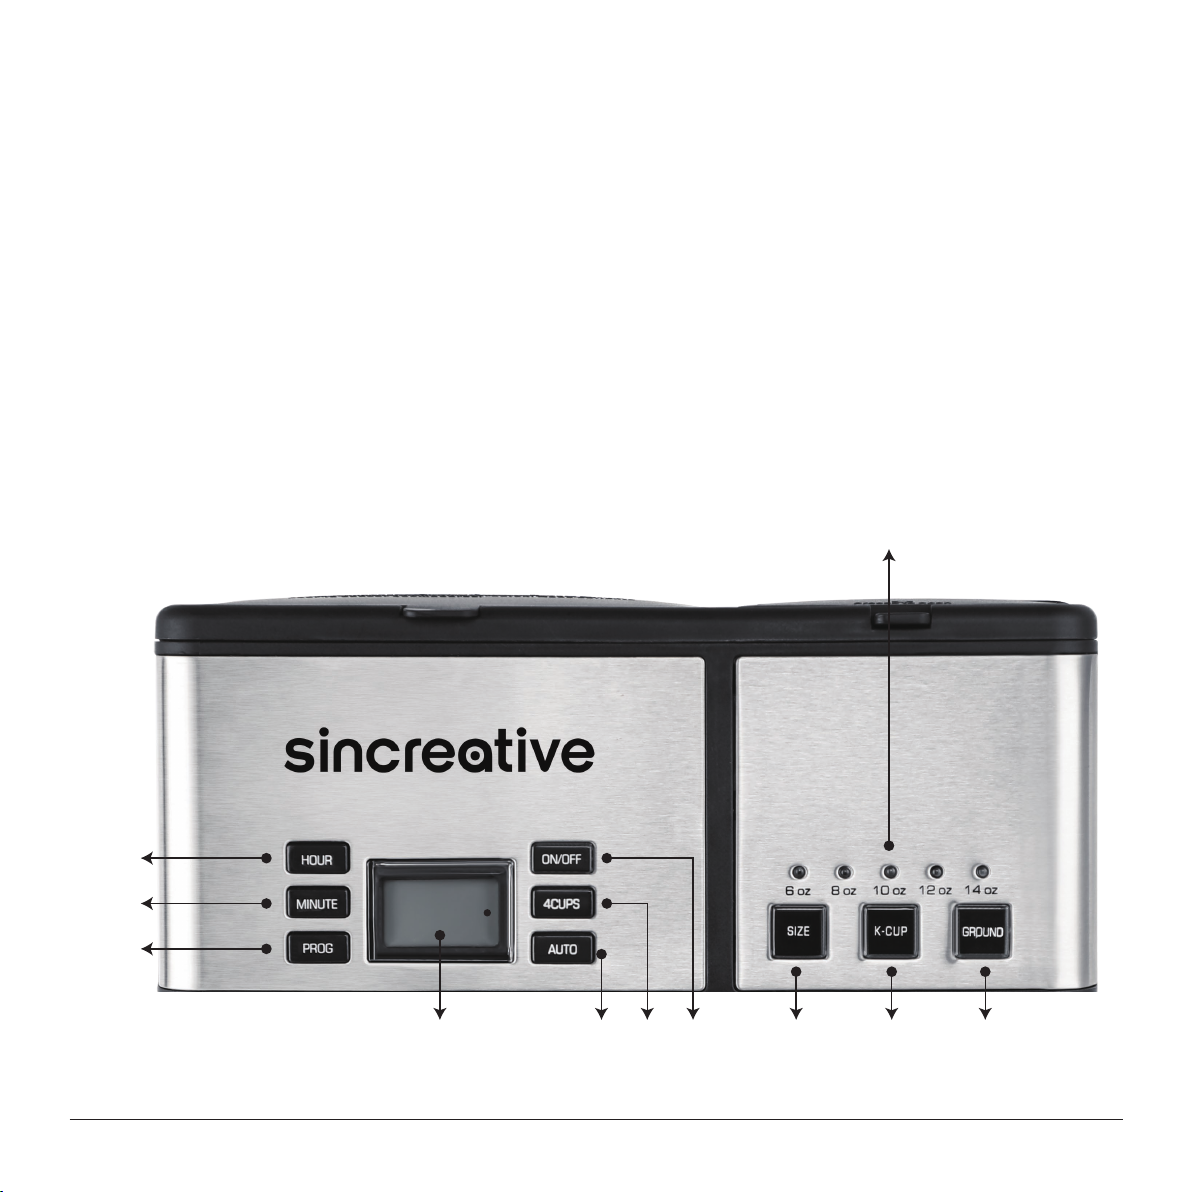
16. Hour Button
Use to set hours for time of day,
Auto On, and Auto O times
17. Minute Button
Use to set minutes for time of day,
Auto On, and Auto O times
18. PROG Button
Use to set the time of day
19. LED Display Screen
*Displays time of day, Auto On, and Auto O times.
*Displays the Status of ON/OFF, 4CUPS and AUTO.
20. AUTO Button
Use to set Auto on times
21. 4CUPS Button
Use to brew 4 cups only
22. ON/OFF Button
Use to start/stop brewing directly
23. SIZE Button
Use to chose the sizes of cup
24. K-CUP Button
Use to brew with a K-CUP capsule
25. GROUND Button
Use to brew with coee grounds
26. Indicators of Cup Size
(6oz, 8oz, 10oz, 12oz, 14oz)

INITIAL CLEANING
We recommend you to perform an initial cleaning before making your first beverage. Follow these instructions, without
adding coee grounds.
01. Fill water reservoir.
02. Make sure carafe is in place.
03. If you haven’t already, plug the power cord into an independent outlet.
04. Press ON/OFF button and allow brew cycle to run.
05. Press the ON/OFF button again to stop once the one-time cleaning process is complete. Discard hot water.
Your Coeemaker is ready to use.
SETTING UP YOUR CUP COFFEEMAKER
SETTING THE CLOCK
When the Coeemaker is plugged in, 12:00 will flash.(If no operation for 5 seconds, the LED screen will stop flashing and
the clock start to run.)
Press PROG button, 12:00 will flash for 5 seconds.
Press Hour and Minute buttons to select the desired time. Hold buttons down to scroll through the digits, or press and
release to advance one digit at a time. When scrolling, the numbers will advance slowly and then speed up. When the
number displayed approaches the desired time, press and release to advance one digit at a time.
Be sure the PM indicator is shown if a PM time is desired.
To finish setting the clock, press the PROG button again or simply wait until the numbers stop blinking.
PROGRAMMING YOUR CUP COFFEEMAKER
Inhaltsverzeichnis
Andere Sincreative Kaffeemaschine Handbücher

Sincreative
Sincreative CM5700 Bedienungsanleitung

Sincreative
Sincreative CM5700A-UL Bedienungsanleitung

Sincreative
Sincreative KCM 207 Bedienungsanleitung

Sincreative
Sincreative CM5700A-UL Bedienungsanleitung

Sincreative
Sincreative CM9429B-UL Bedienungsanleitung

Sincreative
Sincreative KCM 207 Bedienungsanleitung