
Singer SteamWorks Pro Bedienungsanleitung
ON
OFF
05.2012
ENG
ESP
PRT
INSTRUCTION MANUAL
Garment Steamer
SWP
SWP_Brasil_Instruction Manual.indd 1 21.05.2012 13:31:55

1. Read all instructions before using this product.
2. Use this product only as described in this manual. Other uses not
recommended may cause fire or electrical shock.
3. Do not immerse this product in water or any liquid; electric shock and
injury could result.
4. Always unplug this appliance before coming into contact with liquid of any
kind. This includes filling and emptying the water tank.
5. Close supervision is necessary when the appliance is used near children.
6. Do not leave this appliance unattended while it is in operation.
7. This appliance operates using high heat and steam that can cause burns
to skin. Use caution around the Steam Head.
8. Do not touch the hot metal parts, hot water or steam to avoid burns.
9. Do not operate the steamer without filling the water reservoir. Always
check the water level before and during operation.
10. Do not lay the hose on the ground or wind it.
11. Do not direct steam at people or animals.
12. Do not steam clothing while it is being worn.
13. Do not pour water directly into the reservoir. Pour water only into the water
tank.
14. Turn the appliance OFF and let cool before changing Steam Head
attachments to avoid burns.
15. The use of accessories or attachments not provided by SINGER Home
Essentials may result in fire, electric shock, or injury.
16. Never insert any objects into the tank or hose.
17. Keep the hose and steam head elevated above the tank.
18. Steam only in a vertical motion. Never use this appliance in a horizontal
position.
19. Allow the appliance to cool completely for at least 30 minutes and drain
the water tank and water reservoir before storing.
20. Move the appliance by grasping the telescopic pole. Do not force the
casters if they are stuck. Turn off the unit, cool completely, drain the water
tank and water reservoir before inspecting the casters.
21. Unplug the unit from the outlet when not in use, when moving unit from
one location to another, and before cleaning.
22. Do not place the unit or any parts near an open flame, cooking or other
heating appliance.
23. If the cord becomes damaged or the appliance has been dropped or
damaged, do not operate the product.
24. To avoid the risk of electrical shock, do not disassemble the steamer.
Ship it to the nearest authorized SINGER-approved service center for
examination and repair. Incorrect reassembly or repair can cause a risk of
fire, electric shock, or injury while the appliance is in use.
25. No detergent can be added into the water tank or it will cause damage.
Distilled or de-mineralized water is recommended.
26. Use this appliance indoors only.
SPECIAL INSTRUCTIONS:
To avoid a circuit overload, do not operate another high-wattage appliance on
the same circuit. If an extension cord is absolutely necessary, a 15-amp cord
should be used. Cords rated with less amperage may overheat. Use care to
arrange the cord so that it cannot be pulled or tripped over.
SAVE THESE INSTRUCTIONS
FOR HOUSEHOLD USE ONLY
IMPORTANT SAFETY INSTRUCTIONS
SWP_Brasil_Instruction Manual.indd 2 21.05.2012 13:31:56
1
Thank you for purchasing a SINGER Home Essentials product. For
over 150 years, we’ve been in homes around the globe providing
expert garment care with quality, durable tools to keep your garments
and fabrics looking fresh.
TECHNICAL SPECIFICATIONS: Voltage: 127V-220V, ~50/60 Hz Power: 1500 Watts
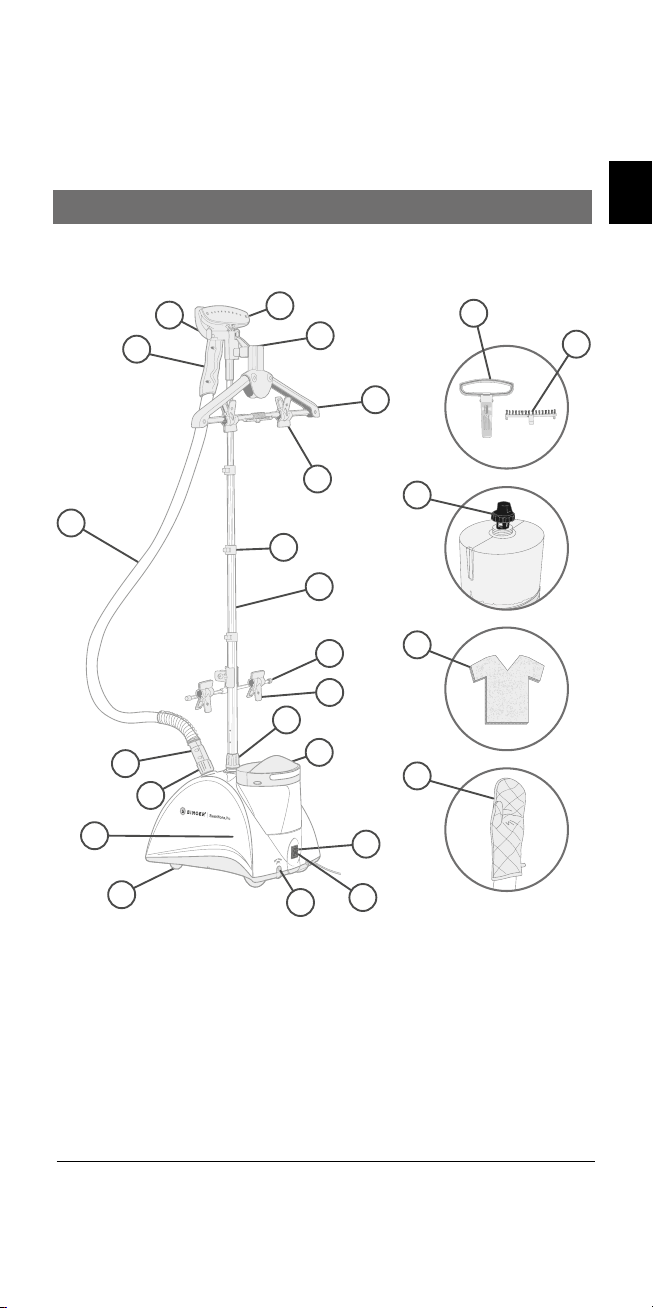
1. Handle
2. Steam Head
3. Steam Head Hanger
4. Clothes Hanger Hook
5. Flexible Cool Touch Hose
6. Hose Connector
7. On/Off Switch
8. Drain Plug
9. Hose Base
10. Pole Base
11. Water Tank
12. Telescopic Pole
13. Rotating Hanger
14. Fabric Brush
15. Crease Attachment
16. Garment Clips
17. Water Reservoir
18. Caster Wheel System
19. Pole Clips
20. Valve Cap
21. Garment Clip Bar
22. Handheld Steaming Board
23. Protective Glove
24. Power Indicator Light
12
1
2
4
5
7
13
6
10
3
19
16
9
11
14
15
18
16
17
8
20
21 22
23
24
GETTING TO KNOW YOUR GARMENT STEAMER ENG
SWP_Brasil_Instruction Manual.indd 1 21.05.2012 13:31:57

2
Assembling Your Steamer
•Removeallpackaging
•PlacethesteamerbaseonthefloorandremovetheWaterTank.
•InserttheTelescopicPoleintothePoleBaseandtwistthering
clockwise to lock.
•ConnecttheClothesHangerHooktothetopoftheTelescopicPole
as shown.
•ExpandtheTelescopicPolebyunlockingtheclipsandfully
extending the pole. Lock clips to secure.
•AttachtheCoolTouchHosebypushingthehoseontotheHose
Base and turning 1/4 turn clockwise to lock.
•HangtheSteamHeadontheSteamHeadHanger.
WARNING:
ALWAYS HANG THE STEAM HEAD ON THE STEAM HEAD HANGER
WHEN NOT IN USE TO PREVENT INJUR Y AND SURFACE DAMAGE .
MAKE SURE THE TELESCOPIC POLE IS FULLY EXTENDED DURING
USE TO ENSURE A SMOOTH STEAM FLOW THROUGH THE HOSE .
DO NOT PULL THE HOSE WITH EXCESSIVE FORCE OR MOVE IT BY
PULLING ON THE HOSE. DAMAGE OR INJURY MAY RESULT.
ASSEMBLY
SWP_Brasil_Instruction Manual.indd 2 21.05.2012 13:31:59

3
Crease Attachment Assembly and Use
•Turnthesteameroffandwaituntilthereisnosteamcomingfrom
the Steam Head. And it is completely cool to the touch.
•ConnectthefluteoftheCreaseAttachmenttothepegsatthe
bottom of the Steam Head.
•PushtheCreaseAttachmentintoplacegentlyuntilitclicks.
•Touse,placethefabricbetweentheSteamHeadandtheCrease
Attachment to create the crease. Move the Steam Head in a vertical
motion to press the crease.
Fabric Brush Assembly and Use
•Turnthesteameroffandwaituntilthereisnosteamcomingfrom
the Steam Head and it is completely cool to the touch.
•InsertthepegsontheFabricBrushintotheholesintheSteam
Head.
•Steamasusual,usingtheFabricBrushtosmoothstubborn
wrinkles.
ENG
SWP_Brasil_Instruction Manual.indd 3 21.05.2012 13:32:00
4
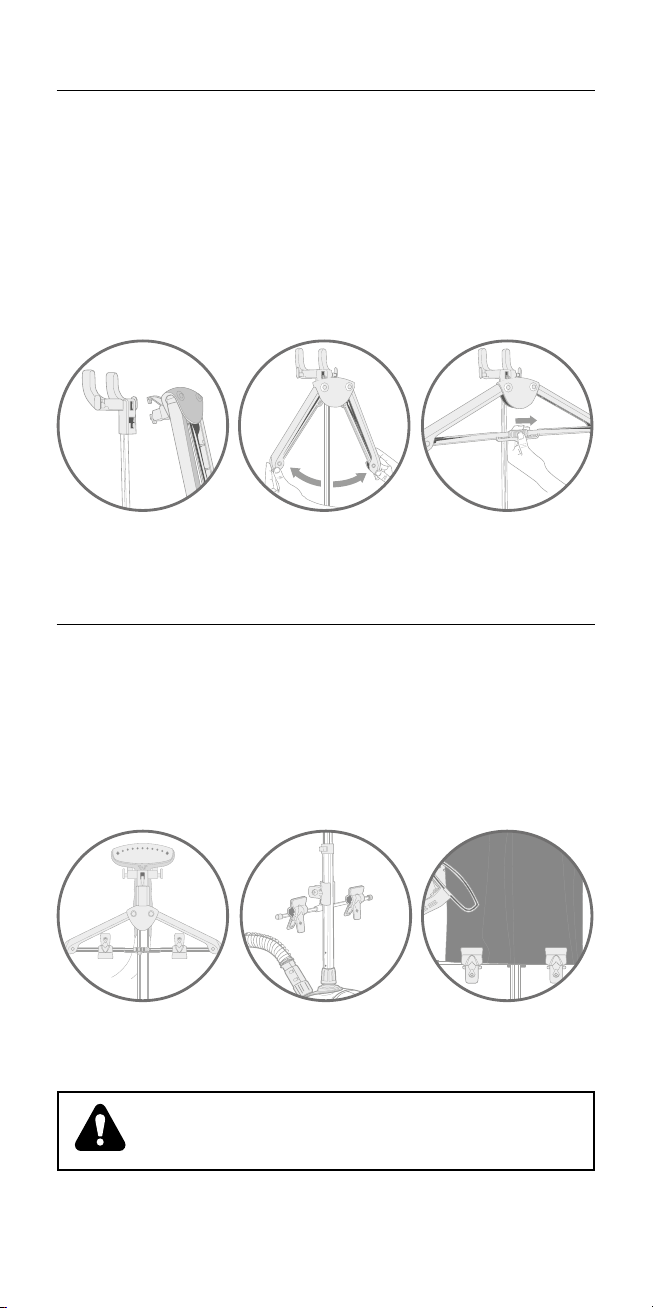
Folding Hanger Assembly
•SecuretheSteamHeadHangerassemblytotheTelescopicPole.
•TiltthehookoftheRotatingHangerandinsertitintotheholeon
the flat side of the Steam Head Hanger. Press gently to lock.
•PullthearmoftheRotatingHangerupuntilthesidesare
completely extended.
•Lockthehorizontalbarinplacebyaligningthedotsonthebar.
Garment Clips Assembly and Use
•SnaptheGarmentClipsintotheholesonthehorizontalbarofthe
Folding Hanger.
•CliptheGarmentClipBartothebottomoftheTelescopicPole.
•Touse,hangthegarmentfromthetopclipsandsecurewiththe
bottom clips, pulling the garment taut to steam or crease.
WARNING: ALWAYS TURN OFF THE STEAMER BEFORE ATTACHING
ACCESSORIES TO AVOID IN JURY.
SWP_Brasil_Instruction Manual.indd 4 21.05.2012 13:32:02

5
Filling the Water Tank
•Turnthesteameroffandunplugit.
•RemovetheWaterTankbypullingupwardonthehandle.
•UnscrewtheValveCapfromtheWaterTank,fillthetankwithcool
water, and replace the Valve Cap. Do not use hot water. To prolong
the life of your steamer we recommend using distilled or de-
mineralized water.
•Thetankholds2.5Litersofwater.
•InserttheWaterTankintothebase,makingsuretheplugonthe
bottom of the tank meets the post on the steamer base and fits
securely in the cavity.
NOTE: Do not operate the steamer without water as this could cause
damage to the unit.
Never use water with additives, including scents, starches, or fabric
conditioners, as they can cause deposits to form in the steamer that
can stain your clothing.
ENG
SWP_Brasil_Instruction Manual.indd 5 21.05.2012 13:32:03

6
Remote Control Instruction (220V)
Instruction Guide
Assemble the machine and make sure the steam hose fix well to the
body. Turn on and indicator lights up. Press remote button to control
steam out or not. The remote control cannot work if you turn off the
unit.
Use Instruction
Plug and make sure the steam hose fix well
to the body. Open the cell cover on the
handle and remove the film. (Make sure the
button cell for remote control is powerful
enough to operate) Turn on and indicator
lights up.
Press the button on the handle, steamer is
in a ready mode and no steam will come
out. Press button again then steam will
come out.
The remote control cannot work if you turn off the unit.
Change Button Battery
You need to change the button battery when
it fails to work.
Remove the cover screw on handle and
change button battery with these specs
(GPA76 LR44 1.5V). Please notice the place
of anode and cathode when put in the batteries. Close the cover and
apply screws to secure it.
Caution: Lightly press the remote button and do not overexert.
SWP_Brasil_Instruction Manual.indd 6 21.05.2012 13:32:04

7
•FilltheWaterTank.
•ExpandtheTelescopicPolebyunlockingtheclipsandfully
extending the pole. Lock clips to secure.
•Pluginthepowercordtoagroundedelectricaloutletandturnon
the power at the ON/OFF switch. The Power Indicator Light will
glow.
•Theunitwillbereadytouseinjust45seconds.
•HangthegarmentontheRotatingHanger.Youmayalsouse
a clean, rust-free clothes hanger, and place the hanger on the
Clothes Hanger Hook.
•Placetheprotectivegloveonthehandthatwillbeholdingthe
garment.
•HoldtheSteamHeadwiththesteamventspointingawayfromyour
body.
•TouchtheSteamHeadtothegarmentlightly,movingitinanup
and down vertical motion, beginning at the bottom of the garment
and moving upward.
•Steamwillrisealongtheinsideandoutsideofthefabrictoremove
wrinkles. Continue to steam the garment, smoothing with your free
(gloved) hand.
•Repeatuntilfabriciswrinklefree.
•Whenfinished,switchthepoweroffattheOn/OffSwitch.
•Unplugthesteamer.
•HangtheSteamHeadontheSteamHeadHangerwhennotinuse.
•EmptytheWaterTankbeforestoring.
HOW TO STEAM
ON
OFF
ENG
SWP_Brasil_Instruction Manual.indd 7 21.05.2012 13:32:04
8
Steaming Tips:
•Donotallowkinkstoforminthehoseatanytime.
•Certaindraperiescanbesteamedwhilehanging.
•Toremovestubbornwrinkles,theFabricBrushmayalsobeused.
NOTE: Do not operate the steamer without water as this could cause
damage to the unit.
Never use water with additives, including scents, starches, or fabric
conditioners, as they can cause deposits to form in the steamer that
can stain your clothing.
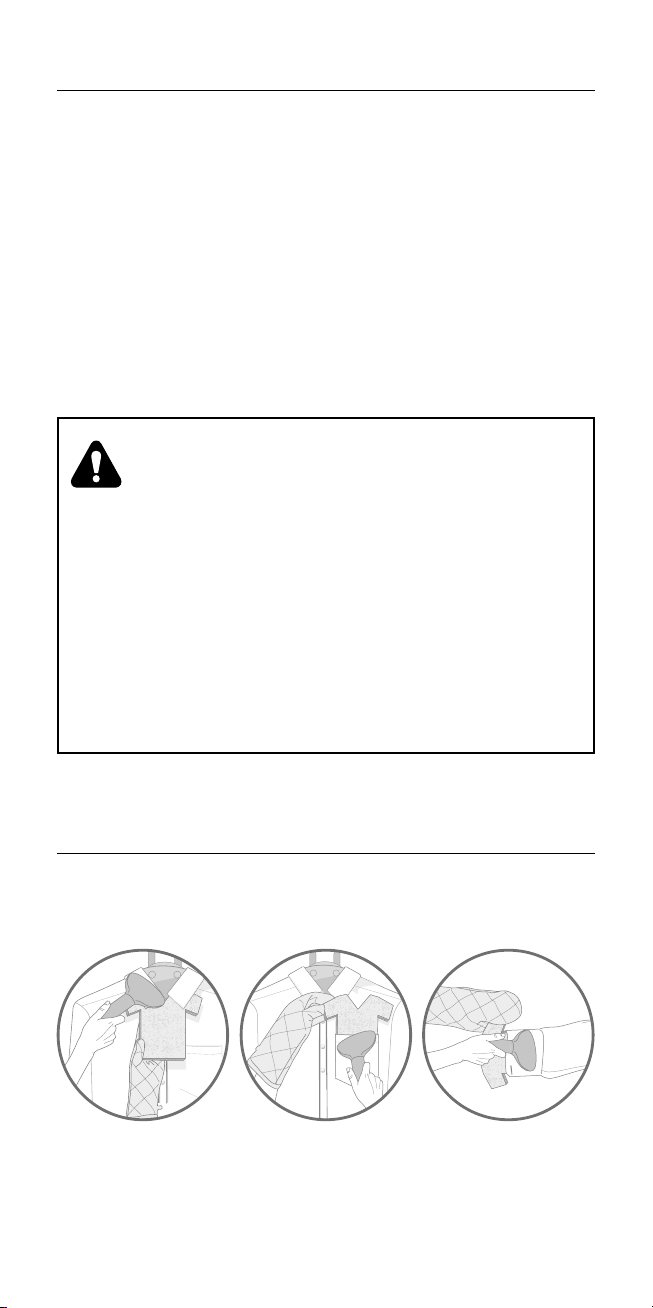
Handheld Steaming Board
Use Steam Board for help with collars, pockets and every corner.
WARNING:
OPERATE THE GARMENT STEAMER ON THE FLOOR AT ALL TIMES.
THE HOSE MAY MAKE A GURGLING NOISE DURING USE. THIS IS
NORMAL AND IS CAUSED BY CONDENSATION IN THE HOSE. HOLD
THE HOSE UP TO ALLOW CONDENSATION TO FLOW BACK INTO THE
TANK .
NEVER STEAM A GARMENT WHILE IT IS BEING WORN. BURNS AND
INJURY MAY RESULT.
PULLING ON A GARMENT WITH TOO MUCH FORCE MAY CAUSE THE
GARMENT STEAMER TO TIP.
DO NOT OPERATE THE GARMENT STEAMER WITHOUT WATER IN THE
TANK .
DO NOT OPERATE THE GARMENT STEAMER FOR MORE THAN 3
HOURS AT A TIME.
DO NOT LIFT THE GARMENT STEAMER BY THE WATER TANK HANDLE.
SWP_Brasil_Instruction Manual.indd 8 21.05.2012 13:32:06
Andere Handbücher für SteamWorks Pro
3
Inhaltsverzeichnis
Sprachen:
Andere Singer Dampfreiniger Handbücher

Singer
Singer SteamWorks Pro Bedienungsanleitung

Singer
Singer SteamWorks Pro SWP Bedienungsanleitung

Singer
Singer SteamWorks Pro Bedienungsanleitung

Singer
Singer ESP36T1 Bedienungsanleitung

Singer
Singer Garment Steamer Bedienungsanleitung

Singer
Singer SG50 Bedienungsanleitung

Singer
Singer SP-550 Bedienungsanleitung

Singer
Singer SteamWorks Classic Bedienungsanleitung

Singer
Singer SteamWorks Pro Bedienungsanleitung


