SMT monilog Bedienungsanleitung
MicroShockDetector (plus)
Quick guide
Kurzanleitung
Guide rapide
Guía rápida 快速入门指南
Краткое
руководство
Kisa Kilavuz
QUICK GUIDE
EN
Your RISK LOGGER must be prepared for the specific application
before starting a task. This includes configuration of the mea-
surement and time parameters as well as checking the battery
and memory status. A detailed description can be found in the
user manual. The current smartphone app MONILOG® Connect for
MicroShockDetector plus can be downloaded free of charge from
the Google Play Store.
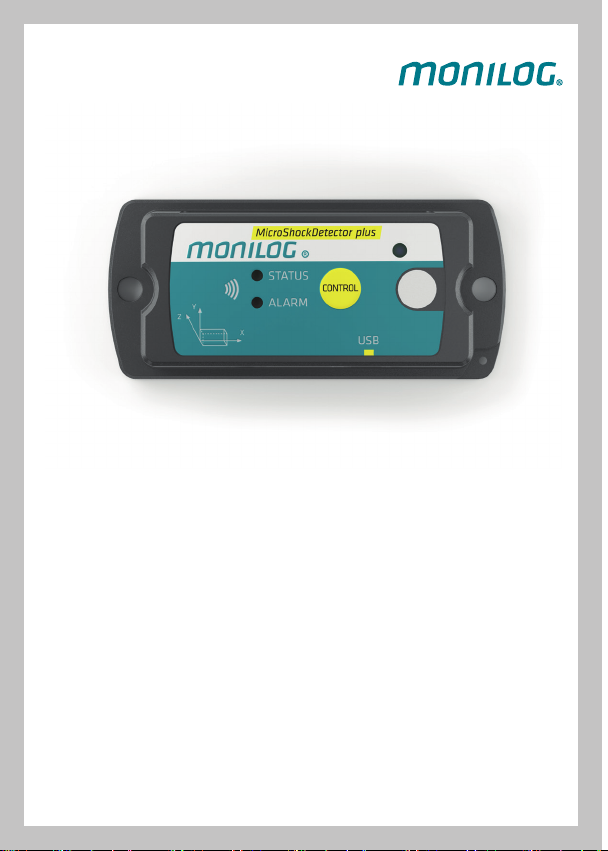
MicroShockDetector (plus)

Checking the device status
◊ Press the CONTROL button briefly (< 2 seconds)
EN
Please refer to the instructions for use in case of any
deviating illustrations.
Switching on
Press the CONTROL button and hold it down for more than
2 seconds until STATUS lights up green.
Switching o
Press the CONTROL button and hold it down for more than
5 seconds until both STATUS and ALARM indicators light up red.
If switching on/o is password-protected, the RISK LOGGER can
only be started up via the „MONILOG®Analyzer“ software.
STATUS
NO DISPLAY
ALARM
The device is switched o or the battery is
empty
The device is ready to measure
An alarm limit value has been exceeded
Remember to calibrate your device regularly. We are at
your disposal with our LONGLIFE package.

Newly delivered MONILOG® RISK LOGGERS are configured ex
works with default parameters and the measured value memory
is deleted. Therefore, the following steps are optional.
1. Backup of measured data with PC via USB
◊ Switch on the device.
◊ Connect the device to your PC using the USB cable provided.
◊ Start “MONILOG® Analyzer” on the PC and wait until the
transmission of the measured data is complete.
Save the measured data as an “.msd” file. Reports and analyses
can later be generated from this.
2. Reading out and sending reduced measured data with
smartphone via NFC (only for MSD plus)
◊ On your smartphone, launch the MONILOG® Connect app and
enable NFC on your smartphone.
◊ Press the „READ DATA“ button in the app and place the
smartphone in the middle of the MicroShockDetector plus as
shown in the app.
◊ After a few seconds, the data is read out and can be sent by
e-mail with a pdf report and the .msd file attached.
The data read out via NFC is a reduced data record. For a more
detailed analysis of the measured data, they must be read out
completely via PC (USB).
EN

3. Configuration for the new application with
MONILOG® Analyzer
◊ Adjust the parameter configuration according to the applica-
tion in the “Configuration” tab.
◊ Use the displayed battery reserve to assess whether the
battery capacity would still be sucient for the scheduled
transport. If in doubt, replace the batteries after configura-
tion. Confirm the insertion of new batteries by pressing the
„Insert new battery“ button.
◊ Activate transferring the configuration to the device, clearing
the memory and updating the time by pressing separate
buttons.
◊ After all parameters have been successfully transferred to the
device, disconnect the USB cable.
◊ Switch o the device.
4. Battery replacement
Important: The device must always be switched o
before replacing the batteries.
◊ Unscrew the base plate.
◊ Insert a new lithium battery with a voltage of 3.6V into the
device. For approved battery types, please refer to the instruc-
tions for use.
◊ Screw the base plate properly back onto the device and switch
it on.
EN
OUR SERVICE NUMBER:
5. On-site assembly
Mount the device at a vibration-stable point of the transpor-
ted goods and switch it on again only after safe installation by
pressing the CONTROL button. This is the only way to determine
the rest position and to avoid premature recording errors.
6. After transport
Switch o the device so that only the relevant measured data is
stored in the memory. The device can then be dismantled.
Manufacturer:
SMT ELEKTRONIK GmbH
An der Prießnitzaue 22
01328 Dresden
Germany
EN
◊ Connect the device to the PC with a USB cable.
◊ Then, press the „New battery“ button via the „MONILOG®
Analyzer“ software and configure the time by pressing the
„Time synchronisation“ button.
◊ The device can now be disconnected from the PC and switched
o or configured as described in 3.
KURZANLEITUNG
DE
Ihr RISK LOGGER muss vor Beginn einer Mission für den Anwen-
dungsfall vorbereitet werden. Dazu gehören die Konfiguration der
Mess- und Zeitparameter, sowie die Prüfung des Batterie- und
Speicherstatus. Eine detaillierte Beschreibung finden Sie in der
Gebrauchsanleitung. Die aktuelle Smartphone App MONILOG®
Connect für MicroShockDetector plus können Sie im Google Play
Store kostenfrei downloaden.
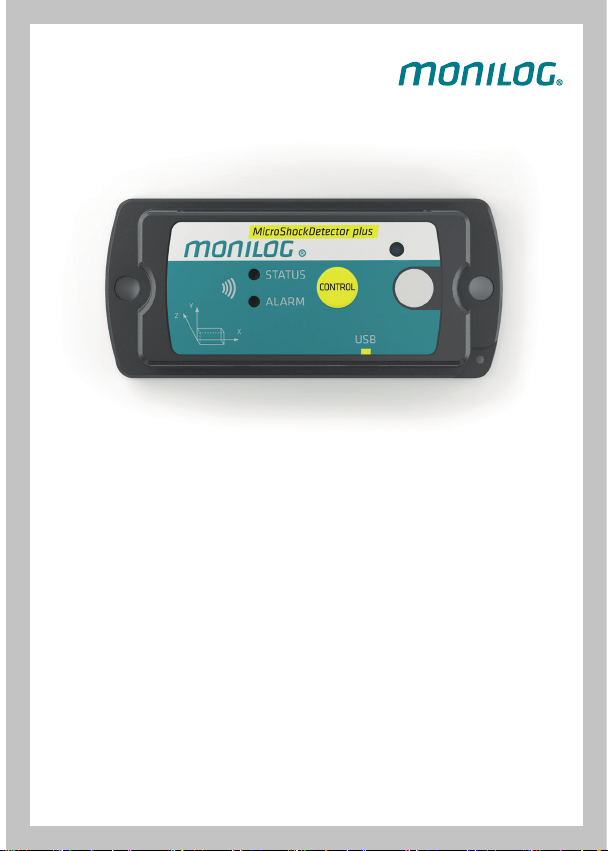
MicroShockDetector (plus)
Gerätestatus prüfen
◊ Drücken Sie kurz (< 2 Sekunden) den CONTROL Button
Bei abweichenden Darstellungen bitte die Gebrauchsanweisung
beachten.
Einschalten
Drücken Sie den Button CONTROL länger als 2 Sekunden bis
STATUS grün leuchtet.
Ausschalten
Drücken Sie den Button CONTROL länger als 5 Sekunden bis
beide Anzeigen (STATUS und ALARM) rot leuchten.
Sollte das Ein-/Ausschalten mit einem Passwort geschützt sein,
kann der RISK LOGGER nur mit Hilfe der Software MONILOG®
Analyzer in Betrieb genommen werden.
STATUS
KEINE ANZEIGE
ALARM
Das Gerät ist ausgeschaltet oder
die Batterie ist leer
Das Gerät ist messbereit
Ein Alarmgrennzwert wurde über-
schritten
Denken Sie an die regelmäßige Kalibrierung Ihres Gerätes.
Mit unserem LONGLIFE Paket stehen wir Ihnen
hier hilfreich zur Seite.
DE

DE
Neu gelieferte MONILOG® RISK LOGGER sind ab Werk mit
Standardparametern konfiguriert und der Messwertspeicher ist
gelöscht. Die folgenden Schritte sind daher optional.
1. Messdaten mit PC via USB sichern
◊ Schalten Sie das Gerät ein.
◊ Verbinden Sie das Gerät mit Ihrem PC über das mitgelieferte
USB-Kabel.
◊ Starten Sie am PC „MONILOG® Analyzer“ und warten Sie, bis
die Übertragung der Messdaten abgeschlossen ist.
Speichern Sie die Messdaten als Dateityp „.msd“. Daraus können
später Reports und Analysen erstellt werden.
2. Reduzierte Messdaten mit Smartphone via NFC auslesen
und versenden (nur für MSD plus)
◊ Starten Sie auf Ihrem Smartphone die App MONILOG®
Connect und aktivieren Sie an Ihrem Smartphone das NFC.
◊ Drücken Sie in der App den „DATEN AUSLESEN“ Button und
legen Sie das Smartphone, wie in der App dargestellt, mittig
auf den MicroShockDetector plus.
◊ Nach wenigen Sekunden sind die Daten ausgelesen und
können per Mail mit einem pdf-Bericht und der .msd-Datei im
Anhang versendet werden.
Bei den über NFC ausgelesenen Daten handelt es sich um einen
reduzierten Datensatz. Für eine tiefergehende Analyse der
Messdaten müssen diese vollständig via PC (USB) ausgelesen
werden.

3. Konfiguration für den neuen Einsatz mit
MONILOG® Analyzer
◊ Passen Sie die Parameterkonfiguration entsprechend der
Anwendung im Tabulator „Konfiguration“ an.
◊ Bewerten Sie anhand der angezeigten Batteriereserve, ob die
Batterie für den geplanten Transport noch ausreichend ist. Im
Zweifel müssen nach der Konfiguration die Batterien ersetzt
werden. Der Einbau neuer Batterien muss über die Taste
„neue Batterie einsetzen“ bestätigt werden.
◊ Konfiguration an das Gerät übertragen, löschen des Speichers
und Aktualisierung der Uhrzeit müssen über separate Tasten
aktiviert werden.
◊ Nachdem alle Parameter erfolgreich an das Gerät übertragen
wurden, ziehen Sie das USB-Kabel ab.
◊ Schalten Sie das Gerät aus.
4. Batteriewechsel
Wichtig: Zum Batterierwechsel muss das
Gerät immer ausgeschaltet sein.
◊ Die Bodenplatte muss aufgeschraubt werden.
◊ Eine neue Lithium-Batterie mit einer Spannung von 3,6V in
das Gerät einsetzen. Zugelassene Batterietypen entnehmen
Sie bitte der Gebrauchsanweisung.
◊ Die Bodenplatte wieder ordentlich an das Gerät schrauben und
das Gerät einschalten.
DE
Inhaltsverzeichnis
Sprachen:


