SONIQ QSP425T Bedienungsanleitung

SIZE: 180 X 255 MM

CAUTION
• DANGER OF EXPLOSION IF BATTERY IS INCORRECTLY REPLACED.
REPLACE ONLY WITH THE SAME OR EQUIVALENT TYPE.
• USE OF CONTROLS OR ADJUSTMENTS OR PERFORMANCE OF
PROCEDURES OTHER THAN THOSE SPECIFIED MAY RESULT IN
HAZARDOUS RADIATION EXPOSURE.
WARNING :
• TO PREVENT FIRE OR SHOCK HAZARD, DO NOT EXPOSE THIS UNIT
TO RAIN OR MOISTURE. DO NOT PLACE OBJECTS FILLED WITH
LIQUIDS ON OR NEAR THIS UNIT.
• SHOULD ANY TROUBLE OCCUR, DISCONNECT THE AC POWER
CORD AND REFER SERVICING TO A QUALIFIED TECHNICIAN.
ON PLACEMENT
• Do not use this unit in places which are extremely hot, cold, dusty
or humid.
• Do not restrict the air ow of this unit by placing it somewhere
with poor air ow, by covering it with a cloth, or by placing it on
bedding or carpeting.
ON SAFETY
• When connecting or disconnecting the AC power cord, grip the
plug and not the cord itself. Pulling the cord may damage it and
create a hazard.
• When you are not going to use the unit for a long period of time,
disconnect the AC power cord.
• The mains plug is used as the disconnecting device. It should
remain readily operable and should not be obstructed during
intended use. To be completely disconnected from the supply
mains, the mains plug of the apparatus should be disconnected
from the mains socket outlet completely.
• The apparatus should not be exposed to dripping or splashing
and that no objects lled with liquids, such as vases, should be
placed on apparatus.
• To completely disconnect the power input, the mains plug of
apparatus shall be disconnected from the mains.
• The mains plug of apparatus should not be obstructed OR
should be easily accessed during intened use.
• Leave a minimum distance 4 inch around the apparatus for
sucient ventilation.
• The ventilation openings should not be impeded by covering
with items such as newspaper, table-cloths, curtains etc.
• No naked flame sources such as lighted candles should be
placed on the apparatus.
• Attention should be drawn to the environmental aspects of
battery disposal.
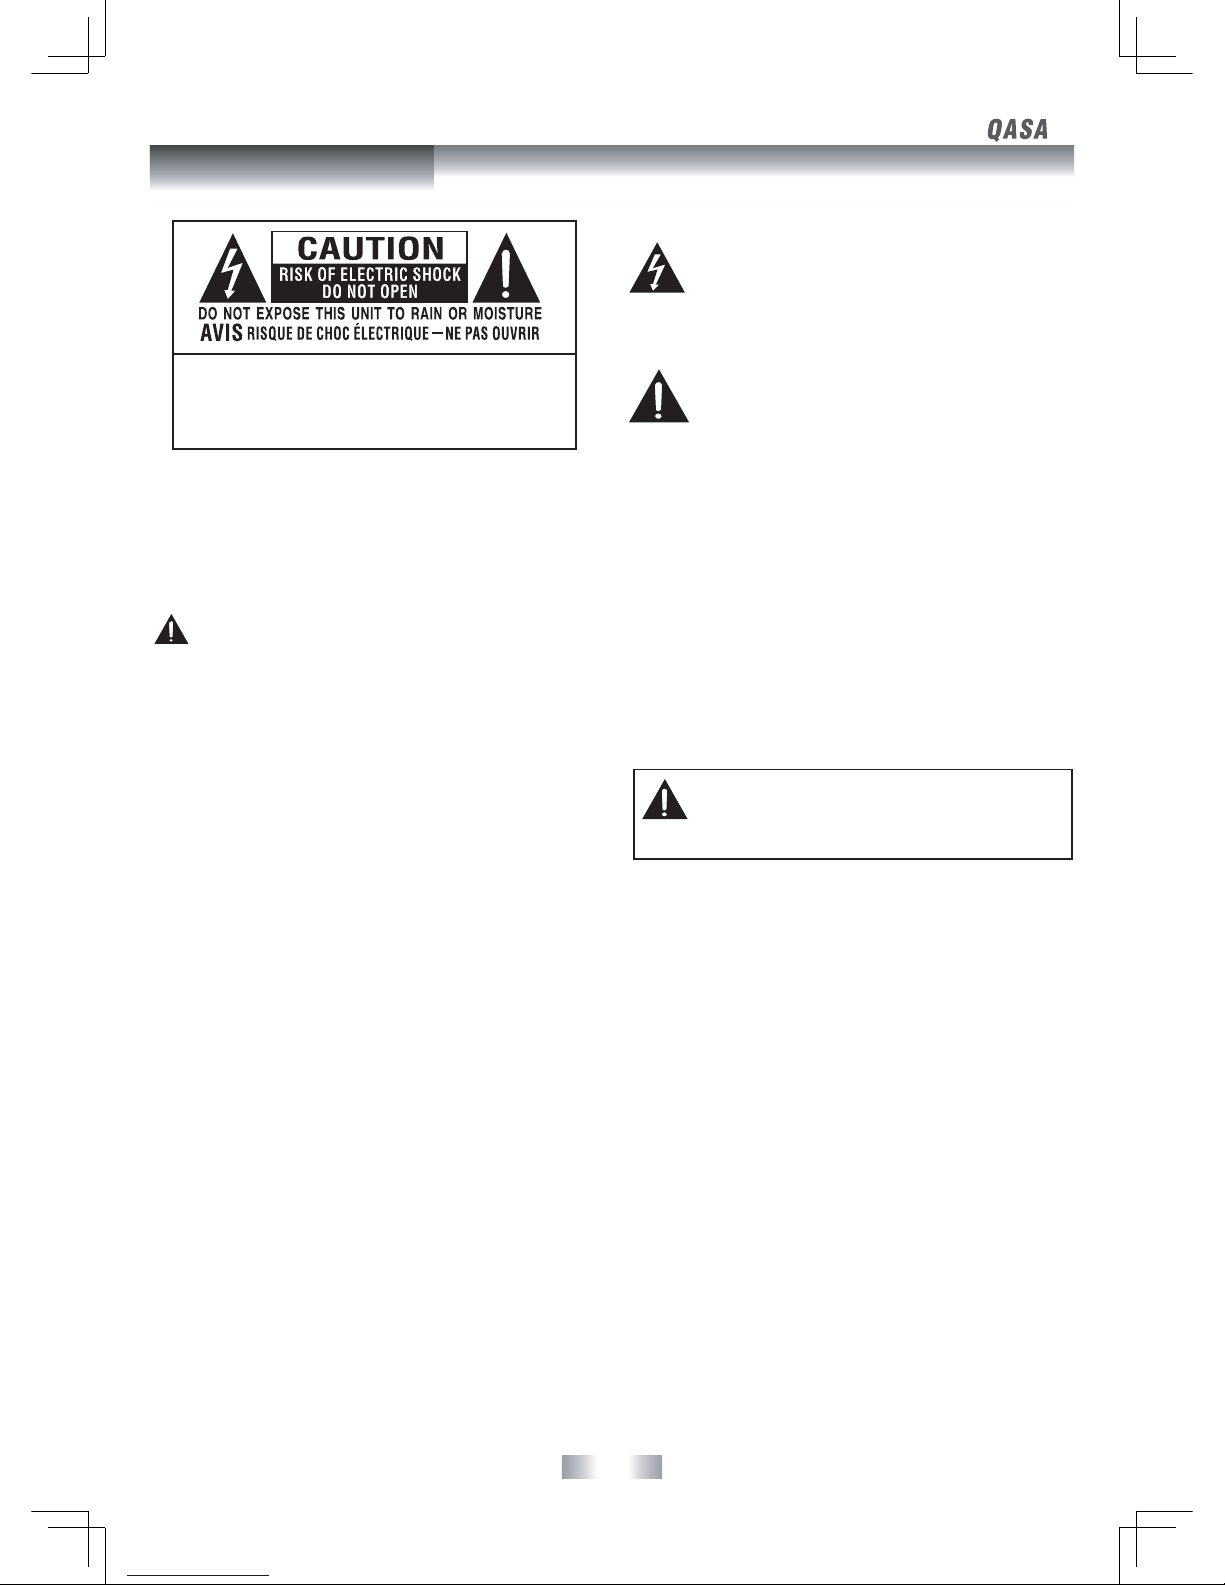
WARNING : TO REDUCE THE RISK OF ELECTRIC
SHOCK, DO NOT REMOVE COVER (OR BACK).
NO USERSERVICEABLE PARTS INSIDE. REFER
SERVICING TO QUALIFIED SERVICE PERSONNEL.
The exclamation point within an equilateral triangle is
intended to alert the user to the presence of important
operating and maintenance (servicing) instructions in
the literature accompanying the appliance.
The lightning flash with arrowhead symbol, within
an equilateral triangle, is intended to alert the user
to the presence of uninsulated “dangerous voltage”
within the product’s enclosure that may be of sucient
magnitude to constitute a risk of electric shock to
persons.
• The use of apparatus in moderate climates.
• Under the inuence of electrostatic phenomenon, the product
may malfunction and require to power reset.
ON CONDENSATION
• When left in a heated room where it is warm and damp, water
droplets or condensation may form inside the equipment. When
there is condensation inside the unit, the unit may not function
normally. Let the unit stand for 1-2 hours before turning the
power on or gradually heat the room and allow the unit to dry
before use.
RATING PLATE LOCATION
The rating plate is located on the rear of the unit.
WARNING: Changes or modifications to this unit
not expressly approved by party responsible for
compliance could void the user authority to operate
the unit.
IMPORTANT INFORMATION
If a television is not positioned in a suciently stable location, it can
be potentially hazardous due to falling. Many injuries, particularly
to children, can be avoided by taking simple precautions such as:
• Using cabinets or stands recommended by the manufacturer of
the television.
• Only using furniture that can safely support the television.
• Ensuring the television is not overhanging the edge of the
supporting furniture.
• Not placing the television on tall furniture (for example,
cupboards or bookcases) without anchoring both the furniture
and the television to a suitable support.
• Not standing the televisions on cloth or other materials placed
between the television and supporting furniture.
• Educating children about the dangers of climbing on furniture to
reach the television or its controls.
- 1 -
Safety Precautions

- 2 -
SAFETY PRECAUTIONS ............................................................................................................................................................ 1
INSTALLATION.......................................................................................................................................................................... 3
Installing the Base Stand ..............................................................................................................................................................................................................................3
Mounting on the Wall .....................................................................................................................................................................................................................................3
ACCESSORIES .......................................................................................................................................................................... 4
GETTING STARTED.................................................................................................................................................................. 4
CONTROL REFERENCE GUIDE ............................................................................................................................................ 5 - 8
CONNECTIONS ................................................................................................................................................................. 9 - 12
Connecting a TV Antenna / Cable / Satellite ..........................................................................................................................................................................................9
Connecting an A / V Device ..........................................................................................................................................................................................................................9
Connecting Devices with a Composite (Yellow RCA-Type) Video Output ...............................................................................................................................10
Connecting a High Denition (HD) Source Using HDMI Connection ........................................................................................................................................ 10
Connecting a High Denition (HD) Source Using Component Connection ..........................................................................................................................11
Connecting a PC ............................................................................................................................................................................................................................................ 12
Connecting an Audio Amplier ............................................................................................................................................................................................................... 12
Connecting the AC Power Cord .............................................................................................................................................................................................................. 13
USING HEADPHONES ............................................................................................................................................................ 13
BASIC OPERATION ......................................................................................................................................................... 14 - 15
TV SETUP ......................................................................................................................................................................... 16 - 19
TV Setting Menu ............................................................................................................................................................................................................................................ 16
Picture Menu...................................................................................................................................................................................................................................................17
Sound Menu ...................................................................................................................................................................................................................................................17
Time Menu .......................................................................................................................................................................................................................................................18
Setup Menu ..................................................................................................................................................................................................................................................... 18
Lock Menu ..................................................................................................................................................................................................................................................... 19
TELETEXT................................................................................................................................................................................ 20
TROUBLESHOOTING GUIDE .................................................................................................................................................. 21
MAINTENANCE....................................................................................................................................................................... 21
Contents

- 3 -
INSTALLING THE BASE STAND
WARNING: The display is very fragile, and must be protected at all times when installing the base stand. Be sure that no hard or sharp objects,
or anything that could scratch or damage the display come in contact with it. Do NOT place pressure on the rear of the unit at anytime
because the screen could crack.
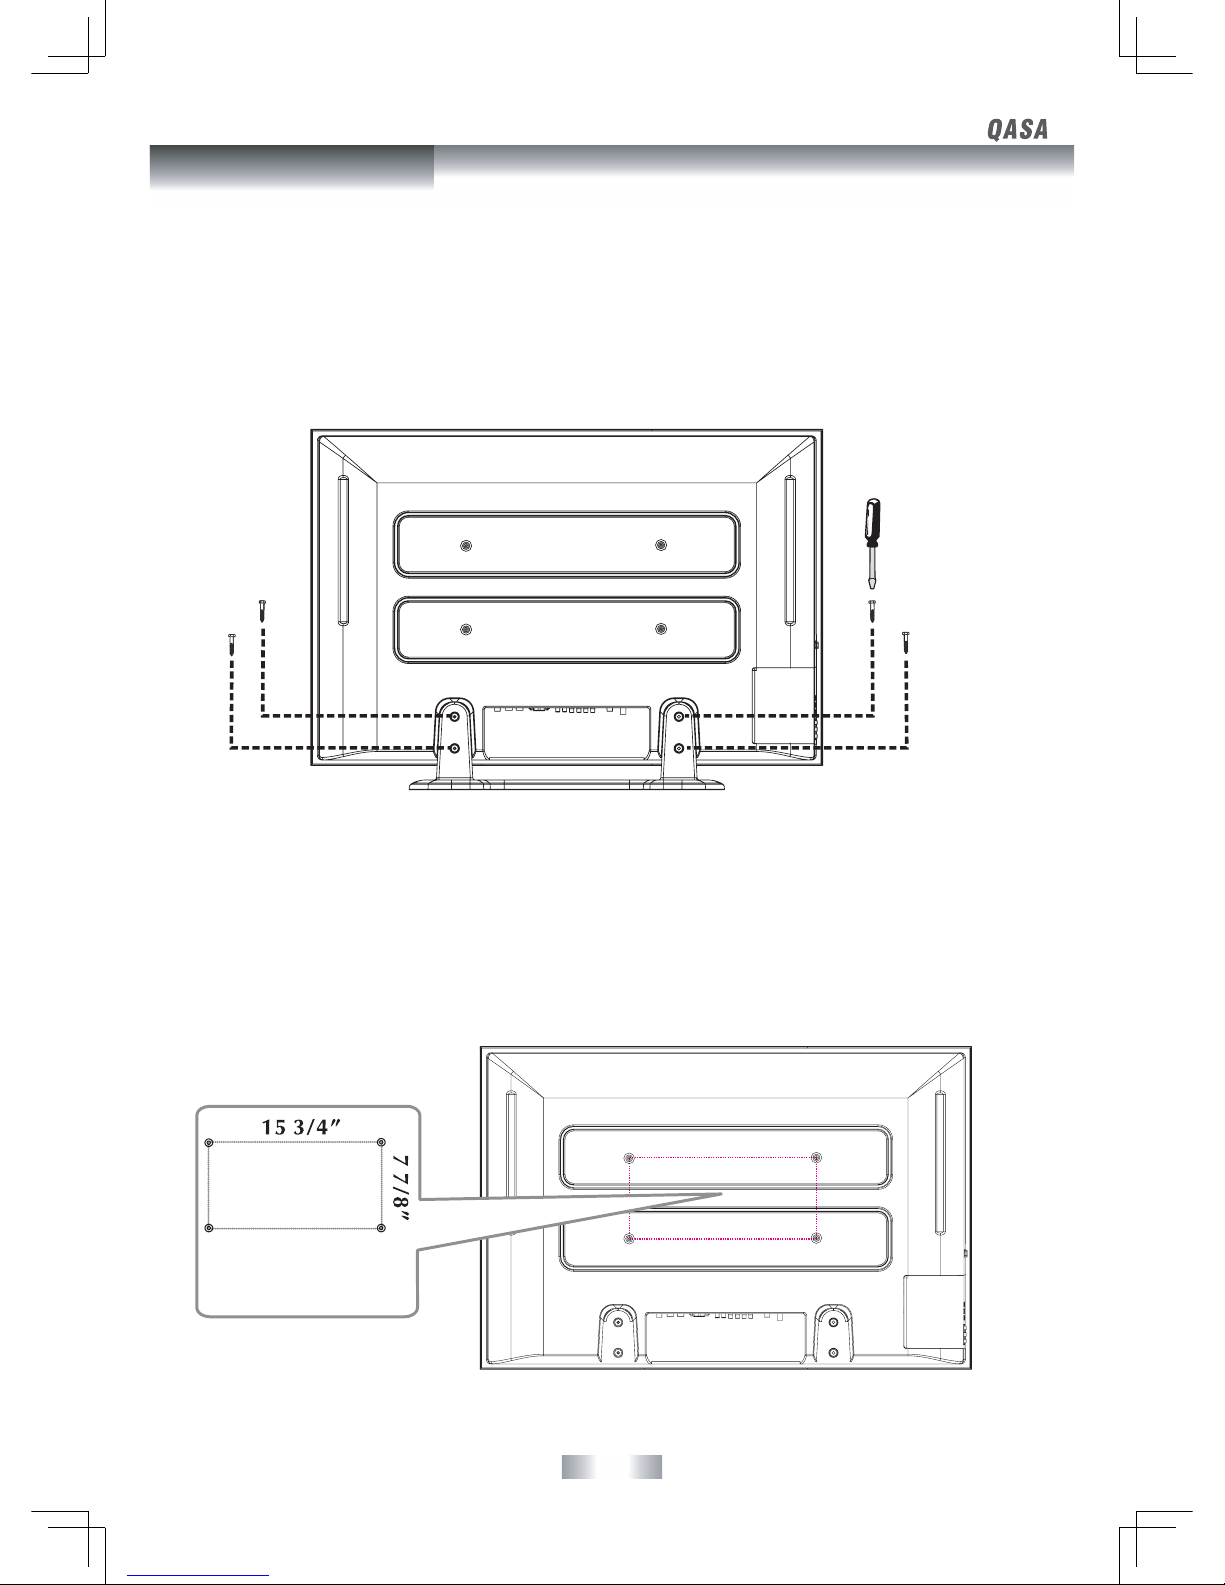
1. Disconnect any cables or cords connected to the unit.
2. Lay the unit down on a at surface, so the back side is facing up, making sure to place a soft cushioned material (such as a blanket or thick
piece of foam) beneath the screen.
3. Put the stand into the hole at the bottom of the TV.
4. Insert screw into the hole and tighten.
MOUNTING ON THE WALL
This unit is VESA-compliant, and is designed to be wall-mounted with a VESA-compliant 15 3/4” x 7 7/8” (400mm x 200mm) mounting kit
designed for at-panel TVs (sold separately). Mount this unit according to the directions included with the mounting kit.
NOTE
Remove the base stand before mounting the unit on the wall.
Four mounting holes
(4xM6 screw)
Installation

- 4 -
Please check and identify the supplied accessories.
Remote Control (with batteries) ............................................................................................................................................... x 1
AC Power Cord ................................................................................................................................................................................. x 1
Screw for Base Stand ..................................................................................................................................................................... x 4
Getting Started
USING THE REMOTE CONTROL
• Point the remote control at the remote sensor located on the unit.
• When there is a strong ambient light source, the performance of the infrared remote sensor may be degraded, causing unreliable
operation.
• The recommended eective distance for remote operation is about 16 feet (5 meters).
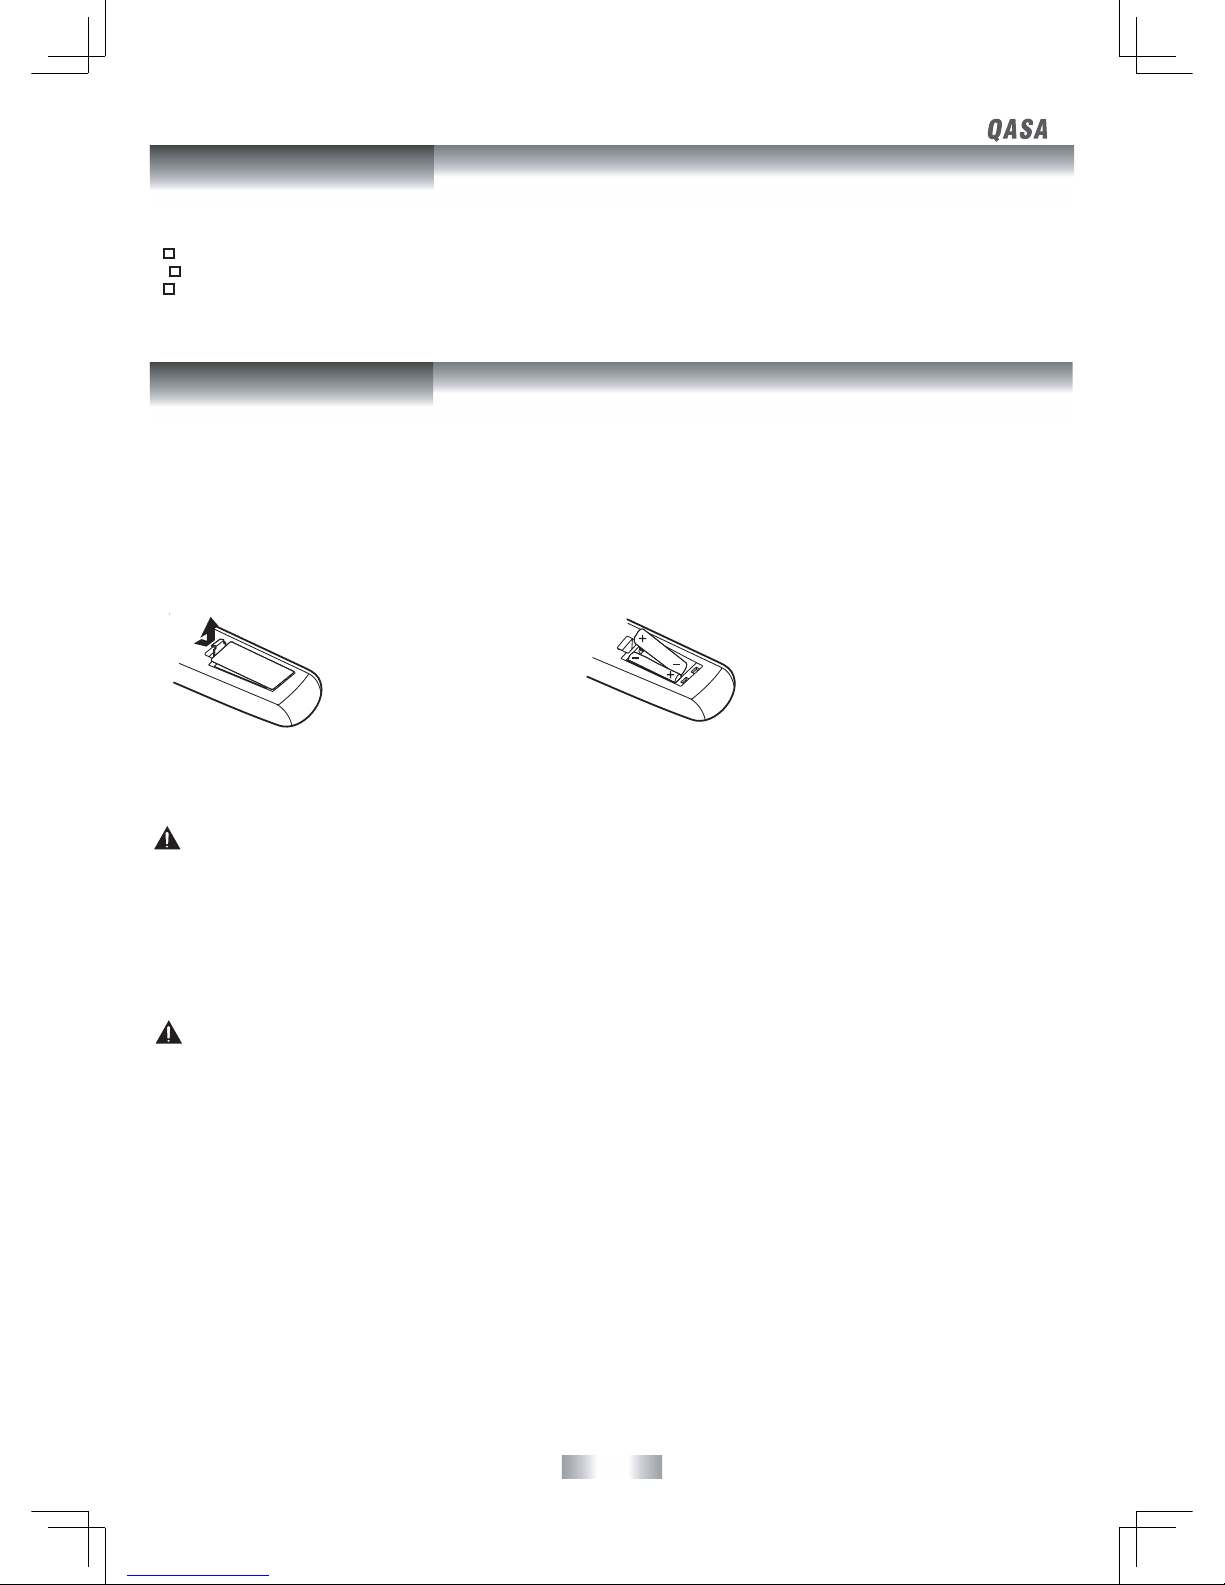
TO INSTALL BATTERIES
1. Open the battery door. 2. Insert 2 “AAA” batteries.
BATTERY REPLACEMENT
When the batteries become weak, the operating distance of the remote control is greatly reduced and you will need to replace the batteries.
CAUTION:
Danger of explosion if battery is incorrectly replaced.
NOTES
• If the remote control is not going to be used for a long time, remove the batteries to avoid damage caused by battery leakage corrosion.
• Do not mix old and new batteries. Do not mix ALKALINE, standard (CARBON-ZINC) or rechargeable (NICKEL-CADMIUM) batteries.
• Always remove batteries as soon as they become weak.
• Weak batteries can leak and severely damage the remote control.
• WARNING : Do not dispose of batteries in a re. Batteries may explode or leak.
WARNING : Battery shall not be exposed to excessive heat such as sunshine, re or the like.
For any questions or problems related to programming a universal remote control, you must contact the customer service department of
the universal remote control manufacturer for assistance, or refer to the instructions included with the universal remote control. We cannot
oer assistance in programming universal remote controls.
Accessories

- 5 -
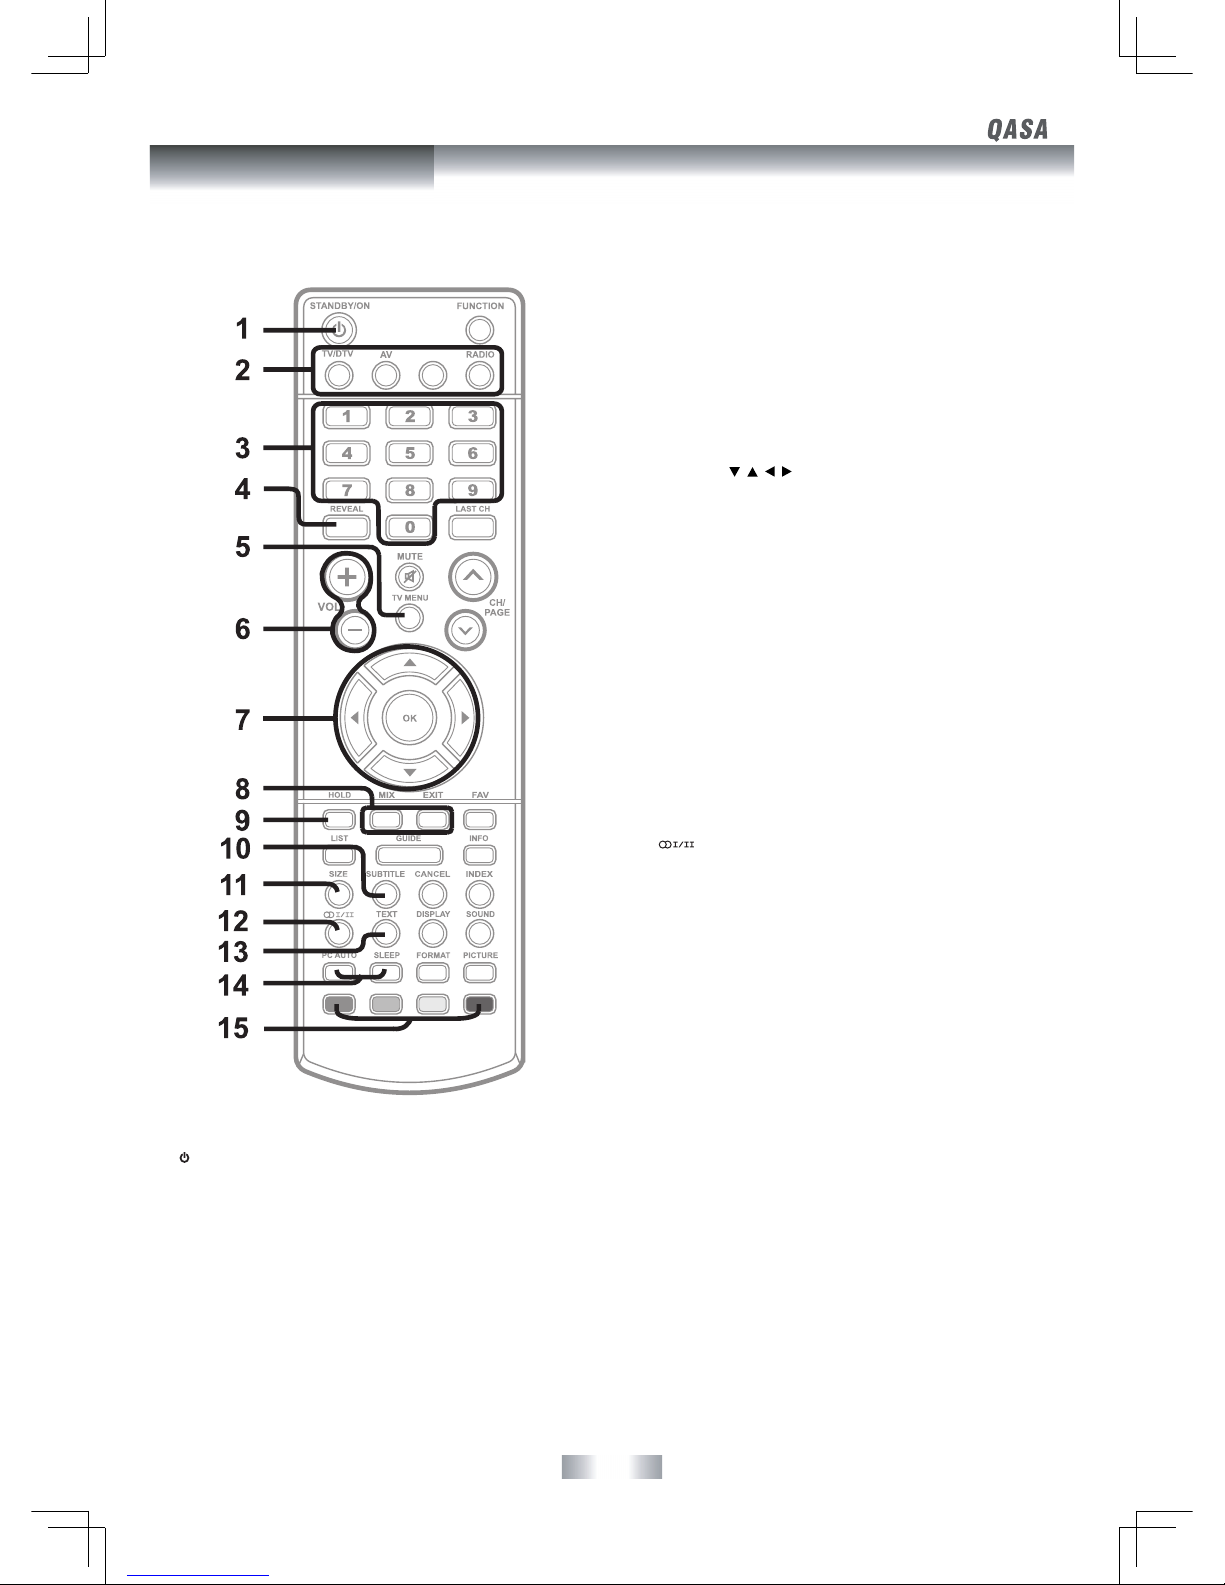
REMOTE CONTROL
1) STANDBY/ON Button
Press to turn ON the unit or put it in STANDBY (OFF) mode.
2) TV/DTV Button
Press to switch to TV/DTV mode.
AV Button
Press to switch to source connected to AV1 / AV2 (composite)
inputs.
PC Button
Press to switch to PC mode.
RADIO Button
Press to select DTV digital radio programmes. Press again to exit
to normal DTV programmes mode.
3) Number (0 - 9) Buttons
Press to change the TV/DTV channels.
4) REVEAL Button
Press to reveal answers on a quiz or game pages from Teletext.
5) TV MENU Button
Press to display the on-screen TV menu.
6) VOLUME (–/+) Buttons
Press to adjust the volume level.
7) CURSOR ( , , , ) Buttons
Press to highlight selections on a menu screen and adjust certain
settings.
OK Button
Press to conrm selections on a menu screen.
8) MIX Button
Press to select Teletext with a TV programme.
EXIT Button
Press to exit the menu and return directly to normal viewing.
9) HOLD Button
Press to stop the automatic page change from Teletext.
10) SUBTITLE Button
Press to select one of your preferred subtitle languages or turn
o subtitle. (Available for digital channels if multiple subtitle
languages are broadcasted.)
11) SIZE Button
Press to set the letters size of teletext on the screen.
12) Button
Press to directly select Mono/ Stereo (and Dual I/ Dual II for
some countries.
13) TEXT Button
Press to directly select Teletext mode.
14) PC AUTO Button
Press to set picture settings for PC mode automatically.
SLEEP Button
Press to set the SLEEP timer. The unit will remain ON for the time
that is set, and will automatically shut o afterwards.
15) RED/GREEN/YELLOW/BLUE Button
Press to edit the channels listed in the Programme Edit.
Press to select the relevant page quickly from Teletext.
PC
Control Reference Guide

- 6 -
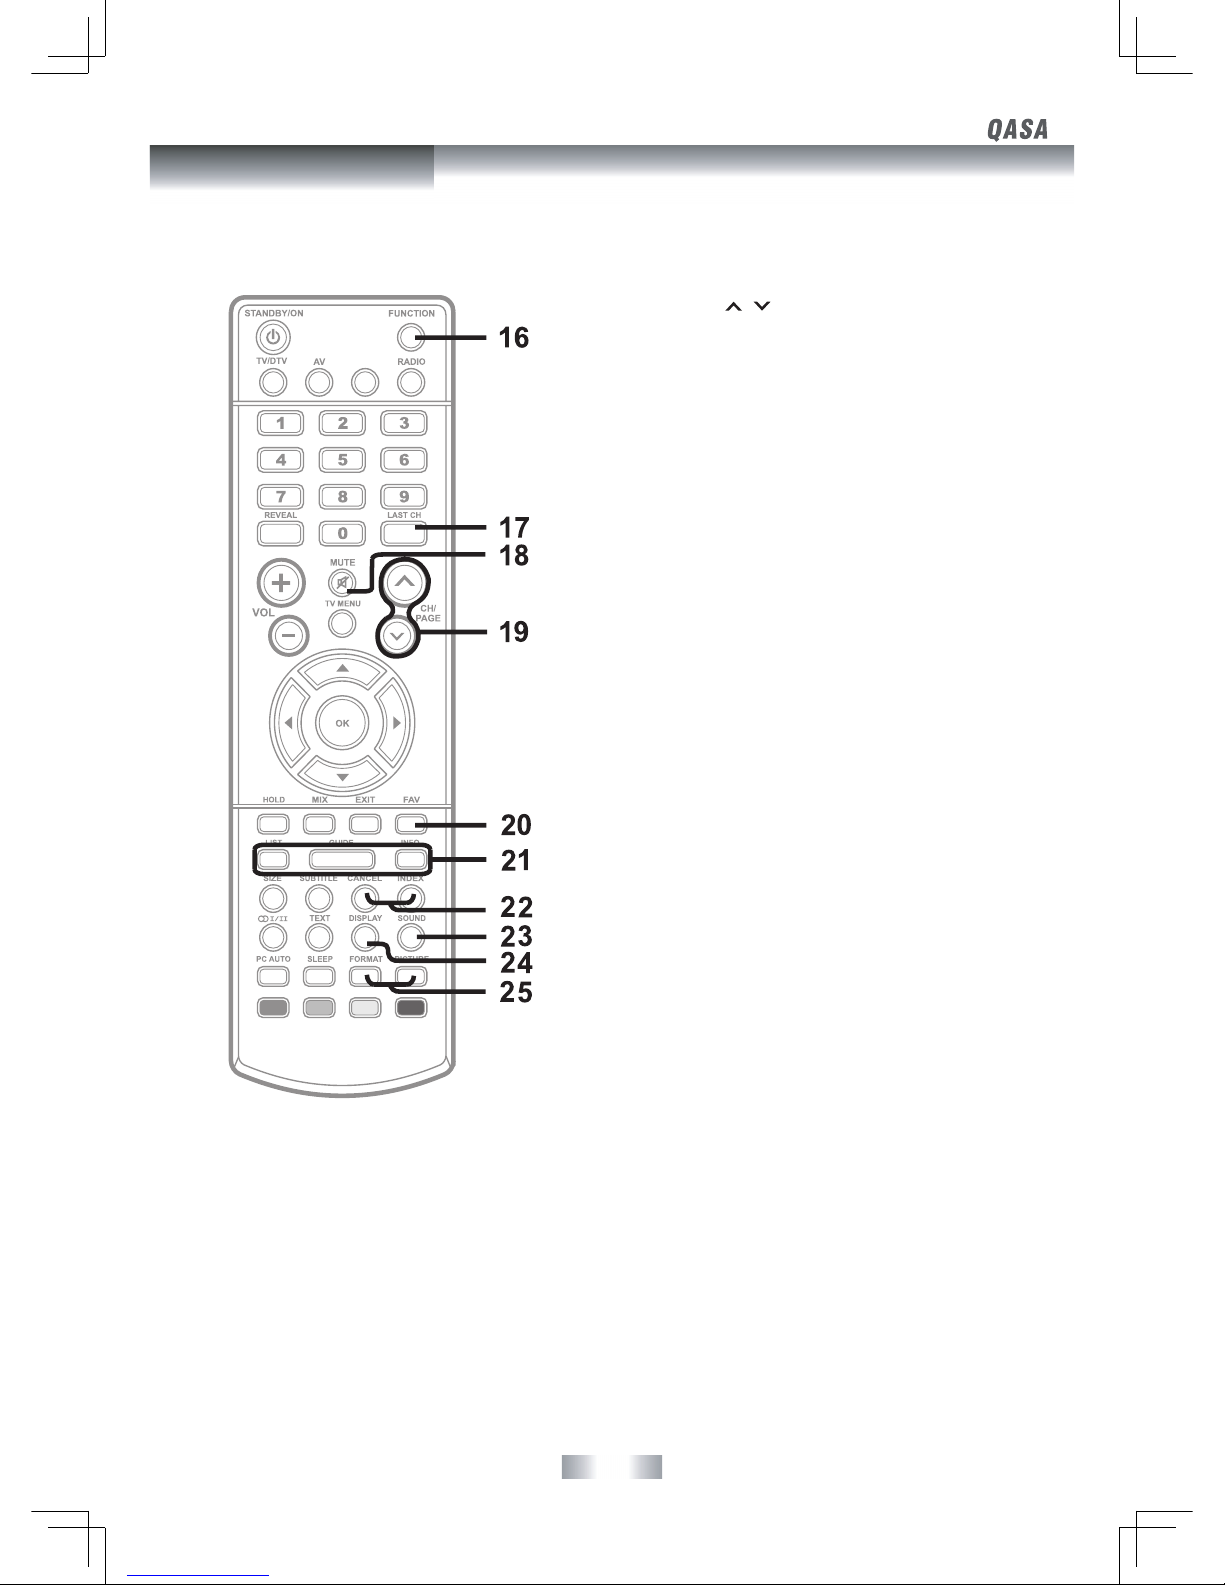
16) FUNCTION Button
Press to switch between DTV, TV, AV1, AV2/SV, YUV1, YUV2,
HDMI1, HDMI2 or PC.
17) LAST CH Button
Press to switch repeatedly between the last two channels
displayed.
18) MUTE Button
Press to mute the sound.
Press again to cancel mute.
19) CH/PAGE / Buttons
Press to change the TV/DTV channels.
Press to go forward or backward the page of Teletext screen in
TV mode.
Press to go forward or backward the page of Programme Edit &
Favourite in TV/DTV mode.
20) FAV Button
Press to display the Favourites program in TV/DTV mode. (You
should setup your favourite TV/DTV channels in Programme Edit
menu.
21) LIST Button
Press to display the channel list in TV/DTV mode.
GUIDE Button
Press to display the PROGRAMME Guide in DTV mode.
INFO Button
Press to display the channel information in DTV mode.
22) CANCEL Button
Press to cancel the Teletext menu.
INDEX Button
Press to select the page number of the index from Teletext.
23) SOUND Button
Press to select from preset sound settings (Standard, Music,
Theatre, Voice & Personal) to match the type of show you are
watching.
24) DISPLAY Button
Press to display information on the screen.
25) FORMAT Button
Press to select the picture format.
PICTURE Button
Press to select from preset screen display settings (Standard,
Movie, Dynamic, Soft & Personal) to match the type of show you
are watching.
PC
REMOTE CONTROL
Control Reference Guide

- 7 -
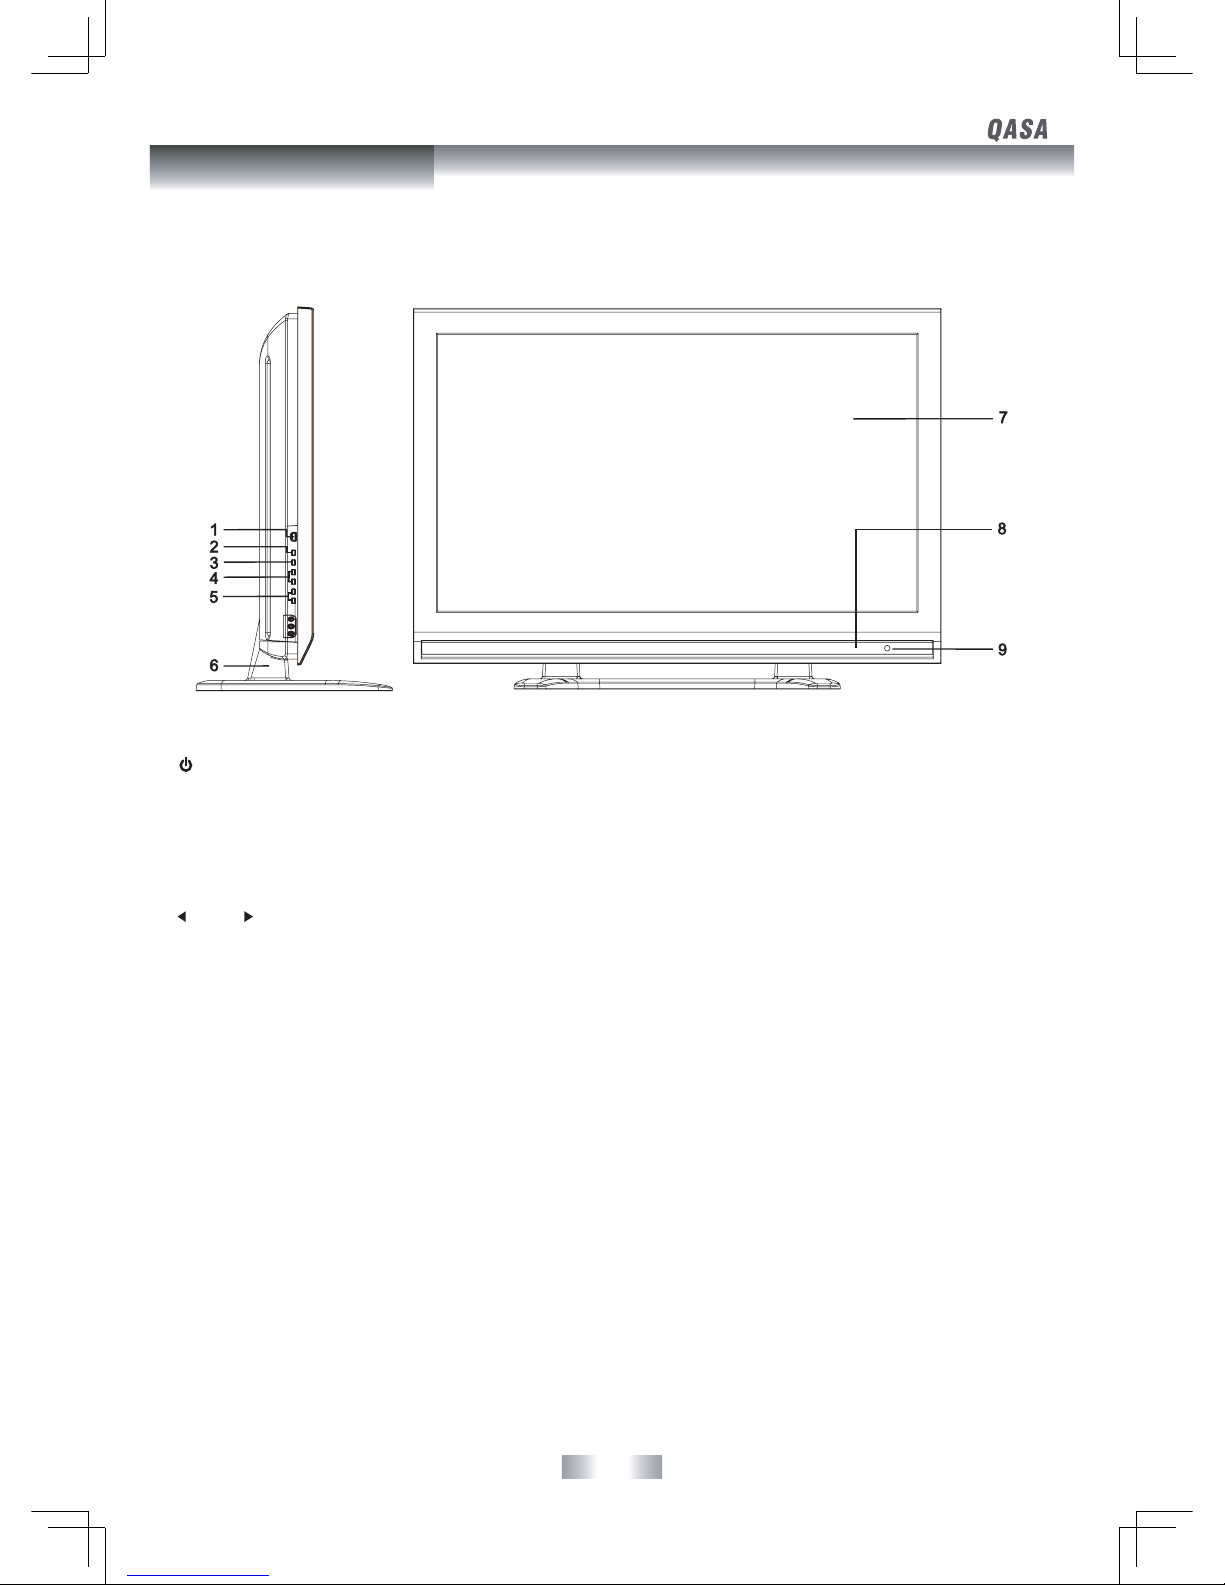
FRONT & SIDE VIEWS
1. / I (STD.BY / ON) Button
Turns the unit on and o.
2. MENU Button
Enters the on-screen TV menu.
3. FUNCTION Button
Selects DTV / TV / AV1 / AV2/SV / YUV1 / YUV2 /
HDMI 1 / HDMI 2 /PC.
4.
CH / CH Buttons
Changes the TV channels.
5. - VOL + Controls
Adjusts the volume level.
6. Removable Stand
7. Color Screen
8. Speaker
9. Remote Sensor
Receives the remote control signal.
Standby Indicator
Control Reference Guide

- 8 -
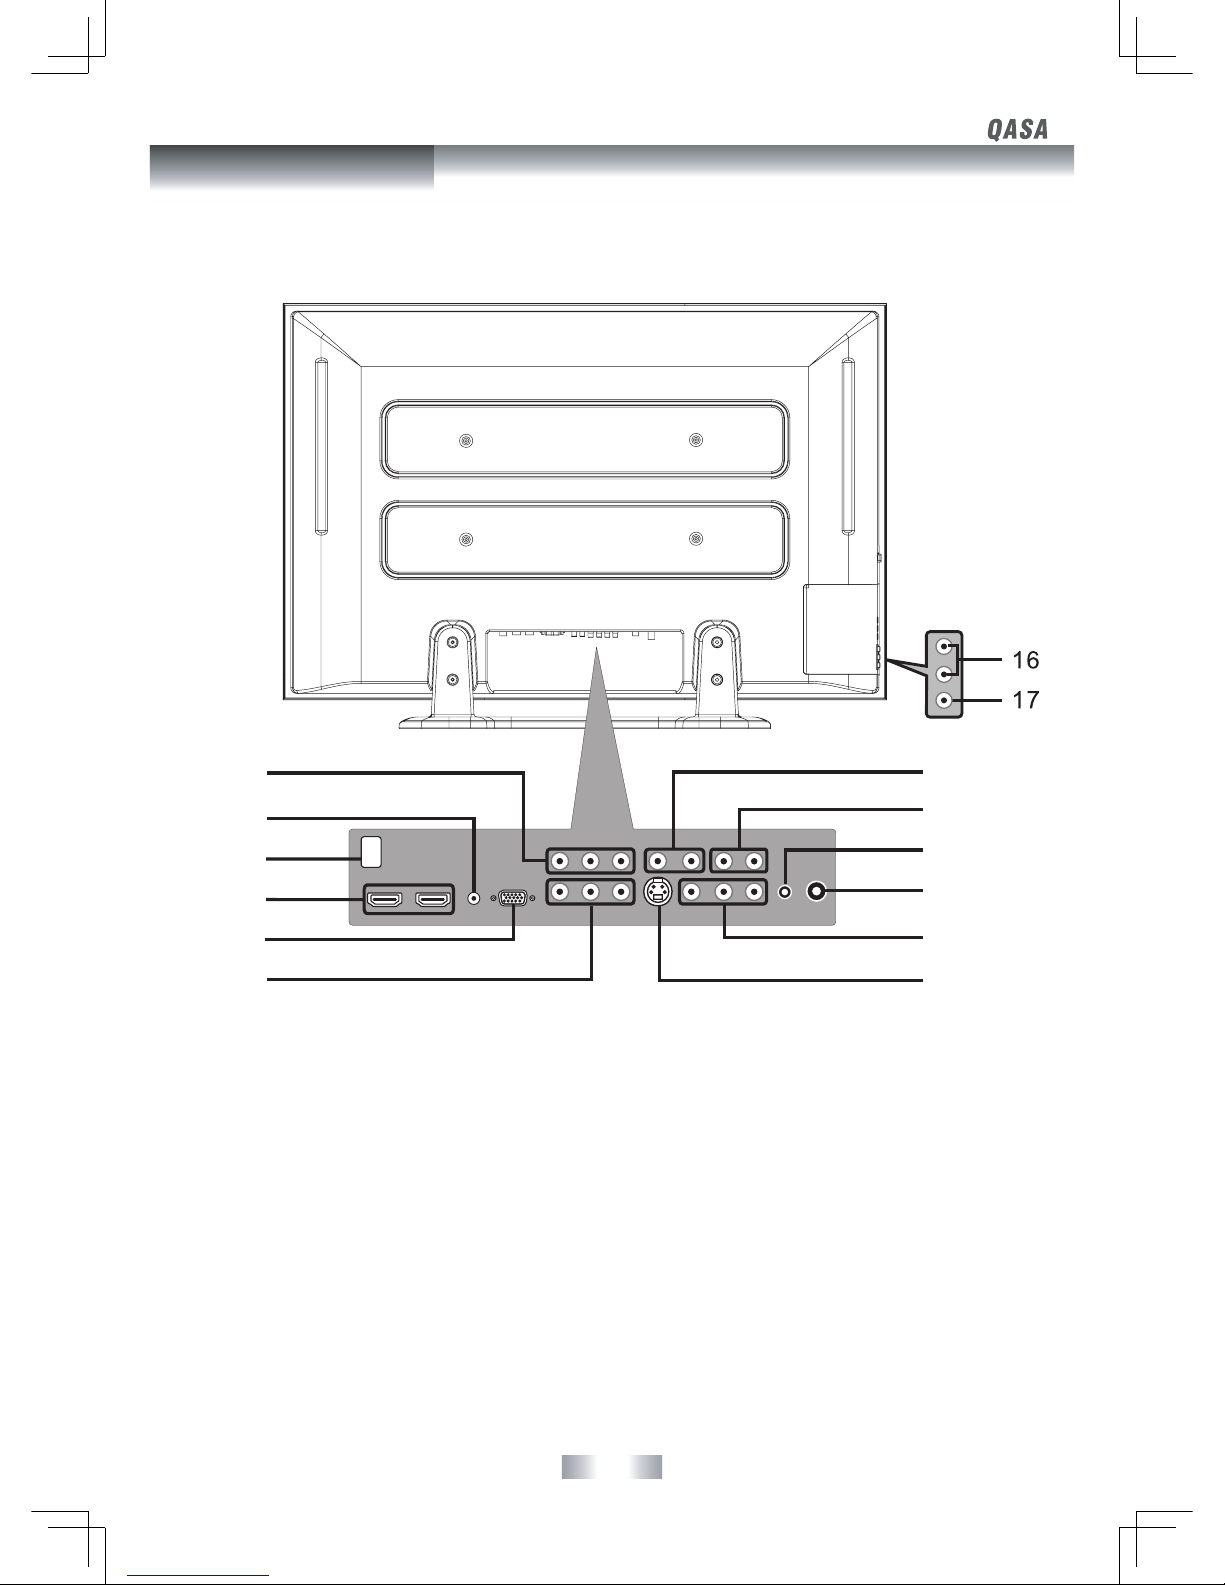
REAR VIEW
10. VIDEO IN 1 Jack
AUDIO IN 1 (Left/Right) Jacks (AV/YUV 1)
11. AUDIO Jack (PC IN)
12. AC Socket
13. HDMI IN Jacks (HDMI IN 1 / HDMI IN 2)
14. MONITOR / VGA Jack (PC IN)
15. COMPONENT VIDEO IN 1 (Y / PB / PR) Jacks
16. AUDIO IN (Left/Right) Jacks (AV IN 2)
17. VIDEO IN Jack (AV IN 2)
18. AUDIO OUT (Left / Right) Jack (AUDIO OUT)
19. AUDIO IN 2 (Left / Right) Jacks (YUV IN 2)
20. PHONES Jack
21. TV ANTENNA Terminal
22. COMPONENT VIDEO IN 2 (Y / PB / PR) Jacks
(YUV IN 2)
23. S-VIDEO Jack
10
11
12
13
14
15
18
19
20
21
22
23
Control Reference Guide

- 9 -
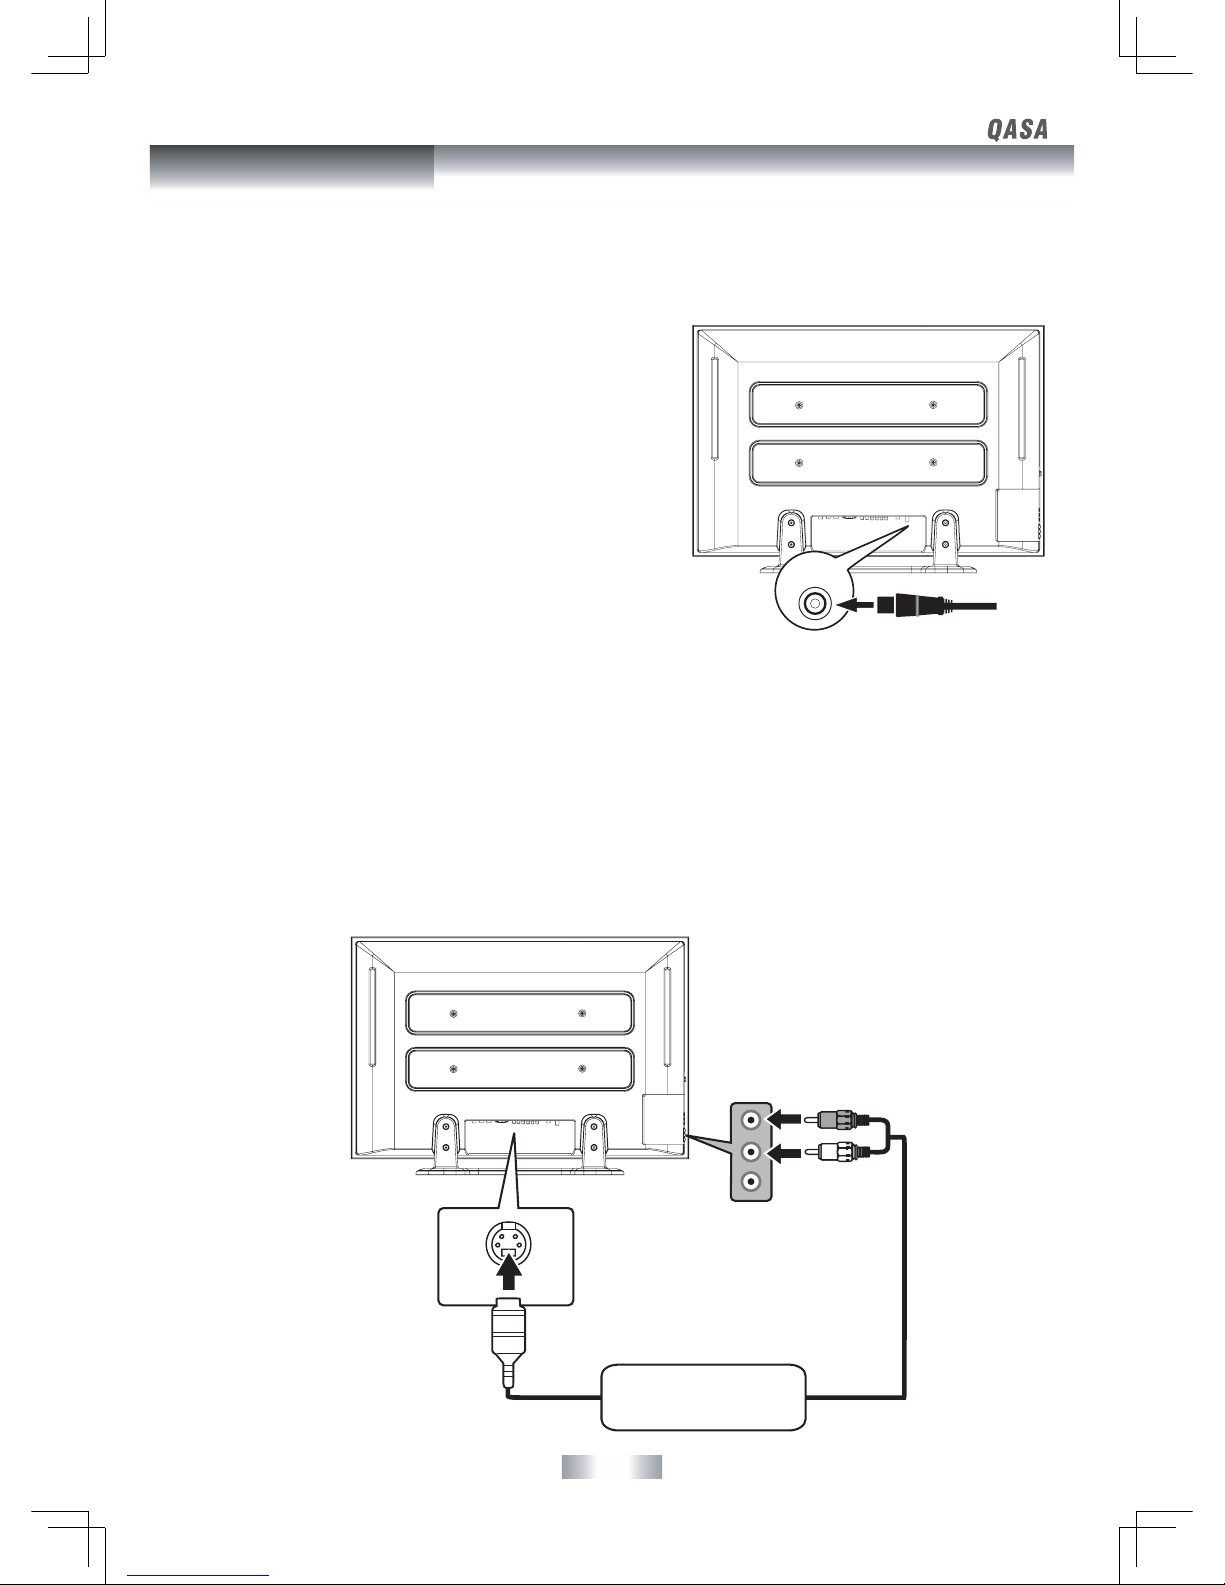
CONNECTING A TV ANTENNA
To view television channels correctly, a signal must be received from one of the following sources:
- An indoor or outdoor aerial antenna
- A cable system
- A satellite system
Note:
For receiving over-the-air TV broadcasts, we recommend that you use
an external xed antenna. Should you require the use of a temporary
antenna, please ensure that you purchase an antenna with sufficient
ability to receive in weak signal areas. Only when you are in close
proximity to a transmitter will a temporary antenna reproduce a signal
as strongly as a xed antenna.
CONNECTING AN A/V DEVICE
To connect to other equipment such as a VCR, camcorder, satellite system or cable, etc.
Connecting to a VCR / Camcorder / Satellite System / Cable
Connect the AUDIO and S-VIDEO cable (not included) as shown:
Make sure you connect the cable from the other equipment (AUDIO OUT and S-VIDEO OUT) to this unit AV IN 2 (AUDIO IN and S-VIDEO IN).
NOTES:
• In AV mode, the unit will be power o automatically if no signal has been input for 15 minutes.
• Please refer to the user manual for the other equipment for more information.
TV antenna cable to TV
ANTENNA terminal
(cable not included)
To S-VIDEO OUT /
AUDIO OUT jacks
To S-VIDEO
IN jack
To AUDIO
IN jacks
(AV IN 2)
TV
ANTENNA
S-VIDEO
VCR/CAMCORDER/
SATELLITE SYSTEM/
CABLE, etc.
Connections
Inhaltsverzeichnis
Andere SONIQ Plasma-TV Handbücher