SWEEX RO003 - QUICK_START_GUIDE Referenzhandbuch

English version
2
RO003/RO003UK Sweex Broadband Router
Important! The Setup Wizard is located on the Sweex CD-ROM. This installation procedure will show you step by step how to setup the router.
If your provider can not be configured with the Setup Wizard, contact your provider for the correct settings and enter them manually.
Introduction
• Do not expose the Sweex Broadband Router to extreme temperatures. Do not place the product in direct sunlight or in the direct vicinity of heating elements.
• Do not use the Sweex Broadband Router in extremely dusty or moist surroundings.
• Protect the product against powerful shocks or jolts - they may damage the internal electronics.
• Never attempt to open the product yourself - it will cause the warranty to lapse.
Front view
Status Meaning
LAN1x t/m 4x
Off No device is connected to this port
On A computer or other network device is connected to this port
Blinking Data traffic is exchanged between the router and the connected device
WAN Off The router is not or not correctly connected to the internet modem
On The router is connected to the internet modem

English version
3
Rear view
1 2 3 4 WAN RESET AC 9V
1. LAN ports 1, 2, 3 and 4 for connecting computers by means of an RJ-45 UTP Ethernet network cable.
2. WAN port for connecting a modem by means of a RJ-45 UTP Ethernet network cable.
3. Reset button to return to the factory settings.
4. Power connector for connecting the power adaptor.
Connecting the Sweex Broadband Router
1. Connect the power adaptor (included) to the rear of the router and the mains socket. The light next to “Power” is lit. In the event the LED is not lit, check
the connections of the power adaptor to the router and the mains socket.
2. Switch on the computer and connect it to the rear of the modem using a network cable (RJ-45 UTP). You can select any of the ports 1, 2, 3 and 4. The
corresponding light at the front will be lit. In the event the light fails to light up, check whether the network cable is properly connected to the computer and
the router.
3. Switch on the modem* again. Note: Here we do not refer to the Sweex router. Connect the modem to the rear of the router using a network cable (RJ-45
UTP). Do this via the WAN port The WAN light at the front of the router will light up. In the event the light fails to light up, check whether the network cable
is properly connected to the router and the modem.
* In order to use the Sweex Broadband Router you need an active Internet connection, which is established through a modem. This modem is usually supplied
by the provider.

English version
4
Configuring the computer to connect to the router
Windows Vista
In the bottom left of your screen, go to “Start” (Start) “Control Panel” (Control Panel).
Click on “View network status and tasks” (View network status and tasks).
Left in the column, click on “Manage network connections” (Manage network connections).

English version
5
Right-click “LAN Connection” (LAN Connection) or “Wireless Network connection” (Wireless Network connection) and select “Properties” (Properties). The
following screen appears:
Now select “Internet Protocol Version 4 (TCP/IPv4)” and click “Properties” (Properties).

English version
6
Select the options “Obtain an IP address automatically” (Obtain an IP address automatically) and “Obtain DNS server address automatically” (Obtain DNS
server address automatically).
Confirm the settings by clicking “OK”. The network settings have now been configured correctly for Vista. The correct settings for the Internet browser will be
discussed later in this manual.
Windows XP
In the bottom left of your screen, go to “Start” “Control Panel”
Then go to “Network and Internet Connections”.
Open “Network Connections”.
Or, if the Windows classic style is used:
“Start” “Settings” “Network Connections”.
Right-click “LAN Connection” or “Wireless Network Connection” and select “Properties”. The following screen appears:
Under the tab “General” select TCP/IP and click “Properties”
Select the options “Obtain an IP address automatically” and “Obtain DNS server address automatically”.
Confirm the settings by clicking “OK”. The network settings for Windows XP have now been configured correctly. The correct settings for the Internet browser will
be discussed later in this manual.

English version
7
Windows 2000
In the bottom left of your screen, go to “Start” “Control Panel”.
Then go to “Network and Internet Connections”.
Open “Network Connections”.
Or, if the Windows classic style is used:
“Start” “Settings” “Network Connections”.
Right-click “LAN Connection” or “Wireless Network Connection” and select “Properties”. The following screen appears:
Now select “Internet Protocol (TCP/IP)” and click “Properties”.
Select the options “Obtain an IP address automatically” and “Obtain DNS server address automatically”. Click “OK” twice.
The network settings for Windows 2000 have now been configured correctly. The correct settings for the Internet browser will be discussed later in this manual.
Internet browser settings for Windows 2000, XP and Vista
1. In order to access the router, the browser settings must be correct. This is easy to check by starting up Internet Explorer and selecting “Tools” from the menu
bar and then selecting the option “Internet Options”.
2. In this window, go to “Connections” and select “Never dial a connection” or remove all connections listed in the field above.
3. At the bottom, click “LAN Settings”, remove all ticks and click “OK”.
4. Restart the browser to activate the settings.

English version
8
Accessing the router (Login)
Open your web browser. In this example we use “Internet Explorer”.
The default router IP address is: 192.168.23.1
An IP address is a unique number required by each network device, including a computer or router, in order to be active within that network. Without an IP
address you are unable to make connections within a network. Type the router IP address in the browser address bar. You can now access the router.
The router login screen appears. Fill out the login name and the corresponding password. The standard login is sweex and the corresponding password is
mysweex.
If this login screen fails to appear, recheck the settings of your Internet browser as described above. Also check the IP address of your computer. In this IP
address, only the digits after the last dot may deviate from the IP address of the router (e.g.: 192.168.22.xxx).
Where to find the IP address of the computer
Vista: Keep the Windows key (next to the left Ctrl key) pressed and press the letter “R”. Type in cmd - press ENTER - In the black window, type ipconfig - press
Enter and your IP address is displayed.
Win2000/WinXP: Click “Start” (Start) - “Run” (Run) - Type in cmd - press ENTER- In the black window, type ipconfig - press Enter and your IP address is
displayed.
Win98/Me: Click “Start” (Start) - “Run” (Run) - Type in winipcfg - press ENTER. In the window, select your network adaptor. (Usually NOT the ppp adaptor) and
your IP address is displayed.

English version
9
Setting the Internet Provider (ISP)
Important! The Setup Wizard is located on the Sweex CD-ROM. This installation procedure will show you step by step how to setup the router.
If your provider can not be configured with the Setup Wizard, contact your provider for the correct settings and enter them manually.
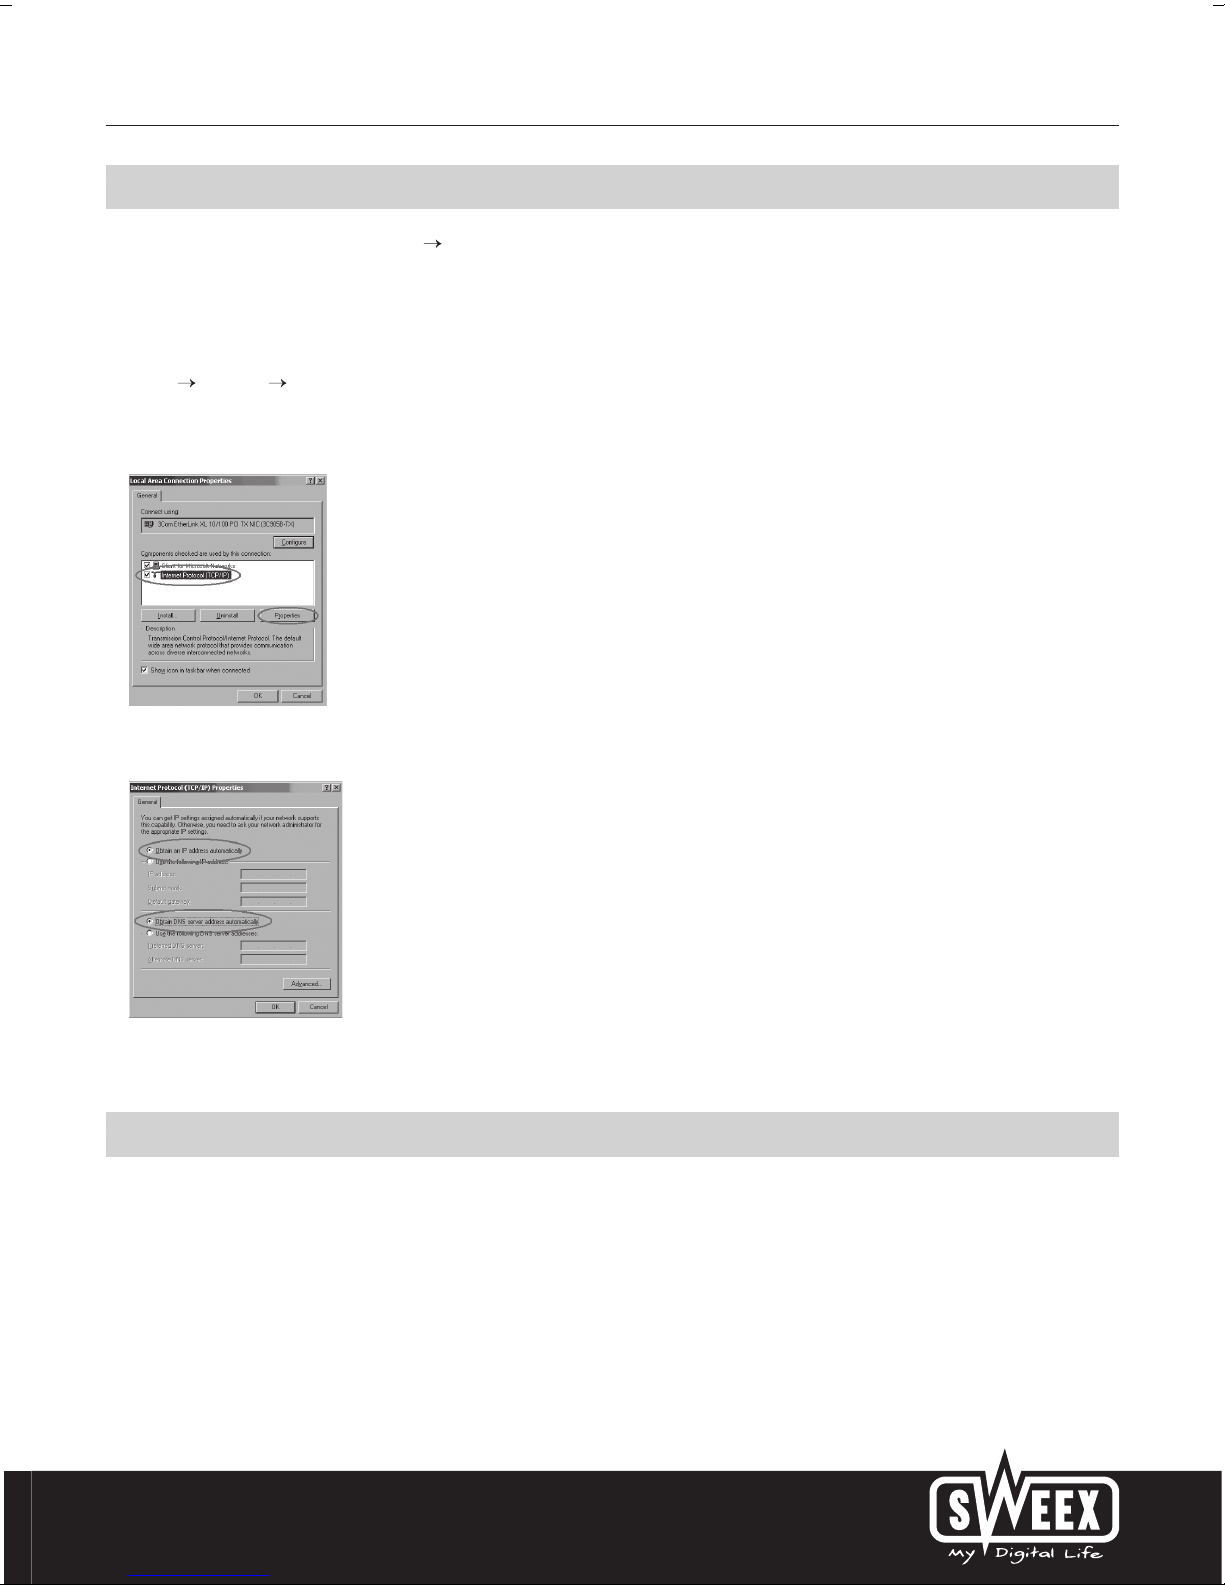
Prior to setting the provider, make sure that the Internet connection is active without the Sweex Breedband Router. If the modem without the router does not
have an Internet connection, setting the router would be pointless. After all, the modem establishes the Internet connection and the Sweex Breedband Router
forwards this existing Internet connection to one or more computers in your network.
A total of 6 different settings are possible. We have listed these together with instructions on how to enter these. In order to find out which settings correspond
to your provider, you can consult the list with providers further down in this manual. The list consists of providers and corresponding subscriptions. The applicable
settings are listed for each subscription form. In the event that your subscription is not listed, consult your Internet provider for the router settings which
correspond to your subscription.
These settings need to be configured in your router only once. Regardless of the number of computers you connect to the router, the following settings only
need to be done on one computer. That is because the settings are not stored on the computer, but on the router.
Setting 1 DHCP without hostname
1. Log in to the Router (see the section “Accessing the Router” above).
2. Left in the column, click on “Internet Provider Setup” or, if you see the screen below, click on “Next”.
3. Select “Dynamic IP” and click “Next”. This setting belongs to providers that use a DHCP connection.
4. You do not have to enter anything in the next window. Click on “Next”. Click “Save” to save the settings.
5. In order to check whether the Internet connection has been set up successfully, go to the status screen by clicking “Status” left in the column. The “WAN IP”
section will display your Internet IP address. It can sometimes take up to 1 minute for this IP address to appear. You have now completed the configuration
and are ready to surf the Internet.

English version
10
6. If your IP address continues to be displayed as 0.0.0.0, click on “Renew”.
If after 1 minute your IP address still continues to show as 0.0.0.0, check the above steps.
Still no Internet? Complete the following steps:
1. Switch off the router and the modem.
2. Disconnect the network cable between the router and the modem at the “WAN” port.
3. Switch on the router and wait until it is fully started up.
4. Switch on the modem and wait until it is fully started up and all the correct lights are lit.
5. Reconnect the network cable between the modem and the router via the “WAN” port of the router. The “WAN” light should light up now.
6. Connect the router via 192.168.23.1 and check your Internet connection in the status screen.
Setting 2 DHCP with hostname
Important: when configuring the router, always use the computer with which you were connected to the Internet prior to connecting the router.
a. Log in to the Router (see the section “Accessing the Router” above).
b. Left in the column, click on “Internet Provider Setup” or click on “Next”.

English version
11
c. Select ‘Dynamic IP” and click on “Next”. This setting is for providers who use a DHCP connection.
d. Under “Hostname” enter the hostname you received from your provider.
e. Leave “Domain name” empty.
f. In order to enter the MAC address of your computer into the router, click “Clone MAC”.
g. Click on “Next”. Click “Save” to save the settings.
h. In order to check whether the Internet connection has been set up successfully, go to the status screen by clicking “Status” left in the column. The “WAN IP”
section will display your Internet IP address. It can sometimes take up to 1 minute for this IP address to appear. You have now completed the configuration
and are ready to surf the Internet.
i. If your IP address continues to be displayed as 0.0.0.0, click on “Renew”.
If after 1 minute your IP address still continues to show as 0.0.0.0, check the above steps.
Still no Internet? Complete the following steps:
1. Switch off the router and the modem.
2. Disconnect the network cable between the router and the modem at the “WAN” port.
3. Switch on the router and wait until it is fully started up.
4. Switch on the modem and wait until it is fully started up and all the correct lights are lit.
5. Reconnect the network cable between the modem and the router via the “WAN” port of the router. The “WAN” light should light up now.
6. Connect the router via 192.168.23.1 and check your Internet connection in the status screen.
Dieses Handbuch passt für folgende Modelle
1
Inhaltsverzeichnis
Andere SWEEX WLAN-Router Handbücher

SWEEX
SWEEX LW053 Bedienungsanleitung

SWEEX
SWEEX LW300 Bedienungsanleitung

SWEEX
SWEEX LW050V2 Bedienungsanleitung

SWEEX
SWEEX LB200010 Bedienungsanleitung

SWEEX
SWEEX LC000070 Bedienungsanleitung

SWEEX
SWEEX LW055 Bedienungsanleitung

SWEEX
SWEEX MO251V2 - QUICK_START_GUIDE Bedienungsanleitung

SWEEX
SWEEX LW140 Bedienungsanleitung

SWEEX
SWEEX LW150 Bedienungsanleitung

SWEEX
SWEEX MO300 - QUICK_START_GUIDE Bedienungsanleitung


