Teka THPD70 Bedienungsanleitung

Instruction
Manual
7.0kg
Heat Pump
Dryer
THPD70
English
www.teka.com


03
Instruction Manual
Peace
of Mind
Customer
Care
Contents
Safety Notes 04
Your Appliance 07
Operating Instructions 08
Cleaning and Maintenance 11
Troubleshooting 13
Warranty 14
Congratulations and thank you for purchasing a Teka appliance. You’ve chosen a product
that features over 90 years of innovation and the very best of European engineering, with
Teka founded in Germany in 1924. Intuitive and stylish, your Teka appliance has been
designed with you in mind meaning that you’ll get great results every time.
Welcome to the world of Teka.
Visit our website for our full range of Appliance solutions, product brochures and service
information.
Teka is proudly distributed and represented by Residentia Group in Australia.
www.teka.com/au
Teka recommends the use of original spare parts.
When contacting our customer service team, please ensure that you have the following
information at hand (which can be found on your appliances’ rating plate.
— Model Number; and,
— Serial Number.
P . 1300 11 4357
E. support@residentiagroup.com.au

04
THPD70
1. Conditions of use
This appliance is intended to be used in household and similar applications such as farm
houses or by clients in serviced apartments, holiday apartments and other residential type
environments.
2. Safety instructions
Before the installation and use of the appliance, carefully read the supplied instructions.
The manufacturer is not responsible if an incorrect installation and use causes injuries and
damages. Always keep the instructions with your appliance for future reference.
Warning! To prevent any damages to your and others’ life or property, you have to follow
the safety notes.
Warning! Caution, risk of fire!
2.1 Children & vulnerable people safety
Warning! Risk of suffocation, injury or permanent disability.
— This appliance can be used by children aged from 8 years and above and persons with
reduced physical, sensory or mental capabilities or lack of experience and knowledge if
they have been given supervision or instruction for the operation of the appliance by a
person who is responsible for their safety.
— Do not let children play with the appliance.
— Keep all packaging away from children.
— Keep all detergents away from children.
— Keep children and pets away from the appliance door when it is open.
— Cleaning and user maintenance shall not be made by children without supervision.
2.2 Installation
— Remove all the packaging.
— Do not install or use a damaged appliance.
— Obey the installation instruction supplied with the appliance.
— Make sure that the floor where you install the appliance is flat, stable, heat resistant and
clean.
— Do not install or use the appliance where the temperature is less than 5°C or higher than
35°C, or a humid environment.
— Do not install the appliance behind a lockable door, a sliding door or a door with a hinge
on the opposite side, where the appliance door can not be fully opened.
— Always be careful when you move the appliance because it is heavy. Always wear safety
gloves.
— Always move the appliance vertically.
— The rear surface of the appliance must be put against the wall.
— Make sure that there is air circulation between the appliance and the floor.
— Make sure the carpet does not obstruct the ventilation openings in the base of the
appliance (if applicable).
— Exhaust air must not be discharged into a flue which is used for exhausting fumes from
appliances burning gas or other fuels.
— If the tumble dryer is put on top of a washing machine, use the stacking kit. The stacking
kit, available from your authorized vendor, can be used only with the appliance specified
in the instructions, supplied with the accessory. Read it carefully before installation (Refer
to the Installation leaflet).
— Ensure you have good ventilation in the installation room to avoid the back flow of gases
into the room from appliances burning other fuels, including open fires.
— The appliance can be installed as freestanding or below the kitchen counter with correct
space (Refer to the Installation leaflet).
— When the appliance is put in its permanent position, check if it is fully level with the aid of
a spirit level. If it is not, adjust the feet until it is.
Safety Notes

05
Instruction Manual
Electrical Connection
Warning! Risk of fire and electrical shock.
— The appliance must be earthed.
— Make sure that the electrical information on the rating plate agrees with the power
supply. If not, contact an electrician.
— Always use a correctly installed shockproof socket.
— Do not use multi-plug adapters and extension cables.
— Make sure not to cause damage to the mains plug and to the mains cable. Should the
appliance power supply cable need to be replaced, this must be carried out by our
Service Centre.
— Connect the mains plug to the mains socket only at the end of the installation. Make sure
that there is access to the mains plug after the installation. Do not connect the appliance
plug with a power connection board.
— Do not pull the mains cable to disconnect the appliance. Always pull the mains plug.
— Do not touch the mains cable or the mains plug with wet hands.
— This appliance complies with the E.E.C. Directives.
2.3 Appliance use
Warning! Risk of fire, explosion, electric shock or damage to the appliance.
Warning! Before first use, leave the dryer to stand for 2 hours after transporting.
— Use this appliance in a household only.
— Do not change the specification of this appliance.
— The final part of the drying cycle occurs without heat (cool down cycle) to ensure that the
items will not be damaged. If you stop the appliance before the end of the drying cycle,
immediately remove and spread out all items, so that the heat can dissipate.
— If you use fabric softener or similar products, obey the instructions on the packaging.
— Do not run the appliance without a filter. Clean the lint filter before or after each use.
— Wipe away lint that has accumulated around the appliance.
— Do not dry the damaged items which contain padding or fillings.
— Do not dry items such as foam rubber (latex foam), shower caps, waterproof textiles,
rubber backed articles and clothes or pillows fitted with foam rubber pads.
— Before drying items that have been in contact with substances such as cooking oil,
acetone, alcohol , petrol, kerosene, spot removers, turpentine, waxes and wax removers,
wash them in hot water with an extra amount of detergent.
— Do not dry items in the appliance if industrial chemicals have been used for cleaning.
— Make sure that no gas lighters or matches have been left in the pockets of the clothing.
— Only dry fabrics which are applicable to dry in the tumble dryer. Follow the instructions
on the fabric label.
— Do not dry not washed items in the appliance.
— If you have washed your laundry with a stain remover start an extra rinse cycle before you
start the dryer.
— Do not drink or prepare food with the condensed water. It can cause health problems to
people and pets.
— Do not sit or stand on the open door.
— Obey the maximum load volume of 7 kg (refer to the “Programme chart” chapter).
— Do not dry dripping wet clothes in the tumble dryer.
— Oil-affected items can ignite spontaneously, especially when exposed to heat sources
such as in a tumble dryer. The items become warm, causing an oxidation reaction in the
oil. Oxidation creates heat. If the heat cannot escape, the items can become hot enough
to catch fire. Piling, stacking or storing oilaffected items can prevent heat from escaping
and create a fire hazard.
— If it is unavoidable that fabrics that contain vegetable or cooking oil or have been
contaminated by hair care products be placed in a tumble dryer they should first be
washed in hot water with extra detergent- this will reduce, but not eliminate, the hazard.
— Ensure all objects are removed from clothing pockets such as lighters and matches.
— Before first use, clean the inside of the drum with a soft fabric cloth and run the “Refresh”
programme with some clean rags inside. After finishing the cycle, please clean the lint
filter as per the instructions within this user manual.

06
THPD70
Dry care symbols
Please pay attention to use the drying machine if the materials of your clothes can not be
dried by it or contain the symbols as follows:
2.4 Care and Cleaning
Warning! Risk of injury or damage to the appliance.
— Before maintenance, deactivate the appliance and disconnect the mains plug from the
mains socket.
— Do not use water spray and steam to clean the appliance.
— Clean the appliance with a moist soft cloth. Only use neutral detergents. Do not use
abrasive products, abrasive cleaning pads, solvents or metal objects.
2.5 Product Disposal
Warning! Risk of injury or suffocation.
— Disconnect the appliance from the mains supply.
— Cut off the mains cable and discard it.
— Remove the door catch to prevent children and pets to get closed in the appliance.
2.6 Transport
Always move the appliance cautiously. Do not use the machine door or the handle of the
water container, to lift the appliance.
2.7 Installation Positioning
— Ensure that your appliance is installed on solid and flat ground, in a level position.
— Please do not place the appliance on a slope, soft carpet or wooden floor.
— Your appliance should only be installed within an internal environment. Do not install the
appliance outdoors.
Level Adjusting
— If the floor is obviously uneven, your appliance feet need to be adjusted. If your appliance
isn’t level, it will cause your appliance to vibrate, and potentially move from its position.
— Use a screwdriver to adjust the height of four machine legs to adjust the level of your
dryer.

07
Instruction Manual
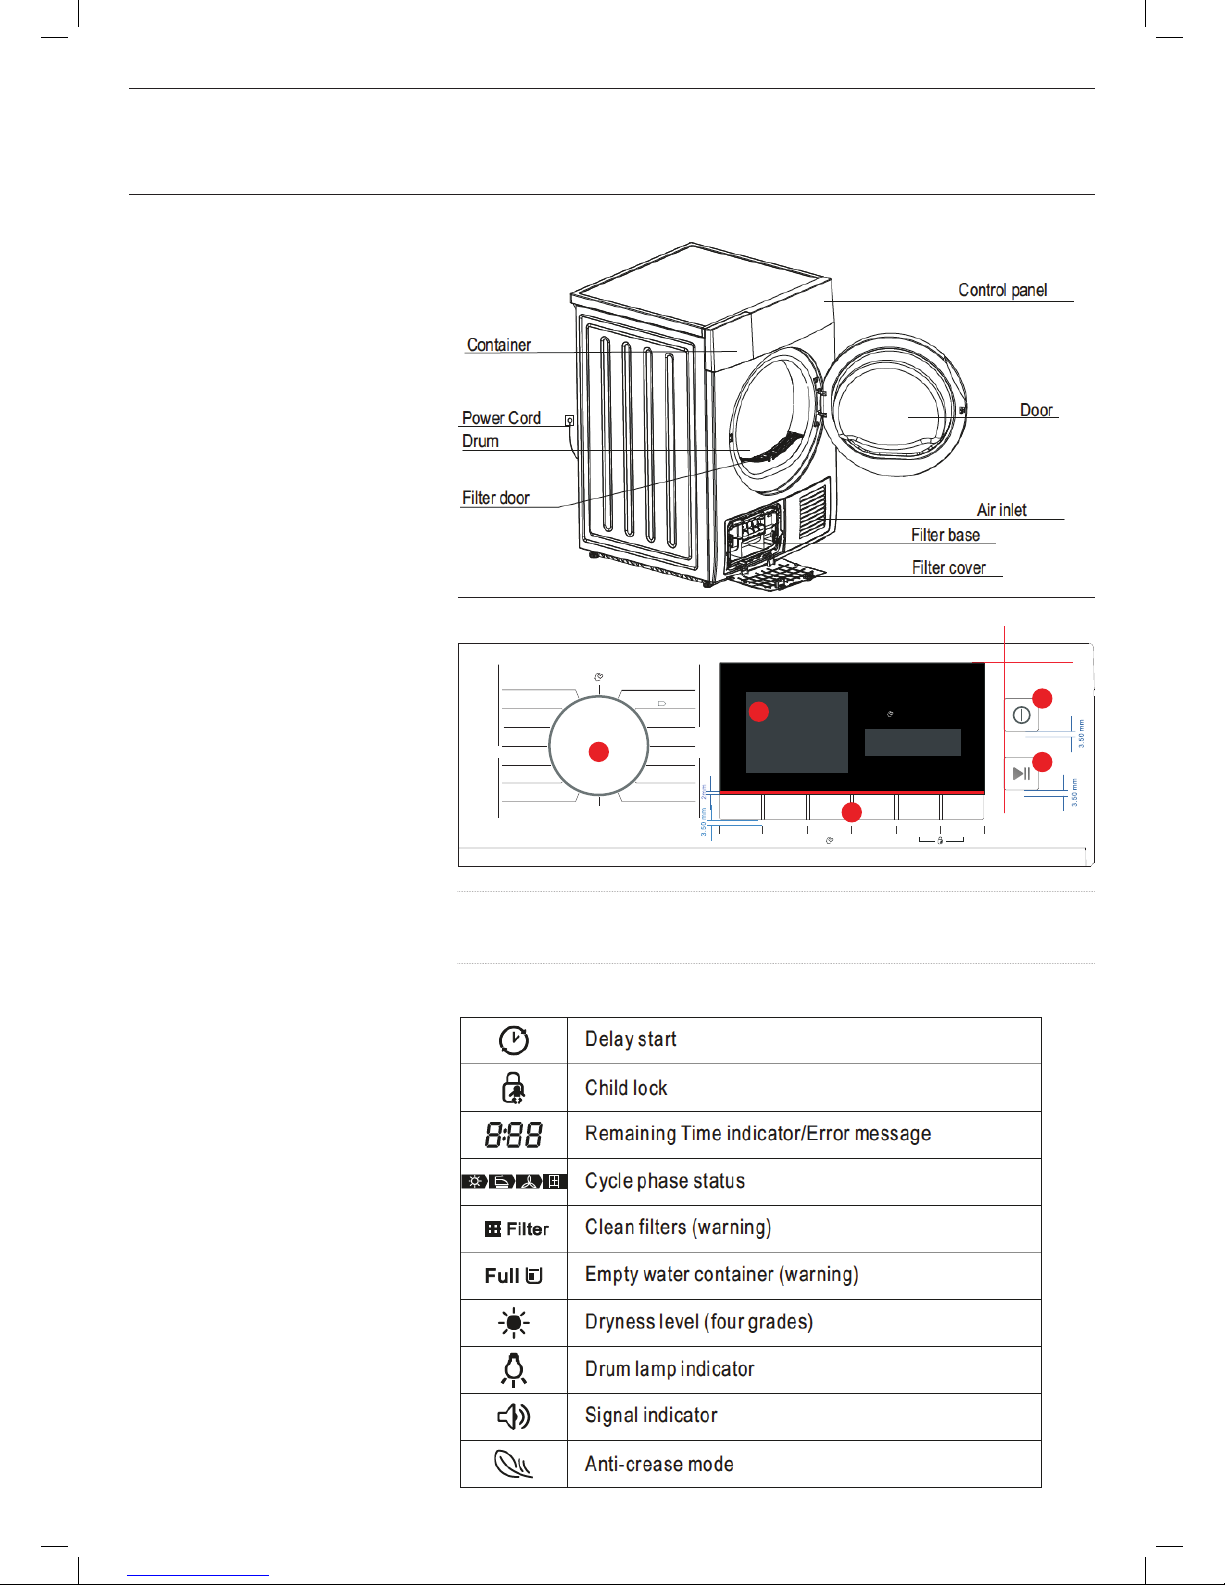
3. Product Components
4. Control Panel
Delay Time Intensity Light Signal Anti-Crease
Start/Pause
On/Off
THPD70
2018C
Light Anti-CreaseSignal
Press 3 secs to set My Cycle
Special
Jeans
Mix
Sports
Shirts
Warm
Cool
Refresh
Time Wool
Cotton
Extra
Standard
Iron
Delicate
Extra
Standard
Iron
Synthetics
My Cycle
1 Programme selection dial 3 Specialty function buttons 5 On/Off button
2 Display 4 Start/Pause button
Display Icons
Your
Appliance
1
2
3
4
5

08
THPD70
5.1 Quick Start
Follow the procedure below to operate your dryer.
5.2 Clothing Weight Reference
The table below provides a weight reference for typical clothing items.
Operating
Instructions

09
Instruction Manual
6. Programme Table
Programmes Load Max Application Delay / Time
Cotton These programme options are designed for use with cotton or linen fabrics.
Extra 7.0kg To dry cotton clothing. Drying level: Extra Dry Y / N
Standard 7.0kg To dry cotton clothing. Drying level: Cupboard Dry Y / N
Iron 7.0kg To dry cotton clothing. Drying level: Applicable for Ironing Y / N
Delicate Delicate 1.0kg To dry delicate laundry that is suitable for drying, or clothing which is
advised to be hand-washed at a lower temperature.
Y / N
Synthetics These programme options are designed for use with synthetic and blended fabrics.
Extra 3.5kg To dry thick or multi-layered synthetic fabrics.
Drying level: Extra Dry
Y / N
Standard 3.5kg To dry thin synthetic fabrics which are not ironed (i.e. easy care shirts,
table linen, baby clothes, socks, etc).
Y / N
Iron 3.5kg To dry thin synthetic fabrics which are also to be ironed (i.e. knitwear,
shirts, etc).
Y / N
Wool Wool 1.0kg Use with fluffy and fresh wool clothing to start the drying process.
Once the programme is complete, remove the clothes and allow them
to finish the drying process by air-drying.
Y / N
Special Jeans 5.0kg To dry jeans or leisure clothes that are spun at high speeds within the
washing machine.
Y / N
Mix 3.5kg Designed for use when you cannot determine your clothing material. Y / N
Sports 3.0kg To dry sportswear, thin fabrics and polyester items which are not to be
ironed.
Y / N
Shirts 1.0kg To dry easy care clothes such as shirts and blouses. Use with the
anti-crease option for minimum ironing effort. Once dried, hang your
items on a clothes hanger.
Y / N
My Cycle My Cycle - Define and save your favourite programme settings. Y / -
Time With these programme options, you can use manual timing option and set your desired
programme duration.
Warm - To warm clothes from a minimum of 10 minutes to a maximum of 120
minutes. (10 minute increments)
Y / Y
Cool - To air clothes without blowing hot air from a minimum of 10 minutes
to a maximum of 30 minutes.
(10 minute increments)
Y / Y
Refresh 1.0kg To refresh textiles that were in storage from a minimum of 20 minutes
to a maximum of 150 minutes.
(10 minute increments)
Y / Y
Note:
1 The Maximum Weights refer to dry items.
2 Energy labeling program: Cotton Extra is the programme used for the AS/NZS 2442
MEPS energy rating.
3 The programmes aboves are only recommendations and users can choose the
appropriate programme according to their personal requirements and habits. Thick
fabrics (i.e. bed linen, jeans, jackets, etc) are not easy to dry and the Jeans drying
programme along with the strongest intensity is strongly recommended.

10
THPD70
7. Options
7.1 Delay Function
Use this delay function to delay the drying programme from 0 to 24 hours. The delay time
means the programme will start after X hours. When the delay programme starts, the time
starts to decrease on the display and the “clock” icon blinks on your appliance display.
To activate the delay function:
— Load your clothing articles into your appliance and close the door.
— Press the On/Off button and use the programme selector dial to select your desired
drying program.
— You can select the “Anti-Crease” or “Signal” functions by pressing the corresponding
buttons, according to your needs.
— Now press the “Delay” button.
— Continue to press the “Delay” button to set your desired delay time.
— Once your desired delay time is displayed, simply press the “Start/Pause” button and the
dryer will automatically begin your selected drying programme at the completion of your
set delay period.
— If you press the “Start/Pause” button once again, the delay function will be paused. To
cancel the delay function, press the “On/Off” button.
7.2 Time Function
When the Warm, Cool or Refresh drying programmes are selected, the Time button can be
used to adjust the drying time. Each press of the “Time” button will adjust the drying time in
10 minute increments.
7.3 Intensity Function
Your appliance features a drying intensity control, allowing you to adjust the dryness level of
your laundry. The Intensity function has four levels, indicated by the icons below.
— The drying time increase by 3 minutes with each level.
— The Intensity function can only be activated before the drying programme is started.
— Press the Intensity button repeatedly to select the desired intensity (and drying time).
— The Intensity function can be used for all programmes except Cotton Iron, Quick,
Synthetic Iron, Baby Care, Warm, Cool and Refresh.
7.4 My Cycle Function
The My Cycle function can be used to define and save your favourite drying programme for
easier selection in the future (i.e. Use this function to save your most frequently used drying
settings).
To set your My Cycle function:
— Use the programme selector dial to select your required programme and select any other
drying functions.
— Press and hold the “Intensity” button for 3 seconds until the display flashes, indicating
that your desired
programme has been saved.
— To use your preset My Cycle, simply turn the programme selector dial to the My Cycle
position and press the “Start/Pause” button to begin.
— If you wish to change your My Cycle settings, simply repeat the steps above at any time.
7.5 Light Function
Your Teka Heat Pump Dryer has an integrated light inside the drum to assist with viewing
your clothing.
Press the “Light” button to activate the internal light for 3 minutes when the door is closed
or the dryer is in operation, or 1 minute when the door is open.
Inhaltsverzeichnis
Andere Teka Trockner Handbücher

Teka
Teka TKS 650 Bedienungsanleitung

Teka
Teka TKS 893 H Bedienungsanleitung

Teka
Teka TKS 890 H Bedienungsanleitung

Teka
Teka TKS 690 C Bedienungsanleitung

Teka
Teka TKS 850 C Bedienungsanleitung

Teka
Teka TKS2 650 Bedienungsanleitung

Teka
Teka TCD70 Bedienungsanleitung

Teka
Teka TKS3 690 C Bedienungsanleitung

Teka
Teka TKS1 600 Bedienungsanleitung
Beliebte Trockner Handbücher anderer Marken

Indesit
Indesit IDV 75 Bedienungsanleitung

Infiniton
Infiniton SD-DG85C Bedienungsanleitung

BOMANN
BOMANN WT 5019 Bedienungsanleitung

Alliance Laundry Systems
Alliance Laundry Systems TMB795C Bedienungsanleitung

Asko
Asko T793C Bedienungsanleitung

Kenmore
Kenmore 8041 - 5.8 cu. Ft. Capacity Electric Dryer Bedienungsanleitung