Thuraya FDU-XT PLUS Bedienungsanleitung

FDU-XT PLUS
USER GUIDE


Table of Contents
1. Introduction 2
2. Package Contents 2
3. Installation Instructions for Land 3
3.1. Antenna Installation 3
3.2. Installing the Satellite Antenna 3
3.3. Installing the GPS Antenna 5
3.4. External Accessories 5
4. Installation Instructions for Marine 6
4.1. Antenna Installation 6
5. Getting Started 8
5.1. External Connections 8
5.2. Connection Interface 9
5.3. Using FDU-XT PLUS as a wall
mounted unit 10
5.4. Start using the FDU-XT PLUS 11
5.5. Connecting an extension phone
to the FDU-XT PLUS 11
5.6. Connecting a Group 3 fax
machine to the FDU-XT PLUS 11
5.7. Connecting a PC or Laptop to
the FDU-XT PLUS 12
5.8. Connecting an external speaker
to the FDU-XT PLUS 12
5.9. Connecting a Bluetooth headset
to the FDU-XT PLUS 13
5.10. Docking the XT-PRO or XT 14
5.11. Docking the XT-PRO DUAL 14
5.12. Undocking the handset from
the FDU-XT PLUS 15
6. Receiving / Making Voice Calls 16
6.1. Receiving Voice Calls 16
6.2. Making Calls 17
6.3. Ending Calls 18
6.4. Auxiliary handset 18
6.5. Volume Control 19
6.6. Muting the microphone in
speakerphone mode 20
7. Sending / Receiving Fax Messages 21
7.1. Sending fax messages with a
fax machine 21
7.2. Receiving fax messages with a
fax machine 21
7.3. Sending fax messages with a
PC/Laptop 22
7.4. Receiving fax messages with
a PC/Laptop 22
8. Receiving / Sending Data 23
8.1. Sending data from a PC/Laptop 23
8.2. Receiving data 23
9. GmPRS Connection 24
10. Extension Phone Locking 26
10.1. Enable extension phone
locking 26
10.2. Disable extension phone
locking 26
10.3. How to change the PIN code 27
11. SOS Calling 27
12. Troubleshooting 28
Common Problems 29
13. LED Indications 30
14. Warranty 31
15. Specications 32

02 I
1. Introduction
The FDU-XT PLUS (Fixed Docking Unit) is a home/oce/marine docking
adapter that allows you to use Thuraya satellite services in indoor
and marine environments. It provides additional exibility and
convenience when using the Thuraya XT-PRO DUAL, XT-PRO and XT.
In addition, FDU-XT PLUS and its accessories are designed to meet
Thuraya’s specications and quality standards.
This indoor and marine docking unit enhances the capabilities of
your Thuraya handset to meet your communication requirements,
both in the home/oce and on a vessel. When a Thuraya handset
is used with FDU-XT PLUS, the handset becomes a communication
center providing voice, fax and data communication.
2. Package Contents
The FDU-XT PLUS package consists of the following items:
FDU-XT PLUS with an Auxiliary
Handset
Support CD, USB Cable, RJ-11 Cable,
FDU-XT PLUS User Guide
Satellite Antenna and
Mounting Adapter
GPS Antenna
Marine Antenna and
Mounting Adapter
AC/DC Power Adapter
Satellite Antenna Cable (Silver, 25m)
/ GPS Antenna Cable (Gold, 25m)
OPTION
For LAND For Marine

FDU-XT PLUS User Guide I 03
3. Installation Instructions for Land
After unpacking, please make sure that your FDU-XT PLUS and all its
accessories are fully ready for installation. Please read the instructions
carefully. If you encounter any diculty in installation, contact your
Service Provider for assistance.
3.1. Antenna Installation
The FDU-XT PLUS antenna set consists of the following components:
1Satellite antenna with mounting adapter.
2Satellite antenna cable to connect the satellite antenna to
the FDU-XT PLUS (25m).
3GPS antenna
4GPS antenna cable to connect the GPS antenna to the
FDU-XT PLUS (25m).
3.2. Installing the Satellite Antenna
The satellite antenna is a rectangular patch antenna and is supplied
with mounting brackets.
3.2.1 How to Install the Satellite Antenna
1Mount the antenna onto any suitable xture (mounting
pole or wall) using the provided mounting brackets and
bolts. The antenna should face the Thuraya satellite (see
3.2.2 for antenna orientation).
2When installing the antenna, make sure the connectors are
accessible when mounted.
3Connect the coaxial cable to the antenna connector
located at the base of the satellite antenna and tighten it
properly by turning it clockwise. Leave enough length for a
small loop and secure the rest of the cable using the cable
ties.
4Connect the other end of the satellite antenna cable on the
reverse side of the FDU-XT PLUS to the port marked “SAT”.

04 I
3.2.2 How to align the Satellite Antenna
Satellite based communication requires a direct line of sight to
the satellite to achieve optimal signal strength. Therefore, the
antenna must rst be mounted in a location facing the satellite
where it can then be nely adjusted for maximum reception.
The locations of the Thuraya satellites are on a geostationary
orbit (at the equator) at a more or less constant position:
Thuraya-2 satellite at 44 degrees east of the zero meridian
(approximately over Somalia)
Thuraya-3 satellite at 98.5 degrees east of the zero meridian
(approximately over Sumatra).
Antenna orientation:
Align your antenna towards the Thuraya-2 satellite if your
location is within the Thuraya-2 coverage area (Europe,
Africa, Middle East).
Align your antenna towards the Thuraya-3 satellite if your
location is within the Thuraya-3 coverage area (Asia,
Australia).
In the overlapping areas, you can approach either of the
two satellites and choose the satellite with the stronger
signal.
If you require an accurate antenna alignment, you can retrieve
precise directions from your current location to the satellite (azimuth
and elevation angle) by either of the following methods:
1Acquire your current GPS position data with your Thuraya
satellite phone (function ‘Current position’), press Options
and send this data by SMS to the short code 1300. You will
then receive the directional data from your location to the
respective Thuraya satellite.
2There are several independent websites where you can
retrieve directional data to a specic satellite by entering
your current location (www.dishpointer.com, www.satsig.
net or others).

FDU-XT PLUS User Guide I 05
3.3. Installing the GPS Antenna
The GPS antenna is a smaller rectangular patch antenna.
Connect the coaxial cable to the antenna connector located at
the side of the GPS antenna and tighten it properly by turning
it clockwise.
1Find an appropriate location to mount the antenna. Make
sure the antenna has a clear view of the sky.
2Mark locations of the “screw holders”on the surface/rooftop
for xing the antenna.
3Drill holes of adequate depth on the surface.
4Keep the antenna in place so that the drilled holes and the
screw holders line up.
5Fix the antenna securely using the screws provided.
6Connect the other end of the GPS antenna cable on the
reverse side of the FDU-XT PLUS to the port marked "GPS".
Maintain a distance of 0.5 to 1 meter between the GPS and SAT
antenna.
Note
3.4. External Accessories
In order to use the FDU-XT PLUS, a compatible Thuraya handset
with an active SIM card is required. In addition, the following
external devices (not included) can be used with the FDU-XT
PLUS:
1Analogue extension phone
2Group3 fax machines
3PC or laptop for data transfer and fax
4External speaker or earphones
5Bluetooth headset
The RJ-11 cable should be 2-wire inner at both ends.
Note

06 I
4.1. Antenna Installation
The FDU-XT Plus antenna set consists of the following components:
1Marine antenna with mounting adapter
2Satellite antenna cable to connect to the FDU-XT PLUS (25m)
3GPS antenna cable to connect to the FDU-XT PLUS (25m)
Pass the RF cable (SAT & GPS)
through the pipe and connect
the connector to the RF cable
(make sure to match the colors,
gold-to-gold and silver-to-silver).
Tighten the connector and
wrap the connected part using
magnetic coupling vinyl tape or
sealant to protect from water.
Mount the pipe to the underside
of the antenna and x securely
using bolts (M5x6).
Insert the waterproof cap into the
bolted parts.
4. Installation Instructions for Marine
After unpacking, please make sure that your FDU-XT PLUS and all its
accessories are fully ready for installation. Please read the instructions
carefully. If you encounter any diculty in installation, contact your
Service Provider for assistance.

FDU-XT PLUS User Guide I 07
Mount the assembled antenna to
the mounting pole of your vessel
(2-inch diameter is recommended)
using the band to keep them
together. Make sure that it is tight
enough to keep it in place.
Secure the cables to the mast
using cable ties (provided at the
site).
Connect the SAT RF connector
to the port on the FDU-XT PLUS
(silver cable connector to the SAT
port).
Secure the earth wire inside the hole located on the underside
of the antenna and the other side of the wire to the mounting
pole using bolts.
Seal the heads of the bolts using sealant.
Connect the silver extension cable to the SAT port and gold extension cable to the GPS port and then connect it to the external antenna cable
connector by matching the colors.
Using extension cable
Connect the GPS RF connector
to the port on the FDU-XT PLUS
(gold cable connector to the GPS
port).
USB DTE FAX EXT SAT GPS POWER
12V/36V
d.c
USB DTE FAX EXT SAT GPS POWER
12V/36V
d.c
08 I
USB DTE FAX EXT SAT GPS POWER
12V/36V
d.c
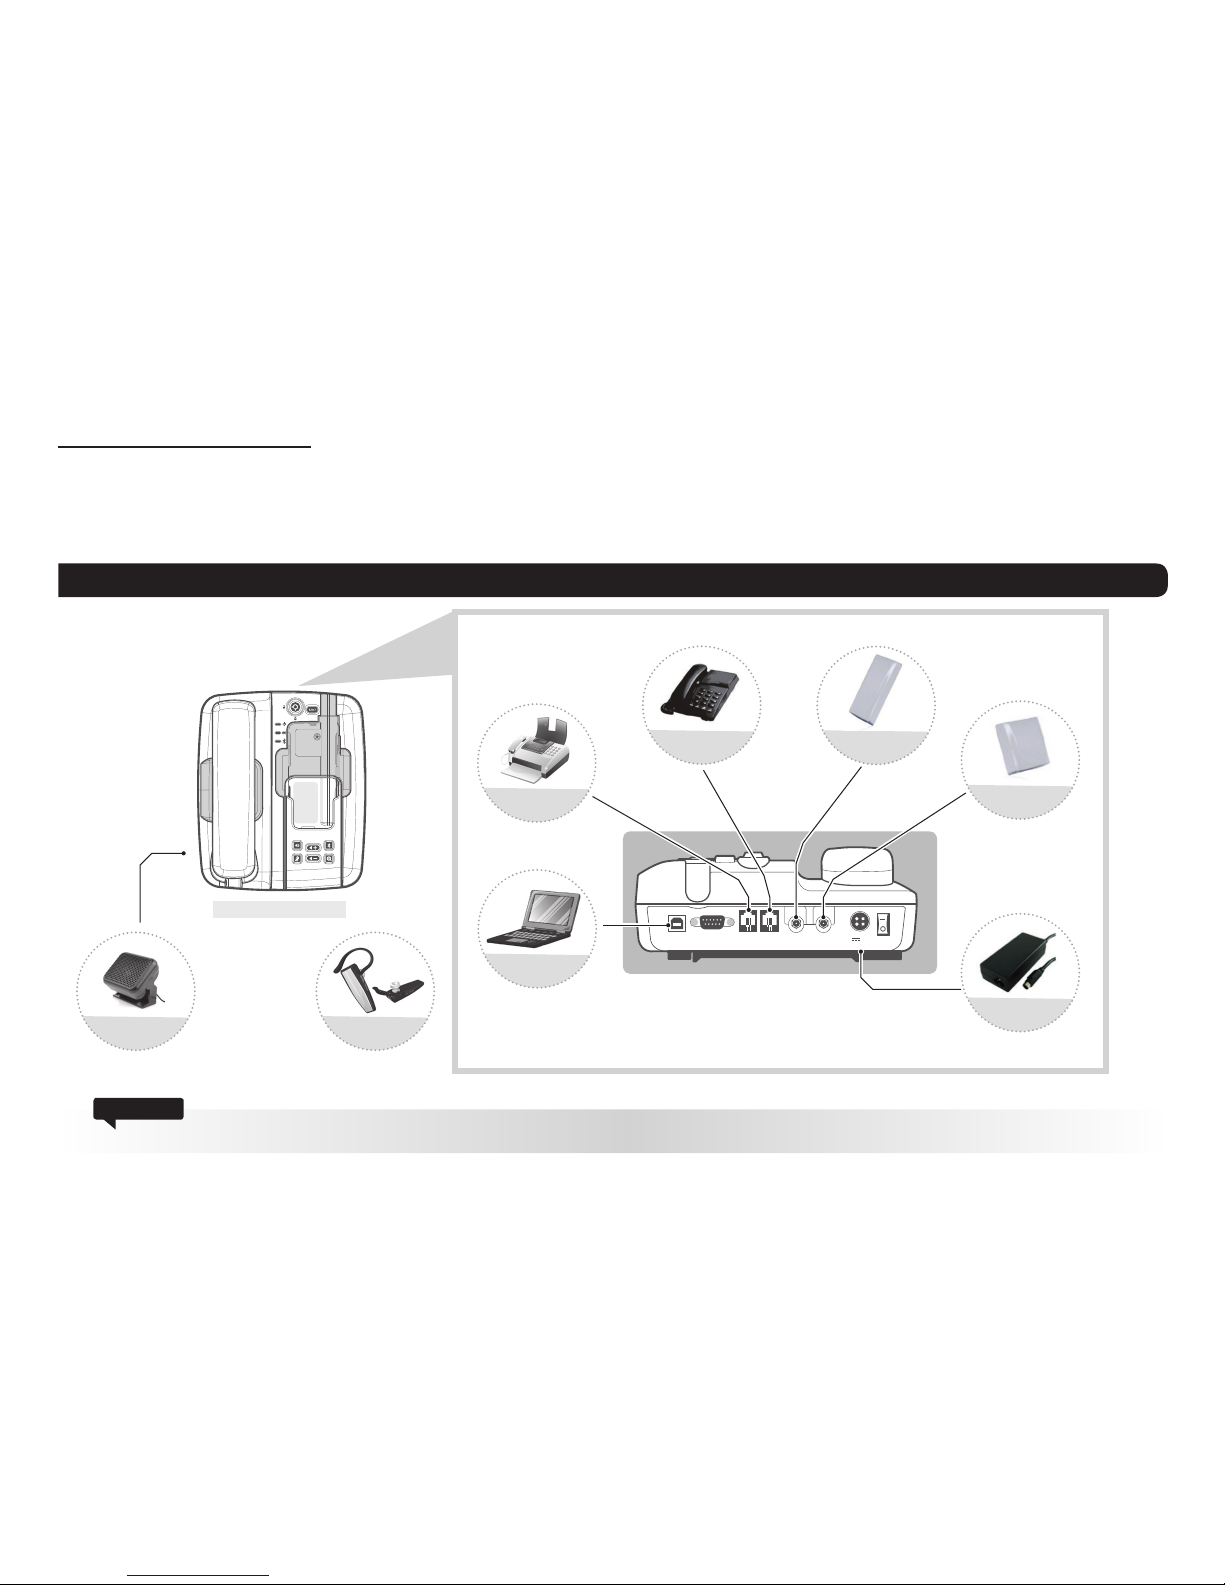
5.1. External Connections
5. Getting Started
The FDU-XT PLUS is intended to be used as a desktop or wall-mounted phone while the Thuraya handset is docked. Slots are provided at the
base of the unit to allow the FDU-XT PLUS to be hooked securely to a wall. Interfaces for connecting external equipments such as Group 3 fax
machines and PCs are provided at the reverse side of the unit.
FDU-XT PLUS
Do not connect FDU-XT PLUS with other products such as PSTN or a general telephone line.
Attention
Satellite Antenna
External Speaker
FAX
Analogue Extension
Phone
GPS Antenna
Power Adapter
(12VDC/5A)
Bluetooth Headset
PC
Inhaltsverzeichnis
Andere Thuraya Dockingstation Handbücher
 Bedienungsanleitung")


