
TrigMic LaserDick Bedienungsanleitung

Description and Features
● TrigMic™LaserPick – professional music
equipment. This is complete solution with two
laser-triggers and multilayer sound module
●Device fixes onto the hoop of kick drum
●Standard LR-type connector allows to
route the audio signal to the mixer console
directly
●Contains a set of factory-preloaded sounds
●User can upload own sounds
●Adjustable parameters of dynamics
●Remote control via Bluetooth
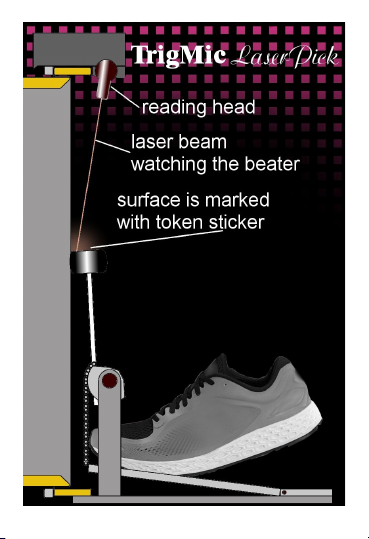
How does it work: Each one Laser
Beam is watching the pedal's beater
with the distance 6..15". The stroke will be
detected as soon as the beater enters to the
laser beam. Electronic circuit estimates the
stroke's force and the sound module
generates the sound signal without dela .
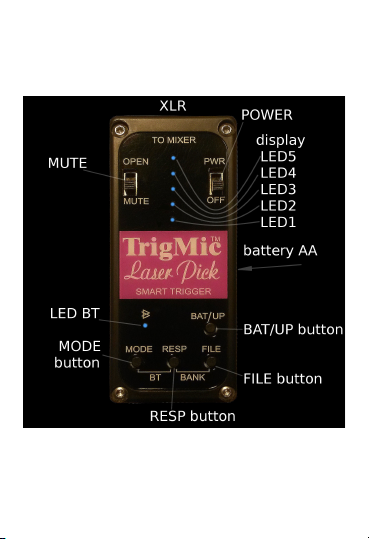
Controls and Displays

Installation and Connection
● The device should be fixed onto the
kickdrum's hoop by musician side, above the
center of drum head. Plug the microphone
cable to LR-connector on the rear side.
Before connecting be sure that the
device and mixer are MUTED and the
48V-phantom is NOT APPL ED. Minimize
the channel's gain, switch off the EQ and
d namic processes.
Switching on
● Please ensure that the device is MUTED.
Move the PWR switch to the ON position.
You will see the short flash of LED5 when the
power feed. If the charge is normal then the
LED5 will flash every 5 second.
● User can check the battery voltage by
pressing the BAT/UP button. All the five
lighting points means the battery is full. Two
lower points means the battery is partially
discharged. The lower LED1 means the
device is going to shutdown.

A out Batteries
● Please watch the charge. Replace the
battery beforehand. Prevent the shutdown
during a concert. If the charge is OK then the
device flashes LED5 every five second.
Partial discharge will be shown by flashing
LED5 with tempo 120 bpm. It means the
battery should be replaced. Mute the device,
switch the PWR off, pull the tape to eject the
battery. Insert new one battery observing the
polarity, Plus outside of yourself.
Use an kind of the AA-sized batteries
with the voltage 1.2 … 4.2V. Default
t pe is Alkaline 1.5V. When You use another
t pe of batter , please don't forget to change
the dedicated parameter in Thin Settings.
Inconsistenc will case the wrong voltage
displa .
We recommend the GP Lithium and
ENERG ZER Ultimate
Get Default: Turn on the device holding
the BAT/UP button to set the default
batter t pe Alkaline 1.5V

Token stickers on the eaters
● There is a kit of self-adhesive token
stickers (two silver color squares with black
bar). Each one token sticker should be
placed onto the top side of the beater as
shown on picture. For single kick drum pedal
use only one token sticker.
There are two work modes — With
d namic and Without that. To pla with
d namic (different force of strokes) direct the
sticker's bar-side to the drum head. To pla
without the d namic (all the strokes maximal
force) direct sticker's bar-side to ourself.
Default mode is Dynamic. How to change
the mode - find out more info in a chapter
"Laser Mode”

Aiming the Lasers
● At the bottom side of the device there are
two laser reading heads. Laser beams go
down when the device is on. Each one
reading head has a ball hinge of two degrees
of freedom. This allows You to deviate the
beam and send it to the desired point. Each
one beam should be aimed to the token
sticker when the pedal is pressed and the
eater is leaning against the drum head.
Usual distance between drum head
surface and aiming point of laser is
about 1/2” … 3/4”.

Laser Modes
There are three modes of lasers: with
dynamic, without dynamic, and left reading
head off, for single pedal play (to economy
the battery). User can change the laser mode
using the Android application,
Settings menu – Sensor Type and Mode
● ”LaserPick Right Beam” for single pedal
with dynamic
● ”LaserPick Dual Beam” (default) for
double pedal play with dynamic
● ”Dual Beam Machine Gun” for double
pedal play without dynamic (tokens should
be rotated by black bar to yourself)
The second way to change laser mode
using the buttons: Press and hold
MODE and FILE buttons over 10 sec.
Current laser mode will be displayed on the
LEDs. Keep buttons hold and change the
mode by pressing BAT/UP button
● LED5 - double pedal without dynamic
● LED4 - double pedal with dynamic
● LED3 - right beam only (single pedal with
dynamic)

Sensitivity set up MODE
● When the dynamic laser mode is chosen,
trigger can estimate the force of stroke by
measuring the rate of beater entering to the
laser beam. Weak strokes with too slow
motion of beater will be ignored. More
powerful strokes will be detected, estimated
by force and going playback by sound
module with corresponding loudness. The
MODE parameter is setting up the sensitivity.
The higher value the more sensitive to weak
strokes.
● Press and hold the MODE button. Current
value will be displayed. The scale has 9
levels. All the five lighting LEDs mean mid
level 5. Keep holding the MODE and change
the level by pressing the BAT/UP button.
Each press increases the sensitivity by 1, up
to level 9. The next press gives level 1.
Adjust the sensitivity of the ear, according
to the features of your strokes.
Value has no affect when the non-
d namic laser mode is chosen.

Response set up RESP
● The RESP parameter is setting up the
dynamic response. In the TrigMic™LaserPick
there is a set of dynamic curves: hyperbolic,
parabolic, linear, exponential and fixed. User
can choose one of nine curves. It allows to
achieve more natural transfer of the dynamic.
Adjust the response of the ear, according
to the features of your strokes.
● Press and hold the RESP button. Current
value will be displayed. The scale has 9
levels. All the five lighting LEDs mean mid
level 5 (linear function). Keep holding the
RESP and change the level by pressing the
BAT/UP button. Every push increases the
response by 1, up to level 9 (fixed). The next
push gives level 1 (hyperbolic).
Value has no affect when the non-
d namic laser mode is chosen.


