
Tronix Tronix Explorer XT Bedienungsanleitung

USER’S GUIDE
(For Tronix Explorer XT / Tronix Explorer XT SE)

Capture the light, get images beyond boundaries...
TRONIX EXPLORER XT
Congratulations on your purchase of the Tronix Explorer XT!
The technically superior Tronix Explorer XT, rated at 350 Watts continuous
and at 1200 Watts peak power, is designed to provide power to most flash
and power pack units. It makes your studio lights work on location or when
power is not available with faster recycling time, more power and better
performance.
Power and Reliability
1200 Watts peak power, recommended up to 2400Ws
-Provides a clean sine wave from a 24V source
-Efficient circuit design that generates almost a thousand full
power pops for 300Ws flash units
Flexibility and Mobility
-Auto volt/Global charging feature (100V 240VAC)
-14V DC car battery charger and Auxiliary Battery port for 24V
external battery pack
-Added mobility with the optional Tronix Explorer bag
-It can also be used for powering battery chargers, laptops,
printers, etc.
Safe and Easy to Use
-Plug and play
-Battery power and charging indicators
-Short circuit switch over from battery to external battery pack
The convenience and reliability that Tronix Explorer XT boasts would be
reason enough to bring this gadget wherever a photographer travels and
goes for work, and needs it most.
Thank you for your purchase of this product. We hope you will enjoy the
product as much as we enjoyed developing it to serve your needs.

Contents
Important Safety Instructions
General Safety
Electrical Safety
Battery Safety
Getting Started
Shipping Materials
Installation
Operation
Charging
Maintenance
Battery Replacement
Troubleshooting
Frequently Asked Questions
Technical Specifications
Service and Warranty
Contact Information

Important Safety Instru tions
SAVE THESE SAFETY INSTRUCTIONS AND USER’S GUIDE. These Safety
Instructions should be followed during installation, operation and
maintenance of Tronix Explorer XT.
General Safety
-Do NOT expose the Tronix Explorer XT to dust, moisture, liquids,
rain or snow.
-Do NOT block ventilation openings of the Tronix Explorer XT;
Overheating may occur. Do NOT place the Tronix Explorer XT in a
compartment with zero clearance.
-Not recommended attachments, when used with Tronix Explorer
XT, may result in risk of fire, electrical hazard or injury.
-Periodically observe the status of the LED indicators to make sure
that Tronix Explorer XT works as intended.
Ele tri al Safety
-Always connect Tronix Explorer XT to a grounded outlet. The
socket outlet to which the product is connected must be in close
proximity and must be easily accessed.
-Flash units and other supported equipment must be properly
connected to Tronix Explorer XT. As with Tronix Explorer XT's
connection to the socket outlet, connections of the equipment to
the product must be easily accessed.
-Always turn OFF and unplug Tronix Explorer XT before doing any
maintenance.
-Tronix Explorer XT incorporates multiple power sources. Only
connect ONE of these sources at a time. Though not posing any
danger, simultaneous connection of any of these sources is NOT
recommended. Disconnect ALL power cords to completely remove
power from the unit.

Battery Safety
Do NOT
make any changes or modifications to Tronix Explorer XT unless otherwise
specified. Except the batteries, Tronix Explorer XT has no serviceable parts.
-CAUTION: Do NOT place the batteries near open flames or heat.
The batteries may explode.
-CAUTION: Do NOT open the batteries. The batteries contain
chemicals that are harmful to the skin and eyes. The batteries
can also emit dangerous or explosive gases.
-CAUTION: To avoid injury due to electrical hazard, remove metal
accessories such as wristwatches and jewelries when replacing
batteries. Use properly insulated tools and handles.
-CAUTION: Tronix Explorer XT uses 12VDC, 7Ah Sealed Lead Acid
batteries. Replace batteries with the same type as originally
installed in Tronix Explorer XT.
-CAUTION: Observe proper polarity when connecting the
batteries. Incorrect polarity may cause electrical hazards or
damage to Tronix Explorer XT.
Dispose repla ed batteries properly. Deliver the battery to its
manufacturer for recycling.
IMPORTANT: Innovatronix In . does NOT re ommend the Tronix
Explorer XT for use in life support equipment, where malfun tion of
the produ t will signifi antly degrade effe tiveness of su h
equipment.
Examples of life support equipment are, but NOT limited to, the fol-
lowing: pa emakers, blood pumps, ventilators and dialysis systems.

Getting Started
Shipping Materials
Please check if the shipped package contains the following:
-1 Tronix Explorer XT unit
-1 Power Cord
-1 Universal Adapter (only for 115VAC/60Hz model)
-1 14VDC Car Battery Charger
-User's Guide (this document)
Contact Tronix Customer Service in case any item is missing in the package
(see Contact Information).
Installation
1. Make sure that the Tronix Explorer XT is switched OFF.
2. Always place the Tronix Explorer XT in an environment there is no
excess of heat, dust and moisture.
3. Plug the power cord to a 100V to 240V AC mains supply. On the front
panel, the green Charging LED indicator should blink. This indicates
that the Tronix Explorer XT is charging.
If Tronix Explorer XT is being charged the first time, charge the unit
for 12 to 15 hours. This step ensures optimum battery performance.
Succeeding charges would only take 3 to 5 hours.
NOTE: The socket outlet to which Tronix Explorer XT is connected
must be in close proximity and must be easily accessed.
Tronix Explorer XT incorporates multiple power sources: AC Input, DC
Input and Auxiliary Battery. Only connect ONE of these sources at a
time. Though not posing any danger, simultaneous connection of any
of these sources is NOT recommended.
Operation
1. Make sure that Tronix Explorer XT is charged as instructed in
Installation.
2. Set up the necessary lighting equipment.
3. Connect the plug of the flash unit being used to one of the Tronix
Explorer XT's sockets. For 115VAC/60Hz models, a universal adapter is
supplied.
NOTE: The connections between the flash units and the Tronix
Explorer XT must be in close proximity and must be easily accessed.
4. Turn on Tronix Explorer XT by switching the power switch to “|”
position. The Battery Level Indicators (green Hi, yellow Med and red
Lo ) indicate the amount of power left in the battery. The Tronix
Explorer XT is now supplying power to the flash units.
5. Test the flash units. If desired lighting requirements are set, proceed
with the photo shoot.
NOTE: Using the modeling lamps in the flash units will prolong
recycling charging time and will easily discharge the battery.
Therefore, it is advised not to use modeling lights when using the
Tronix Explorer XT as power source.
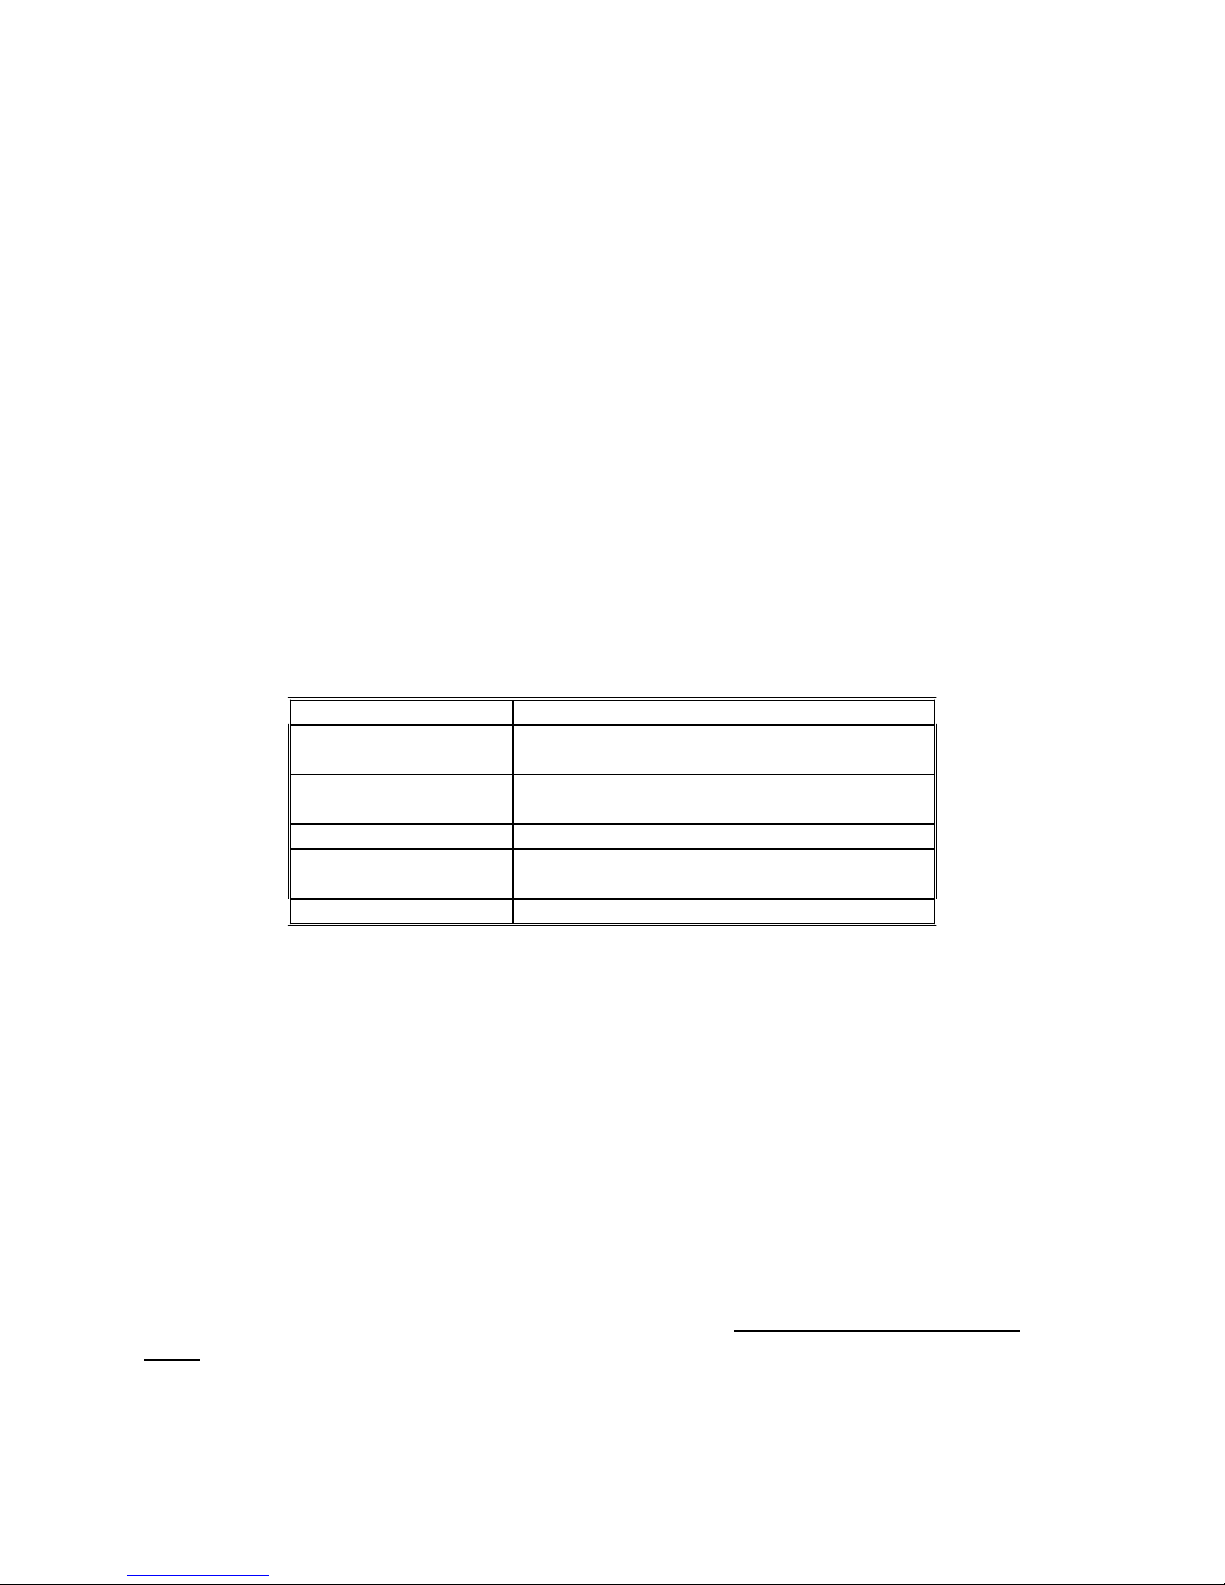
Below is a table of Tronix Explorer XT LEDs’ status and its
corresponding indication:
Status Indi ation
Charging Green Charging LED indicator is
BLINKING
Charging Battery
Full
Green Charging LED indicator stays
ON
Battery Full Green Hi LED indicator is ON
Battery at Half
Power Yellow Med LED indicator is ON
Battery Low Red Lo LED indicator is ON
Aside from its normal use of powering strobes and flashes, Tronix Explorer
XT's battery will be discharged if any of the following occurs:
-Tronix Explorer XT is switched ON at no load. Tronix Explorer
XT’s battery will be discharged after 40 hours.
-Tronix Explorer XT is switched OFF at no load. Tronix Explorer
XT’s battery will be discharged after 200 days. Thus, when not in
use, it is recommended that Explorer XT should be plugged in to
a 100V to 240V AC mains supply or to a 14V DC outlet.
-Even when switched OFF, the Tronix Explorer XT’s internal
circuitry still consumes power. A totally discharged battery will
severely affect its useful life.
Should the Tronix Explorer XT run out of power, Tronix Auxiliary Battery
Pack can be connected to the Tronix Explorer XT. When the Auxiliary Battery
Pack is connected, Tronix Explorer XT bypasses its internal battery and

draws power from the battery pack. Tronix Auxiliary Battery Pack is sold
separately. More information can be obtained from Innovatronix website.
See Contact Information
Charging
-Make sure that the Tronix Explorer XT is switched OFF.
-Tronix Explorer XT can be charged through the following
methods:
Mains Supply
Plug the power cord to a 100V to 240V AC mains supply.
Except for the initial charging, the Tronix Explorer XT
should be fully charged after 3 to 5 hours.
When the green Charging LED indicator stopped blinking
(LED stays ON), the battery is fully charged.
14V DC Outlet
Plug the Tronix Explorer XT to a 14V DC outlet. A car
cigarette lighter socket would be an example. Make sure
the appropriate adaptor is used.
Note that Tronix Explorer XT cannot be fully charged
when this method is used.
Tip: It is recommended to charge the Tronix Explorer XT occasionally,
once a week to a few times a month, when not in use. If the cord is still
plugged after the battery reached full charge, the battery will not be
damaged in any way. Trickle charging also maintains the battery's
optimum life span.
Maintenan e
-For optimum performance, keep the battery fully charged. A lit
green Hi LED indicates a fully charged battery when Tronix
Explorer XT is being used. On the other hand, a lit red Lo LED
indicates a drained battery.
-Switch OFF the unit when not in use. Leaving Tronix Explorer XT
on when not in use will severely drain the battery.
-Use a dry cloth when cleaning the unit. Do not use any liquid or
detergents.
-Coil cables when not in use. Loose cables may cause accidents.

Battery Repla ement
WARNING:
Risk of ele tri sho k. Pro eed with extreme aution.
Before repla ing batteries, dis onne t all ords and wait 30
minutes.
Remove any metal obje ts su h as wristwat hes and jewelry.
Use properly insulated tools and handles.
Stri tly follow the instru tions stated to avoid possible damage
to the unit and injury.
(See separate document for complete instructions on battery
replacement)
1. Make sure that Tronix Explorer XT is turned OFF.
2. Remove the screws of the cover located at the sides and top portion of
the unit.
Remove the cover. Make sure to place all screws in a container to
avoid misplacement.
3. Carefully disconnect the battery terminals located in the boost
converter and the battery converter side (the S cord that connects the
two batteries) located in the charger board side from the battery to
avoid short circuit.
NOTE: Remember to position the wires to ensure correct installation
later.
4. Remove the charger board located at the sides of the batteries. The
charger board serves as DC charger of the batteries inside.
5. Remove the screw of the battery bracket and screw under the battery
casing
6. Remove the battery bracket and the battery at the same time.
7. Turn the unit to the other side and remove the boost converter board.
8. Remove the screw of the battery bracket and the screw under the
battery casing.
9. Slide the battery out of the battery casing.
10. Securely place the new battery, sliding it to the battery casing.
Tighten the battery bracket screws and install the boost converter
board.
11. Turn to the other side and make sure to place the batteries inside the
metal closure first. Reinsert the bracket screws and put back the
charger board before connecting the battery terminals and connector.
NOTE: Make sure that the battery terminals will NOT touch the heat
sink. For safety, you can cover the area of the heat sink where the

battery terminals will pass during battery replacement.
ATTENTION: Remember to take note of the polarity of the wires and
not interchange them. Otherwise, the unit will be damaged. Black wire
is for the negative (–) terminal and red wire is for the positive (+)
terminal.
12. Place back the cover. Reinsert and tighten all screws.
Dispose repla ed batteries properly. Deliver the battery to its
manufacturer for recycling.
Troubleshooting
Refer to the table below to address minor problems regarding installation
and operation of Tronix Explorer XT. For problems that cannot be solved
using the table, contact Innovatronix Customer Service (see Contact
Information).
Problem Possible Cause Solution
No Power Battery Empty Charge Battery; Plug Tronix Explorer XT
to a 100 to 240V AC outlet or to a 14V
DC supply. If the Tronix Explorer XT does
not switch on after charging, contact
Innovatronix Customer Service (see
Contact Information)
Not Charging Not Plugged to
Supply
No Power from
Supply
Plug Tronix Explorer XT to a 100 to 240V
AC outlet or to a 14V DC supply
Ensure power is in the mains supply
outlet. If Tronix Explorer XT still does not
charge, contact Innovatronix Customer
Service (see Contact Information)
Lighting
equipment
not working
Battery not charged
Lighting equipment
malfunctioning
Incompatible
equipment
Charge Battery; Plug Tronix Explorer XT
to a 100 to 240V AC outlet or to a 14V
DC supply
Contact manufacturer of lighting
equipment
Lighting equipment not compatible with
Tronix Explorer XT (see attached
Compatibility Chart for compatible
equipment)
Battery draining
fast
Battery not fully
charged
Modeling lamps in
Charge battery for 3 to 5 hours (12 to 15
hours if charging for the first time)
Modeling lamps, when used with flash
Andere Handbücher für Tronix Explorer XT
1
Dieses Handbuch passt für folgende Modelle
1
Inhaltsverzeichnis
Andere Tronix Wechselrichter Handbücher


