Unitec Wash Select II Bedienungsanleitung

Wash Select II to WashPay Integration
Field Retrofit Installation Guide
Wash Select II Software Version 6.00 and above
POS4000 Software Version 8.25
Unitec
www.StartwithUnitec.com

WASH SELECT II TO WASHPAY
Document Number: WS21046 ii
Document Name: WSII to WashPayIntegration Field Retrofit Installation Guide
WASH SELECT II TO WASHPAY INTEGRATION
FIELD RETROFIT INSTALLATION GUIDE
This guide provides complete instructions for installing the expansion board and
programming the Wash Select II and WashPay Site Controller for integration.
If further assistance is needed, please contact the distributor from which the product
was purchased.
When calling for assistance, you must have the following information available:
Wash Select II Serial Number:
DistributorName:
COPYRIGHT
© 2012 Unitec, Incorporated. All rights reserved. No part of this book, including text,
screen examples, diagrams, or icons, may be reproduced or transmitted in any form,
by any means (electronic, photocopying, recording, or otherwise) without prior written
permission of Unitec, Incorporated.
TRADEMARKS
Wash Select II, Wash Select II POS, WashPay, Unitec, and the Unitec Logo are
trademarks, service marks, or registered trademarks of Unitec, Incorporated.
All other products, services, and company names are trademarks or registered
trademarks of their respective owners.

WASH SELECT II TO WASHPAY
Document Number: WS21046 iii
Document Name: WSII to WashPayIntegration Field Retrofit Installation Guide
Table of Contents
1Introduction.....................................................................................................................................1
2Retrofit Installation Procedures....................................................................................................1
2.1 Parts Checklist.......................................................................................................................1
3Hardware Installation Procedures ................................................................................................1
3.1 Perform System Backup........................................................................................................1
3.2 Disconnect Power to the Wash Select II ...............................................................................2
3.3 Installation Preparation..........................................................................................................2
3.4 Installation Procedures..........................................................................................................2
3.4.1 Expansion Board Installation Procedures ....................................................................................3
3.5 WSII Software Upgrade Procedures .....................................................................................4
3.6 Upgrade POS4000 EPROM..................................................................................................6
4Networking......................................................................................................................................7
5System Configuration....................................................................................................................8
5.1 Wash Select II........................................................................................................................8
5.2 WashPay Server Setup .........................................................................................................9
5.2.1 General Site Information ..............................................................................................................9
5.2.2 Product Programming ..................................................................................................................9
5.2.3 Card Terminal Programming........................................................................................................9
5.2.4 Receipt Printer Setup.................................................................................................................10
5.3 Download Devices...............................................................................................................11
5.4 User Management...............................................................................................................11
5.5 Wash Select II Notifications to the Site Controller...............................................................12

WASH SELECT II TO WASHPAY
Document Number: WS21046 iv
Document Name: WSII to WashPayIntegration Field Retrofit Installation Guide
[THIS PAGE INTENTIONALLY LEFT BLANK]

WASH SELECT II TO WASHPAY
Document Number: WS21046 1
Document Name: WSII to WashPayIntegration Field Retrofit Installation Guide
1 Introduction
This manual provides instructions for integrating the Wash Select II to the WashPay Site
Management System. Perform the steps in this manual to all Wash Select II units, the
POS4000, and the WashPay server.
Before beginning installation, you must also ensure that you have Wash Select II units,
the WashPay server, the router, Internet access through your local Internet Service
Provider, and a CAT5E cable terminated in an RJ45 jack running from the router in the
office/C-store to the Wash Select II. The CAT5E cable should not be more than 250 feet
in length.
2 Retrofit Installation Procedures
2.1 Parts Checklist
Prior to retrofitting the existing Wash Select II units, verify that all parts in the WSII to
WashPay Network Upgrade Kit are present.
• WSII to WashPay Network Expansion Board
• Expansion Board Ribbon Cable
• 4 4-40 M/F stand-offs
• 4 4-40 Nuts with Washers
• Wash Select II EPROM Software Chip version 6.00
• POS4000 EPROM Software Chip version 8.25 and above
• This document
3 Hardware Installation Procedures
3.1 Perform System Backup
Prior to upgrading the software, it is highly recommended that you generate a hard copy
of your site-specific information. This will make it much easier to reprogram your system
in the event of data corruption or loss.

WASH SELECT II TO WASHPAY
Document Number: WS21046 2
Note: Only qualified technicians should perform the following installation procedures.
The following reports will be required to reprogram your system: Accounting report, Fleet
Account report, Configuration report, Pass code/Pass card report and, if the Paging
option is installed, a Pager number report.
3.2 Disconnect Power to the Wash Select II
Before you begin the installation, it is important to first disconnect power to the Wash
Select II at the main power source. Once this has been done, it is recommended that you
verify that the power is off using a voltage meter.
Warning:
Ensure power is disconnected from Wash Select II before proceeding with the
installation. Shut the power off at the main panel box or breaker box and verify
by checking to see if the unit is still powered down.
3.3 Installation Preparation
Prior to beginning the installation, make sure you have done the following:
1. Power off the WSII.
2. Remove the Coin Hopper.
3. Remove the protective plastic CPU cover from the inside, right-hand wall of
the case. This cover is held in place by two wing nuts and two 5/16” hex
nuts.
3.4 Installation Procedures
The following figure will help you locate the specific components in the WSII unit that you
will be installing in this section.
Document Name: WSII to WashPayIntegration Field Retrofit Installation Guide

WASH SELECT II TO WASHPAY
Document Number: WS21046 3
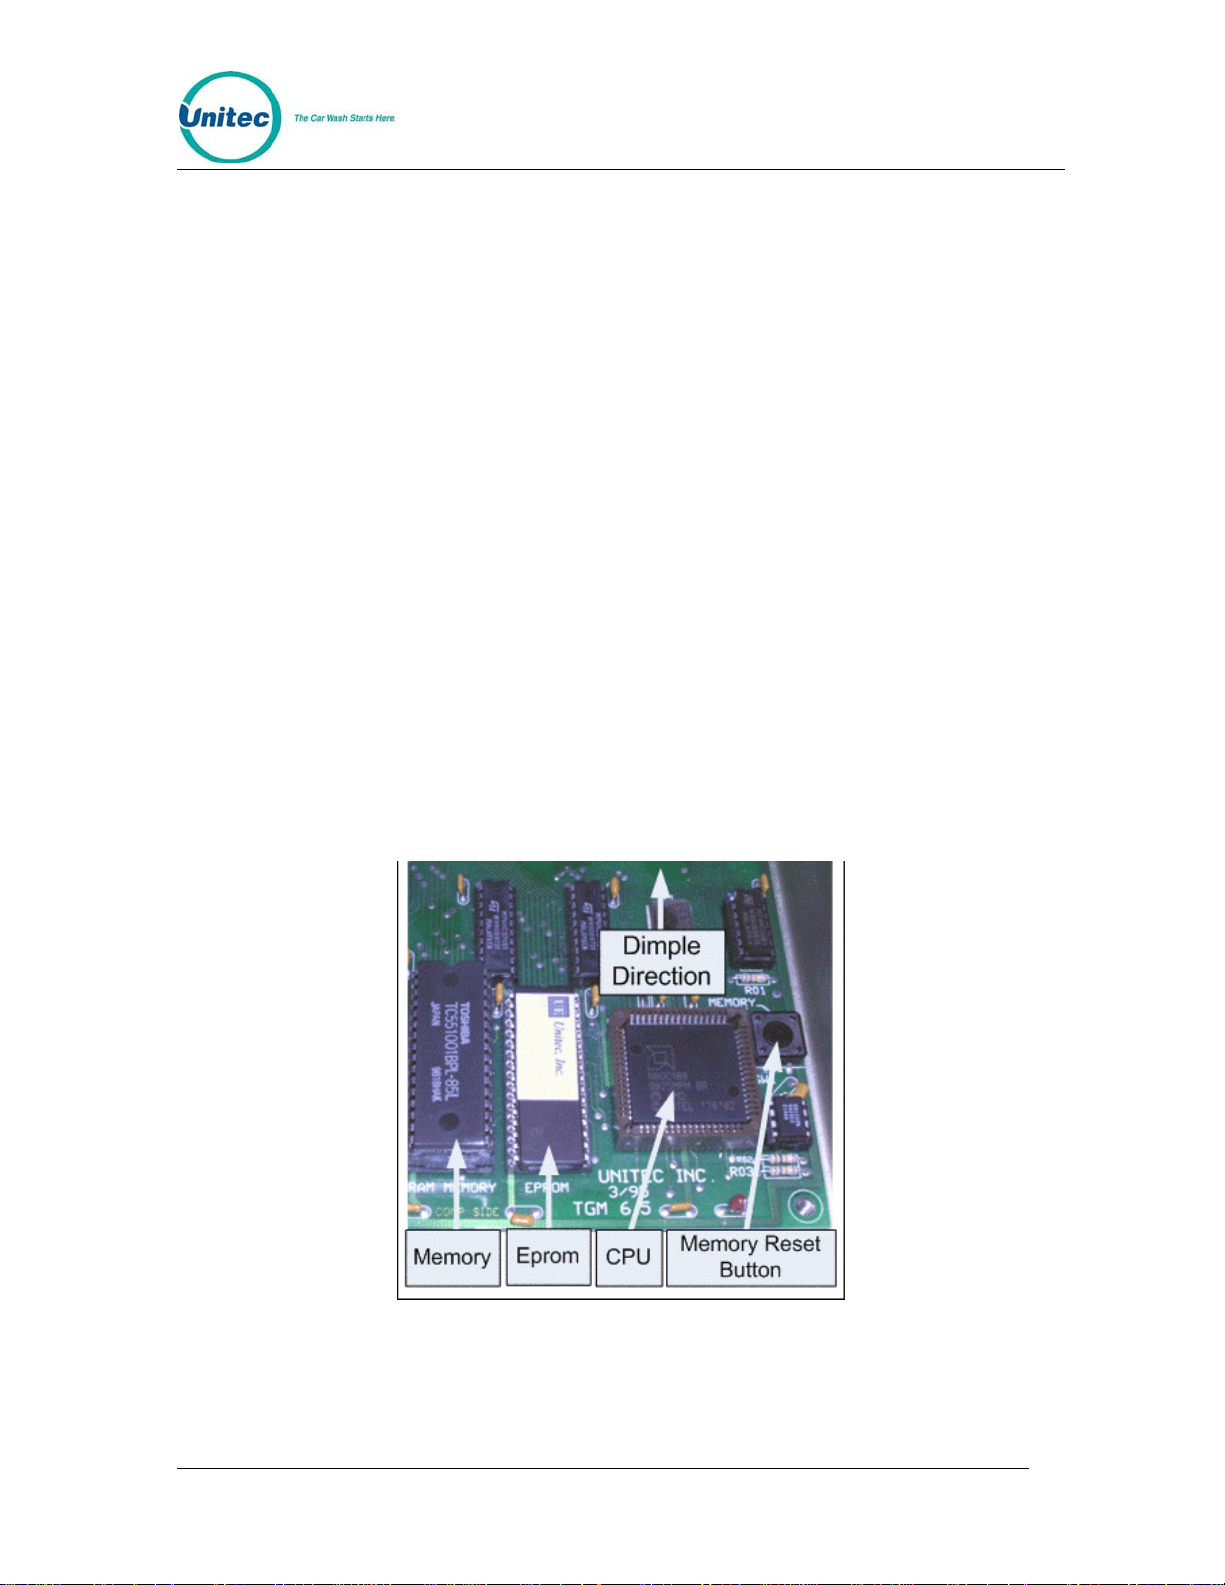
Figure 1. WSII Component Locations
3.4.1 Expansion Board Installation Procedures
To install the expansion board in the WSII unit, follow these procedures:
Document Name: WSII to WashPayIntegration Field Retrofit Installation Guide

WASH SELECT II TO WASHPAY
Document Number: WS21046 4
Figure 2. Expansion and CPU Board Layout
1. Ensure the main power to the WS2 is turned off.
2. Locate the Expansion Board mounting studs on the inside right wall.
3. Attach the included 4-40 male/female standoffs.
4. Attach the Expansion Board to the standoffs using the included white nylon
plastic 4-40 nuts and washers.
5. Connect the ribbon cable from socket J5 on the Expansion Board to socket J2
on the CPU Board.
6. Connect the CAT5 cable to the RJ45 jack on the board.
3.5 WSII Software Upgrade Procedures
To upgrade the WSII software, perform the following procedures:
1. Remove the existing EPROM located at connection U58 on the CPU board
(see Figure 3) by inserting a small flat-blade screwdriver between the
EPROM and the socket and prying it off. Be careful not to damage the
socket or the circuit board.
Document Name: WSII to WashPayIntegration Field Retrofit Installation Guide

WASH SELECT II TO WASHPAY
Document Number: WS21046 5
Figure 3. Locating and Removing the EPROM
Caution: Take care not to damage any pins when removing or installing chips.
2. Insert the new EPROM into the socket on the board. Chip pins may need to
be adjusted to fit into the socket. Use the following steps to adjust the pins:
• Lay the chip on its side with the pins facing away from you.
• Gently rock the chip away from you to bend the pins.
• Lay chip on its other side and rock it away from you.
• Repeat the above steps, alternating sides of the chip, until pins are at
approximately a 90-degree angle and line up in the socket.
3. The notched end of the chip goes up. There is a silk-screened image on the
CPU board you can use to line up the notch correctly. This image is labeled
EPROM.
4. Push the EPROM chip in gently. Do not force it, as you may cause damage
to the chip or the CPU board.
5. Replace the protective plastic cover over the CPU board.
Document Name: WSII to WashPayIntegration Field Retrofit Installation Guide
WASH SELECT II TO WASHPAY
Document Number: WS21046 6
3.6 Upgrade POS4000 EPROM
Depending upon the version of software that is currently in the POS4000 console, this
procedure may delete ALL configuration information, including all codes, fleet accounts,
and accounting information. All setup configurations will be reset to factory defaults. To
properly facilitate reprogramming this information, you should print the following reports
BEFORE proceeding.
• System configuration
• Pricing report
• Fleet accounts
• Accounting reports (those that are used)
• Message configuration
Perform the following steps to change console software (EPROM):
1. Disconnect all cables to the POS4000 console
2. Remove the plastic housing. To do this you must remove 2 screws from the
rear and 2 screws from the bottom of the unit.
3. The upper chassis must be partially removed. Remove the middle and front
screws along the side of the metal chassis. Loosen the rear two screws on
each side of the chassis. This will allow the top piece to open up revealing
the main circuit board.
4. Find the EPROM chip, as indicated below:
Figure 4. POS EPROM Location
The EPROM chip has a small window on the top surface that may or may not
be covered with an adhesive label.
Document Name: WSII to WashPayIntegration Field Retrofit Installation Guide
Andere Handbücher für Wash Select II
2
Inhaltsverzeichnis
Andere Unitec Touch-Terminal Handbücher

Beliebte Touch-Terminal Handbücher anderer Marken

Wincor Nixdorf
Wincor Nixdorf iPOS plus Advanced Bedienungsanleitung

Ingenico
Ingenico AXIUM EX4000 Bedienungsanleitung

Heisei Electronics
Heisei Electronics Q-POS 815 Bedienungsanleitung

Amano
Amano MTX-15 Bedienungsanleitung

FLOWBIRD
FLOWBIRD CWT Compact Touch Bedienungsanleitung

Demco
Demco SP7 Bedienungsanleitung


Motorola
Motorola MTP850 Bedienungsanleitung

YASKAWA
YASKAWA 62H-MDC0 Bedienungsanleitung

MVG industries
MVG industries NeptuLink Bedienungsanleitung

Price Industries Limited
Price Industries Limited FDC Gebrauchsanweisung

Honeywell
Honeywell TemaKey Bedienungsanleitung

EBN
EBN BPC65-B-A16G Bedienungsanleitung