V-tech Frozen II Magic Colour Clock Montageanleitung

Parent’s Guide
Magic Colour Clock
©Disney
91-003708-000 UK


3
INTRODUCTION
Thank you for purchasing the VTech®Frozen II Magic Colour Clock!
The Frozen II Magic Colour Clock is a magical alarm clock with a soft
glowing, colour-changing mood light that projects the time onto the ceiling.
Also includes motion-sensing controls: Just move your hand over the unit
to interact with the games or change the colour of the light. The Frozen II
Magic Colour Clock includes 11 Frozen themed clock faces and 13 coloured
light effects. Play 2 fun fortune telling activities and 4 cool mini games while
watching your Frozen friends on the LCD screen.
INCLUDED IN THIS PACKAGE
• 1 VTech®Frozen II Magic Colour Clock
• 1 parent’s guide
• 4 AA batteries for demo purpose only
WARNING: All packing materials such as tape, plastic sheets, packaging
locks, removable tags, cable ties and packaging screws are not
part of this toy, and should be discarded for your child’s safety.
NOTE: Please keep this parent’s guide as it contains important information.
The toy is only to be connected to Class II equipment bearing the following
symbol .
NOTE: In the unlikely event of harmless electrostatic discharge from an
external device, this product may not function correctly. Please remove and
replace the batteries to restore functionality.
Turn each packaging lock several times
anticlockwise.
Pull out and discard the packaging locks.
Unlock the packaging locks:

4
PRODUCT FEATURES
PRODUCT LAYOUT AND BUTTONS
Screen Icons
Indicate the current status of each mode.
Music Icon Game Icon FM Radio Icon
Audio-in Icon Alarm 1 Icon 2Alarm 2 Icon
Magic
Sensor Icon
Projection Angle
Adjuster
Magic Sensor
OK Button /
Time Telling
Time Projection
Button
Alarm / Settings
Right Button
Volume
Radio
Projector Lens
Projector Focus
Ring
Magic Sensor
Left Button
Clock
Light
Music
Games

5
Buttons Description
Clock
Press this button to enter Clock Mode or to go into Sleep Mode.
When the clock is not in use, Sleep Mode will activate to save power.
Music
Press this button to enter Music Mode.
FM Radio
Press this button to enter FM Radio Mode.
Game
Press this button to enter Game Mode.
Settings
Press this button to access the below settings.
• Alarm Clock Setting
• Light Effect Setting
• Brightness Setting
• Projection Style Setting
• Auto-off Timer Setting
• Time Setting
Light Button
Press this button to switch between ambient and screen display lights on,
ambient light off and both lights off.
Volume Button
Press this button to adjust the volume.
Direction buttons
Press this button to make a selection.
OK Button
Press this button to conrm your selection.
Projection Button
Press this button to turn time projection on or off.
Projector Focus Ring
Turn this to adjust the focus of the time projection.

6
Note:
We recommend using the time projection feature in a dimly lit room to get the
best results.
Projection Angle Adjuster
Adjust the projection angle by rotating the adjuster.
Magic Sensor Ring
Wave your hand above the magic sensors to see magic effects. Works only
when the magic sensor is shown on the screen.
Audio-in Jack
Plug in an external music player (not included) using a 3.5mm jack audio
cable (not included) to listen to music.
AC/DC Jack
Plug in a VTech®7.5V AC/DC power adaptor (sold separately) here.
FM Radio Antenna
To get the best radio reception, please take out the FM Radio Antenna
that is located in the cabinet at the bottom of the unit.
WARNING
•Please keep your Frozen II Magic Colour Clock away from strong light or
direct sunlight, as it can interfere with the magic sensors.
•To ensure the unit works at its best, please ensure there are no obstacles
such as a shelf close to the top of the unit, also do not locate it too close to
a wall.
•If the sensor detects an obstacle that impedes the performance of the unit,
you will see a warning icon on the screen.

7
SPECIAL WARNING ICONS
Low Battery This icon will appear when the battery power
is low. Please replace the batteries.
Bad Signal
This animation will appear when an object is
within the sensor range for an extended period
of time and reduces the performance.
GETTING STARTED
BATTERY INSTALLATION
Frozen II Magic Colour Clock uses 4 AA batteries or a VTech®7.5V adaptor
(sold separately).
• Locate the base compartment cover at the bottom of the unit.
• Remove the base compartment cover.
• Locate the battery cover inside the base compartment.
• Remove the battery cover and install 4 AA size batteries as illustrated.
• Close the battery cover and the base compartment cover.
BATTERY NOTICE
• Use new alkaline batteries or fully charged NI-MH (Nickel Metal-hydride)
rechargeable batteries for best performance.
• Use only batteries of the same or equivalent type as recommended.
• Do not mix different types of batteries: alkaline, standard (carbon-zinc) or
rechargeable, or new and used batteries.
• Do not use damaged batteries.
8
• Insert batteries with the correct polarity.
• Do not short-circuit the battery terminals.
• Remove exhausted batteries from the toy.
• Remove batteries during long periods of non-use.
• Do not dispose of batteries in re.
• Do not charge non-rechargeable batteries.
• Remove rechargeable batteries from the toy before charging (if
removable).
• Rechargeable batteries are only to be charged under adult supervision.
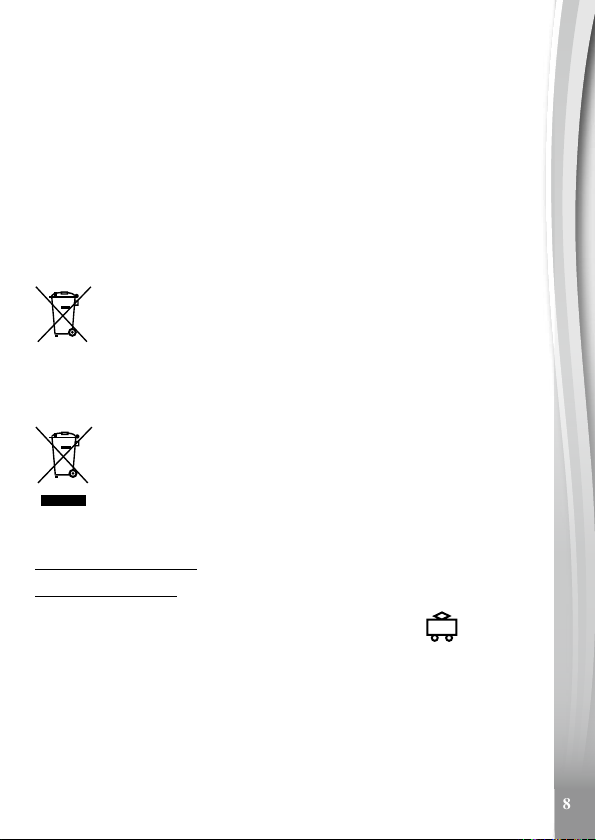
Disposal of batteries and product
The crossed-out wheelie bin symbols on products and batteries, or
on their respective packaging, indicates they must not be disposed
of in domestic waste as they contain substances that can be
damaging to the environment and human health.
The chemical symbols Hg, Cd or Pb, where marked, indicate that
the battery contains more than the specied value of mercury (Hg),
cadmium (Cd) or lead (Pb) set out in Battery Directive (2006/66/
EC).
The solid bar indicates that the product was placed on the market
after 13th August, 2005.
Help protect the environment by disposing of your product or
batteries responsibly.
For more information, please visit:
www.recycle-more.co.uk
www.recyclenow.com
POWER ADAPTOR CONNECTION
• Make sure the unit is OFF and ensure no batteries remain inside the unit.
• Locate the 5.0mm DC Jack on the back of the unit.
• Connect a power adaptor (not included) into the unit’s DC Jack.
• Insert the other end of the power adaptor into a plug socket.
• Make sure the plug socket switch is ON and then turn the unit ON.

9
TRANSFORMER SAFETY NOTICE
• Using a VTech®adaptor (AC/DC 7.5V 400mA) is recommended.
• This toy shall only be used with a transformer for toys.
• The transformer is not a toy.
• This toy is not intended for use by children under 3 years old.
• Do not connect the toy to more than the recommended number of power
supplies.
• Never clean a plugged in electronic device with liquid.
• Please regularly examine the transformer, checking for damage to the cord,
plug, transformer or other parts. Do not use the transformer if there is any
damage to it.
Note:
If the unit stops working or the sound becomes weak, it may be a result of the
adaptor connection. Unplug the adaptor for 15 seconds. Next, plug the adaptor
back in and turn the unit ON. If the problem persists, the adaptor you are using
may be faulty.
TO BEGIN USING THE FROZEN II
MAGIC COLOUR CLOCK
TRY ME MODE
If you’ve just taken the Frozen II Magic Colour Clock out
of the packaging for the rst time, you need to disable the
Try Me Mode before playing.
To disable the Try Me Mode, press the OK button to wake
up the unit and then press the Projection button to exit the Try Me Mode.
INITIAL SET-UP
Press any button to turn the unit on. When the unit is rst turned on, you will
be asked to set the time.
TIME SET-UP
The default time is 8:00 in 24 hour mode.
• Press the OK button to highlight the next item:
Hour, Minute, am / pm (only in 12 hour mode) / , 12 / 24 hr.

10
• Press the / buttons to adjust the value.
• To save the current settings, press the OK button when the tick icon is
highlighted. Or else, you can press the / buttons to choose the reset
icon to reset the time.
STANDBY MODE
To preserve battery life, the Frozen II Magic Colour Clock will automatically
enter standby mode if there is no operation for a period of time. You can also
press the Clock button to go to standby mode if you are already in clock mode.
The current time will display even in standby mode. Press any button to wake
the unit up.
MAGIC SENSOR CONTROL
A magic sensor detects your hand movement, wave
your hand left and right to activate it. You will be able
to select different light effects and play the games using
this method.
The magic sensor is available only if the magic sensor
icon is shown at the top of the screen.
LIGHT CONTROL
Press the light button to switch between ambient and screen display lights
on, ambient light off and both lights off.
PROJECTION CONTROL
The Frozen II Magic Colour Clock will project the current time onto the
ceiling.
Press the projection button to turn the time projection on or off.
Rotate the projector focus lens clockwise or anticlockwise to adjust the focus
of the projection display.
Rotate the projection angle adjuster to adjust the projection angle.
VOLUME CONTROL
Press the volume button to adjust the volume. Use the
/ buttons to decrease or increase the volume.
Press the volume button again or any function button to save
the current settings.
Inhaltsverzeichnis
Andere V-tech Uhr Handbücher

Beliebte Uhr Handbücher anderer Marken

Silicon Laboratories
Silicon Laboratories SI5324 Bedienungsanleitung

Heathkit
Heathkit GC-1005 Bedienungsanleitung

Oregon Scientific
Oregon Scientific PRYSMA RMR221P Bedienungsanleitung

Andrew O'Malley
Andrew O'Malley DOTKLOK Bedienungsanleitung

ALGE-Timing
ALGE-Timing ASC3 Bedienungsanleitung

Bodet
Bodet Profil 960 Bedienungsanleitung


Progetti
Progetti KALIMERO Handbuch

La Crosse Technology
La Crosse Technology WT-3141b Handbuch

La Crosse Technology
La Crosse Technology W86531 Bedienungsanleitung

Sharp
Sharp SPC900 Bedienungsanleitung

La Crosse Technology
La Crosse Technology 404-50447 Bedienungsanleitung

Datexx
Datexx DF0063 Bedienungsanleitung