VGP DExx-vd-isl Bedienungsanleitung

DExx-vd_isl
Quick Start Guide
This document is copyright © VGP Media Ltd 2022
All rights reserved worldwide
VideoGameperfection com is a trading name of VGP Media Ltd
Registered in Republic of Ireland number 637539

Dexx-vd_isl Quick Start Guide VideoGamePerfection com
DExx-vd_isl – Quick Start Guide
Contents
Important safety information 3
Overview 4
Connectors and external controls 5
Remote control 6
Getting started 7
Preparing the SD card 10
Powering on and testing 14
Getting to know your DExx 16
One scaler, three modes 16
Changing modes 17
Connecting a console, PCB or other hardware 17
Scanlines 18
Setting output resolutions 18
Framelock 20
Scaling algorithm 20
Interlace video and the DExx 20
Fine tuning the image 21
Audio input and output 21
Firmware updates 21
Troubleshooting 22
More information 23
Disposing of your DExx 23
Thank you for purchasing the DExx-vd_isl board (DExx for short) Please take time to read through
this short document before you start using the unit
Page 2

Important safety information
Please observe the following safety precautions when using your DExx-vd_isl board
Follow the instructions for your DE10 Nano – Ensure you are using the correct power supply for
your DE10 Nano and following all relevant safety guidelines as supplied with your DE10 Nano kit
Turn off the power before connecting/disconnecting the board – To prevent damage to the DExx
board or your DE10 Nano board, always turn off and disconnect the power before connecting or
disconnecting the device
Turn off the power before connecting/disconnecting devices – To prevent damage to the DExx
board always turn off and disconnect the power to both your device and your DE10 Nano before
connecting or disconnecting any devices to the SCART port
Do not expose to oisture – Droplets of moisture may contact the PCB and cause a short circuit
Never submerge the unit in water
Please supervise children – This product is not a toy and is not designed for use by children
Please supervise children if they use the DExx-vd_isl
Beware of using the bob deinterlace ode on sources that display static graphics or text for a
long period of ti e – This deinterlacing mode produces a constant flickering effect This can cause
image retention/burn-in to occur faster than normal We recommend using the scaler mode and
motion adaptive deinterlacing where possible, see page 20 for more details
Dexx-vd_isl Quick Start Guide VideoGamePerfection com
Overvie
Page 4

Connectors and external controls
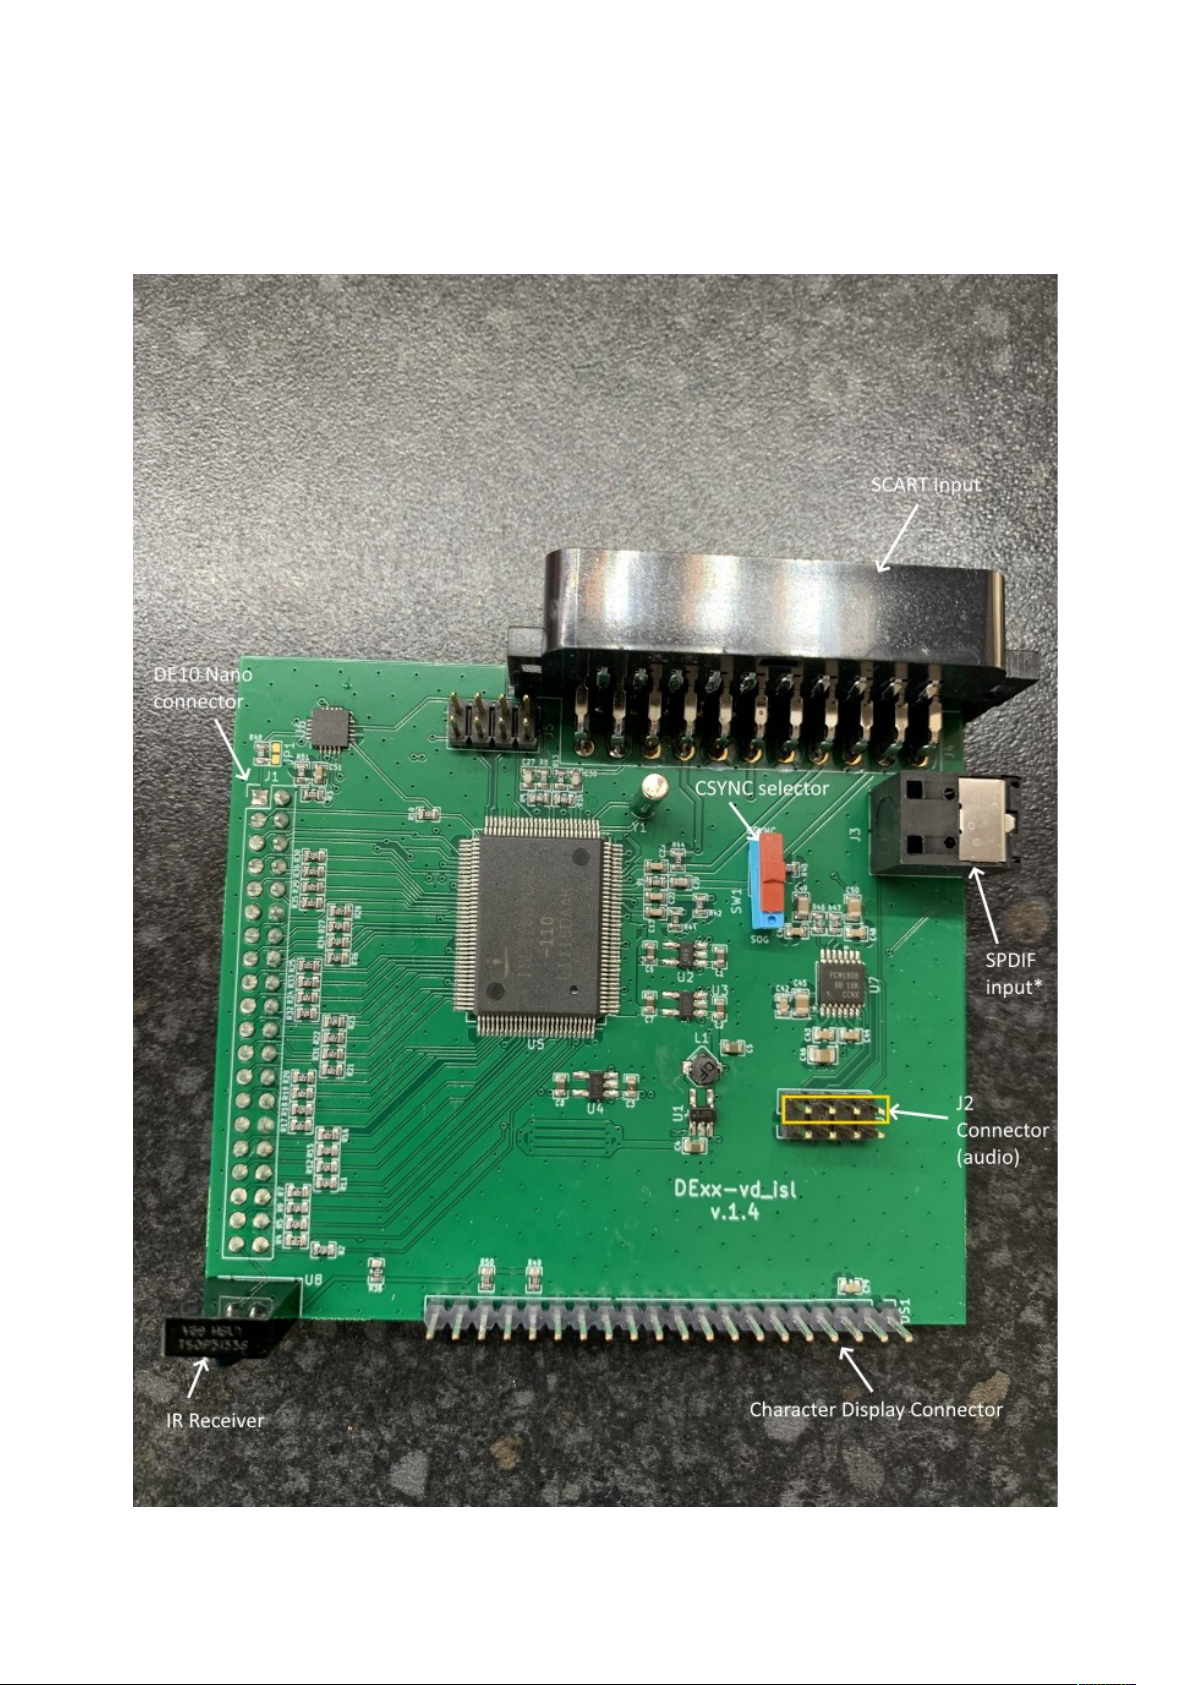
In the overview picture you can see the following features on your DExx-vd_isl board
SCART Input – Connect an RGB SCART source to this input Note the input must be RGB or
YPbPr, S-video and composite SCART sources are not supported and require transcoding into RGB
first Only European spec RGB SCART cables are supported, the less common Japanese JP21
cables must be used with a converter, a suitable one can be purchased here:-
https://videogameperfection com/products/jp21-to-scart-adapter/
The SCART input is referred to as AV1 in the DExx’s on screen menus
CSYNC Selector – Choose between standard RGB with composite sync or sync on green (SOG)
Note that you should use the SOG setting if connecting component video (YPbPr) via an adapter
SPDIF Input – For connecting high quality digital audio input from compatible consoles or
devices
*Note, SPDIF input requires a hardware modification to the DE10 Nano board Details of how to
perform this modification will be posted to the Wiki here:-
https://junkerhq net//xrgb/index php?title=DExx-vd_isl#Toslink
J2 Connector – J2 carries digitized analogue audio and SPDIF and must be connected in order to
get audio from your source device The supplied jumper cable should be connected to the J2 pins
highlighted in yellow in the picture
Character Display Connector – Connect an optional character display to this pin header The
required components for the display can be purchased from the links below:-
https://newhavendisplay com/2x16-character-red-slim-oled-module/
https://www digikey com /en/products/detail/sullins-connector-solutions/PPTC201LGBN-RC/
775914
The pin sockets must be soldered to the character display, this requires soldering skills and
equipment
MicroSD Card Slot – For updating the devices firmware, see “Firmware Updates” on page 21
IR Receiver – Receives commands from the remote control unit Line of sight is required
DE10 Nano Connector – Connect the DExx to the DE10 Nano using this connector

Dexx-vd_isl Quick Start Guide VideoGamePerfection com
Remote control
The DExx-vd_isl uses the same IR remote as the OSSC The button mappings are very similar, and
can be seen below
Page 6
Getting started
Start by carefully removing any add on boards or MiSTer components from your DE10 Nano board,
if applicable A USB hub expansion such as the BlisSTer can be left in place but please disconnect
all cables Disconnect any Ethernet or USB cables and, if MiSTer software is installed, remove your
MiSTer system SD card and store it away safely
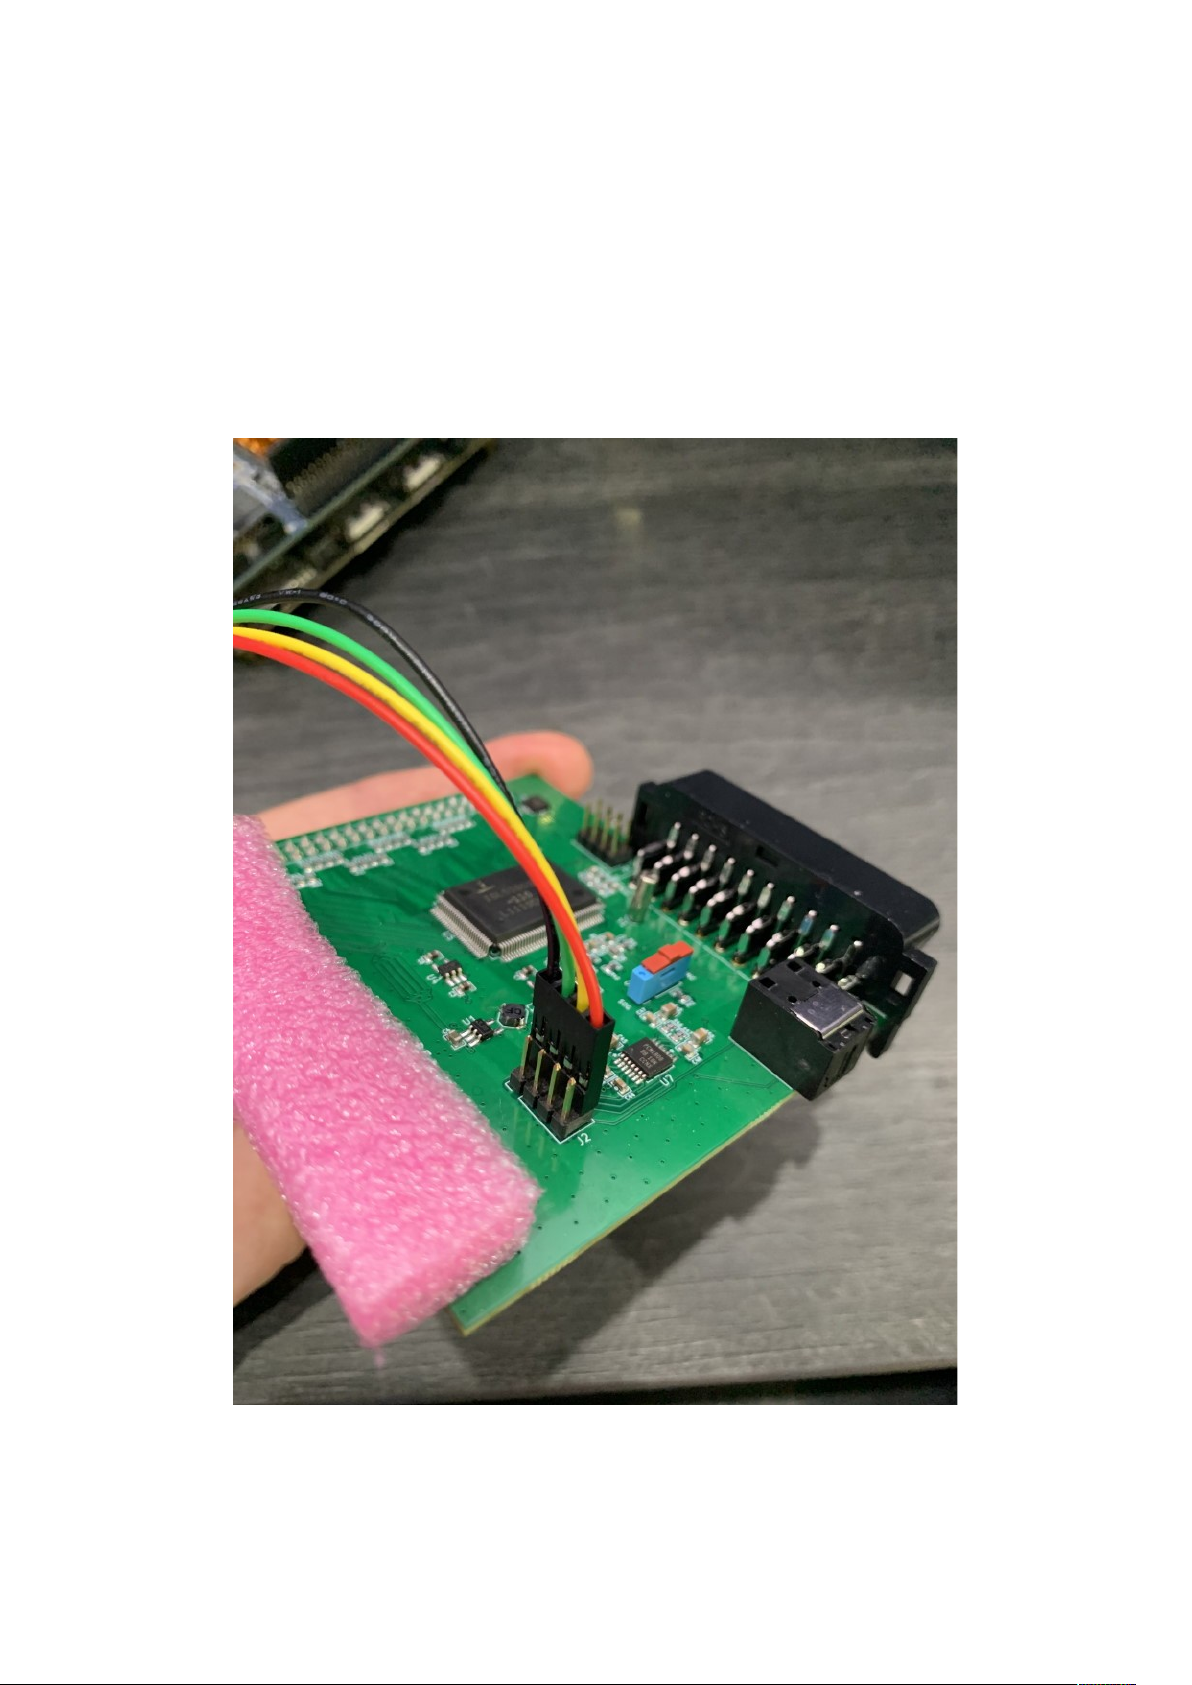
Insert the female end of the supplied jumper cable onto the connector labelled J2, as shown in the
picture below
Note the orientation of the jumper cable J2 has two rows of 4 pins, the jumper cable should be
placed at the back, that is, on the row of pins that is closest to the SCART connector This row of
pins is highlighted in yellow on the overview picture The red cable should be on the right (with the
SCART connector at the back of the board)

Dexx-vd_isl Quick Start Guide VideoGamePerfection com
Orient your DE10 Nano board so that the Ethernet connector is at the front, and the HDMI and
power connectors are at the back Leave the video and power connectors disconnected for now
Note the pin sockets highlighted in yellow, we will need those later
Carefully place the connector from the DExx on to the connector on the right of the DE10 Nano
board, as highlighted in red in the picture above, with the SCART socket on the DExx pointing to
the back Check the alignment of the pins before gently pushing the board down into place The
connector on the DExx matches the connector on the DE10 Nano exactly, one pin for every hole,
Page 8

meaning there should be no exposed pins at either end
Connect the male end of the jumper cable to the DE10 Nano as shown in the picture below
Check that the jumper cable is inserted into the correct place Refer to the previous picture where
the correct pin sockets are highlighted in yellow From the front of the board, there should be four
vacant holes in front of the jumper cable and ten behind
The hardware is now assembled, system software for the DExx should now be copied to a MicroSD
card

Dexx-vd_isl Quick Start Guide VideoGamePerfection com
Preparing the SD card
The DExx requires operating software/firmware to be installed on an SD card This SD card needs
to be prepared with a bootloader the first time you use it Start by downloading the latest version of
the bootloader and firmware from the link here:-
https://github com/marqs85/DExx-vd_isl/blob/master/board/de10-nano/software/bootloader/
sd_image/sdcard_cv img?raw=true
To prepare the SD card we recommend the program “Balena Etcher” which is available here:-
https://www balena io/etcher/
This program is available for Windows, Linux and MacOS The instructions that follow are for
Windows operating systems specifically, but the process should be very similar for Linux and
MacOS too
Download and install the Balena Etcher software and run it, you should see a window like the one
shown below
Click on “Flash from file” A standard file requester window should appear Navigate to your
download folder and choose the SD card image file It should be named “sdcard_cv img” or
“sdcard_cv”
Page 10
Inhaltsverzeichnis
Beliebte Grafikkarte Handbücher anderer Marken

Gainward
Gainward GeForce GTX 690 4GB Bedienungsanleitung

ATI Technologies
ATI Technologies RADEON 137-40225-20 Bedienungsanleitung

MSI
MSI N220GT series Bedienungsanleitung

ATI Technologies
ATI Technologies RADEON 7000 MAC EDITION Bedienungsanleitung

SIIG
SIIG aurora Bedienungsanleitung

ClearSpeed
ClearSpeed ClearSpeed Advance e720 Bedienungsanleitung


