Virtulive VOJAS Bedienungsanleitung

VOJAS Installation Manual
Version1.0
September 2019
Virtulive Technologies Pvt Ltd
VOJAS Installation Manual

VOJAS Installation Manual
Contents
1Disclaimers..................................................................................................................................................................... 3
2Introduction..................................................................................................................................................................... 4
3.1
VOJAS Components........................................................................................................................................... 5
3.2
Before You Begin - Pre-Requisites................................................................................................................ 5
3.2.1
Power Supply.................................................................................................................................................... 5
3.2.2
Projection Surface........................................................................................................................................... 6
3.2.3
Internet Connectivity....................................................................................................................................... 6
3.2.4
Operating Environment.................................................................................................................................. 6
3.3 Getting to know your VOJAS........................................................................................................................... 7
3.3.1
Identifying your device................................................................................................................................... 7
3.3.2
Top Panel & Controls..................................................................................................................................... 8
3.3.3
Front Right View.............................................................................................................................................. 9
3.3.4
Rear & Left View............................................................................................................................................ 10
3.3.5
Connectivity Panel........................................................................................................................................ 11
3.3.6
Remote Commander.................................................................................................................................... 12
4.1
Ceiling Mount Kit................................................................................................................................................ 13
4.2
Additional Tools and equipment.................................................................................................................... 14
4.3
Placement............................................................................................................................................................ 15
4.6
Mounting the Device......................................................................................................................................... 16
4.7
Connecting the Power...................................................................................................................................... 18
4.8
Other Connections............................................................................................................................................ 19
4.9
Securing the Device.......................................................................................................................................... 19
5Switching On the Device.......................................................................................................................................... 20
5.1
Booting Up........................................................................................................................................................... 20
5.2
Shutting Down .................................................................................................................................................... 20
5.3
Sleep Mode.......................................................................................................................................................... 20
5.4
Log In..................................................................................................................................................................... 20
5.5
Input Devices...................................................................................................................................................... 20
5.6
Top Panel Functions......................................................................................................................................... 21
5.7.1
Auto Focus...................................................................................................................................................... 21
5.7.2
Orientation....................................................................................................................................................... 21
5.7.3
Interactivity Button......................................................................................................................................... 22
5.7.4
Turning the Projection On/Off.................................................................................................................... 22
5.8 Charging the IR Pen......................................................................................................................................... 22
5.9 Calibrating the Interactivity ............................................................................................................................. 22
5.10 Connecting to the Internet............................................................................................................................... 22
6Appendix 1 - Warnings & Cautions....................................................................................................................... 23

VOJAS Installation Manual
1Disclaimers
▪
The specifications and information regarding the products in this manual are subject to
change without notice. All statements, information, and recommendations in this manual are
believed to be accurate but are presented without warranty of any kind, express or implied.
Users must take full responsibility for their application of any products.
▪
The software license and limited warranty for the accompanying product are set forth in the
documentation shipped with the product or published on the website and are incorporated
herein by this reference. If you are unable to locate the software license or limited warranty,
contact your Virtulive representative for a copy.
▪
The Virtulive implementation of TCP header compression is an adaptation of a program
developed by the University of California, Berkeley (UCB) as part of UCB’s public domain
version of the UNIX operating system. All rights reserved. Copyright © 1981, Regents of the
University of California.
▪
Notwithstanding any other warranty herein, all document files and software of these suppliers
are provided “as is” with all faults. Virtulive and the above-named suppliers disclaim all
warranties, expressed or implied, including, without limitation, those of merchantability,
fitness for a particular purpose and noninfringement or arising from a course of dealing,
usage, or trade practice.
▪
In no event shall Virtulive or its suppliers be liable for any indirect, special, consequential, or
incidental damages, including, without limitation, lost profits or loss or damage to data arising
out of the use or inability to use this manual, even if Virtulive or its suppliers have been
advised of the possibility of such damages.
▪
Virtulive and the Virtulive logo are trademarks or registered trademarks of Virtulive and/or its
affiliates in the U.S. and other countries. To view a list of Virtulive trademarks, go to this URL:
www.Virtulive.com/go/trademarks. Third-party trademarks mentioned are the property of
their respective owners. The use of the word partner does not imply a partnership
relationship between Virtulive and any other company.
▪
Any Internet Protocol (IP) addresses and other information used in this document are not
intended to be actual addresses. Any examples, command display output, and figures
included in the document are shown for illustrative purposes only. Any use of actual IP
addresses in illustrative content is unintentional and coincidental.

2Introduction
This document is intended to serve as a guide to professional installers to ceiling mount the VOJAS
using the VOJAS Ceiling Mount Kit.
VOJAS is an integrated, multipurpose collaboration device that brings together all elements of
collaboration into a single portable device. VOJAS is designed ground up around the requirements of
the education sector. It provides a simple and cost-effective way to take the traditional classroom
into the digital domain and reach out to students anywhere in the world.
VOJAS uses the cutting-edge technology, engineering, and innovation to bring together the
features of video conferencing, digital projection, video streaming, two-way audio communication,
audio video recording, and high-speed computing into a single affordable, portable device that
enables real-time collaboration between diverse participants.

VOJAS Installation Manual
the equipment.
Connecting to power supplies outside the operating range can result in damage to
Caution:
Warning: Operating without earthing can result in serious injury to users and damage to
equipment.
3.1
VOJAS Components
VOJAS comes with all the necessary components to instantly convert your space into a virtual and
digital classroom. Your VOJAS should be accompanied by the following:
Figure 1. In The Box
1. VOJAS
2. Power Adapter
3. Power Cord
4. Remote Commander & 2 cells
5. IR Pen & Charging Cable (2 number)
6. Quick Set up guide
7. Kensington Cable Lock & Keys
Note –Please contact Virtulive Customer Service or your sales representative if you find any component missing.
Please visit : http://support.virtulive.com/ Or https://www.virtulive.com/ for support
3.2
Before You Begin - Pre-Requisites
3.2.1
Power Supply
▪
Voltage - VOJAS is designed to be operate on AC voltages between 110V and 240V. It
needs a maximum of 5amps of current to operate.
▪
Earthing - VOJAS requires a grounded or earthed power supply for user safety.

VOJAS Installation Manual
Caution: Sudden power outages can damage the electronics and cause software problems.
covers installed.
Covers are integral part of safety design of the product. Do not operate without the
Warning:
adequate protection can result in equipment failure or even injury to users.
The device is not protected against power spikes. Operating the equipment without
Warning:
permanent damage to the electronics.
Exposing the device to direct sunlight or extreme temperatures can cause
Caution:
damage to the equipment.
Exposing the device to water or excessive humid conditions can cause permanent
Caution:
performance and/or cause permanent damage to the equipment.
Exposing the device to very dusty or smoky environments can reduce the
Caution:
▪
UPS –Uninterruptable Power Supply - VOJAS requires an uninterruptible power supply,
sudden outages of power without following the proper Shut Down procedure can damage
the equipment and the operating system of the device.
▪
Protection - VOJAS needs the power supply to be protected against over voltage and short
circuits, it does not have internal protection against these conditions. It can result in
permanent damage to the device and even injury to users in close proximity.
3.2.2
Projection Surface
VOJAS needs an external projection surface, for permanent installation a fixed or retractable
screen designed for a wide aspect ratio (16:9) projector is recommended.
3.2.3
Internet Connectivity
Though VOJAS can operate as a standalone device it is most effective when connected to the
internet and the SmartSpace. It requires an internet connection with a minimum bandwidth of 1MBPS.
VOJAS offers multiple connectivity options to connect to a network including wired LAN (RJ45), Wi-
Fi, 4G GSM.
3.2.4
Operating Environment
▪
Heat - The VOJAS is designed to be operated across a wide range of temperatures
between 0º C to 40º C and has internal cooling fans to maintain a safe operating temperature.
It is still advised to avoid exposures to very high temperatures or direct sunlight as it might
lead to preventive shutdowns.
▪
Humidity - The VOJAS is designed to operate indoors in a controlled environment.
Excessive humidity in the environment can cause internal short circuiting due to
condensation and damage the electronics.
▪
Dust - Do not expose the VOJAS to very dusty environments. Dust can clog the ventilation
passages and can contaminate the projection optics.
▪
Ventilation - The projector lamp and the electronics generate a lot of heat during normal
operation, the equipment may feel warm to touch when in use. Air is circulated through the
device through the ventilation ducts on either side, these ducts must be kept free from

VOJAS Installation Manual
It may also cause damage to the electronics or the lamp.
Obstructing the ventilation ducts may cause the device to overheat and shutdown.
Caution:
obstruction. Do not place or mount the device so as to obstruct free flow of air to the
ventilation ducts. The Power Adaptor will also generate heat and must be placed in a well-
ventilated area.
▪
Ambient Light - VOJAS is most effective if used in an area with controlled ambient lighting
like most projectors, very bright environments can affect the on-screen visibility.
3.3 Getting to know your VOJAS
3.3.1
Identifying your device
The identification plate is located at the bottom of the device. It will contain details that will help
identify your device and its make.
▪
Product: The model name and version of your hardware device
▪
Serial No: Unique identifier for each device
Figure 2. Identification Plate
These details need to be quoted in all communication with the company regarding service or
warranty.
VOJAS Installation Manual
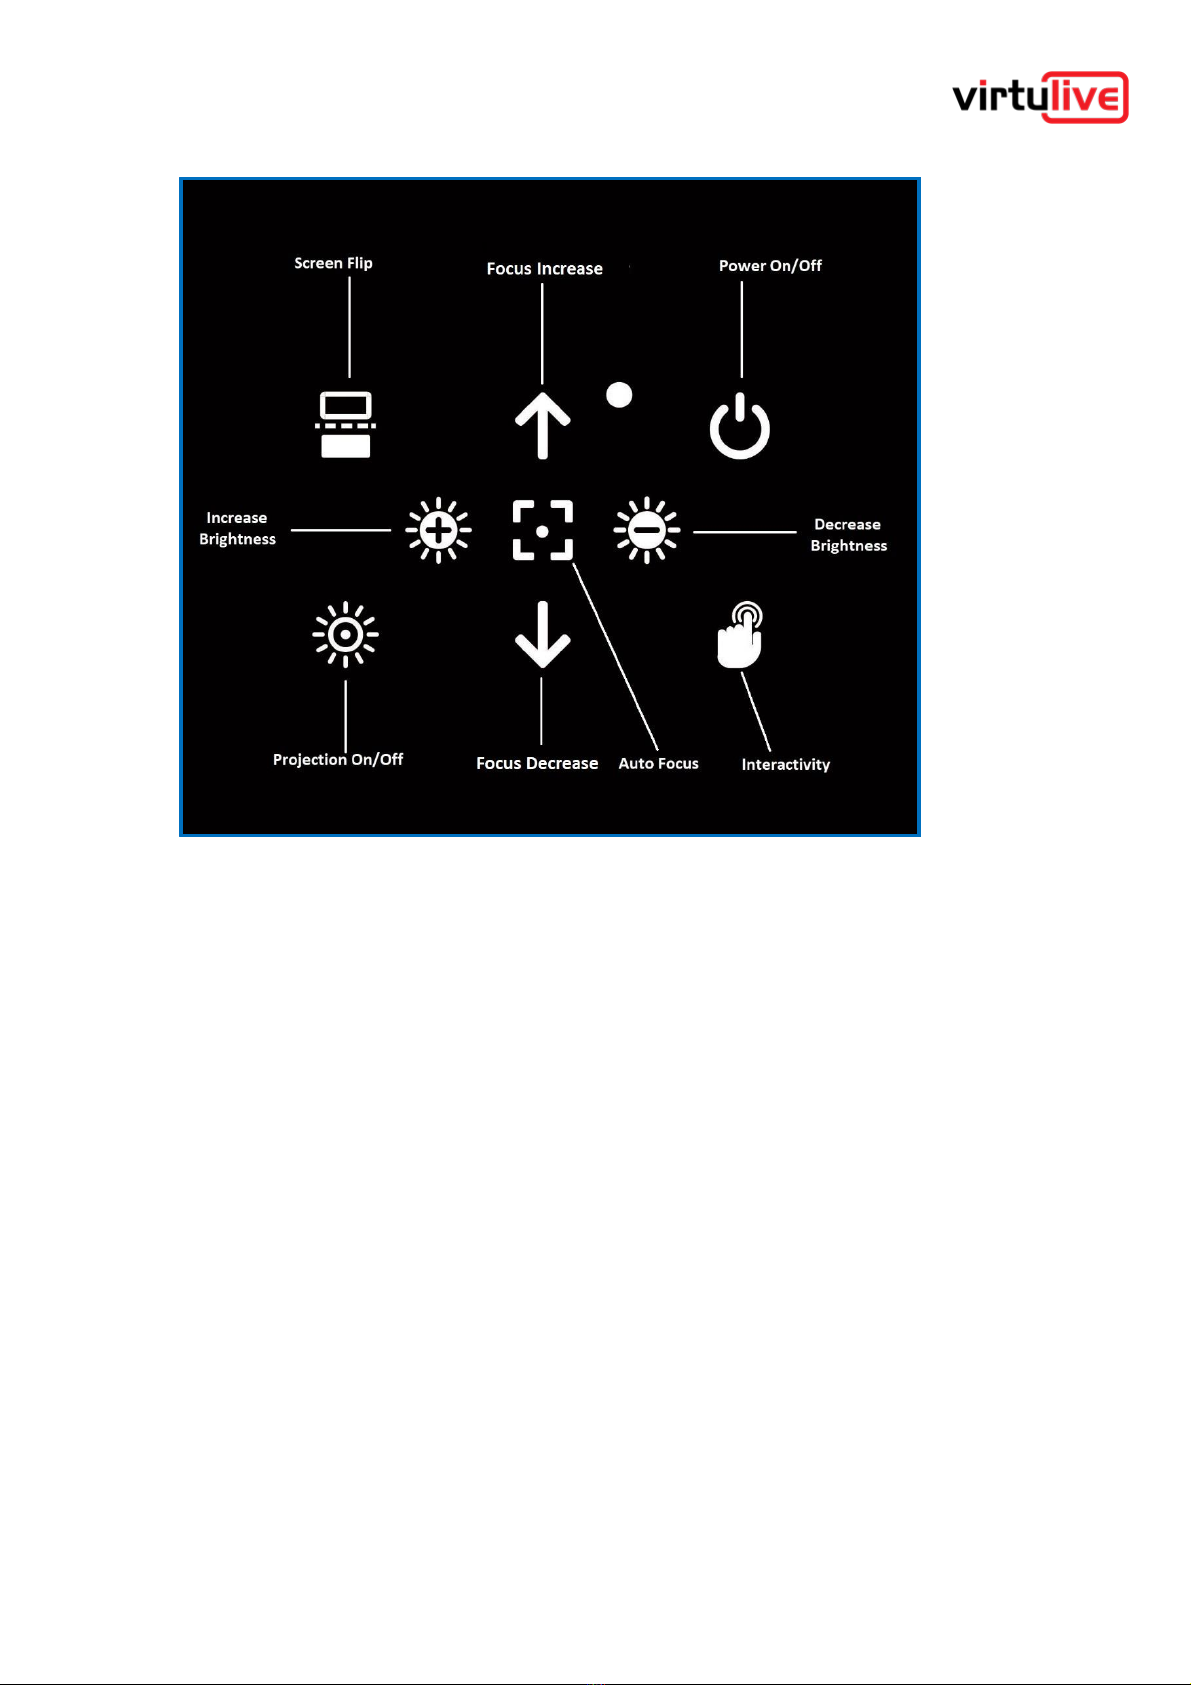
3.3.2
Top Panel & Controls
Figure 3. Top Panel

VOJAS Installation Manual
3.3.3
Front Right View
Figure 4. Front Right View
The diagram shows a Front Right view of the device:
1. Lens
2. Auto Focus Sensor
3. Front Camera
4. Interactivity Sensor
5. Microphone
6. Cooling Fan Vents

VOJAS Installation Manual
3.3.4
Rear & Left View
Figure 5. Rear Left View
7. Speakers
8. Rear Camera
9. Infrared Sensor
10. Kensington lock slot
11. Connectivity Panel
Andere Handbücher für VOJAS
1
Inhaltsverzeichnis
Andere Virtulive Projektor Handbücher

Beliebte Projektor Handbücher anderer Marken


Panasonic
Panasonic PTL735NTU - LCD PROJECTOR-NETWORK IB Bedienungsanleitung

NEC
NEC NP600S EDU Bedienungsanleitung

BenQ
BenQ SH753P Bedienungsanleitung

Eiki
Eiki EK-623U series Bedienungsanleitung

Epson
Epson PowerLite Pro Cinema 6020UB Bedienungsanleitung

Epson
Epson PowerLite Home Cinema 705HD Bedienungsanleitung


