
Vogue CE038 Bedienungsanleitung

Can Opener
Instruction Manual
Blikopene
r
Handleiding
Ouvre-boîtes rotatif
Mode d’emploi
Dosenöffner mit
Drehmechanismus
Bedienungsanleitung
Apriscatole rotativo
Manuale di istruzioni
Abrelatas giratorio
Manual de
instrucciones
Abre-latas rotativo
Manual de instruções
1
Model Modèle
Modell
Modello
Modelo
Malli:
CE038 CE039

Table of Contents
3
6
9
12
15
18
21
Declaration Of Conformity 25
2
Telephone Helpline 0845 146 2887
Safety Tips
•Position on a flat, stable surface.
•A service agent/qualified technician should carry out installation and any repairs if required. Do not remove any
components on this product.
•Consult Local and National Standards to comply with the following:
oHealth and Safety at Work Legislation
oBS EN Codes of Practice
•Keep all packaging away from children. Dispose of the packaging in accordance to the regulations of local
authorities.
•Can rims must be straight before using with this product - it may be necessary to straighten the rim with a pair
of pliers
•Regularly check the can opener for wear (damaged or worn blades can cause fragmentation of can lids which
may enter the can contents)
•Always ensure that the can opener clamp and platform are securely attached to the work surface
Product Description
CE038 – Rotary Can Opener
CE039 – Rotary Can Opener
Introduction
Please take a few moments to carefully read through this manual. Correct maintenance and operation of this appliance
will provide the best possible performance from your VOGUE product.
Pack Contents
Rotary Can Opener Table Clamp & platform
Assembly
1. Attach the clamp to a sturdy work surface
2. Ensure that there is room on the work surface for the can to be rotated
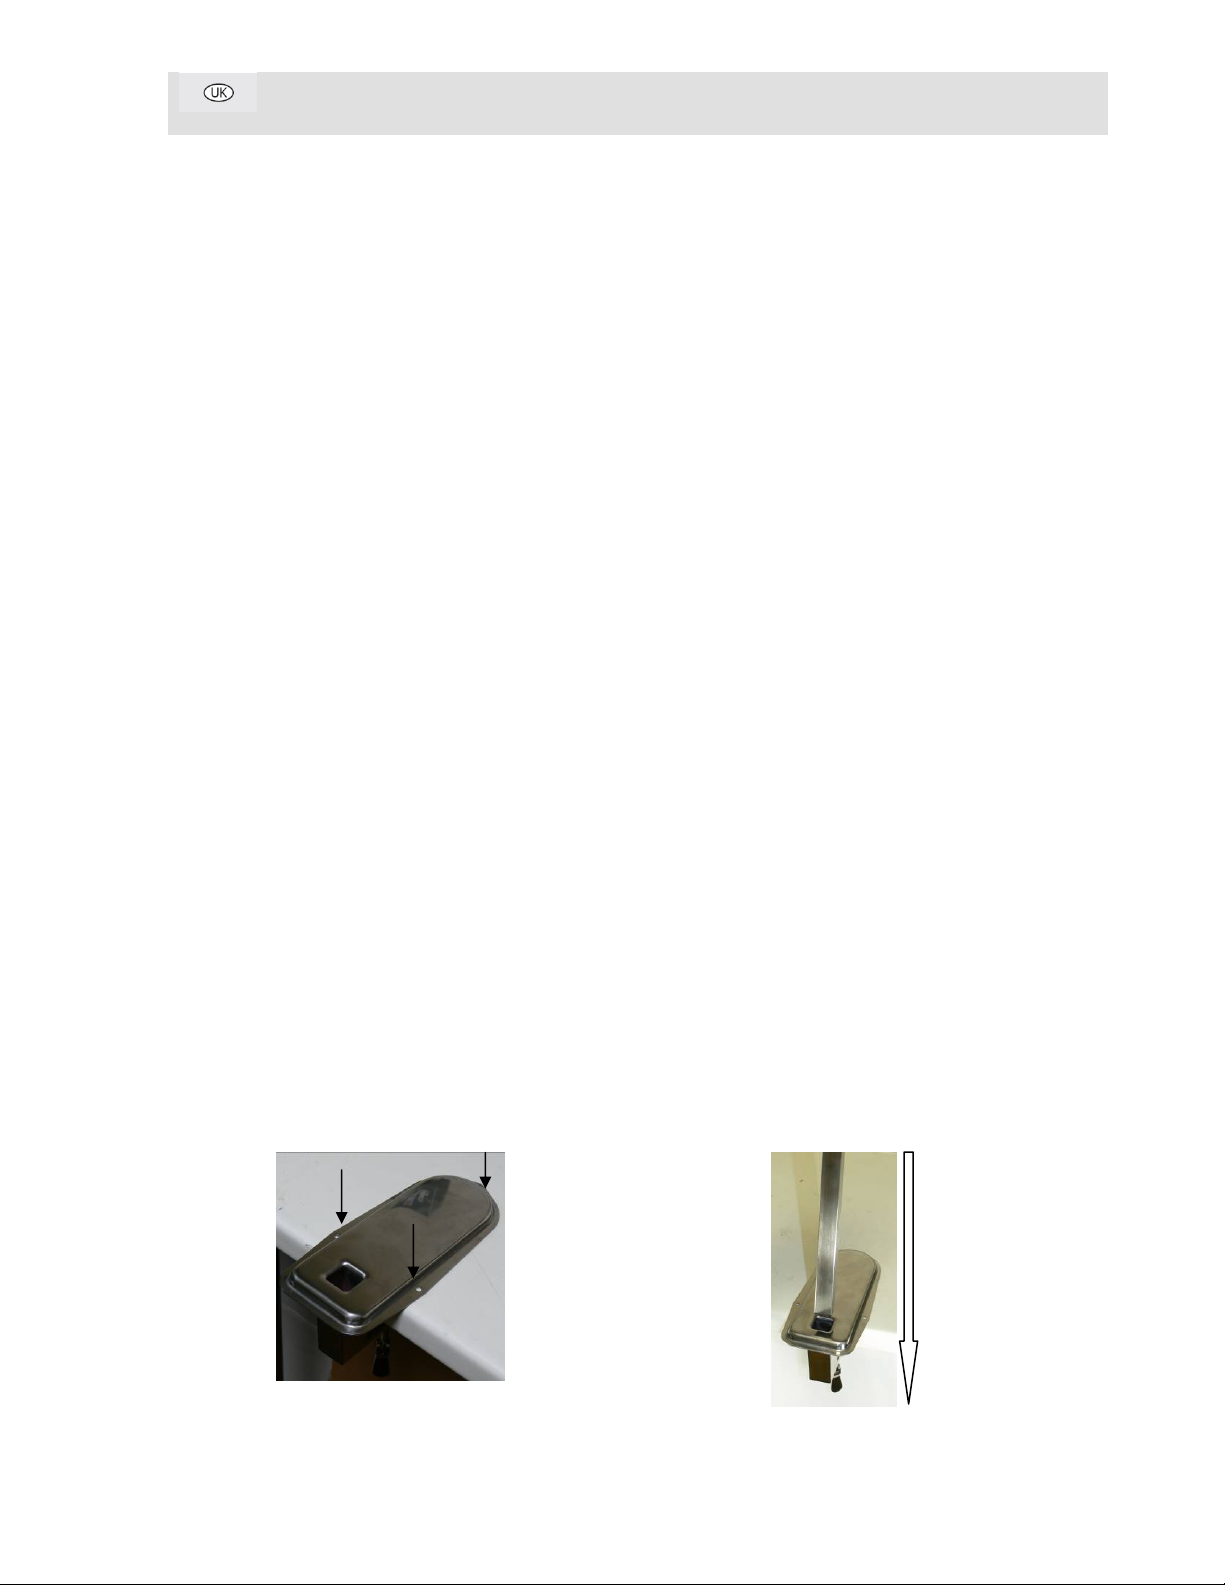
3. For permanent attachment the platform of the clamp should be screwed to the work surface (
figure 1
)
4. Slide the post of the can opener through the opening of the clamp platform, with the blade assembly facing the work
surface (
figure 2
)
Figure 1
Figure 2
3
Telephone Helpline 0845 146 2887
Operation
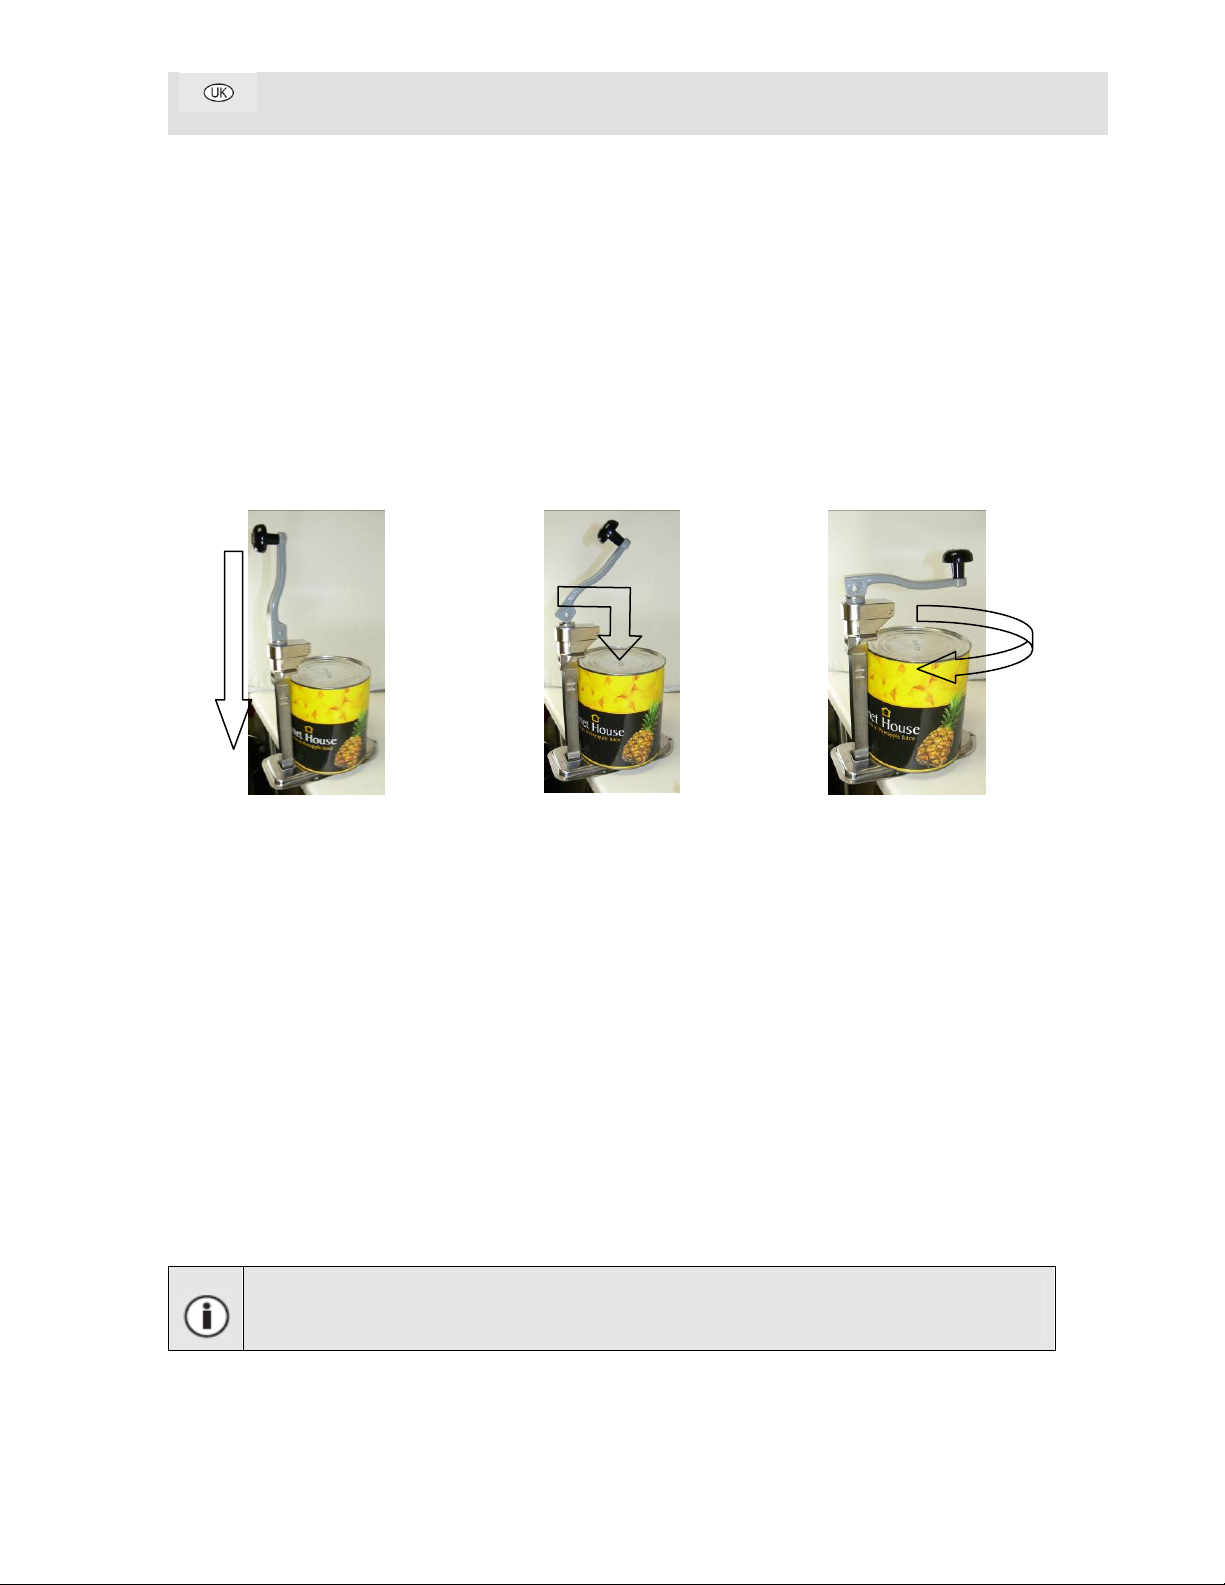
1. Locate the can on the platform; with the grey handlebar upright, firmly stab the can opener down to ensure that the
blade punctures the lid of the can (
figure 3
)
2. Once the blade has punctured the rim, bring the grey handle bar down (
figure 4
); this will grip the rim of the can to
the cog of the can opener
3. Once the can has been gripped in position, turn the handle clockwise to allow the rim of the lid to pass under than
can opener blade
(figure 5)
4. Raise the handle to release the can, and remove from the can opener
Figure 3 Figure 4 Figure 5
Blade replacement (product code AC980)
5. To replace the blade, unscrew the two screws and pull the blade down (pliers may be required to get a grip on the
sides of the blade). Replacement is the reverse of removal
Cog Replacement (product code AC981)
6. To remove the cog, place the can opener in the clamp, with the handle down
7. Place a flat bladed screwdriver in the gap to the right of the rear of the cog (operator side of the can opener)
8. Turn the handle anti-clockwise: the screw driver will prevent the cog moving, and the handle will continue to turn
until it can be lifted clear, releasing the cog.
9. Place the replacement cog in the slot, then replace the handle into the can opener, turning clockwise until the cog
begins to turn
Note: Ensure that the text on the cog is facing up
4

Telephone Helpline 0845 146 2887
Cleaning, Care & Maintenance
98
98
•Regularly check that there is no wear or damage to the blade
•Check the cog for wear to the teeth
•Check that the clamp and platform are securely attached
•Clean regularly using hot water. Always remove any residues. This
can discolour the surfaces.
•Never leave the surface damp as this can cause discolouration
•Parts do not require machine oil or grease; however cog and blade will
obtain some additional protection by the application of foodsafe
mineral oil
Troubleshooting
If your Vogue appliance develops a fault, please check the following table before making a call to the Helpline.
Fault Probable Cause Action
Can slipping whilst turning Cog worn Replace cog
Can opener lifting out of can Can opener at incorrect angle Adjust to ensure can opener is slightly
tilted to the left
Lid not removed cleanly Blunt or damaged blade Check blade and replace if necessary
Technical Specifications
Model Max. Can
Height
Dimensions
h x w x d mm Weight
CE038 14” 540 x 250 x 110 1.80 Kg
CE039 23” 780 x 250 x 110
2.00 Kg
5

Klatentenondersteuning 040-2628080 (Nederland) 050-609999 (België)
Veiligheidstips
•Plaatsen op een geschikt oppervlak
•De installatie en eventuele reparaties zijn door een servicetechnicus/vaktechnicus uit te voeren. Verwijder geen
componenten of servicepanelen van dit product
•.Raadpleeg en volg de plaatselijke en nationale regelgeving op m.b.t. tot het volgende:
oWetgeving van gezondheid en veiligheid op de werkplaats
oWerkregels
•Laat verpakkingsmateriaal niet binnen handbereik van kinderen. Verpakkingsmateriaal in overeenstemming met
de regelgeving van de plaatselijke overheden als afval laten verwerken.
•Om deze blikopener te gebruiken moet de blikrand recht zijn – het kan nodig zijn om de blikrand met een tang
recht te maken
•Controleer regelmatig de blikopener op slijtage (beschadigde of versleten messen kunnen blikdeksels
beschadigen waardoor stukjes blik in de blikinhoud terecht zouden kunnen komen.
•Zorg altijd dat de klem en de basis van de blikopener goed aan het werkoppervlak zijn bevestigd.
Productbeschrijving
CE038 – Blikopener
CE039 – Blikopener
Inleiding
Neem de tijd en lees deze handleiding aandachtig door. Een correct gebruik en onderhoud van deze
machine waarborgt de beste prestatie van uw VOGUE product..
Verpakkingsinhoud
Blikopener Tafelklem & basis
Montage
1. Bevestig de klem op een stevig werkoppervlak
2. Zorg dat er op het werkoppervlak voldoende ruimte is voor het ronddraaien van het blik.
3. Voor een permanente bevestiging dient men de basis van de klem op het werkoppervlak vast te schroeven (
figure 1
)
4. Schuif de steun van de blikopener door de opening van de klembasis en met het snijmechanisme in de richting van
het werkoppervlak. (
figure 2
)
Figure 3
Figure 4
6

Klatentenondersteuning 040-2628080 (Nederland) 050-609999 (België)
Werking
1. Plaats het blik op de basis en met de hendel in verticale positie drukt u blikopener nu met kracht naar beneden zodat
het mes de deksel van het blik perforeert. (
figure 3
)
2. Nadat het mes de blikrand heeft geperforeerd, laat u de hendel op 90° dalen tot aan de draaipositie (
figure 4
);.
Hierdoor wordt de blikrand door het tandwiel van de blikopener gegrepen.
3. Open het blik door de hendel naar rechts te draaien totdat de deksel volledig is verwijderd. (
figure 5
)
4. Breng de hendel omhoog om het blik los te laten en uit de blikopener te halen.
Figure 3 Figure 4 Figure 5
Mes vervangen (productcode AC980)
5. Om het mes te vervangen draait u de twee schroeven los en trekt u het mes naar beneden (gebruik een tang om
een goede grip aan beide kanten van het mes te krijgen). De plaatsing van het nieuwe mes wordt in de
omgekeerde volgorde uitgevoerd
Tandwiel vervangen (productcode AC981)
6. Plaats de blikopener in de klem met de hendel naar beneden om het tandwiel te verwijderen
7. Steek een platte schroevendraaier in de opening, rechts aan de achterzijde van het tandwiel (bedieningszijde van de
blikopener)
8. Draai de hendel naar links: de schroevendraaier voorkomt dat het tandwiel draait en de hendel blijft nu draaien
totdat deze los komt waardoor het tandwiel te verwijderen is.
9. Plaats het nieuwe tandwiel in het slot, zet de hendel opnieuw op de blikopener en draai deze naar rechts totdat het
tandwiel begint te draaien
Omerkring: Zorg dat de tekst op het tandwiel naar boven gericht staat
7

Klatentenondersteuning 040-2628080 (Nederland) 050-609999 (België)
Reiniging, zorg & onderhoud
98
•Controleer regelmatig het mes op slijtage en beschadiging
•Controleer de tanden van het tandwiel op slijtage
•Controleer of de klem en de basis goed zijn bevestigd
•Reinig de blikopener met heet water en een borstel. Spoel de
blikopener met schoon water na omdat resten van reinigingsmiddelen
de duurzaamheid kunnen beïnvloeden.
•Blikopener goed droogmaken.
•Ondanks het feit dat de smering van bewegende delen niet vereist is,
kan men de getande contactoppervlakken met plantaardige olie
beschermen.
Oplossen van problemen
Indien er een storing van uw VOGUE product optreedt, dient u de onderstaande tabel te raadplegen
alvorens contact op te nemen met uw VOGUE dealer of de Hulplijn te bellen.
Probleem Mogelijke oorzaak Handeling
Blik slipt door tijdens het draaien Tandwiel versleten Vervang het tandwiel
Blikopener springt uit het blik Blikopener staat in een verkeerde hoek Pas de hoek van de blikopener aan, zodat
deze iets naar links staat
Deksel wordt niet geheel verwijderd Bot of beschadigd mes Mes controleren en indien nodig
vervangen
Technische specificaties
Model Max.
blikhoogte
Inhoud
h x w x d mm Gewicht
CE038 14” 540 x 250 x 110 1.80 Kg
CE039 23” 780 x 250 x 110
2.00 Kg
8

Standard d’assistance téléphonique 01 64 89 73 61 (Français) 050-609999 (Belgique)
Conseils de sécurité
•Cet appareil doit être posé sur une surface garantissant sa stabilité.
•L'installation et les éventuelles réparations doivent être confiées à un dépanneur / technicien qualifié. Ne
retirez aucun composant ou cache de ce produit.
•Consultez les normes locales et nationales pour vous conformer aux :
olois sur l'hygiène et la sécurité au travail ;
ocodes de bonnes pratiques BS EN
•Gardez les emballages hors de portée des enfants. Débarrassez-vous des emballages conformément aux
règlements des autorités locales.
•Vérifiez que les bords des boîtes sont intacts avant d’utiliser ce produit – vous pourriez devoir les redresser à
l’aide d’une pince.
•Vérifiez régulièrement l’ouvre-boîtes à la recherche de signes d’usure (une lame endommagée ou usée peut
entraîner le déchirement des couvercles de boîtes de conserve, dont des fragments pourraient tomber dans le
contenu de la boîte).
•Veillez toujours à ce que la pince de l’ouvre-boîtes et son socle de fixation soient bien reliés au plan de travail.
Description du produit
CE038 – Ouvre-boîtes rotatif
CE039 – Ouvre-boîtes rotatif
Introduction
Nous vous invitons à consacrer quelques instants à la lecture attentive de ce manuel. L'entretien et
l'utilisation appropriés de cet appareil vous permettront de tirer le meilleur de votre produit VOGUE.
Contenu de l'emballage
Ouvre-boîtes rotatif Pince et socle de fixation
Montage
1. Fixez la pince sur un plan de travail stable.
2. Désencombrez le plan de travail, pour être sûr d’avoir suffisamment de place pour faire tourner la manivelle.
3. Pour une installation permanente de l’ouvre-boîtes, vissez la pince sur le plan de travail
. (figure 1)
4. Passez la tige de l’ouvre-boîtes à travers l’ouverture du socle de fixation, ensemble lame tourné vers le plan de
travail
. (figure 2)
Figure 5
Figure 6
9

Standard d’assistance téléphonique 01 64 89 73 61 (Français) 050-609999 (Belgique)
Operation
1. Posez la boîte de conserve sur le socle de fixation et, après avoir placé la manivelle à la verticale, poignardez
fermement le dessus de la boîte avec l’ouvre-boîtes pour que sa lame perce le couvercle. (figure 3)
2. Quand la lame a traversé le bord intérieur du couvercle, baissez la manivelle à 90o pour la mettre dans sa position
de rotation (figure 4) ; ceci aura pour effet de caler le bord de la boîte de conserve contre la roue dentée de l’ouvre-
boîtes.
3. Ouvrez la boîte de conserve en faisant tourner la manivelle dans le sens horaire, jusqu’au détachement du couvercle
(figure 5).
4. Levez la manivelle pour libérer la boîte de conserve et retirez-la de l’ouvre-boîtes.
Figure 3 Figure 4 Figure 5
Remplacement de la lame (référence produit AC980)
5. Pour changer la lame, dévissez les deux vis et tirez sur la lame (utiliser une pince facilite la saisie des bords de la lame). Pour
remonter une lame, inversez la procédure de retrait.
Remplacement de la roue dentée (référence produit AC981)
6. Pour retirer la roue dentée, placez l’ouvre-boîtes dans la pince, poignée rabaissée.
7. Placez un tournevis à lame plate dans la fente située à droite, à l’arrière de la roue dentée (côté utilisateur de
l’ouvre-boîtes).
8. Faites tourner la manivelle dans le sens anti-horaire : le tournevis immobilise la roue dentée et vous pouvez faire
tourner la manivelle jusqu’au détachement de cette dernière, libérant la roue dentée.
9. Placez la roue dentée de rechange dans la fente, puis remettez la manivelle dans l’ouvre-boîtes en tournant dans le
sens horaire jusqu’à ce que la roue commence à tourner.
Remarque: Veillez à ce que le texte de la roué dentée soit tourné vers le haut
10
Dieses Handbuch passt für folgende Modelle
1
Inhaltsverzeichnis
Sprachen:
Beliebte Dosenöffner Handbücher anderer Marken


Hamilton Beach
Hamilton Beach 76606 - Pop-Top Electric Can Opener Bedienungsanleitung

Kalorik
Kalorik USK DO 36918 Bedienungsanleitung

Black & Decker
Black & Decker CO451 Montageanleitung

Hamilton Beach
Hamilton Beach Walk-n-Cut 76503 Bedienungsanleitung

Hamilton Beach
Hamilton Beach 76370 - Extra Tall Can Opener Bedienungsanleitung

Kenwood
Kenwood CA-P70 Bedienungsanleitung


