Zenmuse H3-3D Gimbal Bedienungsanleitung

©2014 DJI Innovations. All Rights Reserved.
ZENMUSE H3-3D Gimbal
User Manual V1.00
2014.03.20
www.dji.com

©2014 DJI Innovations. All Rights Reserved.
Warning & Disclaimer
H3-3D gimbal is calibrated before delivery, no adjustment or modification to the
gimbal is allowed.
Ensure the camera is mounted to the gimbal before powering the aircraft.
H3-3D gimbal is finely calibrated according to the specified camera model and lens before the delivery. User does
not need to perform extra calibration. Do not attempt to modify the gimbal or mount extra component/device (such
as filter, lens hood, etc.) to the camera; be sure to use the DJI approved battery; otherwise it may affect the
performance of the gimbal.
The H3-3D gimbal is compatible with following DJI flight control system: NAZA-M, NAZA-M V2, WooKong-M and
Phantom 2 and A2. To optimize the gimbal performance, download the above mentioned Assistant Software and
upgrade the firmware of the flight control system.
Make sure the flight control system is operating in the safest manner. We strongly recommend customers to remove
all propellers before powering the aircraft, use power supply from R/C system or flight pack battery, and keep
children when calibrating and configuration the gimbal. Observe the procedures contains in this manual to mount and
connect gimbal on your aircraft. User of this product shall respect the AMA’s National Model Aircraft Safety Code.
DJI Innovations has no control over use, setup, final assembly, modification (including use of non-specified DJI parts
i.e. motors, ESCs, propellers, etc.) or misuse, no liability shall be assumed nor accepted for any resulting damage or
injury. By the act of use, setup or assembly, the user accepts all resulting liability. DJI assumes no liability for damage(s),
injuries or legal responsibilities incurred directly or indirectly from the use of this product.
DJI and H3-3D are registered trademarks of DJI Innovations Names of product, brand, etc., appearing in this manual
are trademarks or registered trademarks of their respective owner companies. This product and manual are
copyrighted by DJI Innovations with all rights reserved. No part of this product or manual shall be reproduced in any
form without the prior written consent or authorization of DJI Innovations. No patent liability is assumed with respect
to the use of the product or information contained herein.
Profile
The H3-3D gimbal offers excellent stabilization features for aerial hobbyist and professional aerial
photographers. Powered by built-in IMU (Inertial Measurement Unit) and special servo module, this gimbal
provide unique stable quality visual experience for the users.

©2014 DJI Innovations. All Rights Reserved. 3
In The Box
Gimbal×1
Built-in servos and stand-alone IMU provide yaw, roll and tilt
stabilization. Integrated bottom damping plate minimizes
installation time.
Damping Unit×1
The upper plate of the damping unit connects the gimbal with the
Phantom 2. Pre-installed vibration absorbers greatly reduce the
vibrations.
Gimbal Controller Unit (GCU)×1
Connect gimbal controller to flight control system using CAN-Bus.
Power GCU and gimbal through 3S~6S power cable.
3
Accessory Pack ×1
The accessory pack includes: vibration absorbers, securing pins and
washers, screws and connection cables.
DJI
Accessory Pack –Spare Vibration Absorbers x4
Spare vibration absorbers for damping unit with 40〬of rigidity.
Accessory Pack –Securing kits x4
Spare securing kits that are used to secure the upper and bottom
plate of the damping unit.
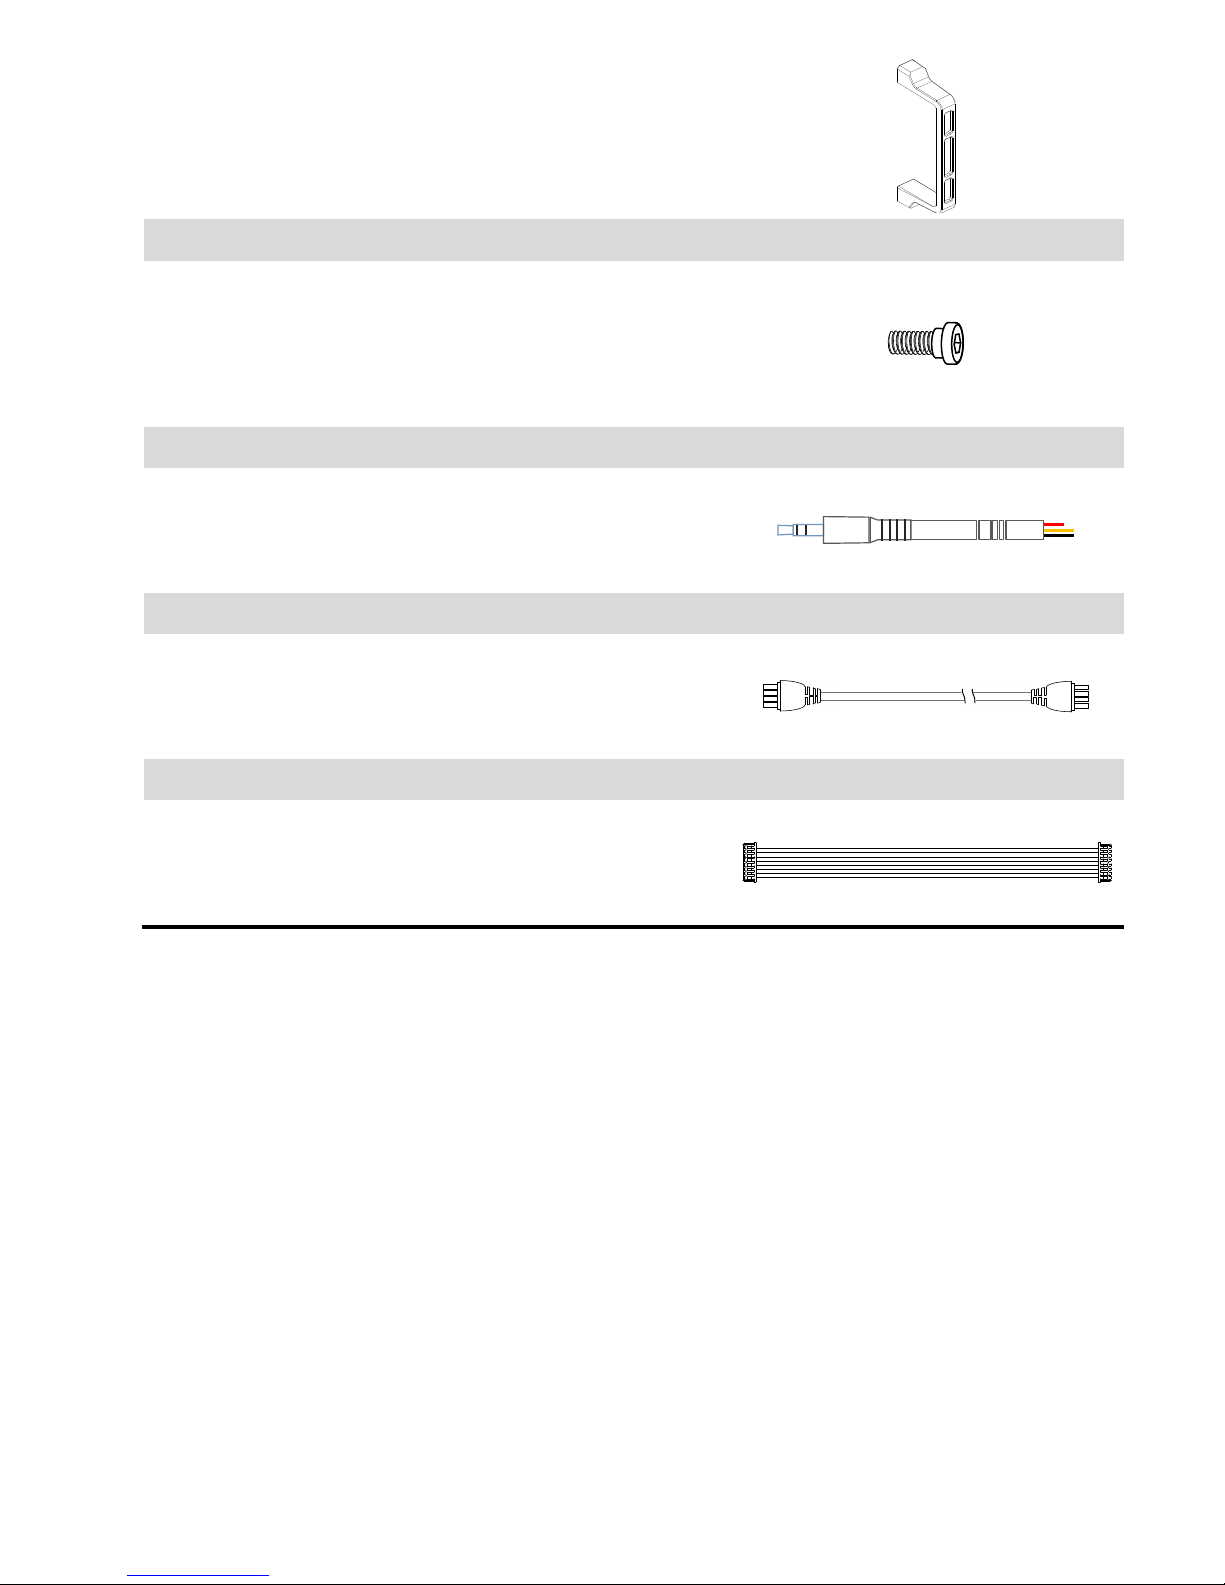
Accessory Pack –Camera securing bracket x1

©2014 DJI Innovations. All Rights Reserved. 4
Camera mounting bracket.
Accessory Pack –Spare Screws ×1
M2.5x6.3:Mounting camera to gimbal.
M2.5x5:Secure gimbal to damping unit.
M3x8:Securing gimbal to aircraft.
Accessory Pack –Gimbal Video signal Cable ×1
For the gimbal controller unit and your wireless video transmission
module connection, transmitting the video signal.
Accessory Pack –CAN-Bus Cable×1
Use CAN-Bus to connect the GCU with the flight control system.
DJI
DJI
Accessory Pack –8-Pin Cable×1
Connect to Phantom 2 or G8 port of GCU.

©2014 DJI Innovations. All Rights Reserved. 5
Table of Content
WARNING & DISCLAIMER ...............................................................................................2
PROFILE ..........................................................................................................................2
IN THE BOX .....................................................................................................................3
TABLE OF CONTENT ........................................................................................................5
1 INSTALLATION ..............................................................................................................6
1.1 GIMBAL DESCRIPTION.......................................................................................................6
1.2 INSTALL H3-3D TO PHANTOM 2.........................................................................................7
1.3 CAMERA INSTALLATION .....................................................................................................8
1.4 FINAL CHECKS ...............................................................................................................10
2 GCU CONNECTION .....................................................................................................10
2.1 CONNECT GCU AND FLIGHT CONTROL SYSTEM ...................................................................11
2.2 VIDEO CONNECTION.......................................................................................................14
3 CONFIGURATION .......................................................................................................15
3.1 DRIVER AND ASSISTANT SOFTWARE INSTALLATION ................................................................15
3.2 ASSISTANT SOFTWARE GUI..............................................................................................15
3.3 CHANNEL SETTING .........................................................................................................15
3.4 FIRMWARE &SOFTWARE UPGRADE ..................................................................................16
4 TEST FLY .....................................................................................................................17
4.1 CHECK LIST BEFORE FLIGHT .............................................................................................17
4.2 GIMBAL TEST ................................................................................................................17
APPENDIX.....................................................................................................................18
TROUBLE SHOOTING ............................................................................................................18
SETTINGS USING WITH THE A2 FLIGHT CONTROL SYSTEM............................................................18
SPECIFICATIONS...................................................................................................................20

©2014 DJI Innovations. All Rights Reserved. 6
1 Installation
1.1 Gimbal Description
Notes:
(1) Ensure the gimbal servos are unobstructed, failure to do so may damage the servo.
(2) Clear the obstacles at once if the operating gimbal is being blocked.
(3) Always mount camera before powering on the gimbal.
1.1.1 Rear View
11
12
13
14
16
17
18
15
1. Yaw servo driver module
2. Upper plate of damping unit
3. Vibration absorbers
4. Bottom plate of damping unit
5. Tilt servo driver module
6. Roll servo driver module
7. Camera mount
8. 8 pin connector port(to GCU/Phantom 2)

©2014 DJI Innovations. All Rights Reserved. 7
1.2 Install H3-3D to Phantom 2
Follow the below instructions to install the H3-3D gimbal to Phantom 2.
1. Insert one securing pins through the assigned holes then another diagonally opposite. Attach and secure
the upper plate to the Phantom 2 with four M2.5x5 screws.
1
12
2. Attach the damping unit bottom plate to upper plate using the four vibration absorbers. Ensure the lip of
the vibration absorbers are properly inserted through the mounting holes on the bottom plate.
3. Insert washers into securing pins to lock the damping unit in place.

©2014 DJI Innovations. All Rights Reserved. 8
4. Plug 8-Pin cable into the 8-Pin port on the gimbal.
Caution:
(1) Aircraft and accessories are not included with gimbal.
(2) Camera must be aligned with the nose of the aircraft.
(3) Gimbal is calibrated before delivery. Do not attempt to adjust or calibrate it yourself.
(4) Do not attempt to remove screws in the gimbal, which may result in reduced performance or even damages.
(5) Do not unplug any cable attaching to the gimbal ports, or change the mechanical structure of the gimbal.
1.3 Camera Installation
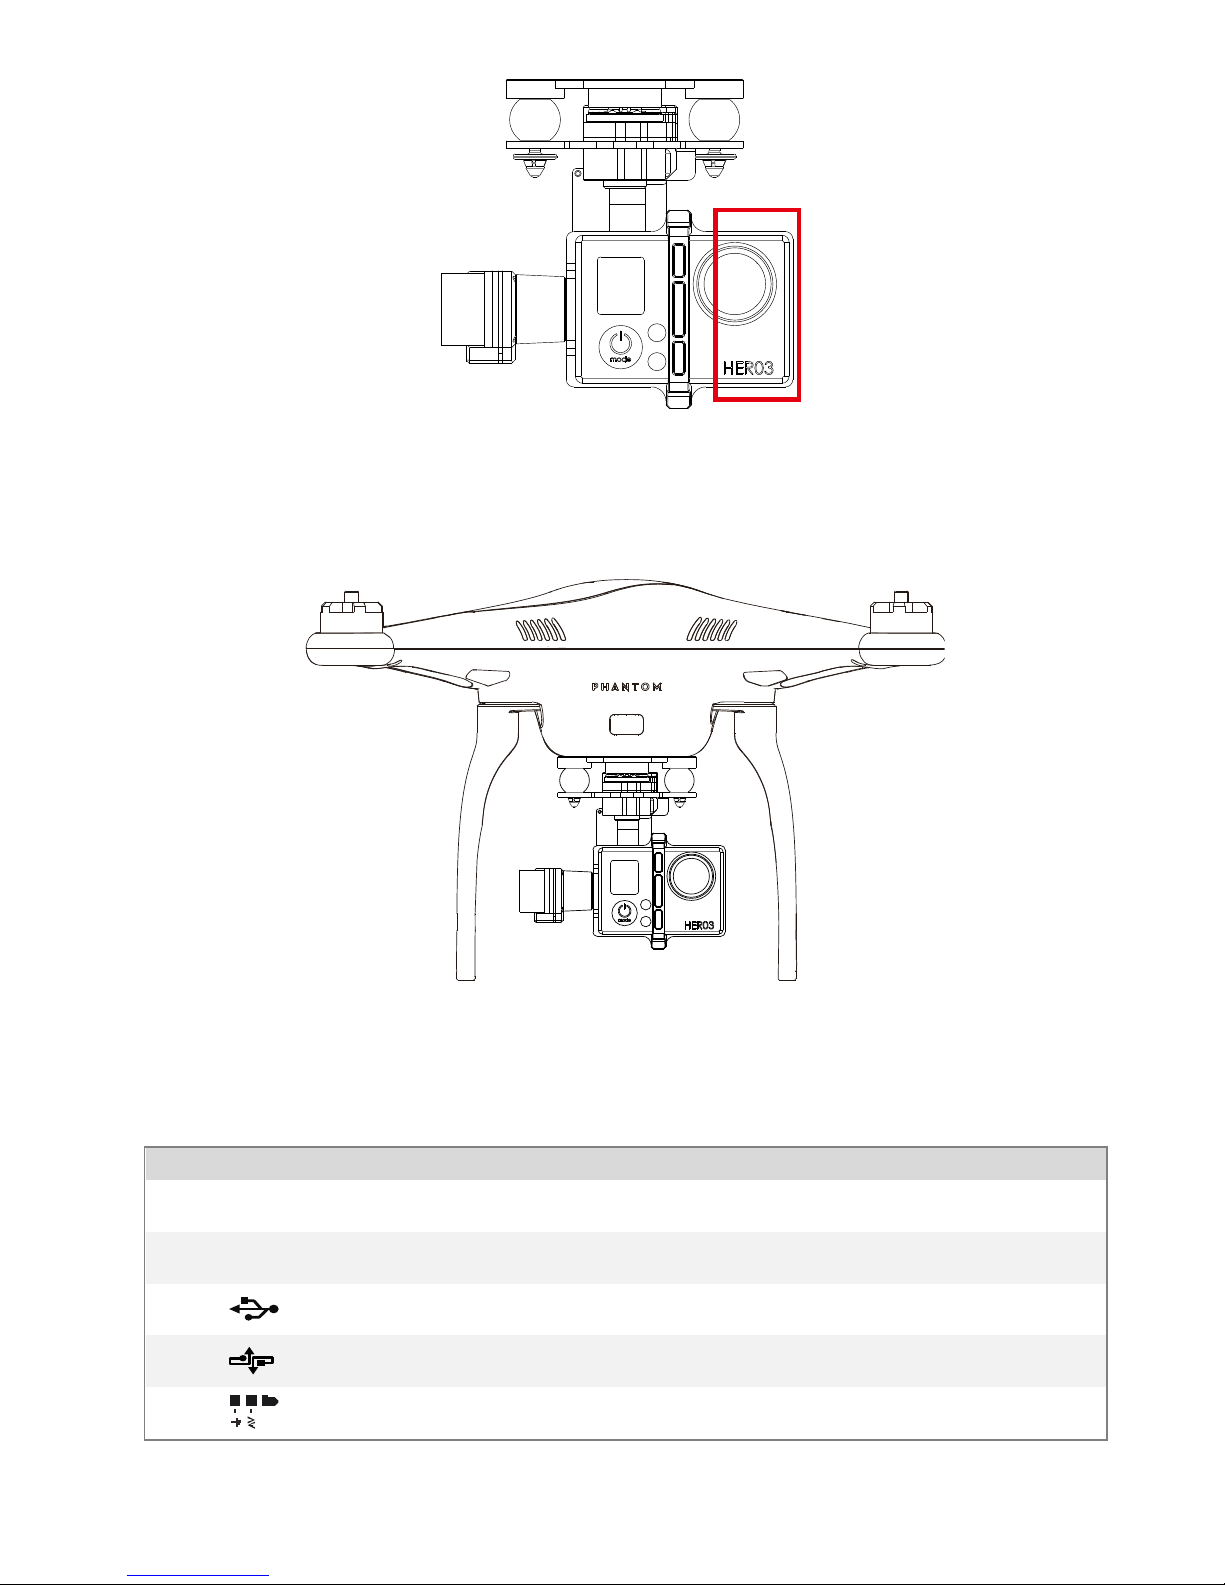
Follow the below instructions to mount the GoPro.

©2014 DJI Innovations. All Rights Reserved. 9
1. Insert one securing pine through the assigned hole on the damping unit upper plate then another
diagonally opposite. Attach the damping unit upper plate to the Phantom 2 with four M2.5x5
2. Press camera connector firmly onto the mounting dock connector highlighted in red.
3. Secure the mounting bracket using two M2.6x6.3 screws..
4. Take note of the camera connector’s location and avoid applying excessive forces to the highlighted area
when removing the camera.

©2014 DJI Innovations. All Rights Reserved. 10
1.4 Final Checks
Ensure the installed damping unit is aligned parallel with the Phantom 2.
2 GCU Connection
GCU Port Description
3S~6S
Connect to battery for GCU or gimbal power
G8
Connect to G8 pin port on the gimbal for signal transmission
Connect to PC to upgrade firmware using Assistant Software
Connect to flight control system
Connect to wireless video downlink module
Andere Handbücher für H3-3D Gimbal
2
Inhaltsverzeichnis
Andere Zenmuse Kamerazubehör Handbücher