3rd Power BRITISH DREAM 112 COMBO & HEAD Bedienungsanleitung
USERS GUIDE
112 COMBO & HEAD
45 W
20 W
POWER
OFF
S
T
D
B
Y
AMPLIFICATION
INPUT
VOLUME MIDDLETREBLE PRESENCEBASS
INPUT
OFF
VOLUME BRILLIANCE TOP CUT
BRITISH
DREAM
™
‘59 AC ‘68 Plexi
BRITISH
DREAM
™

2
Your 3RD POWER Amplifier is a professional musical instrument amplifier. The information
contained herein is current at the time of publication. However, specifications are subject to
change without prior notice.
PRECAUTIONS & WARNINGS
• READ THESE INSTRUCTIONS.
• KEEP THESE INSTRUCTIONS.
• HEED ALL WARNINGS.
• FOLLOW ALL INSTRUCTIONS.
• YOUR AMPLIFIER IS LOUD!
EXPOSURE TO HIGH SOUND VOLUMES MAY CAUSE PERMANENT HEARING DAMAGE !
Practice “safe listening.”
• No user serviceable parts inside. Refer service to qualified personnel. Always unplug AC
power before removing chassis.
• IF YOU INTEND ON OPERATING THIS EQUIPMENT OUTSIDE OF THE USA: Always insure
that unit is wired for proper voltage. Make certain all connections and grounding con-
forms with local standards. Make certain that you have obtained authorization to operate
prior to connecting to power supply.
• WARNING: Vacuum tube amplifiers generate heat. To insure proper ventilation always
make certain there is at least four inches (100mm) of space behind the rear of the ampli-
fier cabinet.
• Keep away from curtains or any flammable objects.
• WARNING: Do not block any ventilation openings on the rear or top of the amplifier. Do
not impede ventilation by placing objects on top of the amplifier which extend past the
rear edge of its cabinet.
• WARNING: Do not expose the amplifier to rain, moisture, dripping or splashing water. Do
not place objects filled with liquids on or nearby the amplifier.
• WARNING: Always make certain proper load is connected before operating the amplifier.
Failure to do so could pose a shock hazard and may result in damage to the amplifier.
• Do not expose amplifier to direct sunlight or extremely high temperatures.
• Always insure that amplifier is properly grounded. Always unplug AC power cord before
changing fuse or any tubes. When replacing fuse, use only same type and rating.
• Avoid direct contact with heated tubes. Keep amplifier away from children.
• Be sure to connect to an AC power supply that meets the power supply specifications
listed on the rear of the unit. Remove the power plug from the AC mains socket if the unit
is to be stored for an extended period of time. If there is any danger of lightning occurring
nearby, remove the power plug from the wall socket in advance.
• To avoid damaging your speakers and other music equipment, turn off the power of all
related equipment before making the connections.
• Do not use excessive force in handling control buttons, switches and controls. Do not
use solvents such as benzene or paint thinner to clean the unit. Wipe off the exterior with
soft cloth.

3
™
Thank you for choosing 3RD
POWER as an integral compo-
nent of your musical journey.
Music is a thrilling blend of
tone, attitude and technique.
When the right combination
occurs, magic happens and it’s
experienced by everyone.
I’ve had the extraordinary
privilege of performing music for 30 years on stage and in the studio.
As the principal visionary of the company, every product we design re-
flects my energy, attitude and life experiences.
Each amplifier we create is designed to help you tell your musical story
- IN 3D!!!
Rock on!
- James Scott
MOVING FORWARD... IN 3D

4
Special Features:
• Hand-built and hand-wired in the USA
• Dual Channel All-Tube design
• Selectable 45W/20WEL34 Power Amp section
• ’59 AC’ Channel EF86 Preamp Pentode topology with Volume, Bril-
liance and High Cut controls
• ’68 Plexi’ Channel 12AX7 Preamp Triode topology with Volume,
Treble, Middle and Bass controls
• Global Presence control
• 112 Combo Version features patent-pending SWITCHBACK™
speaker enclosure design
Dimensions & Weights:
Subject to change anytime. Please measure your amp carefully if a Cus-
tom Case is being made. These measurements do not include handle
and rubber feet.
Dimensions (WxHxD): 25 x 22.85 x 10.5 in.
Weight: 57 lb.

5
Preparing to Operate your British Dream™
Make certain that all connections are made prior to operating your
British Dream™ Amplifier including power cable, speaker connection,
instrument cable and instrument connection. Make certain that all
tubes are installed.
Power Switch (1)
The POWER switch, when placed in the UP position, provides AC wall
power to the amplifier.
Standby Switch (2)
The STANDBY switch, when placed in the CENTER position, puts the
amplifier in ‘standby mode’ allowing the tubes to warm up. When this
switch is place in the UP position, the tube circuitry is fully functional
and operating in 45W(pentode) mode. In the DOWN position, the am-
plifier is operating in 20W(triode) mode.
Presence Control (3)
The global PRESENCE control affects both channels and allows you to
adjust the character or ‘forwardness’ of your sound. Low settings cre-
ate ‘darker’ tones, whereas higher settings create a ‘brilliant’ or crisp
sound.
Front Panel:
12
3
45 W
20 W
POWER
OFF
S
T
D
B
Y
AMPLIFICATION
INPUT
VOLUME MIDDLETREBLE PRESENCEBASS
INPUT
OFF
VOLUME BRILLIANCE TOP CUT
BRITISH
DREAM
™
‘59 AC ‘68 Plexi
6
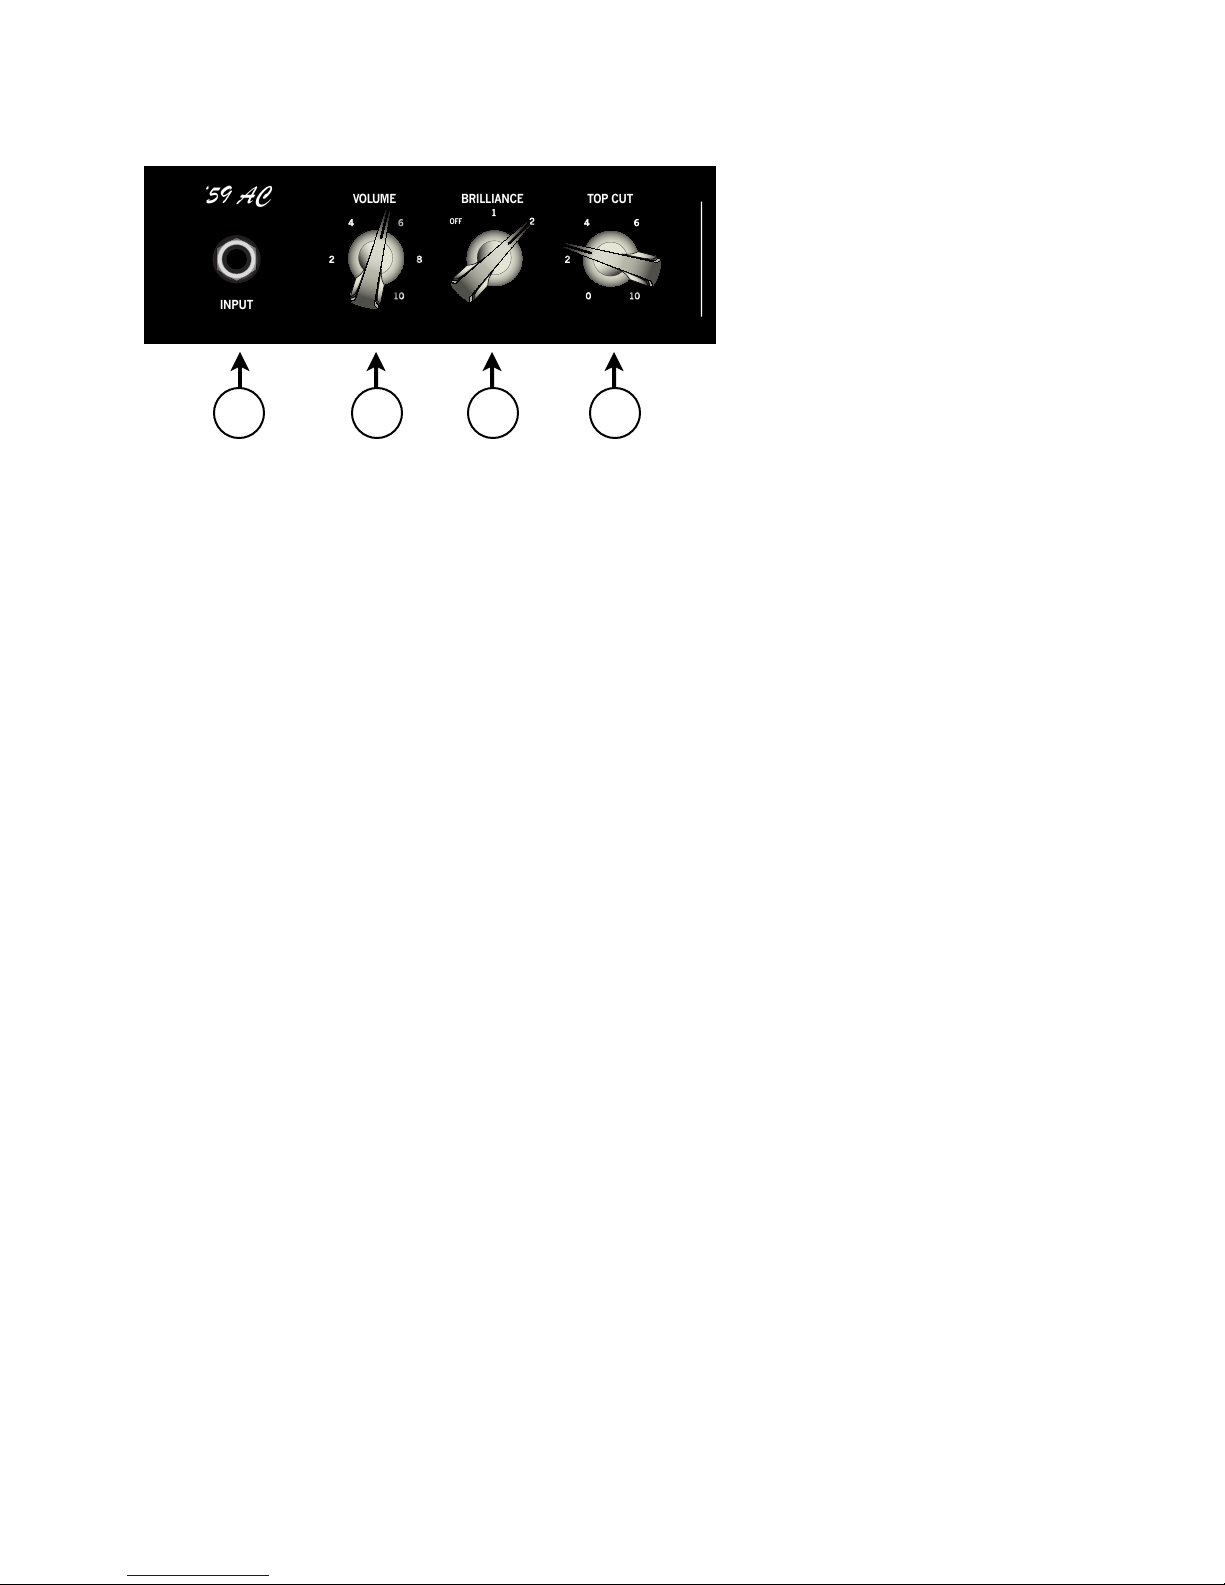
Input Jack (4)
The INPUT jack is where you connect instrument level signals.
Volume Control (5)
The VOLUME control allows you to adjust the signal level as well as
the temperament and overall character of your instrument’s sound.
The ’59 AC channel has been optimized to provide superb versatility
emphasized to deliver rich low frequencies, broad mid-range frequen-
cies and chiming high frequencies.
Brilliance Control (6)
The BRILLIANCE control allows you to adjust the tonal emphasis of
your sound from ‘wide’ to ‘narrow’.
•“OFF” Position: Wide and full range of frequencies. Excellent
choice for single coil and P90 or similarly equipped electric guitars.
•“1” Position: Gentle roll-off of low frequencies. Excellent choice
with humbucking equipped electric guitars.
•“2” Position: Dramatic roll-off of low and low mid frequencies.
Excellent choice with all electric guitars to achieve an authentic
British Invasion guitar sound.
Top Cut Control (7)
The TOP CUT control allows you to adjust the tonal emphasis of your
high frequencies. This control also works in conjunction with the
VOLUME and BRILLIANCE control and will have a subtle yet sub-
stantial affect on the level of perceived instrument gain.
Front Panel: ’59 AC Channel
5 6 74
INPUT
OFF
VOLUME BRILLIANCE TOP CUT
‘59 AC
7
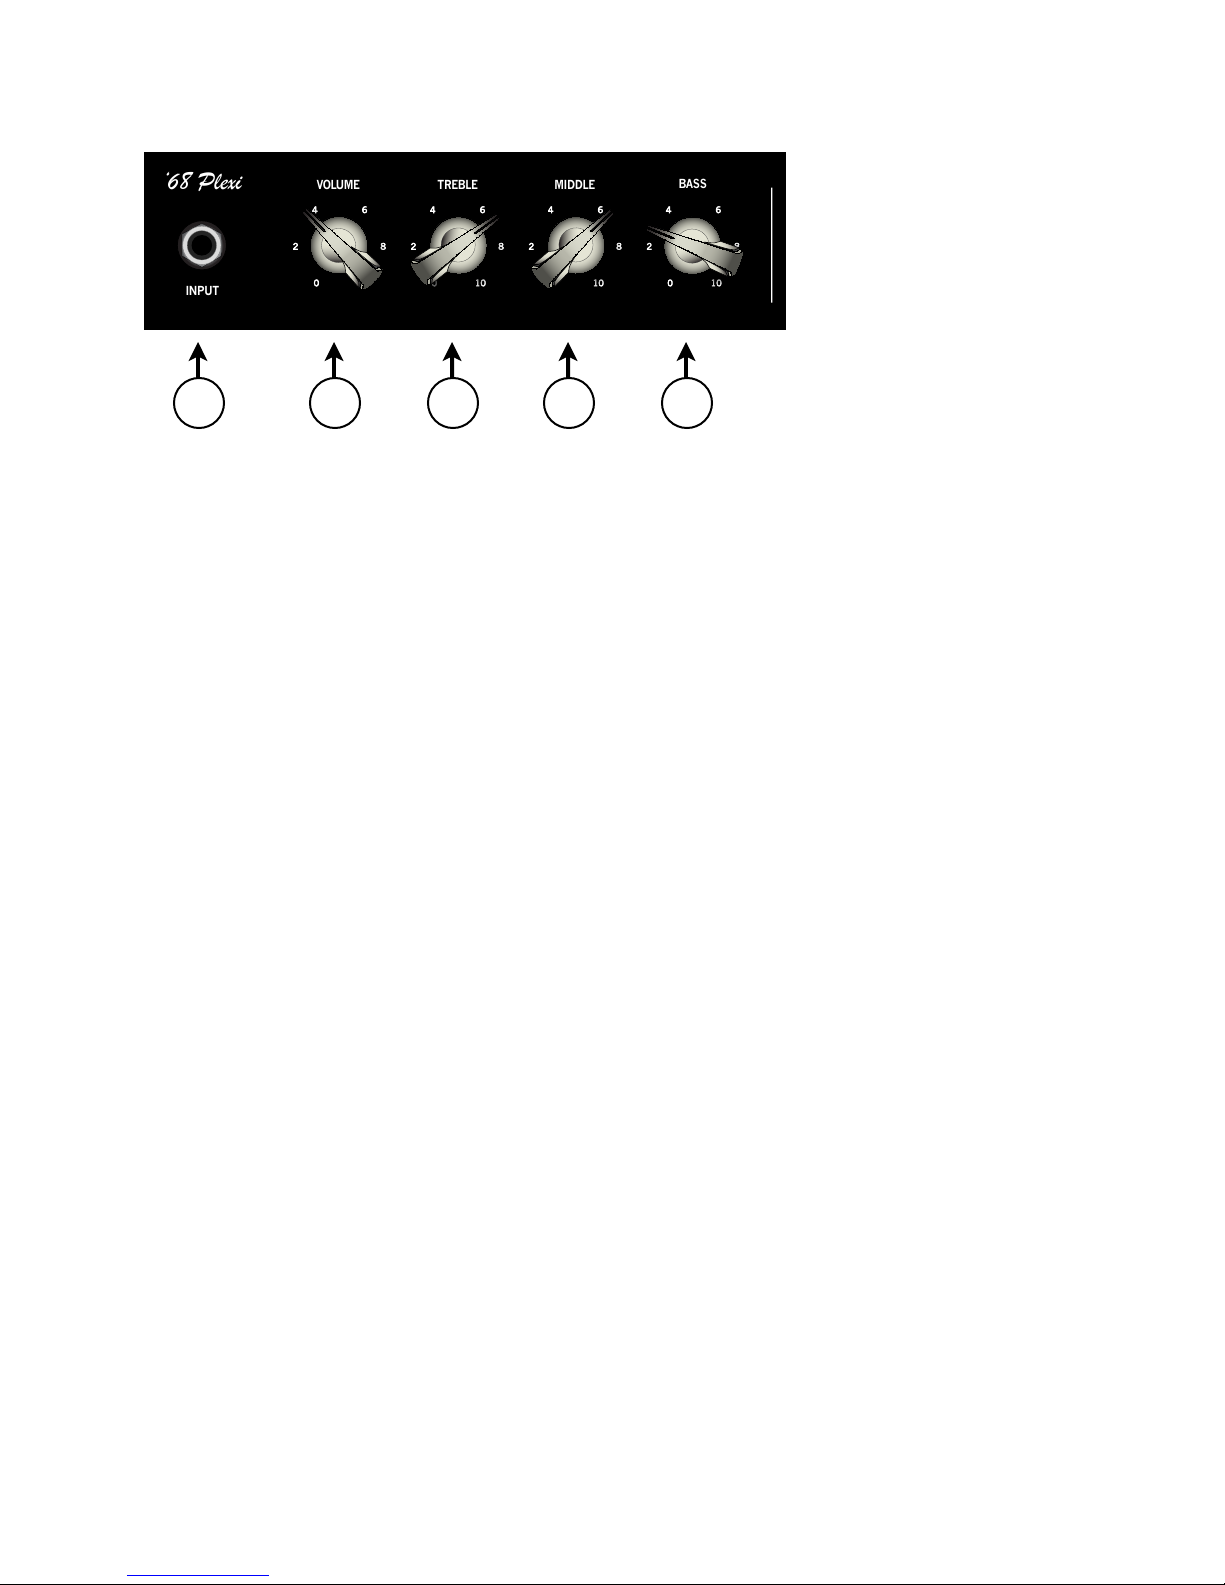
Input Jack (8)
The INPUT jack is where you connect instrument level signals.
Volume Control (9)
The VOLUME control allows you to adjust the signal level as well as
the temperament and overall character of your instruments sound. The
’68 Plexi channel has been optimized to provide superb versatility with
a particular emphasis on tight mid-range frequencies to deliver a wide
range of clean, crunch to vintage overdrive and sustain.
Treble Control (10)
The TREBLE control allows you to adjust the character of the higher
frequency range. The TREBLE circuitry has been optimized to deliver
excellent high frequency character while retaining a smooth tempera-
ment.
Middle Control (11)
The MIDDLE control allows you to adjust the emphasis of the mid-
range frequencies. The MIDDLE circuitry has been optimized to de-
liver excellent ‘in your face’ character while retaining a vintage, warm
or smooth temperament.
Bass Control (12)
The BASS control allows you to adjust the depth of your lower fre-
quencies. The BASS circuitry has been optimized to provide focussed
yet rich low frequencies.
Front Panel: ’68 Plexi Channel
8 9
10
11
12
VOLUME MIDDLETREBLE BASS
INPUT
‘68 Plexi

8
AC Input (13)
The AC INPUT socket (TYPE IEC Grounded) is a required connec-
tion for operating your BRITISH DREAM™ at 120V (standard USA
household electrical power).
Mains Fuse (14)
The MAINS FUSE requires a 2 AMP fast-acting fuse. This fuse pro-
tects your amplifier from voltage peaks from your power outlet.
H.T. Fuse (15)
The H.T. FUSE requires a .5 AMP (500 milliamp) slow-blow fuse. The
H.T. FUSE usually blows if your power tubes are bad to protect the
circuit from being damaged.
SAFETY NOTES:
1) Always plug your amp into a properly grounded 3 prong AC out-
let.
2) Never plug your amp into an ungrounded outlet.
1) Never remove or break off the 3rd prong safety ground pin
from the power cord.
1) Never use a damaged or ungrounded power cord.
2) Always use the proper value and type fuse according to the rear-
panel markings.
3) Never attempt to replace the fuse while the amplifier is still
plugged into the power source. The fuse should only be re-
placed when the power cord has been disconnected from its
power source.
13 1514
Back Panel:

9
16-OHM Speaker Output (16)
The 16-OHM SPEAKER OUTPUT is provided for connecting your
amplifier to standard 16 OHM speaker cabinet.
8-OHM Speaker Output (17)
The 8-OHM SPEAKER OUTPUT is provided for connecting your
amplifier to single 8-OHM speaker, such as the internal speaker for the
combo unit.
4-OHM Speaker Outputs (18)
The two (2) 4-OHM DISCREET SPEAKER OUTPUTs are provided
for connecting your amplifier to single 4-OHM speaker cabinet or for
connecting two (2) 8-OHM speaker cabinets in parallel.
SAFETY NOTES:
1) Never operate your amplifier without a connected speaker cabi-
net. This will damage your tubes or transformers - or both.
2) Always operate your amplifier with the proper impedance out-
put that matches your speaker cabinets(s).
3) In all cases, always use a good quality heavy gauge speaker cable
(not a shielded instrument cable) to connect your BRITISH
DREAM to the speaker cabinet(s).
Back Panel:
16 17 18

10
HybridMASTER™ (16)
The HYBRID MASTER control allows you to set the overall volume
level of the amplifier independent of the volume and tone settings es-
tablished on the front panel. This is a patent-pending circuit design
developed by 3rd Power and is available exclusively on Dream and
Dream Solo series amplifiers.
Effects Insert (17)
The EFFECTS INSERT of the DREAM SOLO is designed to allow
you to insert an effects device (most often, time-based effects like delay
or reverb) after the preamp and before the power amp. When no effects
device is present, this circuit is completely bypassed to deliver a direct
signal path between the preamp and power amp stage.
OPERATION NOTES:
1) This is a line-level effects insert that is best suited for profes-
sional rack-mount effects devices.
2) Best performance is achieved by minimizing patch cable length.
3) When cable runs are over 5 - 10 feet it may be beneficial to use
an external effects buffer device on the SEND connection.
Back Panel:
1716
Dieses Handbuch passt für folgende Modelle
1
Inhaltsverzeichnis
Andere 3rd Power Verstärker Handbücher


