ACTi PMAX-1104 Bedienungsanleitung

2014/02/14
Indoor Box
Mounting on the Ceiling
using an Indoor Bracket
Installation Guide
For Models:
D2xx / E2xx / TCM-5111

www.acti.com
Installation Guide
2
Table of Contents
Mounting Solutions............................................................3
Installation Procedures Using PMAX-1104......................4
Step 1: Prepare the Camera...................................................................... 4
Step 2: Mount the Indoor Bracket ............................................................ 5
Step 3: Attach the Camera to the Bracket ............................................... 6
Step 4: Connect the Cable(s).................................................................... 8
Step 5: Access the Camera Live View...................................................... 9
Step 6: Adjust the Viewing Angle and Focus .......................................... 9
Installation Procedures Using PMAX-1100....................10
Step 1: Prepare the Camera.................................................................... 10
Step 2: Mount the Indoor Bracket ...........................................................11
Step 3: Attach the Camera to the Bracket ............................................. 12
Step 4: Connect the Cable(s).................................................................. 13
Step 5: Access the Camera Live View.................................................... 14
Step 6: Adjust the Viewing Angle and Focus ........................................ 14
Appendix...........................................................................15
How to Access the Camera Live View.................................................... 15
Connect the Equipment......................................................................... 15
Configure the IP Addresses .................................................................. 15
Access the Camera............................................................................... 20
How to Adjust the Viewing Angle and Focus ........................................ 23
D21F / E21F.......................................................................................... 23
D22F / E22F / E270 .............................................................................. 23
D2xV / E2xV / E23 / E24 / E25 / E271 .................................................. 24
How to Connect DI/DO and Audio Devices (Optional).......................... 25
How to Connect DI/DO Devices............................................................ 25
How to Connect Audio Devices............................................................. 28
Safety Information............................................................29

www.acti.com
Installation Guide
3
Mounting Solutions
This Installation Guide describes procedures in installing the camera on the ceiling using the
Indoor Bracket.
Either one of the two indoor brackets can be used with the camera. Availability varies per
location.
PMAX-1104
PMAX-1100
See Installation Procedures Using
PMAX-1104 on page 4.
See Installation Procedures Using
PMAX-1100 on page 10.

www.acti.com
Installation Guide
4
Installation Procedures Using
PMAX-1104
This section provides step-by-step procedures in installing the camera on the ceiling using
PMAX-1104 bracket.
NOTE: The camera images in this documentation may be different from your camera.
Step 1: Prepare the Camera
1. Remove the lens cover from the camera.
2. Attach the bundled lens to the camera. For models with vari-focal lens, connect the lens
connector to the camera .
Fixed Lens Example Vari-Focal Lens Example
NOTE: Lens type may vary depending on camera model. The above illustrations are
examples only.
2b
2b
2a
or
www.acti.com
Installation Guide
5
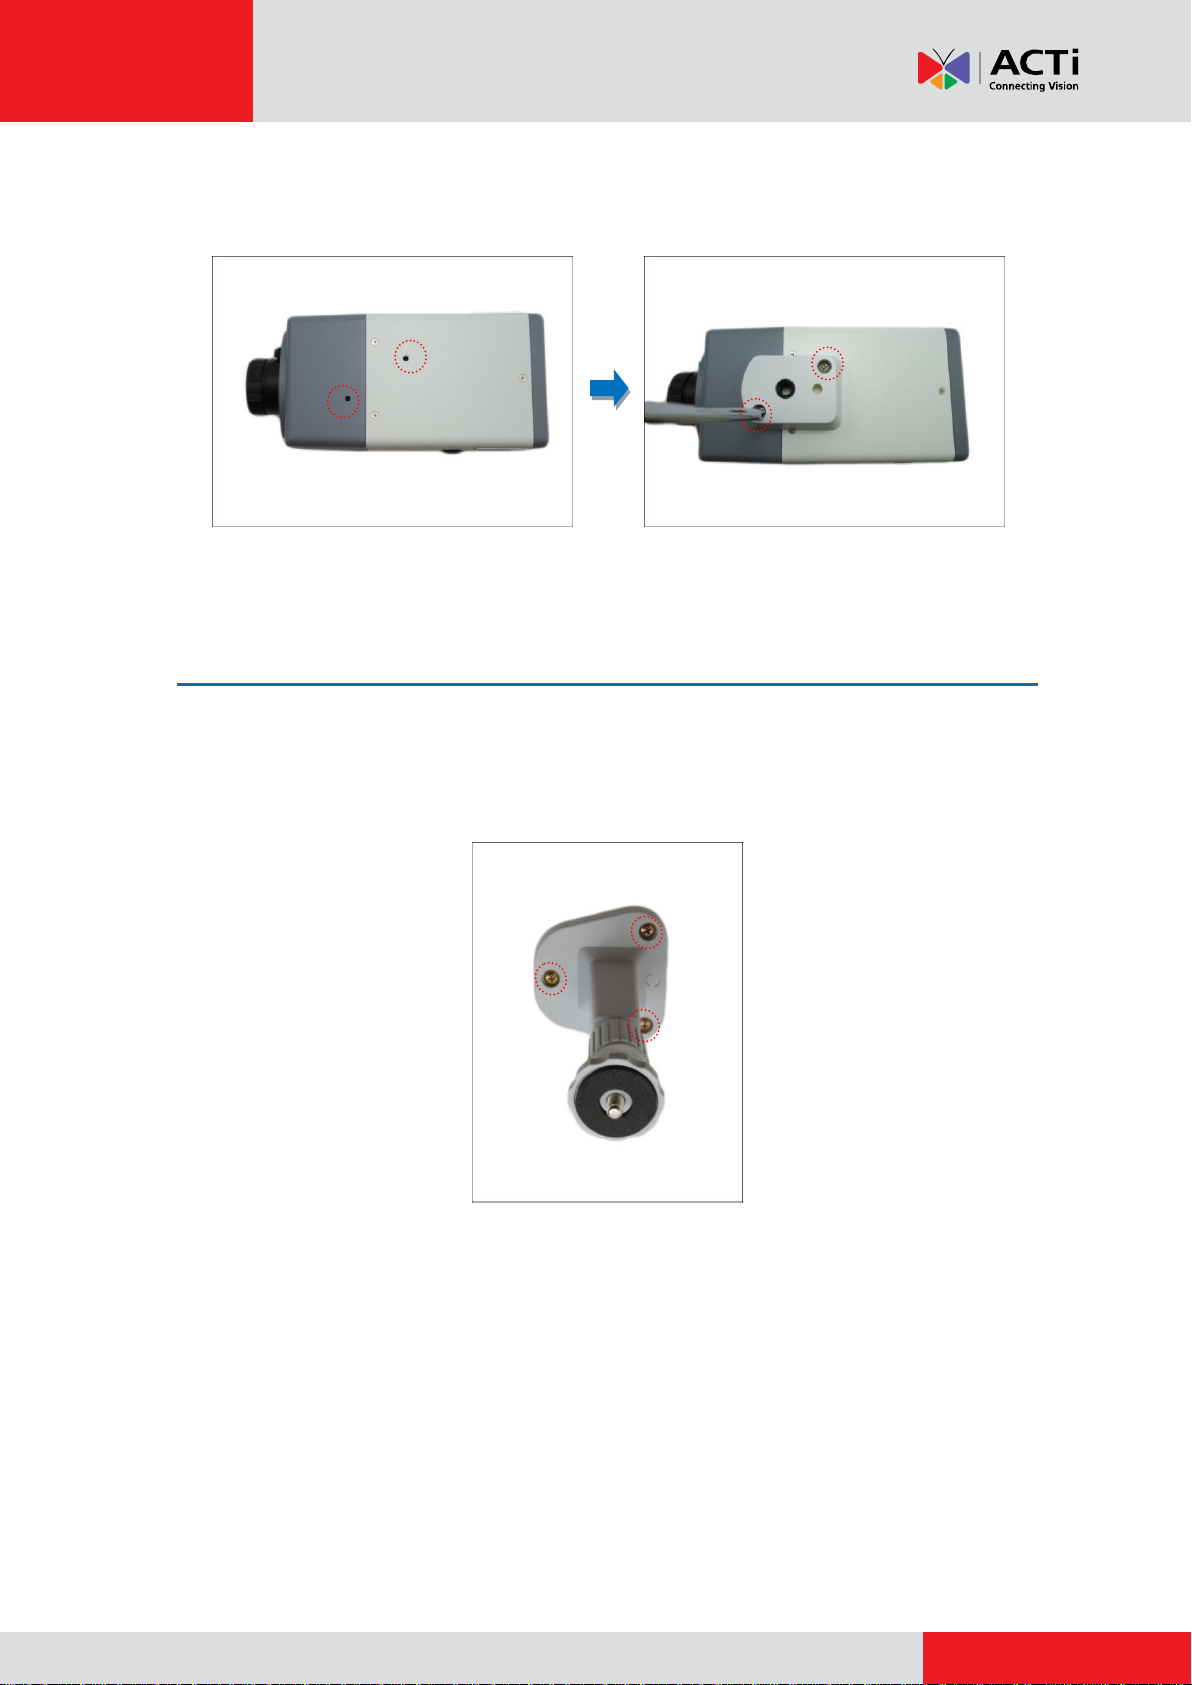
3. Attach the bundled mounting block on the top side of the camera using the two (2) screws
(included in the camera package).
Step 2: Mount the Indoor Bracket
NOTE: Before installing the bracket, make sure the ceiling or wall can bear more than the weight
of the camera and its accessories.
Install the indoor bracket to the ceiling the three (3) screws included in the bracket package.

www.acti.com
Installation Guide
6
Step 3: Attach the Camera to the Bracket
1. For camera models with a memory card slot, insert a memory card into the slot with the metal
contacts facing down at this point, if necessary. Push until the card clicks into place.
2. Slightly loosen the knurled knob.
3. Screw the camera to the bracket by its mounting block.


www.acti.com
Installation Guide
8
Step 4: Connect the Cable(s)
1. Connect the network cable to the Ethernet port of the camera.
For camera models that support DI/DO and audio connection, connect the audio input/output
or DI/DO devices to the camera at this point, if necessary. See How to Connect DI/DO and
Audio Devices (Optional) on page 25 for more information.
2. Connect the other end of the network cable to a switch or injector. Then, connect the switch
or injector to a network, PC and a power source. See Power-over-Ethernet (PoE) connection
example below.
Network
AC Power
Source
PoE Injector /
PoE Switch
Power Cable
Ethernet Cable
Ethernet Cable
(Data + Power)
Ethernet Cable
(Data)
Camera

www.acti.com
Installation Guide
9
Step 5: Access the Camera Live View
See How to Access the Camera Live View on page 15 for more information on how to access
the Live View of the camera.
Step 6: Adjust the Viewing Angle and Focus
Based on the live view, adjust the focus and the viewing angle of the camera. Adjustments vary
depending on model, for detailed information, see:
D21F / E21F on page 23
D22F / E22F / E270 on page 23
D2xV / E2xV / E23 / E24 / E25 / E271 on page 24

www.acti.com
Installation Guide
10
Installation Procedures Using
PMAX-1100
This section provides step-by-step procedures in installing the camera on the ceiling using
PMAX-1100 bracket.
NOTE: The camera images in this documentation may be different from your camera.
Step 1: Prepare the Camera
1. Remove the lens cover from the camera.
2. Attach the bundled lens to the camera. For models with vari-focal lens, connect the lens
connector to the camera .
Fixed Lens Example Vari-Focal Lens Example
NOTE: Lens type may vary depending on camera model. The above illustrations are
examples only.
2b
2b
2a
or
Dieses Handbuch passt für folgende Modelle
1
Inhaltsverzeichnis
Andere ACTi Rack & Stand Handbücher


Beliebte Rack & Stand Handbücher anderer Marken

Salamander
Salamander Acadia AC/W/L400/WH Bedienungsanleitung

Fohhn
Fohhn VAT-09 Benutzerhandbuch

ricoo
ricoo FS0522 Bedienungsanleitung

AMSOIL
AMSOIL BMK-22 Kurzanleitung

Kargo Master
Kargo Master 48220 Bedienungsanleitung

Milestone AV Technologies
Milestone AV Technologies SIMPLICITY SLF2 Bedienungsanleitung


