Advantech SIU7117 Bedienungsanleitung

3M IP Camera: Bullet + WDR + PoE
User Manual
Release: 12 May 2014

1
-
CON EN S -
Chapter I
Introduction ................................................................................................ 3
1.1
Highlights of your new Network IP Camera ..................................................................... 3
1.2
Safety Instructions ........................................................................................................... 4
1.3
Packaging Contents ..........................................................................................................
1.4
Familiar with your new Network IP Camera .................................................................... 6
1.
DI/DO PIN ASSIGNMENT .................................................................................................. 8
1.6
Installation of the Network IP Camera ............................................................................ 9
Chapter II
Access Network IP Camera by Web UI ........................................................ 11
2.1 Locate the IP address of Network IP Camera ................................................................ 11
2.2 Access to IP Camera’s Web User Interface and Install ActiveX Plugin .......................... 13
2.3 Viewing Live Video......................................................................................................... 16
2.4 Client Settings ................................................................................................................ 19
Chapter III Advanced Configuration ................................................................................ 20
3-1 System ........................................................................................................................... 21
3-2 Security .......................................................................................................................... 23
3-3 Network ......................................................................................................................... 26
3-3-1 ‘General’ setup page .............................................................................................. 26
3-3-2 ‘Advanced’ setup page ........................................................................................... 29
3-4 IP Filter .......................................................................................................................... 32
3- Video ............................................................................................................................. 34
3- -1 Image Setting ......................................................................................................... 3
3- -2 Video Setting .......................................................................................................... 38
3- -3 Overlay Setting ....................................................................................................... 41
3-6 Audio ............................................................................................................................. 43

2
3-7 Motion ........................................................................................................................... 44
3-8 PTZ Control .................................................................................................................... 46
3-9 Event .............................................................................................................................. 48
3-9-1 Settings ................................................................................................................... 49
3-9-2 Media ..................................................................................................................... 1
3-9-3 Event Server ........................................................................................................... 2
3-10 Recording .................................................................................................................... 6
3-11 SDHC ............................................................................................................................ 7
3-12 Log ............................................................................................................................... 9
3-13 Device Info ................................................................................................................... 60
3-14 Maintenance ............................................................................................................... 61
3-1 Language ..................................................................................................................... 62
Chapter IV
roubleshooting .................................................................................... 63
Chapter V Digital I/O User Guide ............................................................................ 65
Chapter VI
Specification .......................................................................................... 67

3
Chapter I Introduction
1.1 Highlights of your new Network IP Camera
Congratulates on purchasing this high-resolution Mega pixels network
IP Camera! This IP Camera provides Mega pixels high-resolution video
quality, with the advanced megapixel lens, you can view images remotely
in more detail than conventional close-circuit cameras.
Other highlights of this network IP Camera include:
Ultra-high resolution Mega pixel CMOS image sensor.
Analog video (BNC) output, works with conventional video devices
such as TV Monitors, analog DVRs, etc.
Digital input / output interface lets you connect peripherals such as
external alarm, sensor, etc.
Audio input / output interface, you can listen to voices in remote
place, and speak to person in remote place.
Built-in Micro-SD card slot for local storage, which can act like a
stand-alone DVR.
Two Way audio.
3GPP Mobile Surveillance Supported.
RS-48 communication supported.
ONVIF Compliant.
Support IEEE802.3af Power over Ethernet (PoE) standard.

4
1.2 Safety Instructions
Please follow the safety instructions listed below when you’re using this
Network IP Camera, or you would harm this camera and / or yourself!
Also, the warranty will become void if you disobey these safety
instructions.
This Network IP Camera is sophisticated electronic device; do not
drop it from high places.
Do not place this IP Camera at hot / humid places, and avoid direct
sunlight.
This IP Camera is not a toy; keep it out from the reach of children.
Do not insert any accessories of this IP Camera into your body.
Make sure lens set is secured when you’re using this IP Camera, lens
set may fall down if it’s not properly secured, and cause damage to
human and itself.
If you want to use this IP Camera at any place that may be spilled by
water or dirt, a secure and water-proof camera housing is required.
Do not pull any cord that is connected to this IP Camera by force.
IP Camera will become hot after long time of use. Refrain from touch
IP Camera with hand, or cover this IP camera with paper or cloth.
Never connect powered cable to IP Camera’s DI/DO contacts.
If the IP Camera falls into water when powered, do not attempt to
retrieve it back by yourself! Find a qualified electric technician for
help.

1.3 Packaging Contents
Please check the contents of your new Network IP Camera when you
unpack the package. If any item is missing, please contact your dealer of
purchase for help.
Item No.
Description Quantity
1 Network IP Camera 1
2 Bracket Kit 1
3 Sun Shield Kit 1
4 CDROM 1
Quick Installation Guide 1
6
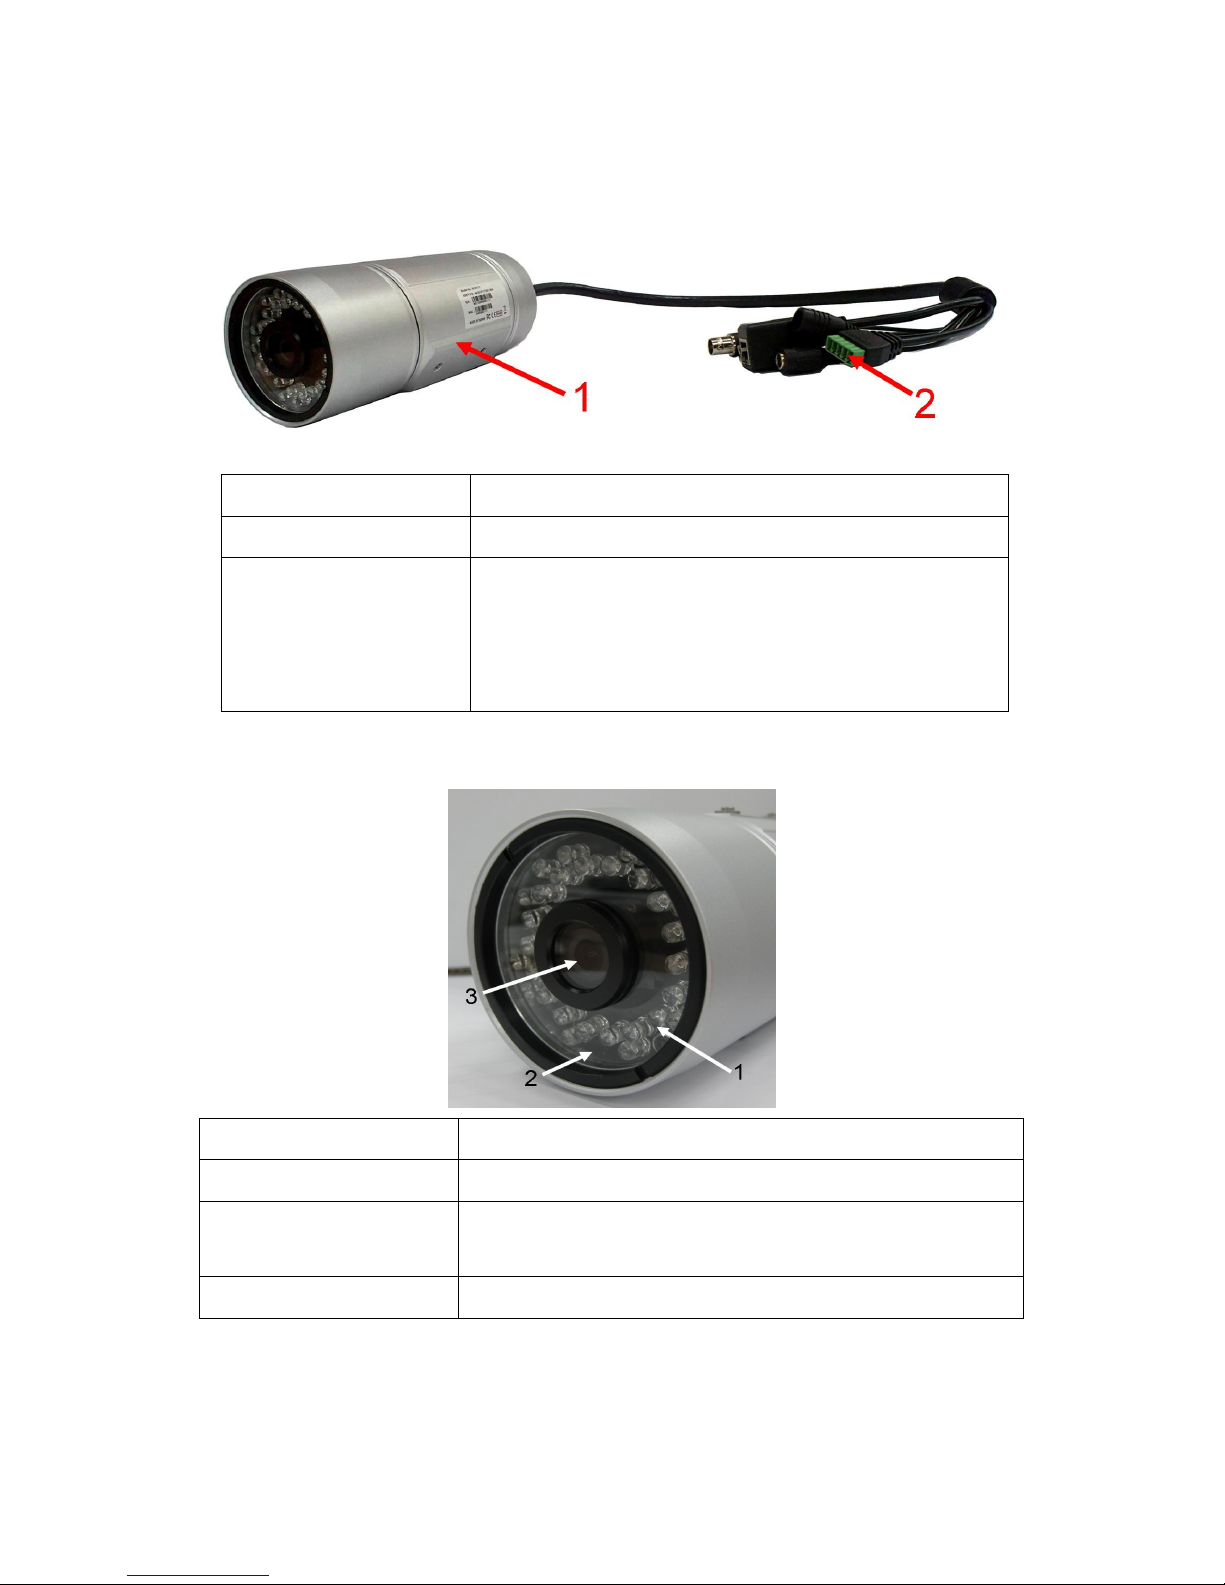
1.4 Familiar with your new Network IP Camera
Item Description
1. IP camera device IP camera
2. I/O cable RS48 -+ , DI/DO , GND , DC12Volt/2A input
Reset Button , Audio output , Audio input
Network, RJ4 connector
TV output, BNC connector
[Front site]
Item Description
1. IR-LED Used for illumination assistance under night mode
2. Day/night sensor Used for day/night detection and IR-LED ON/OFF
control
3. Lens Fixed focal length.

7
[Back]
Item Description
1. Screw Connects between camera device body & sun
shield.
2. Sun Shield Protect camera device body from sun shine or rain
directly
3. Camera device
body
IP camera metal case
4. Bracket mount The portion to mount bracket
. Cable Glands For water proof

8
1.5 DI/DO PIN ASSIGNMEN
Item Description
1 - : RS48 -
+ : RS48 +
1 : DO
2 : GND
3 DI
2 DC12 Volt/2A input
3 Reset Button
4 Audio output
Audio input
6 Network, RJ4 connector, two LED index, orange color is
power index, green is network index
7 TV output, BNC connector
※Please check the I/O cable attached index before insert or release any
wire.

9
1.6 Installation of the Network IP Camera
Please follow the instructions below to setup your new IP camera.
1. Connect Ethernet cable to LAN port.
2. Plug DC power adapter to power outlet on the wall.
3. Connect DC power cable to IP Camera’s DC power connector.
4. If everything’s ok, you should see the left LED light on LAN port light
up. If not, please recheck every step and try again, or ask your dealer
of purchase for help.
. Unplug the power then find the screws in the package, use
screwdriver to fix the sun shield on the device’s main body.
Inhaltsverzeichnis


