Akron acquabella Bedienungsanleitung

Shower Base
Installation manual
Manual de instalación
En
Es
Shower Base
Platos de ducha
Hand over to the customer
Entregar al cliente
AKRON
Products
!Do not install this fixture against a wall unless
the appropriate flange is first installed.
Certified Certificados
CSA B45.5 / IAPMO Z124-2017

2
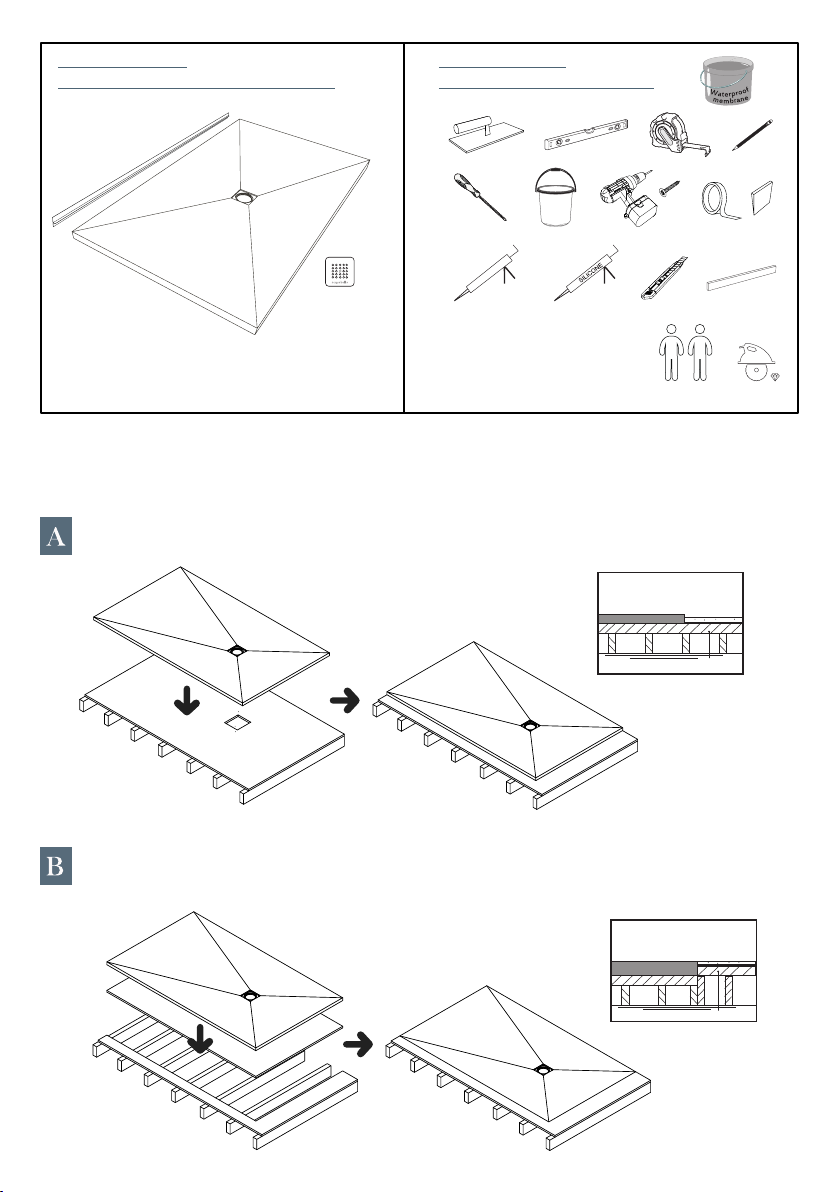
· Included items
· Artículos incluidos en la entrega
· Required tools
· Herramientas Necesarias
· Adhesive
· Adhesivo
(KERACAULK U, KERAPOXY 410,
PLANICRETE W OR ULTRABOND
ECO GPT)
No drain included
Válvula no incluida
*
*2x
Installation options
Opciones de instalación
Floor installation
Instalación sobre suelo
Ground level installation
Instalación a ras de suelo
Base · Plato Tile · Azulejo
Suboor · Subsuelo
Base · Plato Tile · Azulejo
Suboor · Subsuelo

3
Installation
Instalación
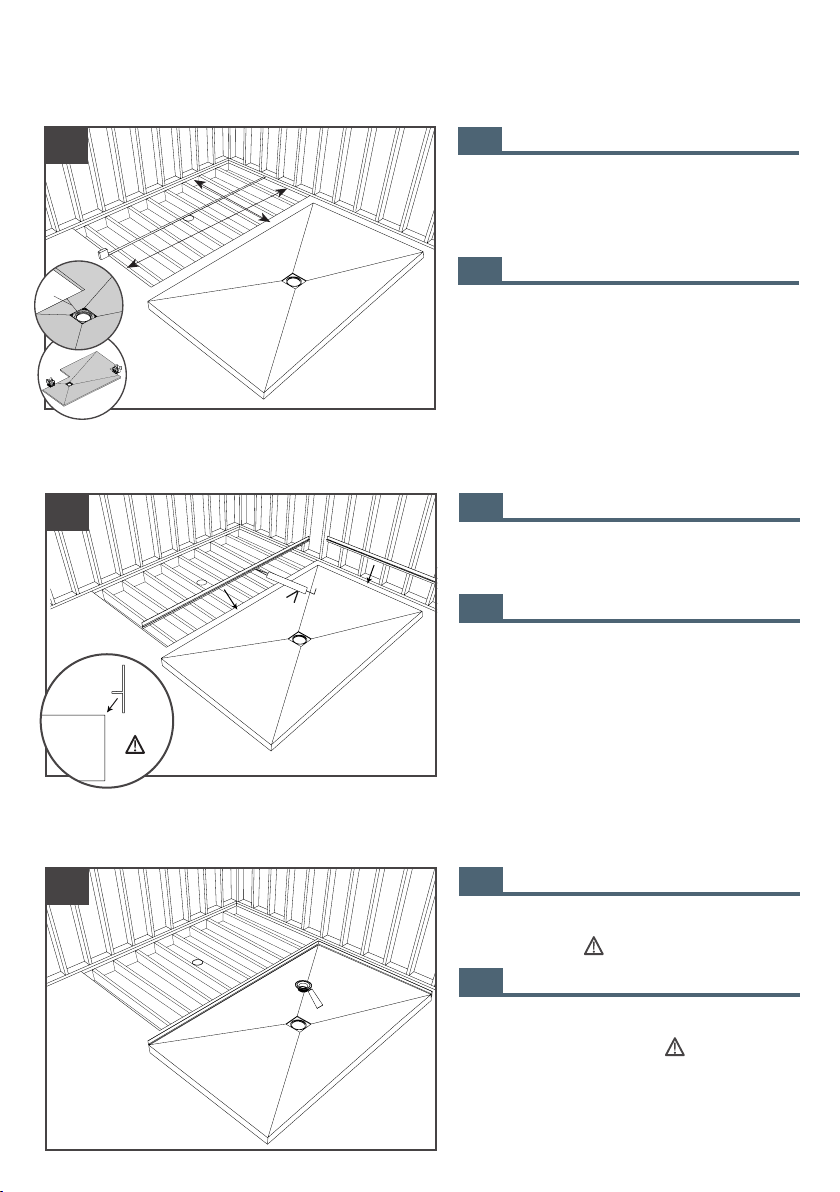
Measure your shower base and make sure you
have enough space for the installation. Make
sure that all the pipes have been previously ins-
talled.
Mide tu plato de ducha y asegúrate de que tie-
nes suficiente espacio para la instalación. Ase-
gúrate de que todas las tuberías han sido insta-
ladas previamente.
1
≥254mm
≥10”
En
Es
En
Es
Install the PVC profile (tile flange) in the base of
the shower with 100% silicone.
Instale el perfil de PVC en la base de la ducha
con 100% silicona.
2
En
Es
Install the drain in the base of the shower, using
the silicone on top, following the manufactu-
rer’s instructions.
Instale el desagüe en la base de la ducha, usan-
do la silicona en la parte superior, siguiendo las
instrucciones del fabricante.
3

4
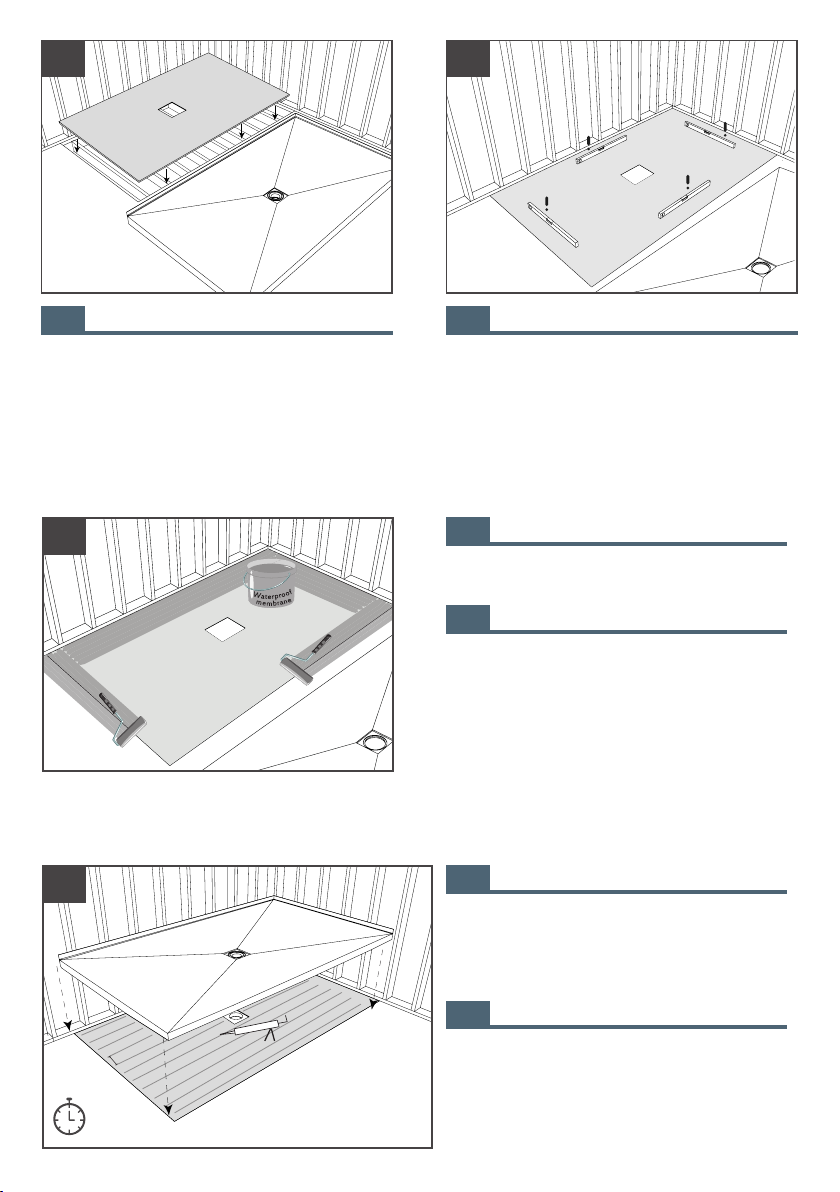
Make sure that the floor surface is perfectly le-
vel, either wood or concrete. Pour self-leveling
cement if necessary. IMPORTANT: Allow the ma-
terial to dry for the time stipulated by the manu-
facturer.
Asegúrate de que la superficie del suelo esté
perfectamente nivelada, ya sea de madera o de
hormigón. Vierta cemento autonivelante si es
necesario. IMPORTANTE: Deje secar el material
durante el tiempo estipulado por el fabricante.
4 5
En Es
6We recommend to apply waterproofing mem-
brane of your choice, let it dry prior to installing
the shower base.
Recomendamos aplicar membrana impermea-
bilizante de su elección, dejar secar antes de
instalar el plato de ducha.
En
Es
Apply beads of adhesive (KERAPOXY 410, PLA-
NICRETE W or ULTRABOND ECO GPT) , leaving
at least 2” (5 cm) between them and 4” (10 cm)
maximum, on the installation surface. IMPOR-
TANT: Allow the material to dry for the time sti-
pulated by the manufacturer.
Aplicar cordones de adhesivo (KERAPOXY 410,
PLANICRETE W oULTRABOND ECO GPT), de-
jando al menos 5 cm (2”) entre ellos y 10 cm (4”)
como máximo, en la superficie de instalación.
IMPORTANTE: Deje secar el material durante el
tiempo estipulado por el fabricante.
4”
En
Es
7

5
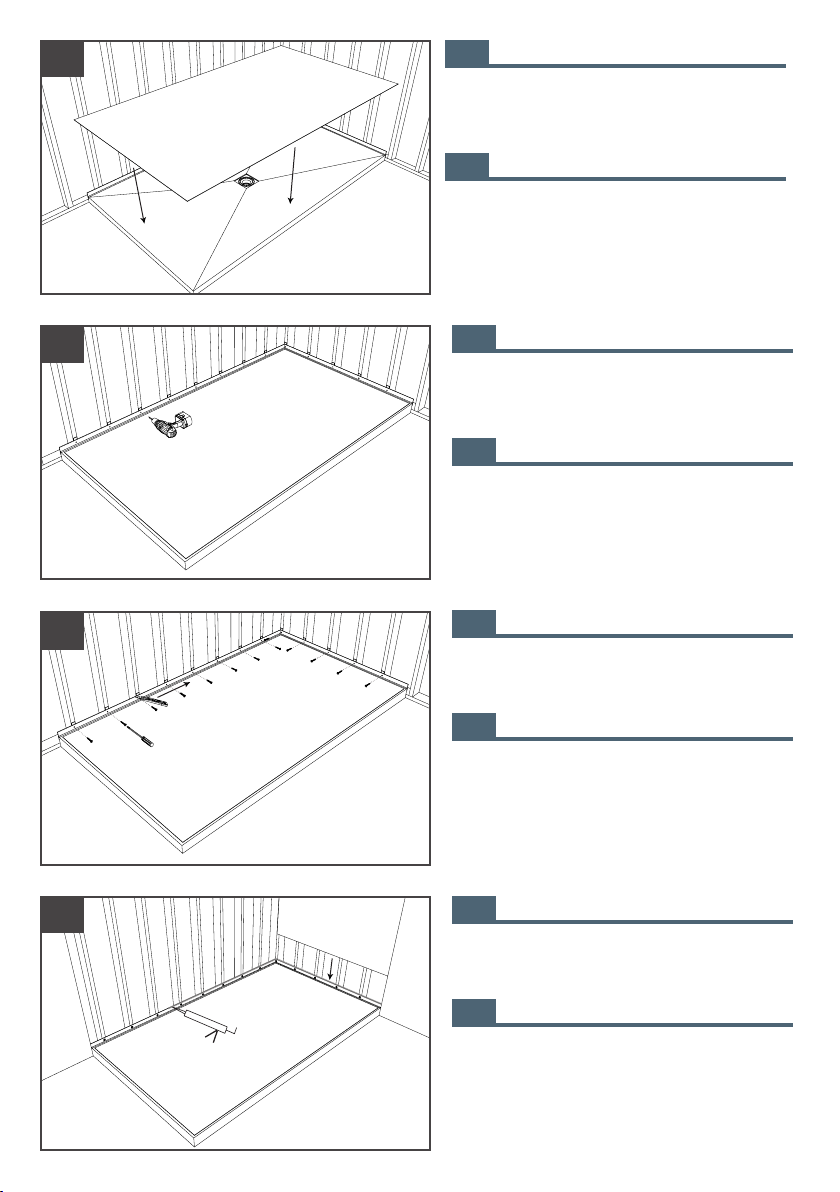
Protect the base of the shower with a cardboard.
Protege la base de la ducha con un cartón.
ESP
En
Es
8
Es
If necessary, use wooden wedges between the
base and the wall beams for proper installation.
Pre-drill the profile and wedge with a 1/8” (4
mm) drill bit.
Si es necesario, use cuñas de madera entre la
base y las vigas de la pared para su correcta ins-
talación.
Pre-taladrar el perfil y la cuña con una broca de
1/8” (4 mm).
9En
Es
Screw the profile to the wooden beams with ST
4x20mm (1/8 “x3/4”) screws. Cut off the excess
wedges.
Atornille el perfil a las vigas de madera con tor-
nillos de ST 4x20mm (1/8“x3/4”). Cortar el ex-
ceso de las cuñas.
10 En
Es
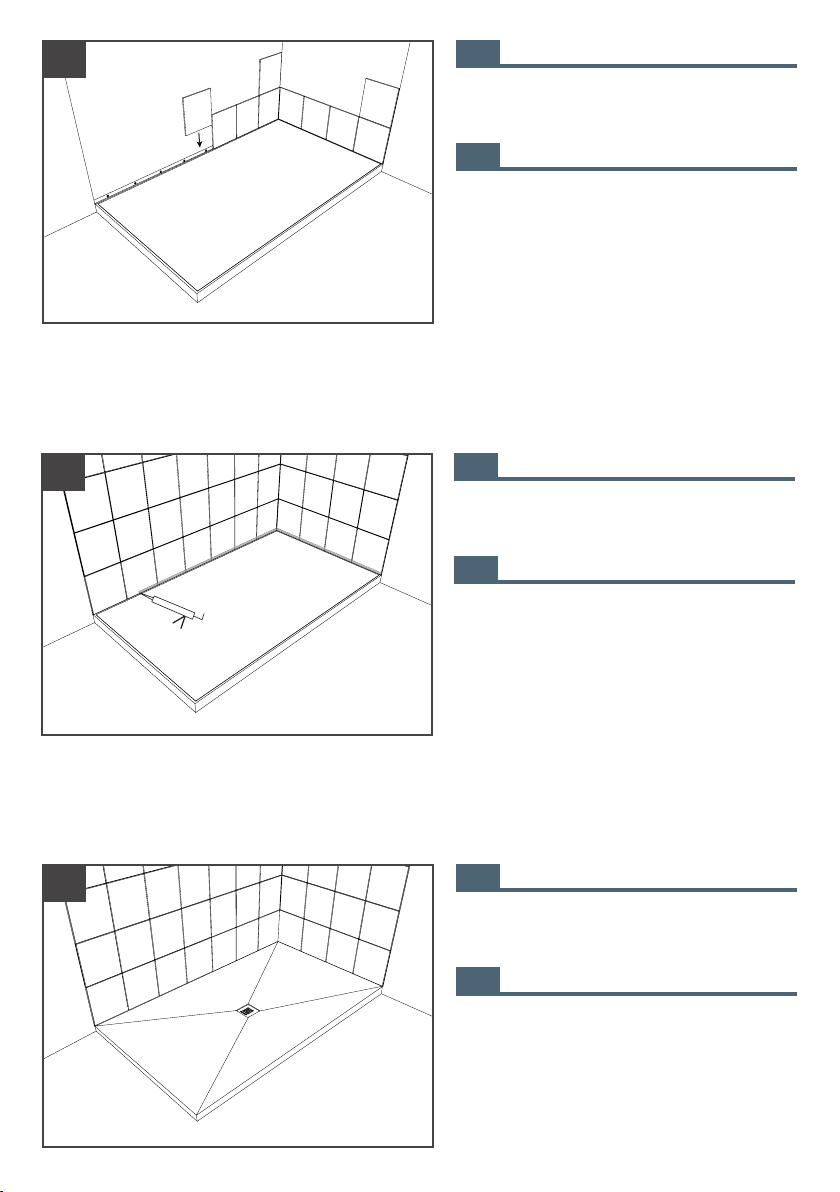
Install the wall panels on the edge of the profile,
using silicone (KERACAULK U).
Instalar los paneles de pared sobre el borde del
perfil, usando silicona (KERACAULK U).
11 En

6
Tile the entire area leaving an expansion joint
between the shower base and the tiles of at least
1/5” (5 mm).
Coloca azulejos en toda el área dejando una
junta de expansión entre la base de la ducha y
los azulejos de al menos 1/5” (5 mm).
Remove the cardboard and place the Acquabe-
lla grid.
Quita el cartón y coloca la rejilla de Acquabella.
12
14
Es
En
Seal the zone using silicone KERACAULK U to
secure waterproofing.
Sellar la zona con silicon KERACAULK U para
asegurar la impermeabilización.
13
Es
En
Es
En

7
USE AND MAINTENANCEUSE AND MAINTENANCE
USO Y MANTENIMIENTOUSO Y MANTENIMIENTO
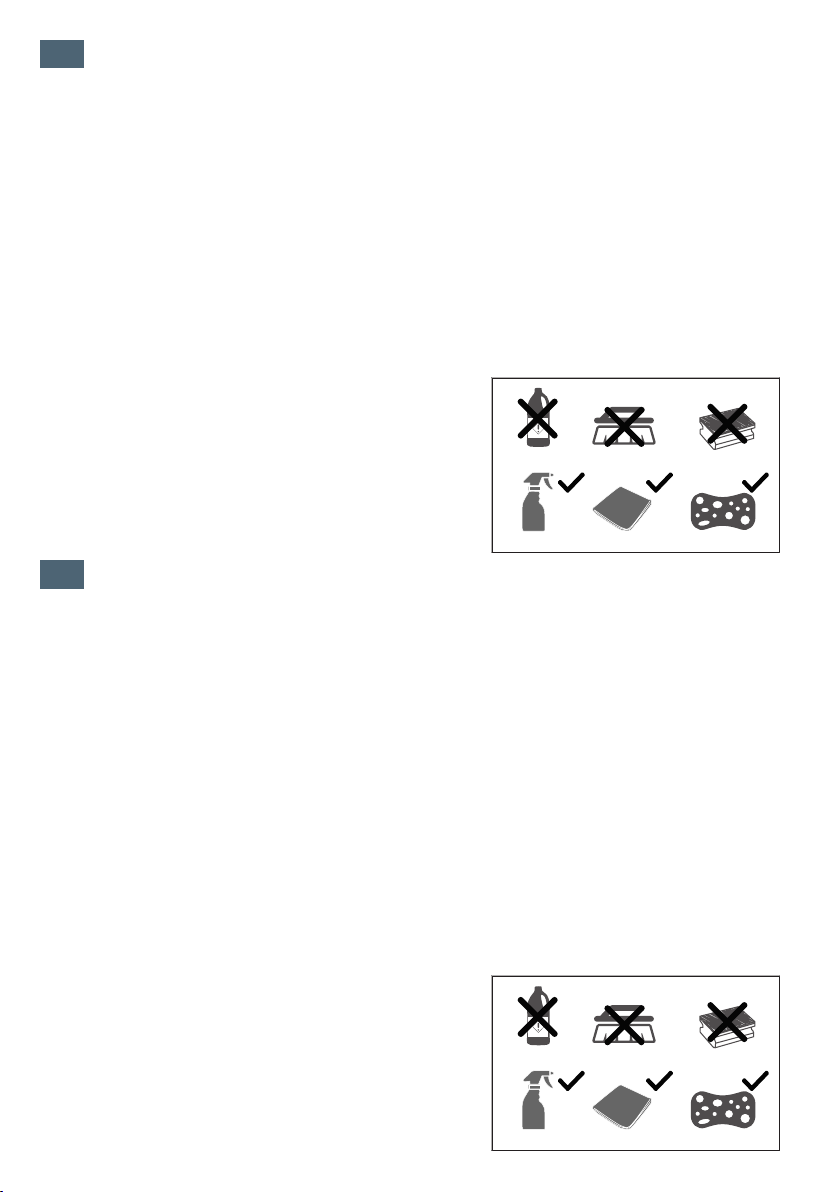
Para disfrutar de su plato de ducha durante muchos años siga estos sencillos consejos:
Para la limpieza rutinaria basta con enjuagar con un paño suave de algodón (no abrasivo) el plato con
agua. NUNCA UTILIZAR ESTROPAJOS (SCOTCH BRITE, ni de FIBRAS NATURALES), ni DISOLVENTES,
ÁCIDOS, ÁLCALIS O CON ABRASIVOS. Después de utilizar cualquier producto de limpieza es necesario
enjuagar de forma abundante con agua y jabón el plato con la finalidad de eliminar los posibles restos
de productos de limpieza y asegurar una ventilación suficiente del cuarto de baño. En casos de manchas
difíciles se pueden utilizar los denominados “borradores mágicos” que pueden ser adquiridos en cual-
quier supermercado.
Evitar todo contacto con lacas, quitaesmaltes de uña, disolventes orgánicos, alcoholes, ácidos, alcalis,
etc.
Si utiliza tintes de pelo, enjuague el plato de ducha con agua y jabón una vez terminada la ducha.
Para eliminar los posibles restos de cal que pueda quedarse en el plato, podemos utilizar un antical
domestico rebajando con agua 1:3 del siguiente modo:
- Retirar la rejilla inox del desagüe y aplicar con un paño húmedo por toda la superficie.
- Dejar actuar 15 minutos y transcurrido ese tiempo enjuagar con abundante agua.
- Volver a colocar la rejilla y enjuagar de nuevo el plato con agua.
No es recomendable para el uso de exteriores.
To enjoy your shower base for many years, follow these simple tips:
For routine cleaning, simply rinse the base with water using a soft cotton cloth (non-abrasive). NEVER
USE SCOTCH BRITE, NEITHER NATURAL FIBRES, SOLVENTS, ACIDS, ALKALIS OR ABRASIVES. After
using any cleaning product, it is necessary to rinse abundantly with water and soap the shower base in
order to eliminate the possible remainders of cleaning products and to assure a sufficient ventilation of
the bathroom. In cases of difficult stains, you can use the so-called “magic erasers” that can be purchased
in any supermarket.
Avoid all contact with lacquers, nail polish removers, organic solvents, alcohols, acids, alkalis, etc.
If you use hair dyes, rinse the shower base with water and soap once the shower is over.
To remove any possible lime residue that may remain on the shower base, we can use a domestic an-
ti-lime (VIAKAL) by lowering with water 1:3 (1 L of Viakal for 3 L of water) as follows:
- Remove the stainless-steel grid from the drain and apply with a damp cloth all over the surface.
- Let it work for 15 minutes and after that time rinse with abundant water.
- Replace the grid and rinse the shower base again with water.
Not recommended for exterior use.
Neutral · Neutre
Neutral · Neutre
En
Es

8
FAQ´SFAQ´S
-What products should I use to clean my Acquabella bases and countertops from construction debris?
To clean the possible remains of cement, glue and mortar we will use a descaler for joints called DETERDEK ,
CLEANALL AND SHOWERCLEAN & SHINE from FILA, since it is specific for the removal of remains of work,
it is also used to remove other components such as saltpeter, rust and lime, read the instructions for use.
DO NOT SCRUB, let the product act; NEVER USE SCOTCH BRITE, NEITHER NATURAL FIBRES, SOLVENTS,
ACIDS, ALKALIS OR ABRASIVES. After cleaning, rinse with plenty of water and ensure sufficient ventilation
of the bathroom. It is not dangerous for the user or for the environment.
-What products should I use to clean my Acquabella AKRON bases and countertops from daily use?
Soap and water applied in a sponge, not abrasive. NEVER USE SCOTCH BRITE, NEITHER NATURAL FIBRES,
SOLVENTS, ACIDS, ALKALIS OR ABRASIVES. In cases of difficult stains, you can use the so-called “magic
erasers” that can be purchased in any supermarket.
-What material should I use to glue or seal Acquabella’s AKRON shower base?
The gluing of the different elements must be done using adhesive such as KERAPOXY 410, PLANICRETE W
or ULTRABOND ECO GPT (Mapei), and the sealing with KERACAULK U (Mapei) or non-acid silicone.
-Who can I ask for spare parts-components of Acquabella’s AKRON shower bases?
To ask for spare parts or replacement you must contact our commercial department.
-Are our Acquabella’s AKRON shower bases non-slip?
In addition to the texture of the shower base, the same innovative composition of AKRON bases provides
an anti-slip surface, according to the UNE-ENV 12633:2003 Annex A and DIN 51097:1992.
-And if the surface of Acquabella’s AKRON base is damaged, do you have a solution?
Despite the fact that we have a great deal of influence on the protection of the base during the insta-
llation work, it is possible that for various reasons the surface of the shower base is damaged. For these
cases we have a repair kit of the same color and easy to apply that will restore the color and finish of your
shower base for many years.
En

9
FAQ'SFAQ'S
-¿Qué productos he de usar para limpiar mis platos y encimeras AKRON de Acquabella de restos de sucie-
dad de obra?
Para la limpiar los posibles restos de cemento cola y mortero utilizaremos un desincrustante para juntas
llamado DETERDEK, CLEANALL Y SHOWERCLEAN & SHINE de la casa FILA, ya que es especifico para
la eliminación de restos de obra, también se utiliza para la eliminación de otros componentes como el
salitre, óxido y cal, leer las instrucciones de uso. NO FROTAR, dejar actuar el producto; NUNCA UTILIZAR
ESTROPAJOS (SCOTCH BRITE, ni de FIBRAS NATURALES), ni DISOLVENTES, ÁCIDOS, ÁLCALIS O CON
ABRASIVOS. Después de limpiar, aclarar con abundante agua y asegurar una ventilación suficiente del
cuarto de baño. No es peligroso para el usuario ni para el medio ambiente.
-¿Qué productos he de usar para limpiar mis platos y encimeras AKRON de Acquabella del uso diario?
Agua y jabón aplicados en una esponja, no abrasiva. NUNCA UTILIZAR ESTROPAJOS (SCOTCH BRITE, ni
de FIBRAS NATURALES), ni DISOLVENTES, ÁCIDOS, ÁLCALIS O CON ABRASIVOS. En casos de manchas
difíciles se pueden utilizar los denominados “borradores mágicos” que pueden ser adquiridos en cualquier
supermercado.
-¿Qué material he de usar para pegar o sellar platos AKRON de Acquabella?
El pegado de los distintos elementos debe realizarse utilizando adhesivo como KERAPOXY 410, PLANI-
CRETE W or ULTRABOND ECO GPT (Mapei), y el sellado con KERACAULK U (Mapei) o silicona no ácida.
-¿ A quién solicitar recambios-componentes de los platos AKRON de Acquabella?
Para solicitar recambios o repuestos deberá solicitar respuesta a nuestro departamento comercial.
-¿ Son antideslizantes nuestros platos AKRON de Acquabella?
Además de la textura del plato, la misma composición innovadora de los platos AKRON proporciona una
superficie antideslizante, de acuerdo a la norma UNE-ENV 12633:2003 Anexo A y norma DIN 51097:1992.
-¿ Y si se estropea la superficie del plato AKRON de Acquabella, tiene solución?
A pesar de que incidimos mucho en la protección del plato durante la obra de colocación, cabe la posibili-
dad de que por diversas causas la superficie del plato queda deteriorada. Disponemos para estos casos de
un KIT DE REPARACIÓN del mismo color y de fácil aplicación que volverá a restaurar el color y acabado de
su plato de ducha por muchos años.
Es

10
It is possible to repair the color of an AKRON base by Acquabella if for some reason the surface of the
shower has deteriorated due to improper use. In these cases, a repair kit can be requested specifying the
color and texture of the shower base to be repaired. The kit consists of two containers, one with colored
lacquer and the other with catalyst (transparent liquid). Depending on the color, the percentage of these
products is different, this percentage is indicated when the Kit is supplied.
Procedure for the repair of an AKRON shower base:
Clean very well the zone to paint, taking special care in greasy or soapy rests. You can apply for this pro-
cess burning alcohol or acetone diluted in water with a cloth that does not leave any kind of lint.
The surface must be totally clean and dry.
Protect with masking tape or similar, the susceptible zones of staining (tiles, screens, etc)
Open the containers.
Pour the colored lacquer and the catalyst on a small plastic paint bucket and mix.
Use a wool roller to paint of 3 or 4 inches, exercising long strokes and always in the same sense, reiterating
the necessary. It is important that it does not release lint residues.
Depending on the state to restore, it is possible that you need to apply several coats of paint. To do this,
let dry between one and another at least 40 minutes before applying the next coat.
Finally let it dry 48 hours before removing the protection masking tape.
Attention:Attention: for your safety, use mask and gloves as you are working with chemical products.
REPAIR INSTRUCTIONS FOR ACQUABELLA SHOWER BASESREPAIR INSTRUCTIONS FOR ACQUABELLA SHOWER BASES
ADVICEADVICE
Transport the shower base only inside the packaging and avoid improper loading. Do not support it in a
tilted position.
Acquabella. US is not responsible for damage caused by improper storage or transport.
Installation should only be performed by an authorized sanitary specialist.
Always check the AKRON shower base before installing it and make sure that it drains perfectly.
Protect the pan with the protective cardboard until the work is completed.
During the installation of the base the surfaces, coatings, wall, and tiles must be protected.
Follow the manufacturer’s instructions when installing the trap.
Avoid any type of dirt, in particular soiling due to drainage obstruction or construction debris.
The floor on which the shower base sits must be clean, free of grease and dry.
To ensure a good installation, the work phases must be carried out in accordance with the working times.
En
En
Inhaltsverzeichnis
Andere Akron Sanitärprodukte Handbücher