
BRAYER BR2009 Bedienungsanleitung

Instruction manual
Инструкция по эксплуатации
Electric grill press BR2009
Электрический гриль-пресс BR2009
brayer.ru

СОДЕРЖАНИЕ
EN......................................................................................................................................3
DE....................................................................................................................................12
RU ...................................................................................................................................22
KZ....................................................................................................................................32
3
EN
PRESS GRILL BR2009
The grill is used for cooking meat, sh or
vegetables. The unit can be used as a press grill or
a at frying surface.
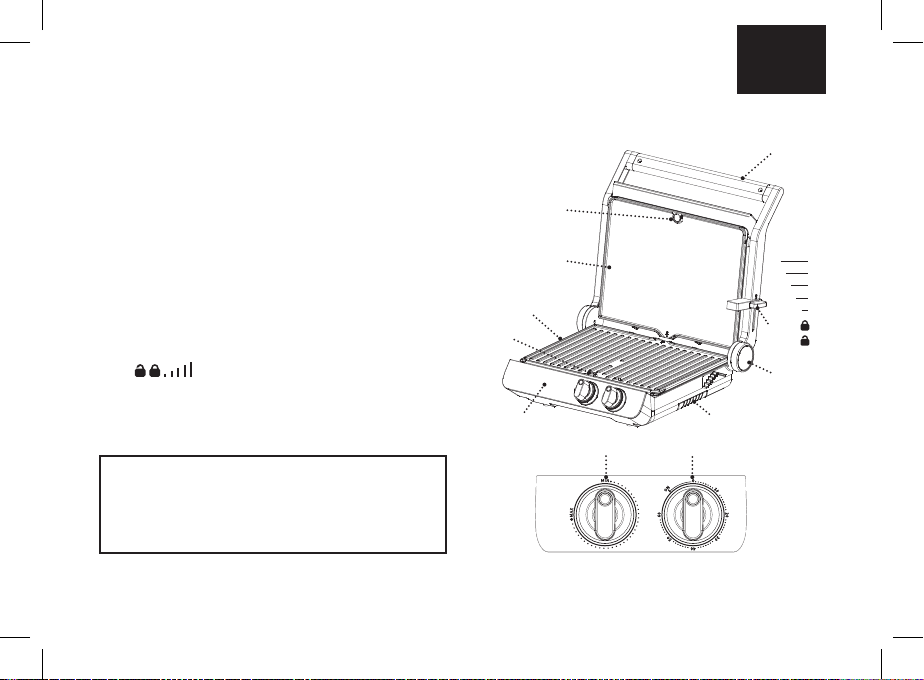
DESCRIPTION
1. Control panel
2. Magnetic lock of the lower working surface
3. Lower working surface
4. Upper working surface
5. Magnetic lock of the upper working surface
6. Handle
7. Lock of the upper and lower parts of the grill/
regulator of the gap between the working surfaces
«»
8. Grill opening button «180°»
9. Tray
10. Temperature control knob
11. Operating time setting knob
EN
ATTENTION!
For additional protection it is reasonable to install a
residual current device (RCD) with nominal operation
current not exceeding 30 mA into the mains. To install
RCD, contact a specialist.
1
2
3
4
5
6
7
8
9
10 11

4
EN
Рiс. 1
Рiс. 2

5
EN
SAFETY MEASURES AND OPERATION
RECOMMENDATIONS
Read the operation manual carefully before using
the press grill; after reading, keep it for future
reference.
• Use the press grill for its intended purpose only, as
specied in this manual.
• Mishandling the grill can lead to its breakage and
cause harm to the user or damage to the user’s
property, which is not covered by warranty.
• Make sure that the operating voltage of the unit
indicated on the label corresponds to your home
mains voltage.
• Connect the power plug to the socket with reliable
grounding contact.
• To avoid re, do not use adapters for plugging the
press grill in.
• Do not connect the unit to any external timers or
remotely controlled electrical outlets.
• Install and use the press grill on a at, dry, steady
and heat-resistant surface with free access to the
mains socket.
• Do not use the unit outdoors.
• It is recommended not to use the unit during lightning
storms.
• Protect the grill from impacts, falling, vibrations and
other mechanical stress.
• Never leave the unit connected to the mains
unattended.
• Do not use the unit near heating appliances, heat
sources or open ame.
• Do not use the grill in places where aerosols are
used or sprayed, and in proximity to inammable
liquids.
• Do not use the grill in proximity to the kitchen sink, in
bathrooms, near swimming pools or other containers
lled with water.
• If the grill has fallen into the water, immediately
unplug the power cord from the electrical outlet,
and only then the device can be removed from the
water. Contact our service center to have the device
examined or repaired.
• Do not let the power cord touch hot surfaces and
sharp edges of furniture.
• The press grill body heats up strongly during
operation, do not touch hot surfaces marked with
«» to avoid burns.
• Do not move the press grill when it is hot; wait until it
cools down completely.
• Use the unit in places with proper ventilation.
• Use only the removable parts supplied with the press
grill.
• Do not switch the press grill on without products.
• Do not use the grill for cooking frozen food,

6
EN
• defrost frozen food before cooking.
• Beware of steam output from the gaps between the
operating surfaces, do not touch and do not place
open parts of your body near the gaps between the
frying plates.
• Take the products out of the press grill right after
cooking; keeping products in the operating grill for a
long time can cause their ignition.
• Never use metal objects to take the cooked food
out, as they can damage the non-stick coating of the
frying plates; use the kitchen tools intended for non-
stick surfaces.
• Unplug the unit after usage or before cleaning. When
unplugging the grill, hold the power plug and carefully
remove it from the mains socket, do not pull the
power cord, as this can lead to its damage and cause
a short circuit.
• Do not touch the unit body, the power cord and the
power plug with wet hands.
• For child safety reasons do not leave polyethylene
bags used as packaging unattended.
ATTENTION! Do not allow children to play with
polyethylene bags or packaging lm. Danger of
suocation!
• Do not allow children to touch the operating surface,
the unit body, the power cord or the power plug
during operation of the unit.
• Be especially careful if children or disabled persons
are near the operating unit.
• During the unit operation and breaks between
operation cycles, place the unit out of reach of
children.
• The unit is not intended for usage by persons
(including children) with physical, sensory ,
psychological or mental disabilities or when they
lack experience or knowledge if they are not under
supervision of a person who is responsible for their
safety or if they are not instructed by this person on
the usage of the unit.
• From time to time check the power cord integrity.
• If the power cord is damaged, it should be replaced
by the manufacturer, a maintenance service or
similar qualied personnel to avoid danger.
• Do not repair the unit by yourself. Do not
disassemble the unit by yourself, if any malfunction
is detected, and after the unit was dropped, unplug it
and apply to the authorized service center.
• To avoid damages, transport the unit in the original
package.
• Keep the unit in a dry cool place out of reach of
children and disabled persons.
• The unit is not intended for usage by children.
• Do not leave children unattended to prevent using
the unit as a toy.

7
EN
THE UNIT IS INTENDED FOR HOUSEHOLD USE
ONLY, DO NOT USE THE UNIT FOR COMMERCIAL
OR LABORATORY PURPOSES.
BEFORE THE FIRST USE
After unit transportation or storage at negative
temperature, unpack it and wait for 3 hours before
using.
• Unpack the unit and remove all the packaging
materials.
• Keep the original package.
• Read the safety measures and operating
recommendations.
• Check the delivery set.
• Examine the device for damages; do not plug a
damaged device into the mains.
• Make sure that the indicated specications of the
power supply voltage of the unit correspond to the
specications of your mains. When using the device
in the mains with a frequency of 60 Hz, no additional
actions are required.
• Clean the grill body surface with a slightly damp cloth
and then wipe it dry.
• Move the lock (7) to the position « », take the
handle (6) and open the grill.
• Remove the upper working surface (4), grasp the
two sides of the upper part of the working surface
(4), at the level of the magnetic lock (5) and remove
it downwards.
• Remove the lower working surface (3), grasp the two
sides of the lower part of the working surface (3),
at the level of the magnetic lock (2) and remove it
upwards.
• Remove the tray (9).
• Wash the frying plates (3, 4) and the tray (9) with
warm water and neutral detergent, rinse them and
wipe dry.
• Install the surfaces (3, 4) in place, to do this, align
the protrusions on the body and the recesses in the
lower part of the surfaces (3, 4), and then lift the
upper surface (3) and bring the lower surface (4)
down until the magnetic locks (2, 5) are triggered,
make sure that the surfaces (3, 4) are xed.
• Place the grill keeping at least a 20 cm gap between
the grill body and the walls and 60 cm of space
above the grill.
• Use the grill on a at steady surface, away from
sources of moisture,
• heat and open ame with free access to the mains
socket.
• Do not place and do not use the grill near highly
inammable objects
• or liquids and objects subject to thermal deformation.
• Use the unit in places with proper ventilation.
• Make sure that the tray (9) is installed to its place.
• Before using the grill open it and oil the frying plates
(3, 4) slightly.

8
EN
• Insert the power plug into the mains socket.
• Turn the temperature control knob (10) and set it to
the «MAX» position.
• Turn the operating time setting knob (11) and set the
grill operating time to no more than 10 minutes, while
the grill will turn on and the indicators of the knobs
(10, 11) will light up.
Notes:
- the light indicator of the operating time setting
knob (11) will light up constantly when the grill is
turned on;
- the light indicator of the temperature control knob
(10) will go out when the working surfaces (3,
4) reach the set temperature, the indicator will
periodically light up and go out, signaling that the
set temperature of the working surfaces (3,4) is
maintained.
• At the end of the set operating time, the grill will
turn o, unplug the power cord from the electrical
outlet, wait for the grill to cool completely, grasp the
handle (6), open the grill and remove the remnants of
vegetable oil from the working surfaces (3, 4) with a
paper napkin.
• The grill is ready to use.
Notes:
- when using the unit for the rst time, a foreign
smell or some smoke from the heating elements
can appear — this is normal and it is not covered
by warranty.
FOOD COOKING WITH THE GRILL
ATTENTION!
- The press grill body heats up strongly during
operation, do not touch hot surfaces marked with «
» to avoid burns.
- Beware of steam output from the gaps between
the operating surfaces, do not touch and do not
place open parts of your body near the gaps
between the frying plates.
- Do not use the grill for cooking frozen food.
- Do not cook meat with large bones.
- Frying time depends on the products used.
- Before using the grill make sure that the tray (9) is
installed to its place.
- Do not open the grill after switching it on, the frying
plates (3, 4) heat up faster and more even in the
closed position.
- Before eating make sure that the food is cooked
through.
- Take the products out of the press grill right after
cooking; keeping products in the operating grill for
a long time can cause their ignition.
- Never use metal objects to take the cooked food
out, as they can damage the non-stick coating
of the frying plates (3, 4); use the kitchen tools
intended for non-stick surfaces.
• Prepare the necessary products.

9
EN
Notes:
- working surfaces (3, 4) are double-sided, one side
is «at», the other side is «grooved», choose the
desired side and install the working surfaces into
the grill;
- The working surfaces (3, 4) are xed with
magnets, before turning on the grill, make sure
that the working surfaces (3, 4) are securely xed;
- before removing the working surfaces (3, 4), make
sure that they are cold.
• Insert the power plug into the mains socket.
• Turn the temperature control knob (10) and set the
temperature from «MIN» 100°C to «MAX» 230°C.
• Turn the operating time setting knob (11) and set the
grill operating time up to 60 minutes, meanwhile the
grill will turn on and the indicators of the knobs (10,
11) will light up.
Notes:
- if necessary, you can turn the grill on to a constant
mode of operation, to do this, turn the operating
time setting knob (11) counterclockwise to the
«ON» position;
- at the end of the set operating time of the grill, a
short signal will sound, the grill will turn o and the
indicators of the knobs (10, 11) will go out.
• Wait for the heating of the working surfaces (3, 4),
the indicator of the temperature control knob (10) will
go out.
• Take the handle (6) and open the grill.
• Carefully put the products on the lower frying plate
(3), avoid burns by possible splashes of juice or fat
dripping from the products.
• Take the handle (6) and lower the upper frying plate
(8) on the products.
Note: depending on the thickness of the cooked
products you can adjust the clearance between the
frying plates (3, 4). To do this, move the lock (7) handle
to the required position « » (pic. 2).
• After you nish cooking, take the handle (6) and lift
the upper frying plate (8).
• Put the prepared products into an appropriate dish;
use wooden or heat-resistant plastic kitchen tools to
remove the products.
• To turn the grill o in an emergency, turn the
operating time setting knob (11) and set it to the «0»
position, unplug the power cord from the electrical
outlet.
Using the grill as a cooking unit (pic. 1)
• You can use the grill as a at frying surface.
• Before connecting the power plug to the mains
socket open the grill. To do this, take the handle (6)
and lift the upper part of the grill.
• Press the button (8) «180°» and open the grill
completely.
• Insert the power plug into the mains socket.
• Turn the temperature control knob (10) and set the
temperature from «MIN» 100°C to «MAX» 230°C.

10
EN
• Turn the operating time setting knob (11) and set the
grill operating time up to 60 minutes, meanwhile the
grill will turn on and the indicators of the knobs (10,
11) will light up.
• Wait for the heating of the working surfaces (3, 4),
the indicator of the knob (10) will go out.
• Carefully place the products on the working surfaces
(3, 4), be careful to avoid burns by possible splashes
of fat or juice from the products.
• At the end of the set operating time of the grill, a
short signal will sound, the grill will turn o and the
indicators of the knobs (10, 11) will go out.
• Put the prepared products into an appropriate dish;
use wooden or heat-resistant plastic kitchen tools to
remove the products.
• To turn the grill o in an emergency, set the operating
time setting knob (11) to the «0» position, unplug the
power cord from the outlet.
• Wait until the grill cools down completely, then lift the
upper part of the grill, press the button (8) «180°»
and fold the upper and the lower parts together.
• To x the lower and the upper parts of the grill set the
lock (7) handle to the position « ».
CLEANING AND CARE
• Clean the frying plates (3, 4) of the grill after every
use.
• Turn the grill o by setting the operating time setting
knob (11) to the «0» position, unplug the power
cord from the outlet, wait for the grill to cool down
completely.
• Clean the grill body surface with a slightly damp cloth
and then wipe it dry.
• Take the handle (4) and open the grill.
• Remove the upper working surface (4), grasp the
two sides of the upper part of the working surface
(4), at the level of the magnetic lock (5) and remove
it downwards.
• Remove the lower working surface (3), grasp the two
sides of the lower part of the working surface (3),
at the level of the magnetic lock (2) and remove it
upwards.
• Remove the tray (4) and pour the liquid out of it.
• Wash the frying plates (3, 4) and the tray (2, 5) with
warm water and neutral detergent, rinse them and
wipe dry.
• Install the surfaces (3, 4) in place, to do this, align
the protrusions on the body and the recesses in the
lower part of the surfaces (3, 4), and then lift the
upper surface (3) and bring the lower surface down
(4) until the magnetic locks (2, 5) are triggered, make
sure that the surfaces (3, 4) are xed.
• Do not use metal brushes, abrasives or solvents to
clean the frying plates (3, 4) and the grill body.
• Do not immerse the grill, the power cord and the
power plug into water or any other liquids.
Inhaltsverzeichnis
Sprachen:
Andere BRAYER Grill Handbücher

BRAYER
BRAYER BR2006 Bedienungsanleitung

BRAYER
BRAYER BR2030 Bedienungsanleitung

BRAYER
BRAYER BR2007 Bedienungsanleitung

BRAYER
BRAYER BR2003 Bedienungsanleitung

BRAYER
BRAYER BR2004 Bedienungsanleitung

BRAYER
BRAYER BR2005 Bedienungsanleitung

BRAYER
BRAYER BR2002 Bedienungsanleitung

BRAYER
BRAYER BR2001 Bedienungsanleitung

BRAYER
BRAYER BR2008 Bedienungsanleitung

BRAYER
BRAYER BR2010 Bedienungsanleitung


