
BuyTricycle Scout Bedienungsanleitung
ASSEMBLY GUIDE
BuyTricycle
Email: [email protected]m
Twitter: @BuyTricycle
facebook: @BuyTricycle
Phone: +44 7856 715212
Spanish, French, German, Dutch, Italian, Portuguese,
Polish :
www.buytricycle.com/instructions

Thank you for purchasing from us, we have included a free battery light to keep you safe, a pump to keep
you inflated & a cable lock & weather cover to keep your trike safe and dry!
IMPORTANT - Frame number can be found under the crank in the center of the trike.
Before your first ride, you must check the following items:
• Checkallnutsandboltsaretightandnonehavebecomeloose.
• Checkthatthehandlebars,wheels,pedalsandsaddlearesecureandadjustedtosuit
• Checkthatyouknowhowthegearsandbrakesoperateandtheyareworkingsuciently.
• Checkthatyourtyresareinatedcorrectly.
• Pleasenotethatifthemudguardsdonotseemaligned,simplymovethembackintopositionandre-tightenthe
bolts.
•Onfoldingmodelsalwaysmakesurequickreleasesystemissecureandlockedinplacebeforeride.
Build Instructions:
We've tried to make this booklet as user friendly as possible but it is only a guide, so please only attempt the
build if you have experience with Tricycle / bicycle assembly, if not seek professional assistance. BuyTricycle will
not be held responsible for accidents/injuries due to an improper build, but please do not hesitate to contact us
with any questions you may have.
Tools Required:
•Spanner - included
•Phillipsandflatbladescrewdrivers - Included
•Metric Allen Keys - included
•Pliers with cutting ability
•Bike chain tool/ splitter - included
•BicycleOil - Recommended
•Bicycle Grease - Recommended
•Bike/Trike Stand would be useful as elevation
required
IMPORTANT:Carefully open your Tricycle box and remove packaging. Lay out all the separate components, all
hardware is located in the small box, the nuts & bolts are in labeled bags, Please check for any faults on the
tricycle/parts, if anything is missing then please contact us and we will arrange replacements immediately.

1. Begin by attaching the rear axle to the trike frame
using the hardware provided (fig.1) and the four bolts
already attached to the axle, 3 bolts either side,
4 bolts are pre-inserted in the axle, these may
need to be loosened.
Fig 1
2. It is recommended to attach the rear mudguards before the wheels (step 11) Attach the rear
wheels, the right wheel has a different cut to the left, so ensure they fit onto the correct side.
ADULT TRIKE PARTS IDENTIFICATION
Fender Bar
Basket
Axle
Support Bar
Basket Support Arm
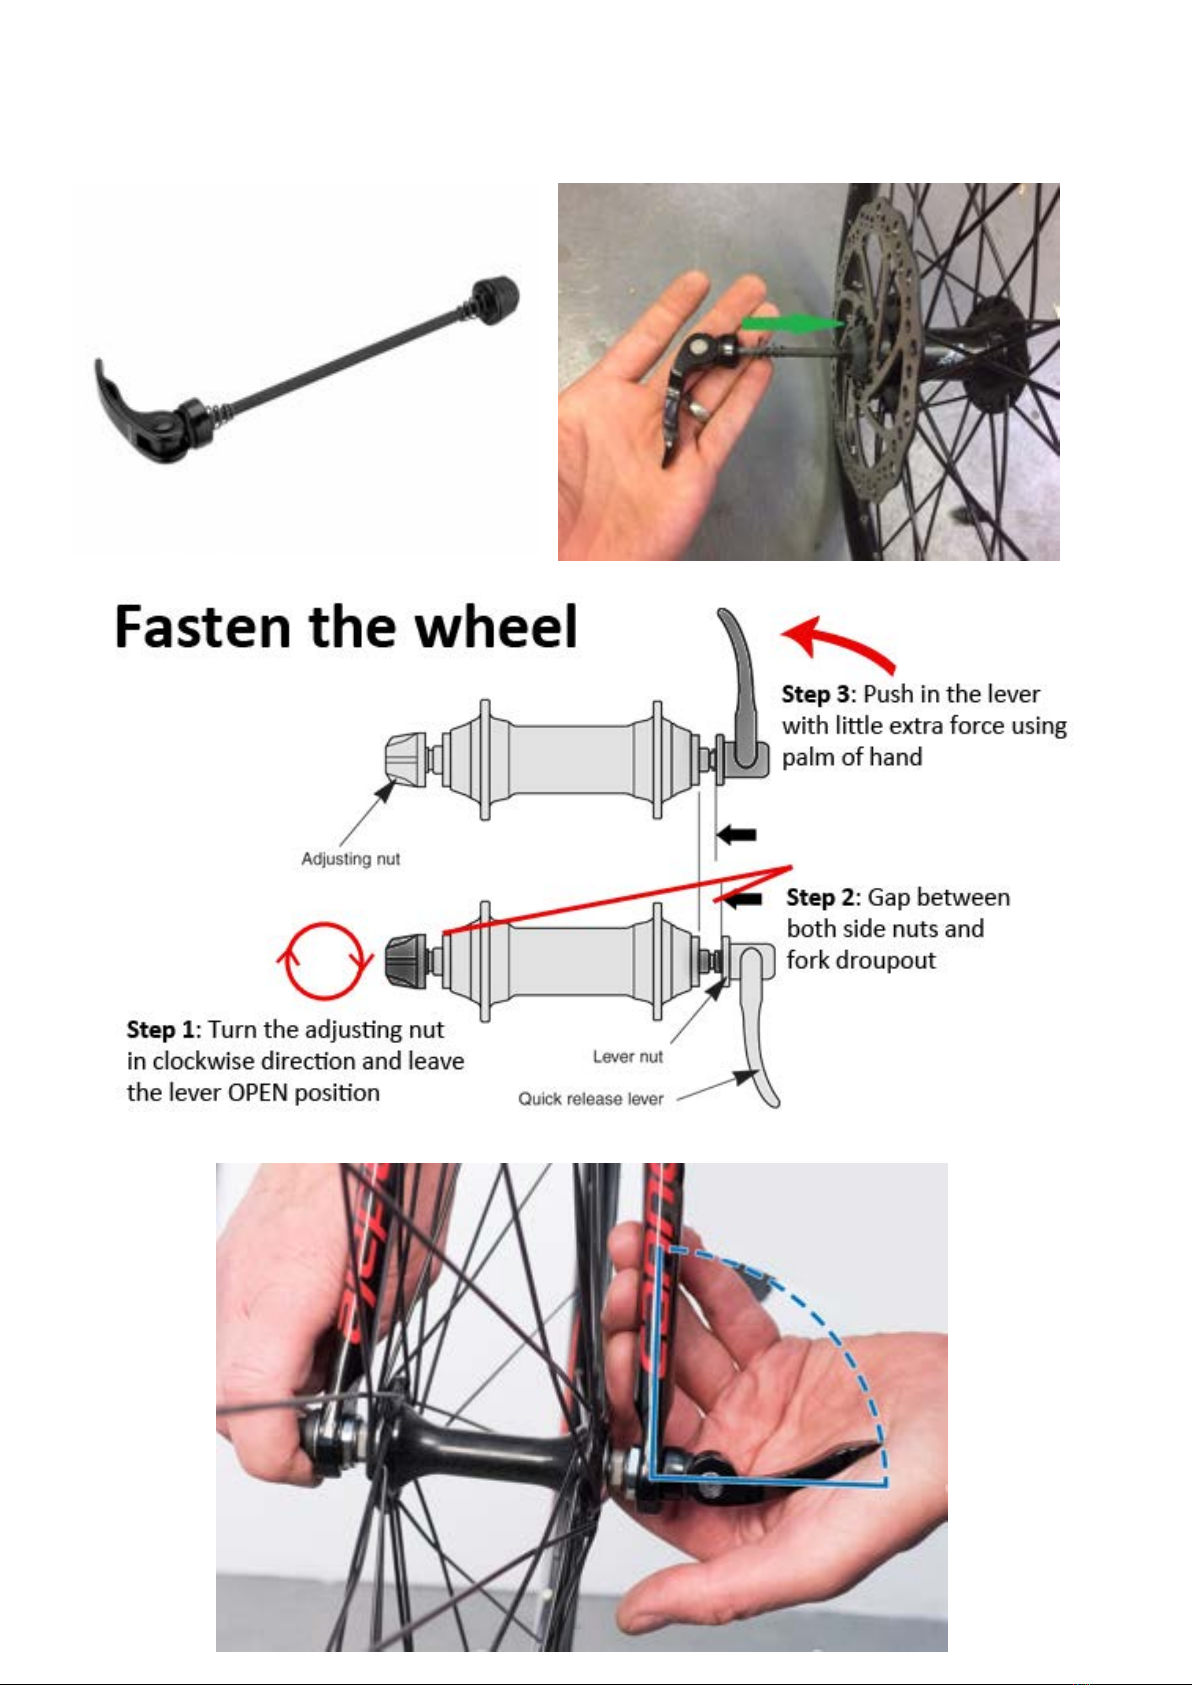
The front wheel uses a quick release axle (fig 1a), this must be inserted through the wheel
before placing the wheel into the forks and tightening the axle.
1a
FOR E-TRIKES ONLY
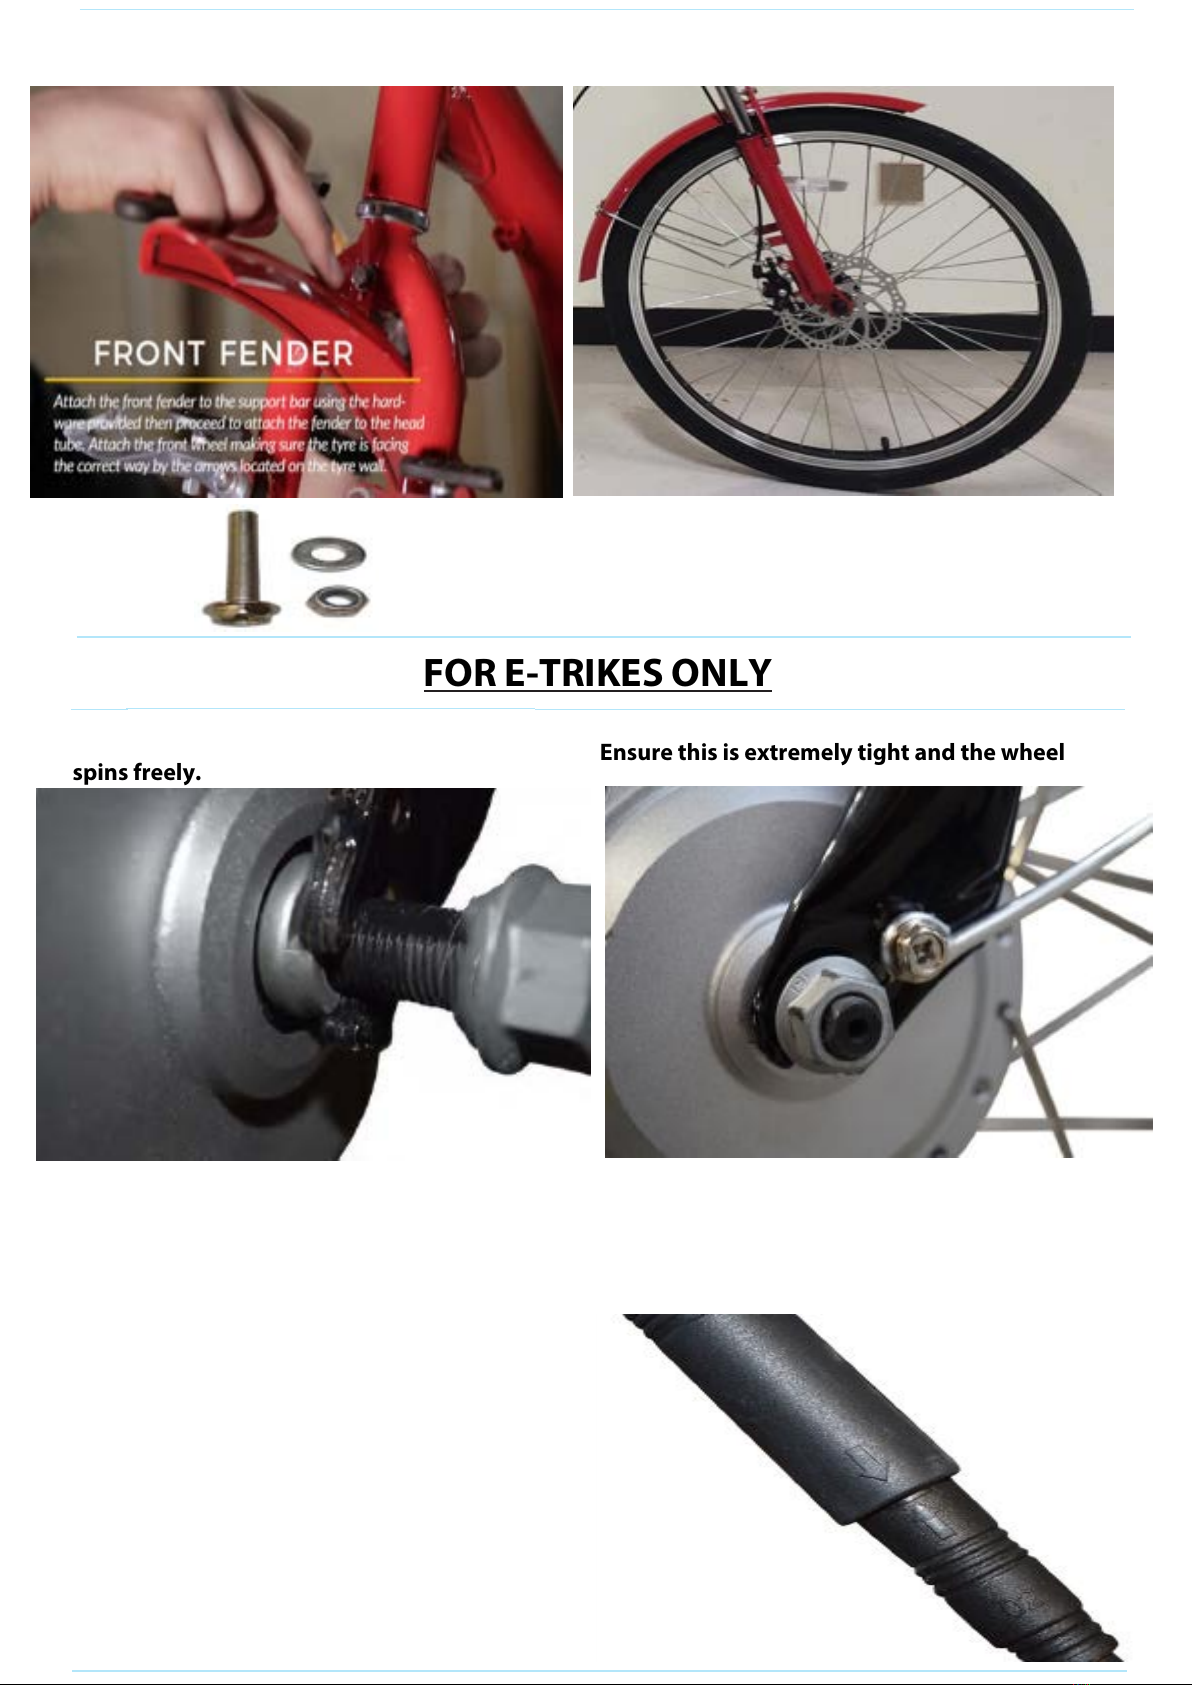
3b. Attach the front fender using hardware . Fig 2
Fig 2
Determine final closing position of lever. Rotate front
lever and adjusting nut so the lever will end up just in
front of fork. Reposition the lever as necessary if it will
not fully close, ensure fully closed before cycling.
3.Attach the front motor wheel. Check the directional arrows on the tyre to ensure it is the correct way.
Motor cable will be on the same side as chain. (right) Ensure this is extremely tight and the wheel
spins freely.
To fit the front wheel (Electric Wheel Hub) remove both plastic caps from the large nut either
side of the tyre and loosen the bolt on each side, insert the wheel into the forks keeping the
smaller washer outside the forks. (washer > locking washer > forks > washer > nut.
3b. POWER CABLE (IMPORTANT)
When joining your cable from the front electric
wheel hub to the cable from your battery, ensure
the two arrows meet as shown here. Once this is
done use the tie wraps to secure the cable to the
forks to keep it safe and tidy.
If the LCD screen shows error 03 then the cable is
not inserted correctly.

4. Fit the chain over the chain wheel, through the rear gear cluster and the Shimano dérailleur and
link together using a chain tool.
Fig 3
5.
You can now proceed to attach the pedals, they are labeled L for the Left side and R for the right.
Attach the chainguard using the hardware in Fig 3.
6.Attach the saddle to the seat pole and insert into the seat tube, tighten with the quick release hatch.
Check for the minimum insertion mark on the tube, insert the tube so it is no longer visible.

8.
Fix the rear brake cable to the left hand lever, run the cable through the guide hole and along the trike
to the rear disc brake.
The front just needs to be fitted to the right hand lever, it is pre-wired into the V-brake.
7.Insert the handlebars into the head-tube, tighten to the required height and angle. Check for the
minimum insertion mark on the stem, insert the stem so it is no longer visible.

Front Disc brake
8b. With wire snippers shorten the excess front brake cable and
fit cable caps ( Fig. 4). Then fit the cable caps to the rear brake
cable and rear gear cable.
Fig 4
The rear cable should be fed into the rear disc brake as shown below, ensure the disc runs smoothly,
pull the cable tight and tighten the brake.
8a.
Feed the front brake cable down into the front
caliper and tighten into place.
Test the wheel spins freely and adjust the brakes to
ensure stopping capabilities.

9.Time for the gears, feed the gear cable through the housing and pass it through
the guide holes on the frame to the rear of the trike
Feed the cable into the derailleur, before tightening the gear cable in place, ensure you have set the max
high and low screws, these screws limit the movement of the derailleur and stop it from coming
off while
changing gears, there is a very helpful video on our instructions page which will teach you how to set
gears. www.buytricycle.com/instructions

ADJUSTMENT - Rear Dérailleur:
The Low limit screw determines how far the rear derailleur will travel toward the wheel of the bicycle, while the High
limit screw determines how far the cage will travel toward the frame.
1. Shift the rear shifter to the largest number
indicated, and place the chain on the
smallest sprocket.
Rear Derailleur Rear View
Freewheel
SIS Cable Adjuster
Outer side of Top Gear
Pulley Adjustment
Screw
Guide Pulley
Tension Pulley
Adjustment
Screws
Rear Derailleur Side View
SIS Cable
Adjuster
High Gear
Adjustment Screw
Low Gear
Adjustment Screw
2. AdjusttheHighlimitscrewsothechainand
the smallest sprocket are lined up vertically.
Remove any slack in the cable by pulling
it taut, then connect the cable through
the cable anchor and bolt securely. Some
derailleurs have an adjusting barrel (see
drawing). Use the adjusting barrel to ne
tune the adjustment of the chain location.
Turning the adjusting barrel clockwise will
move the derailleur outboard - away from
the wheel - while turning it clockwise will
direct the chain inboard - towards the wheel.
3. Usetheadjustingbarreltonetunethe
adjustmentofthechainlocation.Turning
theadjustingbarrelclockwisewillmovethe
derailleur outboard - away from the wheel
- while turning it clockwise will direct the
chain inboard - towards the wheel
4. Shift the chain onto the largest sprocket;
adjustthelowlimitscrewsothechainand
the largest cog are lined up vertically. If you
are unable to get the chain to the largest
cog, turning the Low limit screw counter-
clockwise will enable the chain to move
towards the wheel.
5. Shift through the gears ensuring each gear
is achieved quietly and without hesitation.
11.First, install the 2 rear relfectors in Fig A onto the mudguards, this must be done first because you will
not have access after.
You can now attach the rear fenders using the 6 chrome bars and hardware in fig B & C
Fig B
Attach these to the flat end of the chrome bar
and attach onto trike x 3 each side.
Fig C
Attach these to the curved end of the chrome bar
and onto the mudguard x 3 each side.
Fig A
Inhaltsverzeichnis
Andere BuyTricycle Fahrrad Handbücher


