CYP PUV-3150TR-UEAO Bedienungsanleitung

PUV-3150TR-UEAO
UHD+ HDMI over HDBaseT 3.0 Transceiver with USB,
KVM, LAN with Analogue & Digital Audio Pathways
OPERATION MANUAL


DISCLAIMERS
The information in this manual has been carefully checked and is
believed to be accurate. CYP (UK) Ltd assumes no responsibility for any
infringements of patents or other rights of third parties which may result
from its use.
CYP (UK) Ltd assumes no responsibility for any inaccuracies that may be
contained in this document. CYP (UK) Ltd also makes no commitment to
update or to keep current the information contained in this document.
CYP (UK) Ltd reserves the right to make improvements to this document
and/or product at any time and without notice.
COPYRIGHT NOTICE
No part of this document may be reproduced, transmitted, transcribed,
stored in a retrieval system, or any of its part translated into any language
or computer le, in any form or by any means—electronic, mechanical,
magnetic, optical, chemical, manual, or otherwise—without express
written permission and consent from CYP (UK) Ltd.
© Copyright 2021 by CYP (UK) Ltd.
All Rights Reserved.
Version 1.1
TRADEMARK ACKNOWLEDGMENTS
All products or service names mentioned in this document may be
trademarks of the companies with which they are associated.

SAFETY PRECAUTIONS
Please read all instructions before attempting to unpack, install or operate
this equipment and before connecting the power supply. Please keep the
following in mind as you unpack and install this equipment:
• Always follow basic safety precautions to reduce the risk of re,
electrical shock and injury to persons.
• To prevent re or shock hazard, do not expose the unit to rain,
moisture or install this product near water.
• Never spill liquid of any kind on or into this product.
• Never push an object of any kind into this product through any
openings or empty slots in the unit, as you may damage parts inside
the unit.
• Do not attach the power supply cabling to building surfaces.
• Use only the supplied power supply unit (PSU). Do not use the PSU if
it is damaged.
• Do not allow anything to rest on the power cabling or allow any
weight to be placed upon it or any person walk on it.
• To protect the unit from overheating, do not block any vents or
openings in the unit housing that provide ventilation and allow for
sucient space for air to circulate around the unit.
• Please completely disconnect the power when the unit is not in use
to avoid wasting electricity.
VERSION HISTORY
REV. DATE SUMMARY OF CHANGE
v1.00 2021/04/07 Preliminary release

CONTENTS
1. Introduction..................................................1
2. Applications ..................................................1
3. Package Contents .........................................2
3.1 Single Unit..............................................................2
3.2 Dual Unit Set .........................................................2
4. System Requirements ..................................2
5. Features.........................................................3
6. Operation Controls and Functions..............4
6.1 Front Panel.............................................................4
6.2 Rear Panel...............................................................6
6.3 IR Cable Pinouts ...................................................7
6.4 RS-232 Pinout........................................................7
7. Connection Diagram ....................................8
8. Specications................................................9
8.1 Technical Specications ....................................9
8.2 Video Specications......................................... 11
8.3 Audio Specications........................................ 13
8.3.1 Digital Audio ........................................... 13
8.3.2 Analogue Audio..................................... 14
8.4 Cable Specications ........................................ 15
8.5 HDBaseT Features............................................. 16
9. Acronyms.....................................................17

1
1. INTRODUCTION
This 4K UHD+HDMI over HDBaseT Transceiver uses HDBaseT 3.0, the
newest generation of HDBaseT technology, and is the perfect solution for
extending full bandwidth (18Gbps) HDMI 2.0, 4K@60Hz (4:4:4, 8-bit) video
with HD audio as well as Ethernet and control via a single run of Cat.6A/7
cable over distances of up to 100 meters. This transceiver unit can be
congured to function as either a transmitter or a receiver, enhancing the
exibility of any installation. Multiple control and data signals may also be
transmitted along with the audio and video, including bi-directional IR,
RS-232, USB 2.0, and Gigabit Ethernet.
When two of these transceivers are used together, 2 USB 2.0 host (Type-B)
connections are available (1 on the transmitter, 1 on the receiver) which
will connect the host to devices on up to 4 USB 2.0 (Type-A) ports (2
on the transmitter, 2 on the receiver) forming a highly exible KVM
extension conguration (Note: Only 1 USB host may be active at a time).
This transceiver is ideal for use in any video extension scenario, but it
excels when latency-free, uncompressed video is critical, such as medical
installations, live conferences, and education. This unit is controllable via
front panel buttons.
2. APPLICATIONS
Household entertainment sharing and control
Lecture room display and control
Meeting room presentation and control
Classroom display and control

2
3. PACKAGE CONTENTS
3.1 Single Unit
1× UHD+HDMI over HDBaseT Transceiver with USB KVM
1× 48V/0.83A DC Power Adapter
3× 3-pin Terminal Block
1× Operation Manual
3.2 Dual Unit Set
2× UHD+HDMI over HDBaseT Transceiver with USB KVM
1× 48V/0.83A DC Power Adapter
6× 3-pin Terminal Block
1× Operation Manual
4. SYSTEM REQUIREMENTS
HDMI source equipment such a media player, video game console, or
set-top box.
HDMI receiving equipment such as an HDTV, monitor, or audio
amplier.
The use of Premium High Speed HDMI cables, and industry standard
Cat.6A or Cat.7 Ethernet cable is highly recommended.

3
5. FEATURES
HDMI 2.0 and DVI 1.0 compatible
HDCP 2.2 and HDCP 1.x compliant
HDBaseT 3.0 compliant (Backwards compatible with HDBaseT 2.0/1.0)
Supports up to 4K UHD+(18Gbps, 4K@50/60Hz 4:4:4, 8-bit) video input
and output over both HDMI and HDBaseT
Supports Deep Colour input and output up to 12-bit
Supports 10-bit and 12-bit HDR (High Dynamic Range) input/output
Supports CEC bypass
HDBaseT extends video, audio and data over a single Cat.6A/7 cable
and can reach distances up to 100m/328ft
HDBaseT feature support: HD Video and Audio, Gigabit Ethernet,
Bi-directional PoH, Bi-directional audio (optical and analogue), and
Control
(bi-directional USB/IR/RS-232 pass-through)
Selectable HDMI or HDBaseT input in receiver mode
2 USB 2.0 Type-A device ports and 1 USB 2.0 Type-B host port
Note: Only one host port can be active at a time. The active USB host port
is automatically selected between the connected transmitter and receiver.
HDMI output functions as a local monitor when in transmitter mode
Can either receive or provide power via PoH over the HDBaseT
connection allowing for exible installation options.
Controllable via front panel buttons.
4
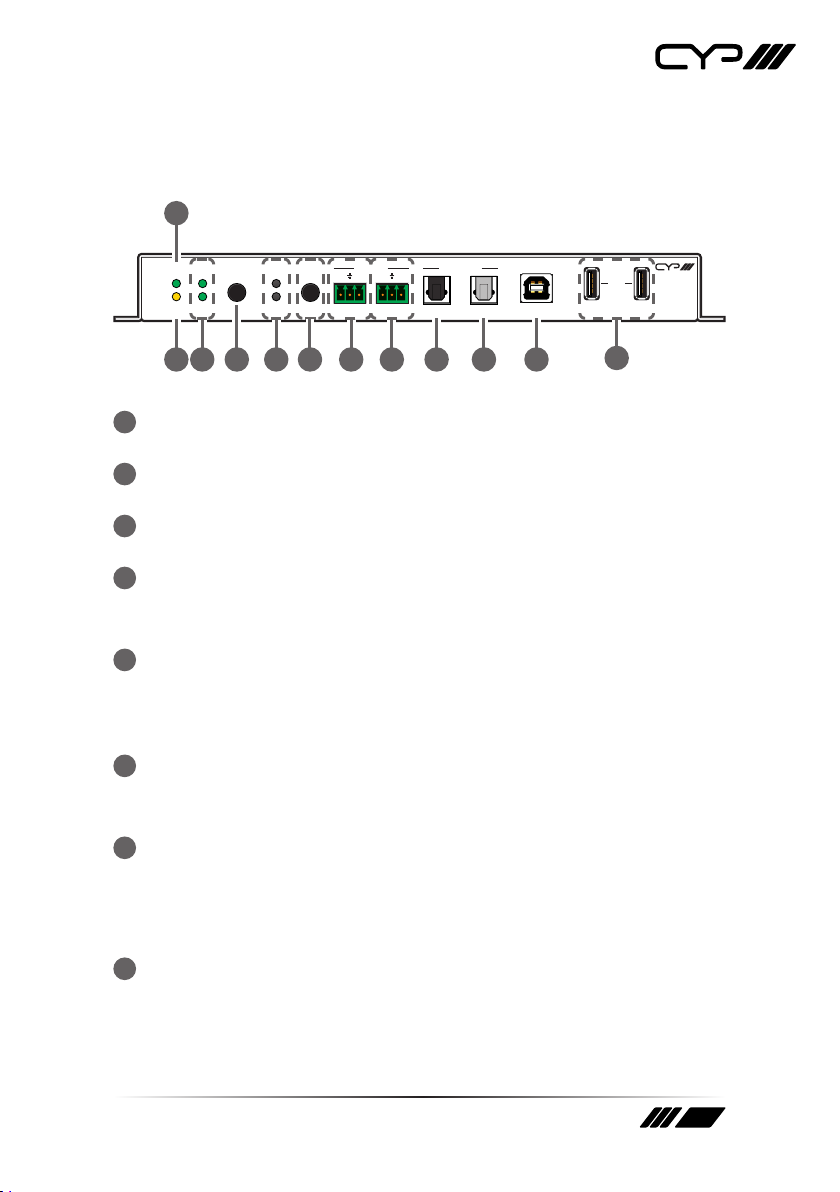
6. OPERATION CONTROLS AND FUNCTIONS
6.1 Front Panel
POWER
PUV-3150TR-UEAO
T/R AUDIO
OUTIN OUTINLINK
T
R
HDMI
HDBT
LR LR
USBOPTICALVIDEO
IN
USB
(SERVICE)
10 116 7 12
8 952
1
3 4
1POWER LED: This LED will illuminate to indicate the unit is on and
receiving power.
2LINK LED: This LED will illuminate solidly when a live connection with
a compatible transmitter/receiver is active.
3T & R LEDs: These LEDs will illuminate to indicate if the unit is in
transmitter (T) or receiver (R) mode.
4T/R Button: Press this button to toggle the unit’s mode between
transmitter mode and receiver mode.
Note: The switching modes will also result in the unit rebooting.
5HDMI & HDBT LEDs: These LEDs will illuminate to indicate which
input is currently selected.
Note: When the unit is in the transmitter mode, only the HDMI input can
be selected as a source.
6VIDEO IN Button: Press this button to toggle between the HDMI and
HDBaseT inputs when in receiver mode.
Note: This button has no function when the unit is in transmitter mode.
7AUDIO IN 3-pin Terminal Block: Connect to the analogue audio
output of a device such as a media player or game console using
a 3-pin adapter cable. Audio is sent to the analogue audio 3-pin
terminal block output on the connected compatible transmitter/
receiver.
8AUDIO OUT 3-pin Terminal Block: Connect to powered speakers or
an amplier for analogue audio output using a 3-pin adapter cable.
Audio is sourced from the analogue audio 3-pin terminal block input
on the connected compatible transmitter/receiver.

5
9OPTICAL IN Port: Connect to the optical audio output of a device
such as a media player or game console using an appropriate optical
cable. Audio is sent to the optical audio output on the connected
compatible transmitter/receiver.
10 OPTICAL OUT Port: Connect to powered speakers or an amplier
for digital audio output using an appropriate optical cable. Audio
is sourced from the optical audio input port on the connected
compatible transmitter/receiver.
11 USB (SERVICE) Port (Type-B): Connect directly to a standard USB
host such as a PC or laptop to extend their USB functionality to all
currently connected USB devices.
Note: Only one USB host (Type-B) port may be active at a time. If a new
host is connected to another USB Type-B port, both the transmitter and
receiver will automatically reboot to complete the host change.
12 USB Ports (Type-A): Connect directly to a standard USB device such
as a mouse, keyboard, or ash drive to extend their USB functionality
to the currently active USB host (Type-B) port.
Inhaltsverzeichnis
Andere CYP Transceiver Handbücher

CYP
CYP COH-TR6 Bedienungsanleitung

CYP
CYP CH-V502TR Bedienungsanleitung

CYP
CYP AVX-501F-TR Bedienungsanleitung

CYP
CYP AVX-501C-TR Bedienungsanleitung

CYP
CYP CH-U331TR Bedienungsanleitung

CYP
CYP CDPS-P314EDC Bedienungsanleitung

CYP
CYP COH-TR7 Bedienungsanleitung

CYP
CYP CH-701TR Bedienungsanleitung

CYP
CYP CH-V501TR Bedienungsanleitung

CYP
CYP SDV-FTRX Bedienungsanleitung


