
Dartel LJ-110B Bedienungsanleitung
User guide
Please read these instructions
carefully before use and keep
this User Guide for future
reference!
LJ-110B

1
User Guide
LJ-110B
Please read these instructions
carefully before use and keep this
User Guide for future reference.

2
Contents LJ- 110B
Contents
I. Introduction......................................................................................... 3
Telephone features............................................................................... 3
Function button index............................................................................ 5
II. Getting started................................................................................... 7
How to connect the batteries................................................................ 7
How to connect the handset and telephone line................................... 7
How to set the dial mode for your type of telephone exchange............ 8
III. Using the telephone......................................................................... 9
How to set the display contrast............................................................. 9
How to set date and time...................................................................... 10
Ringer volume control........................................................................... 11
How to select ringer melody.................................................................. 11
2-way speaker function......................................................................... 12
How to make a call............................................................................... 12
How to receive a call............................................................................. 13
OUT memory........................................................................................ 13
How to delete the OUT number............................................................ 14
Redial function...................................................................................... 15
How to enter a pause............................................................................ 15
Hold function......................................................................................... 15
Two touch dial memory......................................................................... 16
Flash function........................................................................................ 18
How to lock telephone numbers............................................................ 19
Alarm function....................................................................................... 19
“Don’t disturb” function.......................................................................... 21
Calculator.............................................................................................. 22
IV. Clip (Caller ID) – Calling line identification presentation............. 23
How to review Clip numbers................................................................. 24
How to delete Clip numbers.................................................................. 24
VIP function.......................................................................................... 25
How to make a call from the Clip memory............................................ 25
How to set the local area code.............................................................. 26
V. Wall mounting.................................................................................... 28
VI. Help................................................................................................... 29
Important advice.................................................................................. 30
Declaration of Conformity………………………………………………… 31

3
I. Introduction LJ-110B
I. Introduction
Important!
Please read these instructions carefully before use and keep this User Guide
for future reference.
Telephone components supplied:
! telephone set (base unit + handset),
! handset cord,
! line cord,
! user guide,
! guarantee card.
# Telephone features
♦ 16-digits, blue backlit LCD display
♦ 7 number memory
♦ Calculator
♦ CLIP(Caller ID) – calling line identification
presentation in FSK/DTMF European
system
- maximum of 52 memory locations
- telephone number review
- date and time display
- local area code enter
- call back
- VIP function
♦ Alarm-clock
♦ Call timer
♦ Adjustable display contrast
♦ Date and time setting
♦ Calendar
♦ Handset volume control
♦ Last numer redial
♦ Maximum of 28 redial memory
♦ Pause

4
I. Introduction LJ-110B
♦ 2-way speaker function
♦ Pre-dial function
♦ Flash
♦ 16 types of ringer sound selectable
(8 melody ringers)
♦ Ringer volume control
♦ „Don’t disturb” function
♦ Music on hold
♦ Tone/pulse dialing
♦ Lock for long distance calls
♦ Lighted keypad
♦ Wall mounting

5
I. Introduction LJ-110B
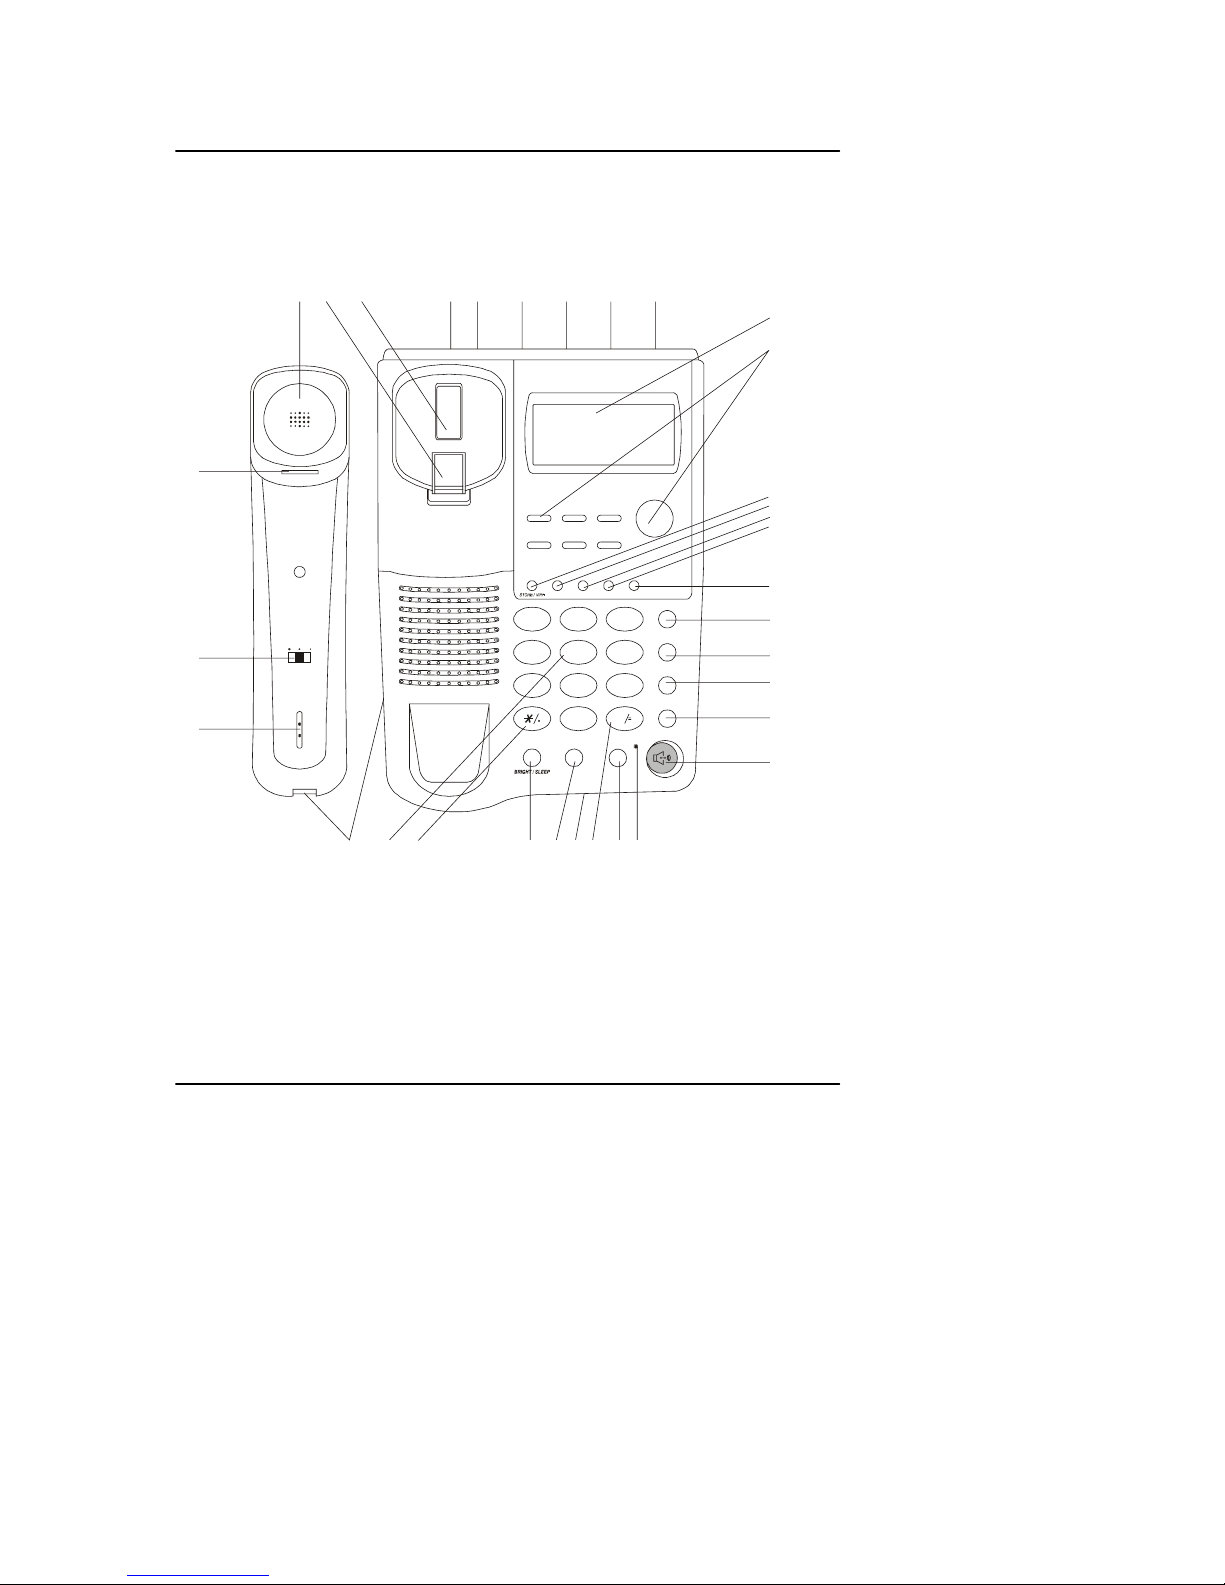
# Function button index
1. Handset loudspeaker
2. Wall clip
3. Hook switch
4. Line socket TEL IN
5. Second line socket TEL OUT
6. DIAL MODE T/P switch
7. RINGER Hi-Low switch
8. VOLUME Hi/Low switch
9. DC9V socket for connecting the adaptor
10. Display
11. M1...M7 buttons
12. STORE/VIP/÷
÷÷
÷button
13. OUT/X button
14. DOWN/- button
15. UP/+ button
16. CAL button
17. RECALL button
18. DEL button
19. SET/HOLD button
20. BACK button
21. SP-PHONE button
22. Handset hole
23. VOLUME HI/LOW switch
24. Handset microphone
25. Handset socket
26. Keypad
27. */. button
28. BRIGHT/SLEEP button
29. FLASH button
30. Base microphone
31. #/= button
32. RD/P button
33. IN USE indicator
6
I. Introduction LJ-110B
Note!
The line sockets, the RINGER Hi/Low switch, the VOLUME Hi/Low switch, the DIAL MODE
T/P switch, the DC9V socket, the handset socket are located on the side of the base unit. In
addition, on the bottom of the base unit, is the socket for blocking telephone numbers.
12
A
BC
3
DEF
4
GHI
5
JKL
6
MNO
7
PQRS
8
TUV
9
WXYZ
0
#
S
P
-
P
H
O
N
E
M1 M2 M3
M4 M5 M6
M7
OUT / X DOWN / - UP / + CAL
RECALL
DEL
SET / HOLD
BACK
FLASH RD / P
IN US E
VOLUME
HI LOW
123 456789
10
11
12
13
14
15
16
17
18
19
20
21
22
23
24
25 26 27 28 29 30 31 32 33

7
II. Getting started LJ-110B
II. Getting started
# How to connect the batteries
♦ Remove the cover of the battery
compartment on the underside of the base
unit.
♦ Fit three 1,5V AA batteries, being careful
to match the “+” and “-“ signs on the
batteries to the signs marked on the
battery compartment itself.
♦ Replace the battery compartment cover.
Note!
Instead of batteries, the adaptor to the DC9Vsocket, which is placed on the side of the base
unit can be connected. The parameters of the adaptor must be as follows:
! inside voltage –
UIN = 230V, f =50 Hz
! outside voltage–
Uout = 9V DC
! current
Ioutmin = 100 mA
! standard plug (
Φ
=2.1 mm)
with „-” inside.
Adaptor is not in complete!
# How to connect the handset and telephone line
♦ Plug one end of the coiled handset cord
into the handset and the other end into
the socket on the side of the telephone.
♦ Insert the base unit’s telephone line plugs
into the PTT wall socket and telephone
socket TEL IN as shown on the illustration.
Note!
The telephone is equipped with two line sockets. These sockets are connected in parallel. It does
not matter, where the telephone line and second telephone are connected.

8
II. Getting started LJ-110B
After connecting the telephone, the display shows the following settings:
! 00- counter of CLIP numbers,
! 00:00- clock,
! 1M- month,
! 1D- day,
! 2003 – year,
! WED – Wednesday.
These symbols will be always displayed in the
standby mode.
# How to set the dial mode for your type of telephone exchange
These are two different modes a telephone
can use to communicate with the local
exchange. Modern telephone exchanges
accept TONE dialling, but some older
exchanges accept only PULSE dialling. This
telephone is capable of either type of dialling-
but if your local telephone exchange is a
modern one that accepts TONE dialling, this is
the best type to use, because:
! it gives you much faster connections,
! it allows you to use special functions if
they are available in your area.
To set the right dial mode:
move the DIAL MODE T/P switch to T or P
position.
Note!
Special functions are available only if the relevant TP S.A. services have been subscribed to.
If more information is required, please contact the BOK office or your network provider.
YOUR TELEPHONE IS NOW READY FOR USE!!!
MD
IN
WED

9
III. Using the telephone LJ-110B
III. Using the telephone
# How to set the display contrast
The display contrast can be set in two ways.
1. The first way.
To set the display contrast:
♦ press the SET/HOLD button. The display
will show - 0 1 2 3 4 5 6 7 -.
♦ Press the 2button. The display will show
LCd - 3 -.
♦ Press the UP/+ or DOWN/- button to
select the right contrast.
♦ Press the SET/HOLD button to confirm
the setting. The display will show
- 0 1 2 3 4 5 6 7 – again.
♦ Press the DEL button to return to the
standby mode.
If no further buttons are pressed, the
telephone will return to standby mode after
several seconds. The setting will be stored.
2. The second way.
To set the display contrast:
♦ press the BRIGHT/SLEEP button until you
set the right contrast.
♦ Press the DEL button to return to the
standby mode.
If the DEL button is not pressed, the
telephone will return to standby mode
after several seconds. The setting will be
stored.
SET / HOLD
DOWN / - UP / +
DEL
DEL
Dieses Handbuch passt für folgende Modelle
1
Inhaltsverzeichnis
Andere Dartel IP-Telefon Handbücher


