
FineDigital FineDrive 400 Bedienungsanleitung

1
Finedrive
FINEDRIVE 400
User’s Guide

2
Caution
WARNING: TO REDUCE THE RISK OF FIRE OR ELECTRIC SHOCK, DO NOT EXPOSE THIS APPLINCE TO RAIN OF
MOISTURE.
CAUTION: TO REDUCE THE RISK OF ELECTRIC SHOCK, DO NOT REMOVE COVER (OR BACK). NO USE-
SERVICEABLE PARTS INSIDE. REFER SERVICING TO QUALIFIED SERVICE PERSONNEL.
Fine Digital makes no warranty as to the accuracy or completeness of map data in this
product and disclaims any and all express, implied or statutory warranties, including any
implied warranty of merchantability or fitness for a particular purpose. It is the user’s
responsibility to use this product prudently. This product is intended to be used only as a
travel aid and must not be used for any purpose requiring precise measurement of direction,
distance, location or topography.
NOTICE TO DRIVERS IN CALIFORNIA AND MINNESOTA: State law prohibits drivers
in California and Minnesota from using suction mounts on their windshields while operating
motor vehicles. Other Fine Digital dashboard or friction mounting options are recommended.
Fine Digital does not take any responsibility for any fines, penalties, or damages that may be
incurred as a result of disregarding this notice. (See California Vehicle Code Section
26708(a); Minnesota Statutes 2005, Section 169.71)
Warning: This product, its packaging and its components contain chemicals known to the
State of California to cause cancer, birth defects or reproductive harm. This Notice is being
provided in accordance with California’s Proposition 65.
The Finedrive FINEDRIVE 400 is not waterproof.

3
Contents
CAUTION.......................................................................................................................................................2
CONTENTS....................................................................................................................................................3
NAVIGATION.................................................................................................................................................4
GETTING STARTED.........................................................................................................................................4
MAP SCREEN.................................................................................................................................................5
PLANNING YOUR ROUTE .................................................................................................................................9
ADDING DETOURS AND STOPOVERS ..............................................................................................................31
MANAGING YOUR FAVORITES LIST .................................................................................................................34
SETTING YOUR OPTIONS...............................................................................................................................36
TECHNICAL SUPPORT ..............................................................................................................................43
APPENDIX...................................................................................................................................................44
FCC COMPLIANCE.......................................................................................................................................44
4
Navigation
Getting Started
To start the unit
Press the POWER button. The screen will display the Home Screen.
To start Navigation, tap the Navigation icon.
Tap the OK button after you have read and agreed to the warning. The map screen appears and you are
ready to set your first destination.
Getting a GPS signal
To use the unit to guide you to a destination, the unit must be receiving signals. GPS signals can be
obstructed by ceilings, trees and nearby tall buildings. Signals can also be obstructed by the root of your
vehicle. For best results, position your unit where it has a clear view of the sky.
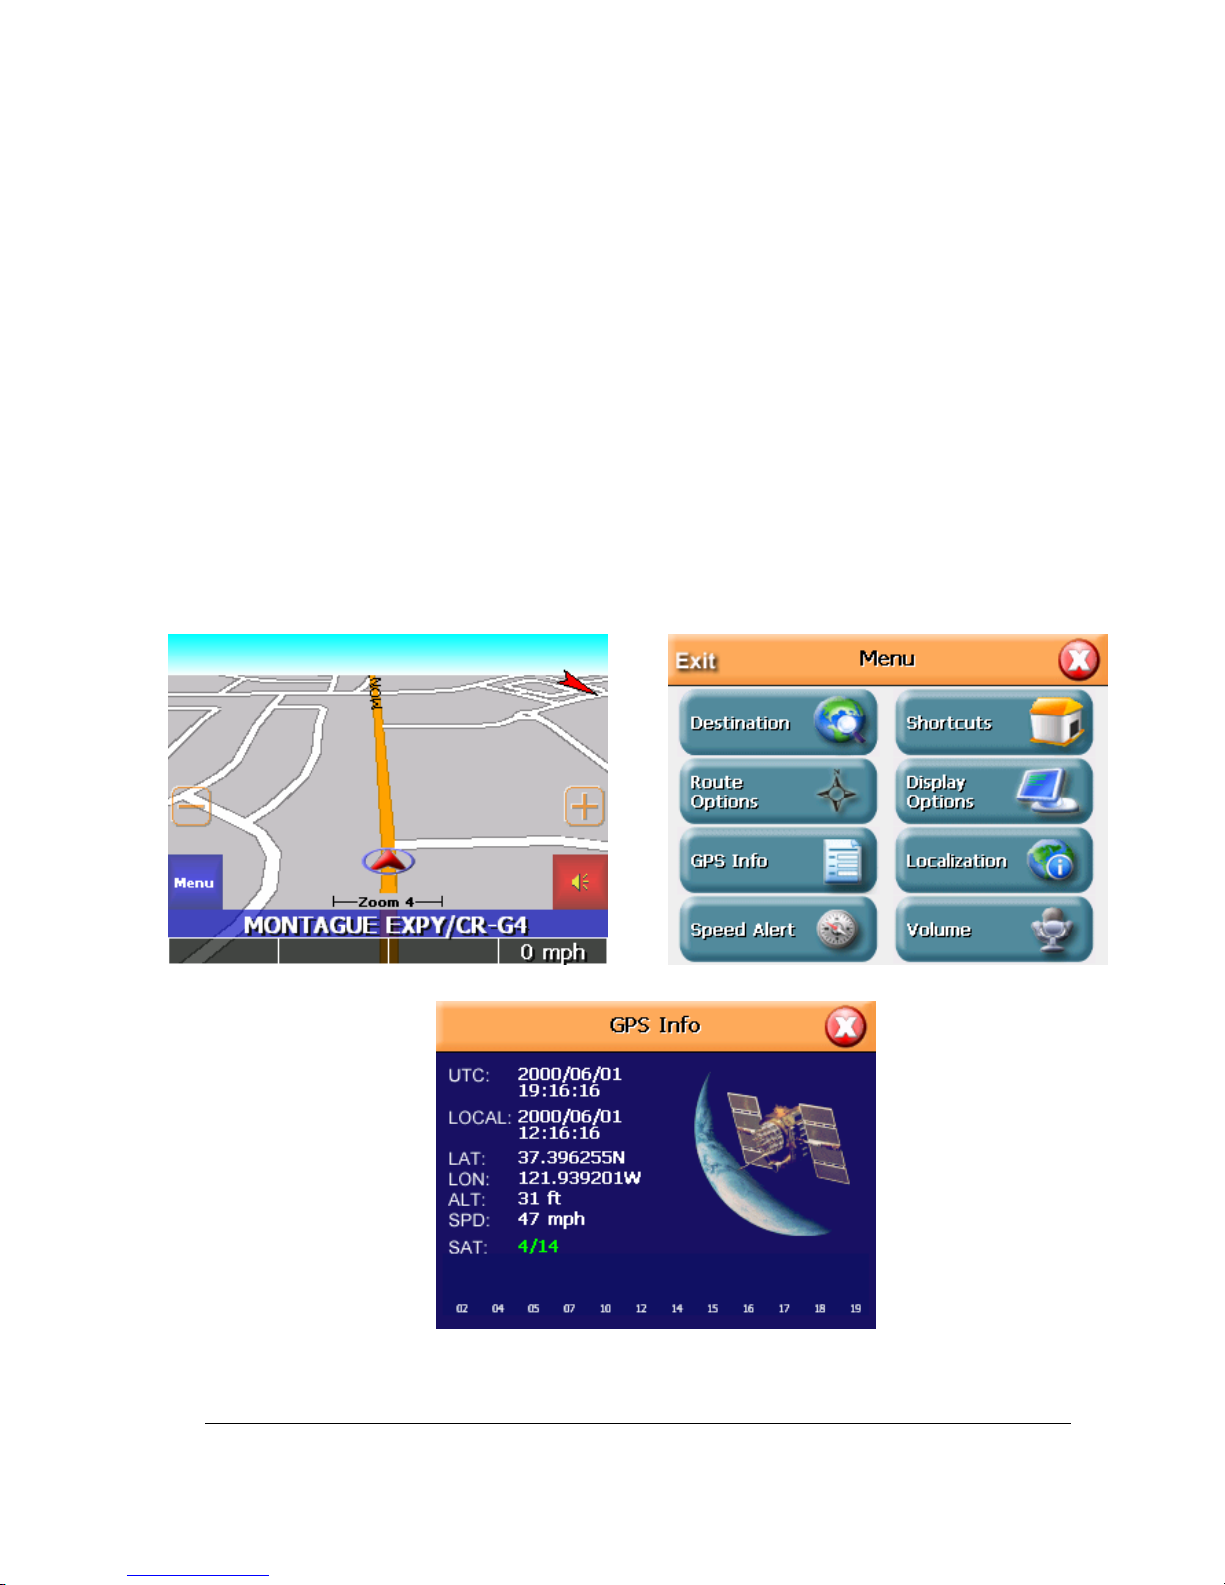
TO CHECK THE STATUS OF YOUR GPS SIGNAL
1. Tap the Menu button on Map screen and then GPS Info.
▶
2. The GPS info screen appears.
3. To close the GPS info screen, tap the red X in the upper right corner.
5
Map screen
The unit gives you many ways of looking at the map. You can see your current position, you can view any
of the maneuvers on a route, and you can pan the map to view other areas. You can find information
about specific locations.
Map view
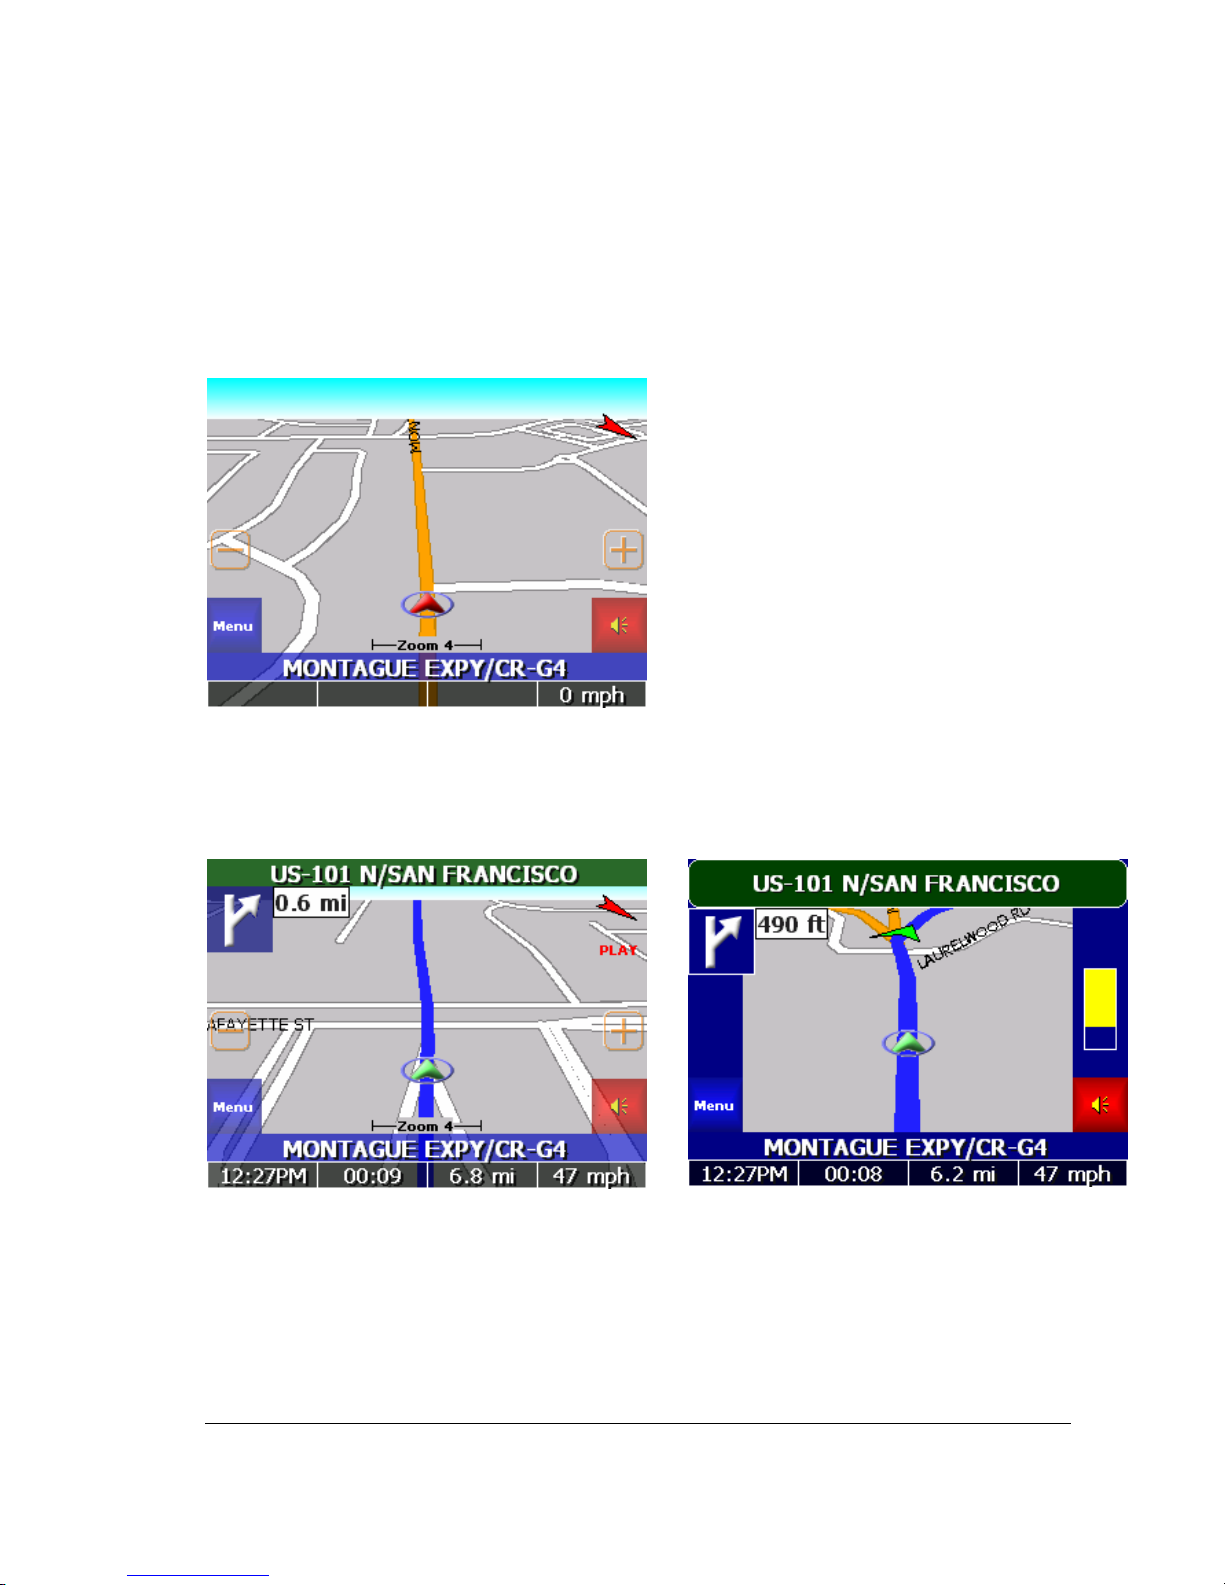
If you a GPS signal, the map view on the unit show you your current location, indicated by a green arrow.
If the arrow is red, you do not have a GPS signal, and if the arrow is yellow the GPS signal is weak.
At the bottom of the map is a scale indicating your current zoom level.
Maneuver detail
If you have set a destination, the map displays additional information. As you navigate to a destination, the
top of the map displays the name of the next street, the direction of your next turn and the distance to that
turn.
At the bottom of the map you see the time, an estimate of how much time before you arrive at your
destination, the remaining distance to your destination, and your current speed.
Panning the map
You can pan the map by tapping and dragging the map

6
To return to the regular map view, press the “X”
Button.
7
Route list
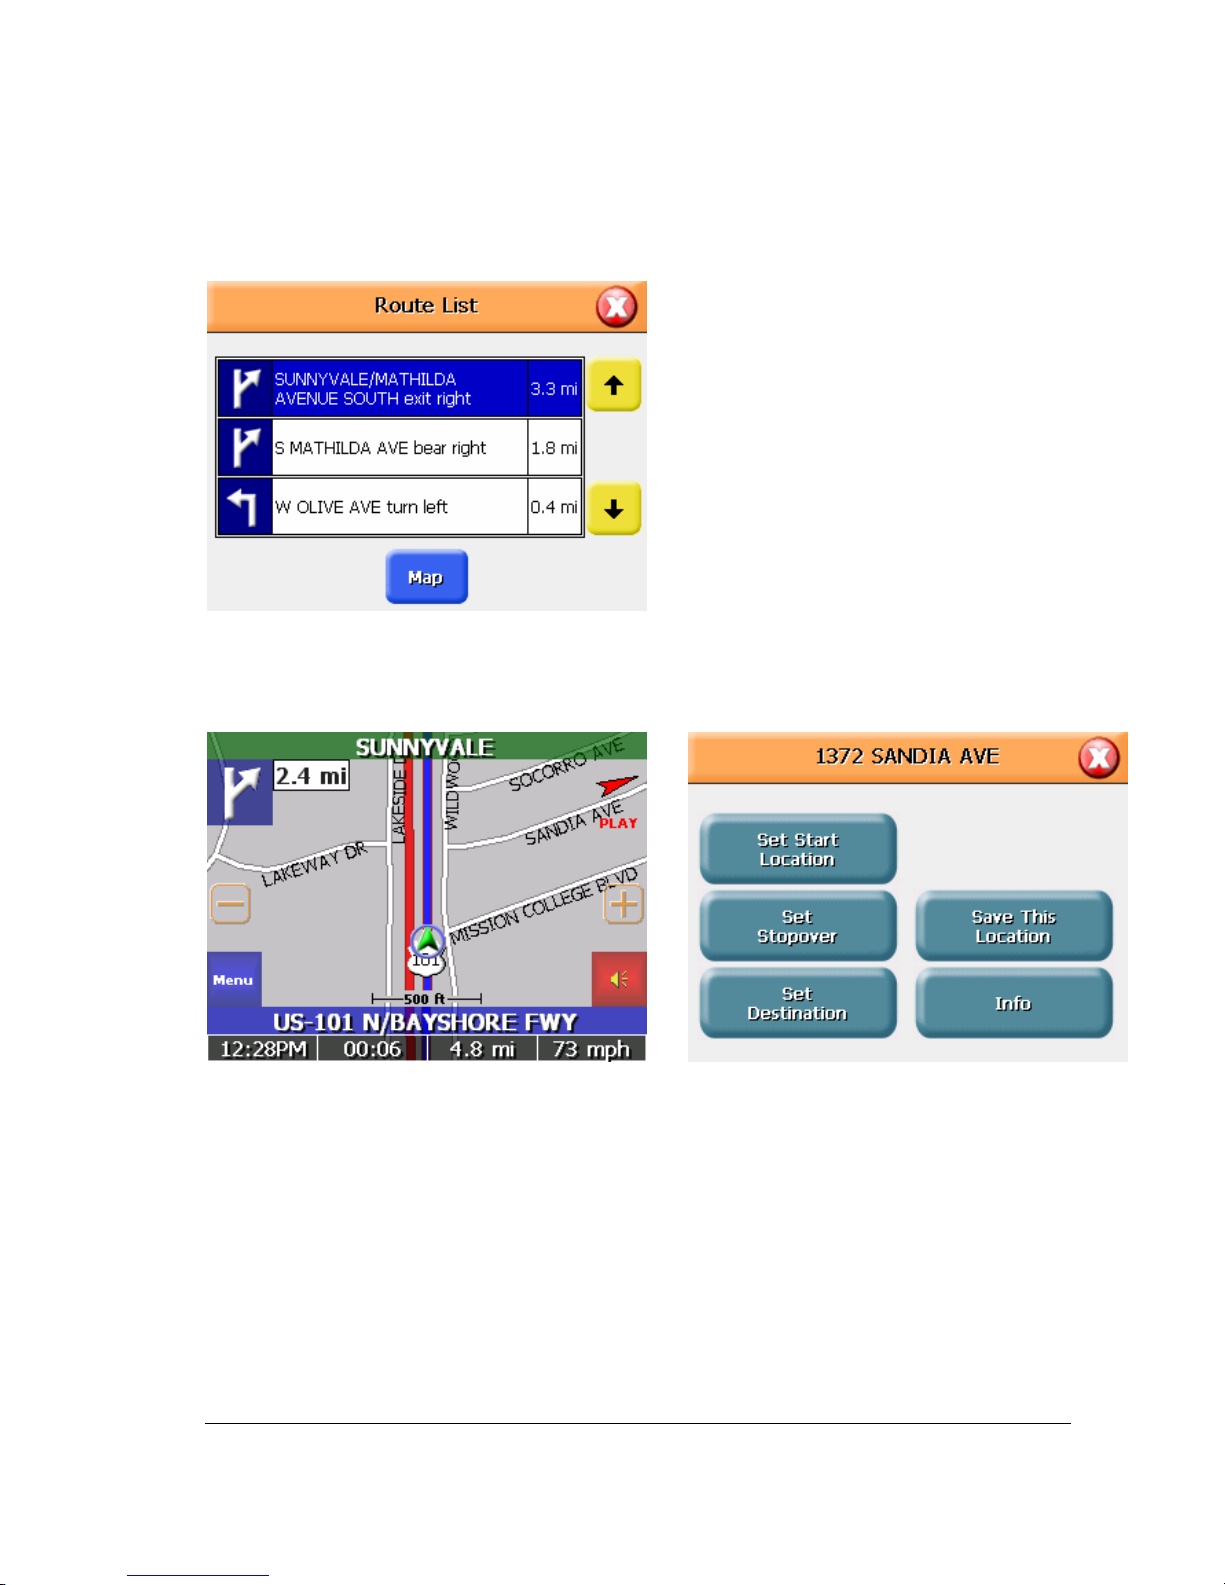
If you have set a destination, you can view a list of the maneuvers that make up your route by pressing the
right side of the wheel button. Tapping an item on the list and then tapping Map will display the maneuver
detail screen for that maneuver.
Location and POI information
You can find location information about any point on the map by pressing firmly on the map. A screen
appears giving you the opportunity to set the location as the Start or the Destination, save the location to
your Favorites list, or view information.
From the information screen you have several options:
zSet start location
zSet destination
zSave this location
zInformation
Setting the location as a starting point is useful if you are trying to find the distance between two locations.
Setting the location as your destination is a quick way to set a destination. Saving the location adds the
location to your Favorites list (you’ll learn more about Favorites later in this manual)
If you press firmly on a POI (Point of Interest) icon, you see the POI(S) screen, which lists the POIs at
that location the map.
TO VIEW LOCATION INFORMATION
1. To view information about location on the map, press firmly on the map. The address information screen
appears.

8
2. Tap information. The information screen appears, giving you block information about the location, including
latitude and longitude.
TO VIEW POI INFORMATION
1. To view information about POI on the map, press firmly on the icon on the map. The POI(s) screen appears.
2. Tap information. The information screen appears, giving you block information about the location, including
latitude and longitude.

9
Planning your route
You can set a destination with the unit many different ways. Once you have set a destination, you can add
a detour or a stopover.
The unit also offers an Itinerary feature, where you can enter up to 50 destinations and use the Itinerary
screen to move the addresses into any order like you.
Setting the home address
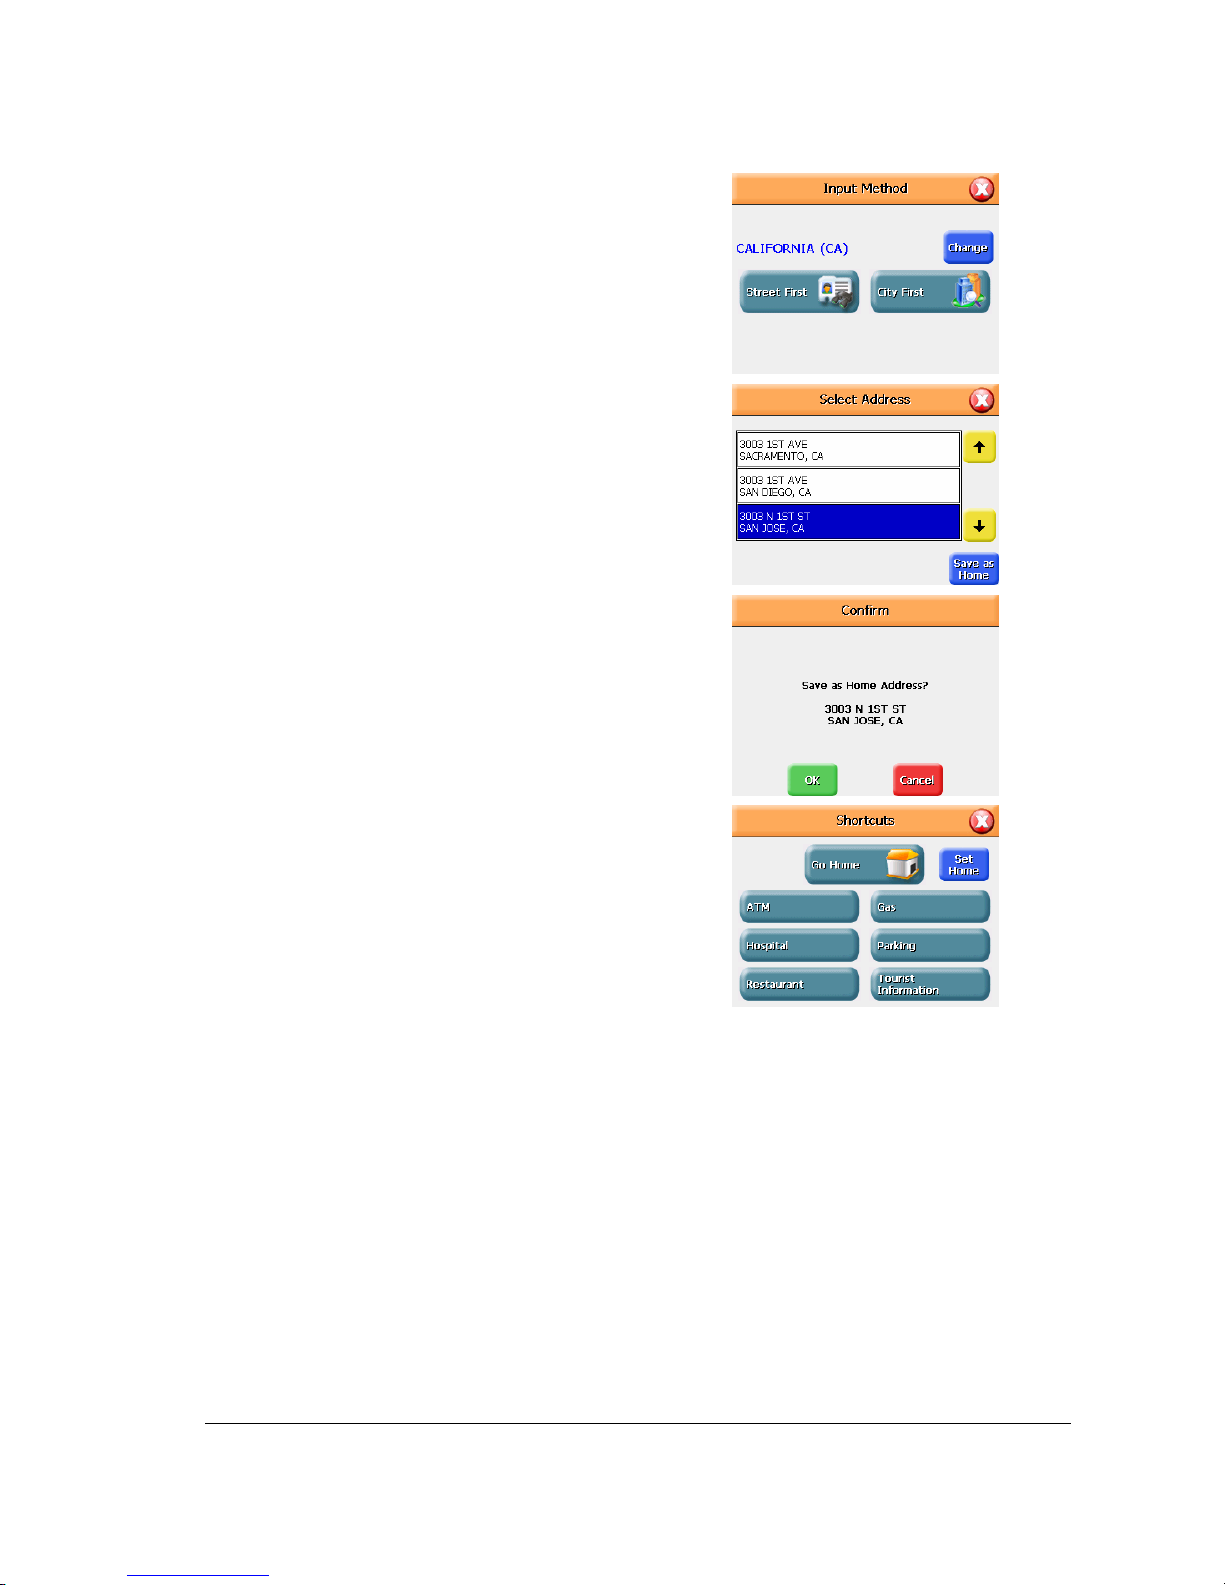
TO ENTER YOUR HOME ADDRESS:
Tap Menu. The main menu appears
Tap Shortcut button on the screen
Tap Set Home button next to the Go Home button.
10
Enter your street name, followed by your street number.
Select the match.
Tap Save as Home button
Tap on OK to confirm
Tap on Go Home to quick computer the route to your home.
Inhaltsverzeichnis
Andere FineDigital GPS Handbücher

FineDigital
FineDigital FineDrive 350 Bedienungsanleitung

FineDigital
FineDigital FineDrive 300 Bedienungsanleitung

FineDigital
FineDigital Finedrive 500 Bedienungsanleitung

FineDigital
FineDigital FineCaddie Bedienungsanleitung

FineDigital
FineDigital Finedrive 400 Bedienungsanleitung

FineDigital
FineDigital FineDrive 350 Bedienungsanleitung


