Fruity Chutes SATS-MINI Betriebsanleitung

Sentinel Automatic Trigger System (SATS-MINI) with VTOL Support – User and
Programming Guide
(as of V1.2.0 software, V2.1 hardware)
© Fruity Chutes Inc 2021, All Rights Reserved - Proprietary Information, do not share!
This document outlines how to use the SATS-MINI. This includes using the Shooty Chute Windows UI program
to setup and program the SATS-MINI features. This guide also covers typical applications and setup for the
SATS-MINI. Refer to the Product Guide for detailed technical information of the SATS-MINI. Also refer to the
online help page SATS-MINI Quick Start Guide and Resources
for more information and the software
downloads.
Table of Contents:
ShootyChute Software Installation 3
Windows UI Installation 3
Connecting the SATS 6
Dashboard Information 7
Upgrading the SATS-MINI Firmware 7
Configuring the SATS-MINI using Shooty Chute Windows app 7
Tools - Device Setup - General Settings 7
Tools - Device Setup - Channel Settings 7
Tools - Device Setup - General Setting Details 8
Tools - Device Setup - Channel Settings Details 9
Inputs and outputs during startup 9
Channel Configuration for Default Configuration 10
Input Safety Override, Output Status 11
Channel 1 and Channel 2 - Safety Override 11
Channel 3 and Channel 4 -Output System Status 11
Tools - Advanced Settings 11
Flight Mode 12
Miltirotor Specific Detection Features 12
Tumbling (Non-Primary Axis) failure settings 12
Yaw (Primary Axis) Settings 12
© Fruity Chutes Inc - http://fruitychutes.com

Rotation Tolerance 13
Fixed Wing Specific Flight Mode - Absolute Angle 13
Common Detection Types for all Flight Modes 13
Free Fall Settings 13
Altimeter-Based Fall 13
External Voltage Monitor 14
Saving and Loading Setups 14
Send to Device 14
Other Tools 14
Send Default Configuration 14
Dump Log 14
Erase Log 14
Reset to Factory Defaults 14
SATS-MINI Installation 14
SATS-MINI Orientation Calibration 15
Testing and Verification 15
Multirotor drones 15
Fixed Wing using Absolute Angle 16
Tips for Flight Testing 16
Best Practices 17
What To Do After Parachute Deployment 17
© Fruity Chutes Inc - https://fruitychutes.com

ShootyChute Software Installation
Windows UI Installation
Download the installation bundle navigate to the SATS-MINI Quick Start Page on our website. Download the
.zip file to your local hard drive. All releases have both the Windows UI and the firmware update file named
ATS.uf2. We recommend always upgrading both the Windows UI and installing new firmware to maintain
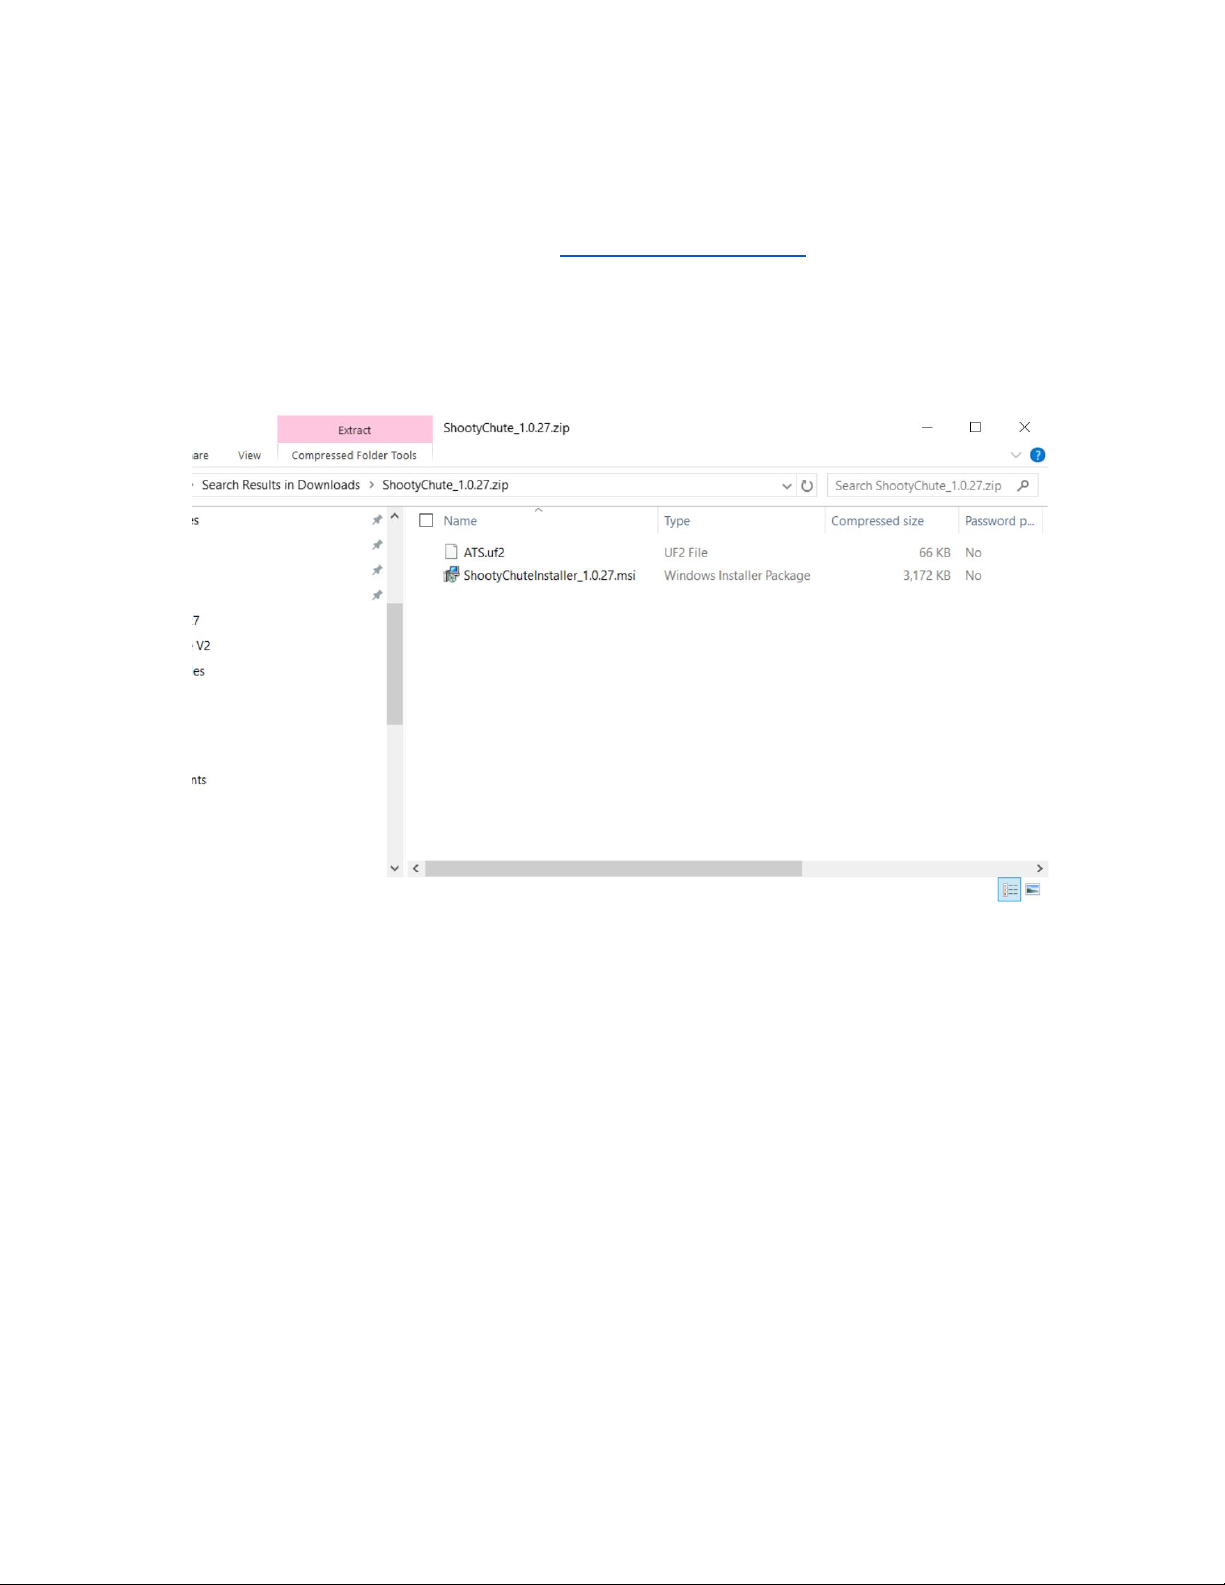
compatibility with new features. Below shows screenshots of the installation download.
1 - After downloading you can clock on the .zip file to view the contents:
To install the Windows UI click on ShootyChuteInstaller_xxx.msi to install.
© Fruity Chutes Inc - https://fruitychutes.com

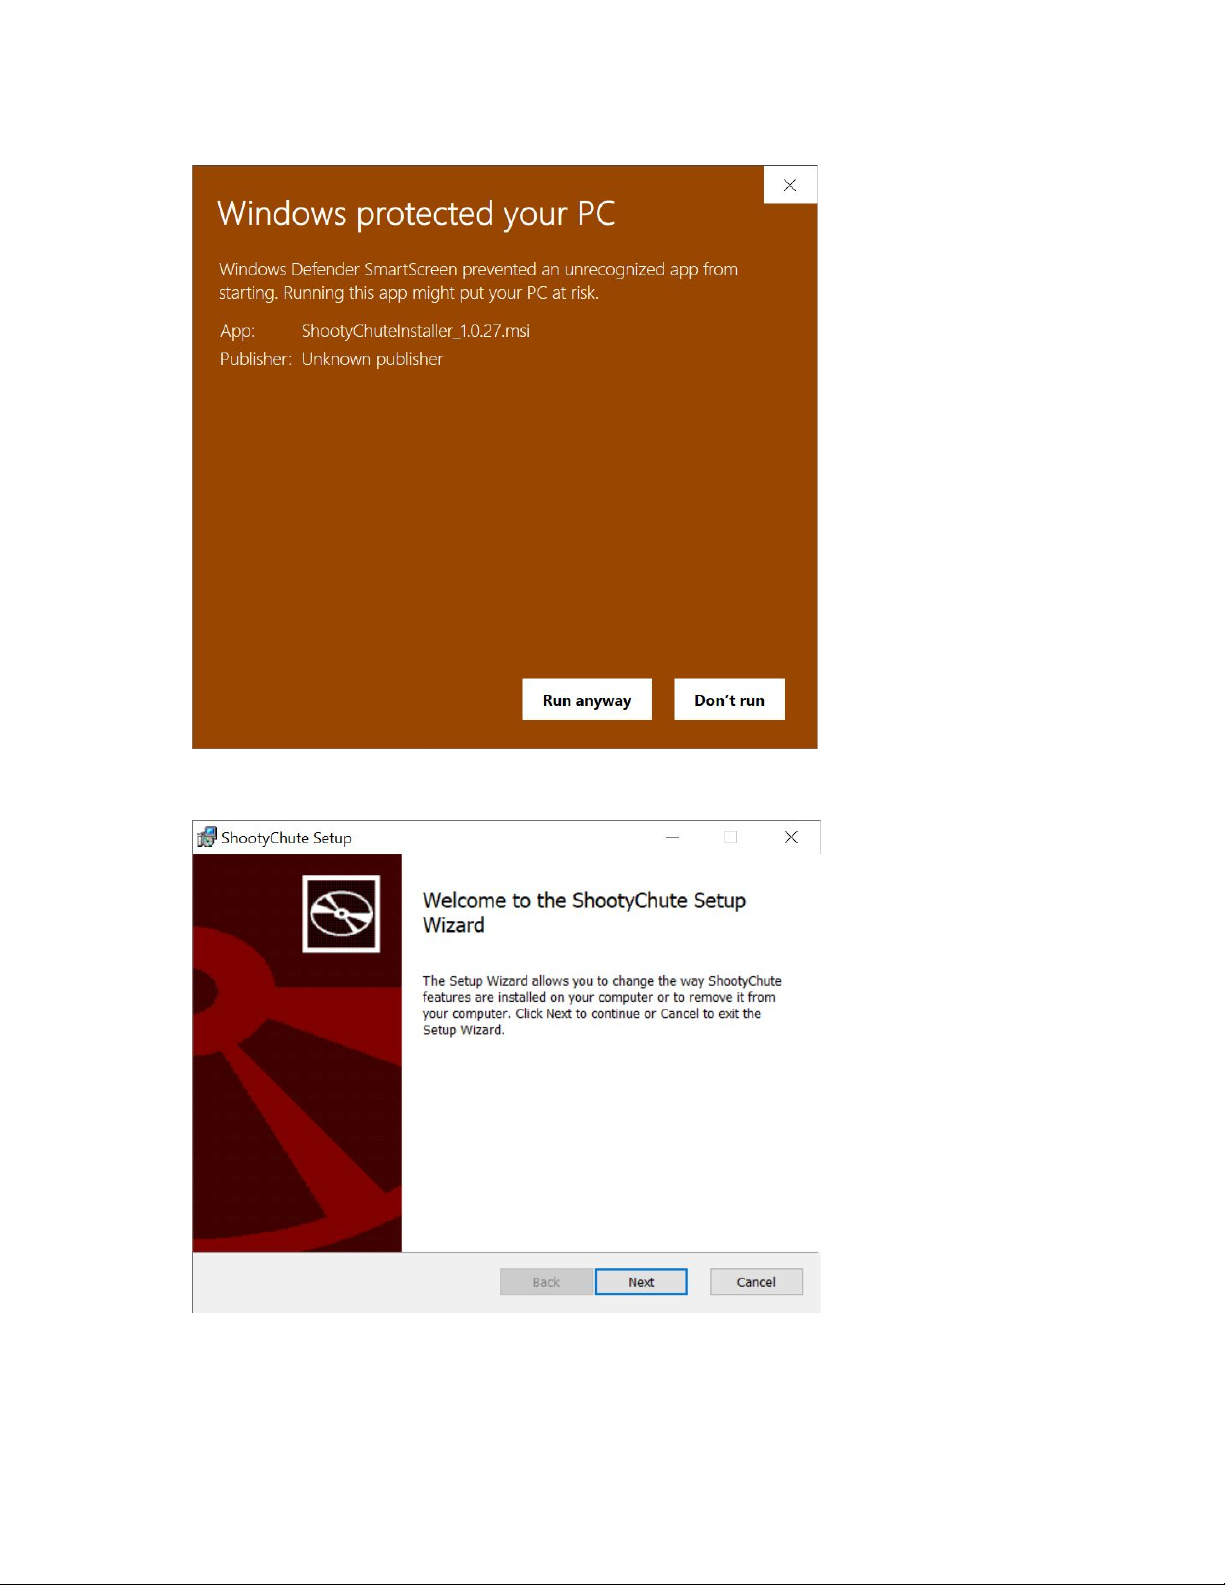
2 - After clicking you may see a screen like this. Click on More Info.
© Fruity Chutes Inc - https://fruitychutes.com

3 - You will then see this. Click on Run Anyway.
4 - Then go through the wizard to install the program. You can install a desktop icon.
© Fruity Chutes Inc - https://fruitychutes.com

5 - To run the program click on the icon and click Yes to run.
TIP: Plug in the SATS-MINI USB port first into your PC in order to allocate a port.
Connecting the SATS
Select the COM port for the SATS-MINI. If you have several ports listed you may need to try several ports to
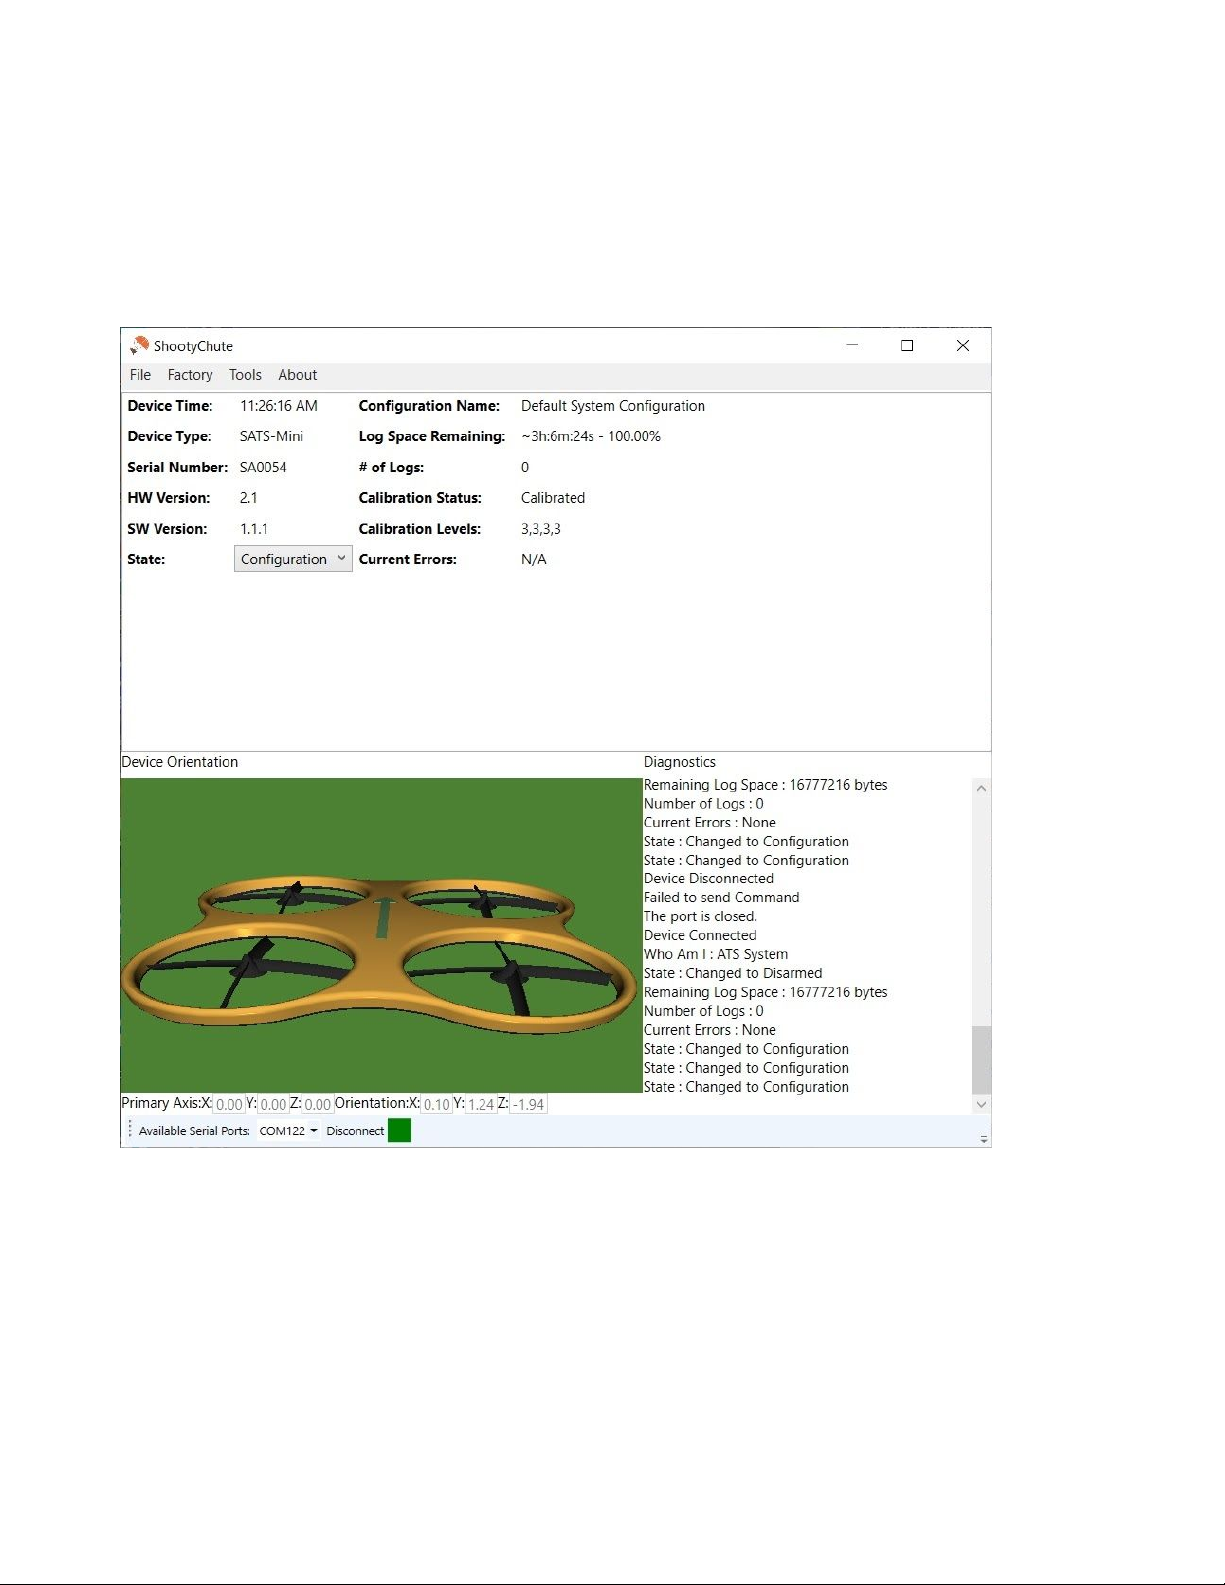
connect. After starting the ShootyChute app and connecting to the SATS MINI you will have a screen like this.
© Fruity Chutes Inc - https://fruitychutes.com

Dashboard Information
Moving the SATS-MINI around will cause the virtual drone to track the movement of the SATS-MINI. The screen
is divided into several sections:
●Top - This is a dashboard showing various metrics and statuses of the SATS-MINI.
●Bottom Left - This shows the virtual drones and orientation that the SATS-MINI sees.
●Bottom Right - These are diagnostic messages from communications between the SATS-MINI and the
ShootyChute UI.
Upgrading the SATS-MINI Firmware
Firmware updates for the SATS-MINI are formatted as a self installing UF2 file format. The firmware file ATS.uf2
is in the release zip file download. In order to install:
1. Before upgrading the SATS-MINI save your configuration to your hard drive. After the update you can
restore your settings to the SATS-MINI.
2. Power up the SATS-MINI and connect the USB cable. You should hear the beep that the USB port is
recognized.
3. Before you start make sure the SATS-MINI is in the Idle state, the green light should be flashing which is
Idle.
4. To load the firmware use a paper clip of other small tool and press the reset button twice within 1
second or less. There is an access hole in the SATS-MINI case to reach the Reset button (RST). This will
put the SATS-MINI into the Bootloader mode and a drive letter will show up in your Windows File
Explorer that says FEATHERBOOT. The status LED will also pulse red.
5. Open up the zip download folder. Drag the ATS.uf2 file into the FEATHERBOOT folder and you should
see the red light flicker and the SATS-MINI will restart.
6. After the update you may have a purple flashing mode like indicating a configuration error. In all cases
you should do a Factory Reset to configure the EEPROM and Flash memory to use the new firmware.
7. After Factory Reset the green idle light will start to flash and the SATS-MINI with be in Idle.
8. If you have a saved configuration you can load that up.
Configuring the SATS-MINI using Shooty Chute Windows app
Tools - Device Setup - General Settings
This is covered in the Quick Start guide.
Tools - Device Setup - Channel Settings
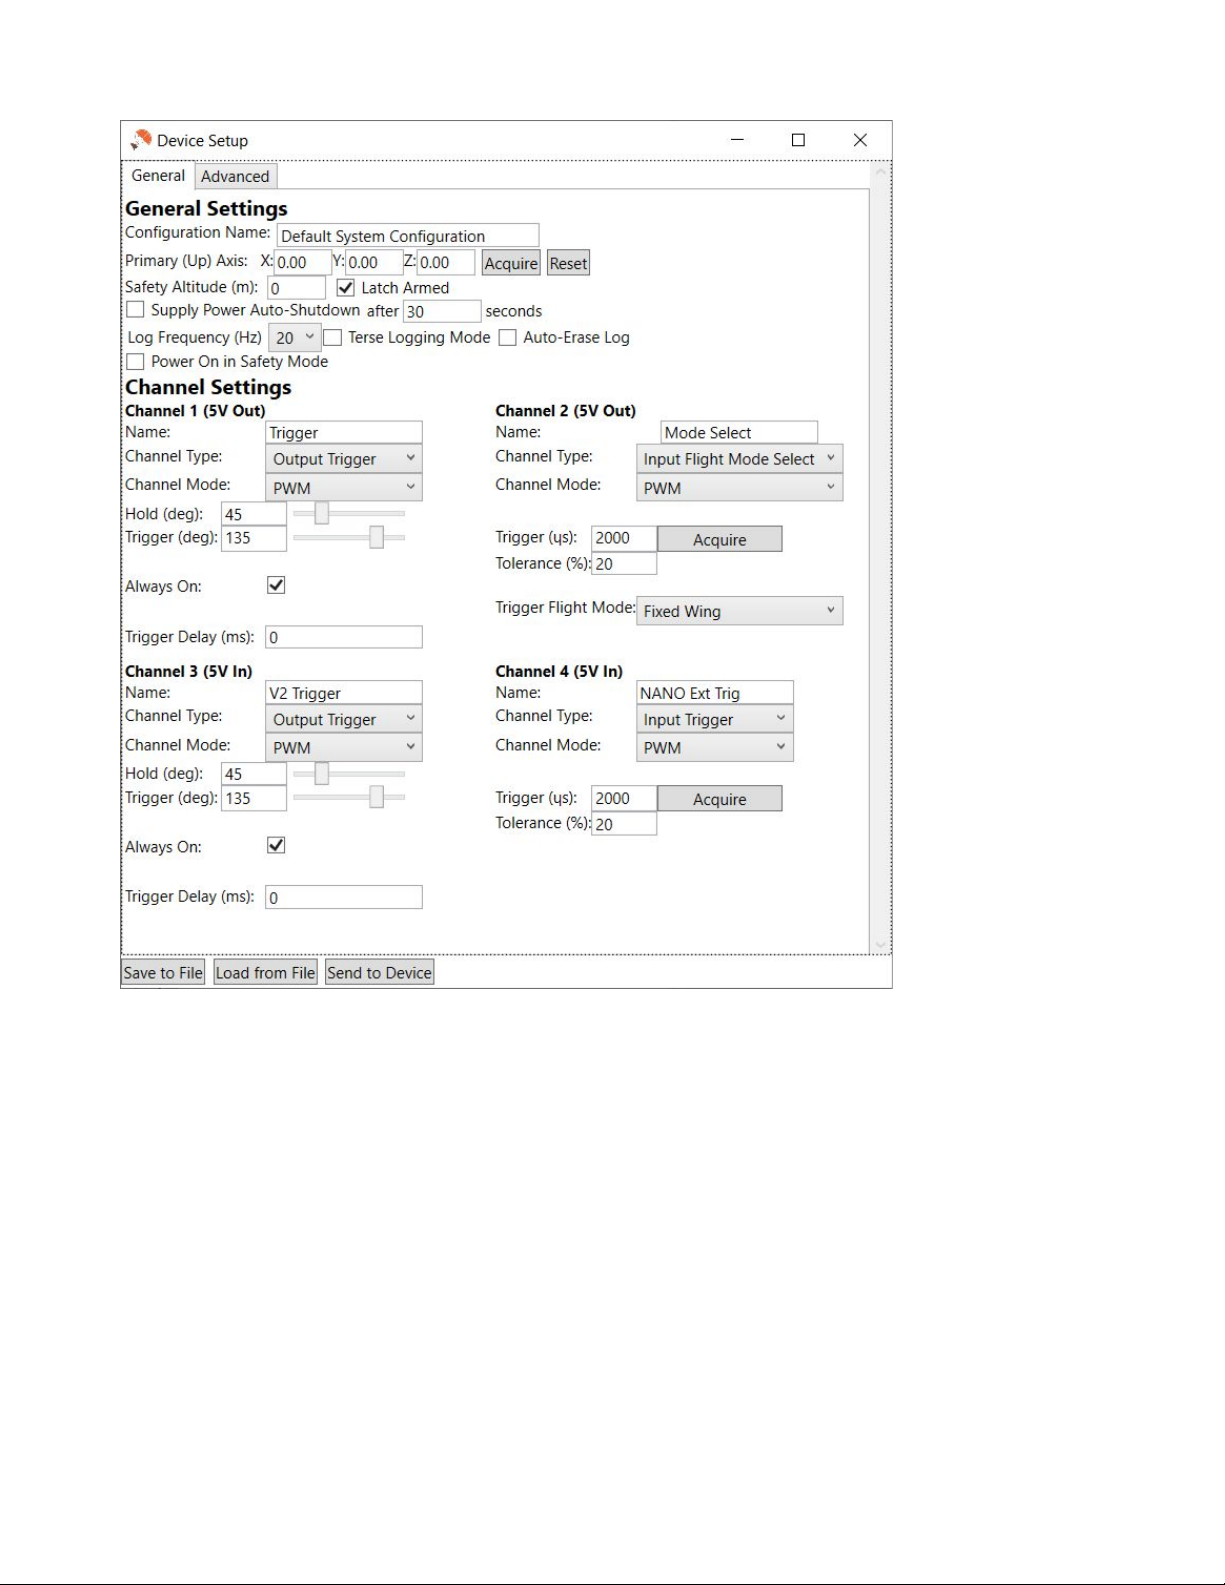
After connecting to the SATS-MINI to configure the device click on Tools - Device Setup. This will open up a
screen where you can configure all the features of the SATS-MINI.
© Fruity Chutes Inc - https://fruitychutes.com

Tools - Device Setup - General Setting Details
The general settings allow you to configure high level functionality of the SATS-MINI. These are:
●Configuration Name - Enter for example your Drone name and other information that describe the
setup.
●Primary (UP) Axis - This lets you capture the current SATS position and define this as UP. Mount the
SATS-MINI on your drone and with the drone level, and pointing to magnetic north press Acquire to
capture the IMU orientation that defines the drone up (Z) axis.
●Safety Altitude (m) - Enter the altitude where below this the SATS is in Safety, and above the SATS-MINI
will go to armed. Entering 0 disables this feature. Units are meters.
●Supply Power Auto-Shutdown - Is enabled this causes the SATS-MINI to automatically turn off after a
delay of XXX seconds after power removal. Use this to automatically allow the SATS-MINI to turn on,
and also turn off bases on the external 5V power supply. (Software V1.0.29 and above)
●Flight logging options - Log Frequency, Terse Logging, Auto-Erase Log. These are prescribed below.
© Fruity Chutes Inc - https://fruitychutes.com

○Log Frequency - The Flight Log (black box recorder) can record at different rates as of V1.1.1 at
5hz, 10hz or 20 hz. Pre version 1.1.1 only 10 hz is available. The default log frequency is 10
entries per second. At 10 hz the flash memory can hold over 6 hours of flight time (when in
safety or armed). Setting to 5 hs will approximately double the time available. 20 hz will be
approximately half the time. In all cases the ShootyChutes dashboard will indicate the log space
available, and how many flight logs are currently recorded. (Version 1.0.30 and later)
○Terse Logging - If selected the detailed Flight logging is suppressed to save log space. However
if triggered the previous 100 log events are written to Flash, then the trigger details. This
allows many more flights to be made before the log fills up.
○Auto-Erase - If enabled when the log memory is full the lSATS-MINI will automatically erase the
log on upon power up.
●Power On in Safety Mode - Use this to cause the SATS-MINI to always power up in Safety / Armed
mode. This makes sure the SATS-MINI is always ready to protect your drone even if the SATS-MINI is
disarmed after use. We recommend this feature if enabled is used along with Altitude based safety.
(V1.0.30 and later)
Tools - Device Setup - Channel Settings Details
The SATS-MINI supports many virtual channel features. These include:
●Output Trigger - Output activated to eject the parachute or for Flight Termination
●Input Trigger - Input for an external trigger signal to eject the parachute
●Input Safety Override - Input used to assert the Safety state
●Output System Status - Output that signals when the SATS-MINI are in a specified operation state.
●Input Flight Mode Selector - Allows an external input to cause the SATS-MINI to select either of two
completely independent sets trigger conditions. This is useful for VTOL aircraft where there are two
distinct modes of flight being vertical take off (multi-copter) or forward flight (fixed wing).
All inputs and outputs support PWM signal type. Also supported are DC level types.
Inputs and outputs during startup
All IO pins will float during device startup (tri-state). If during this time you want to make sure a pin is held high
or low use an external 1K resistor to pull high or low. Once the SATS-MINI is active outputs will be immediately
driven depending on configuration.
Input’s one active have passive 10K pullups and unless driven low will otherwise float high.
© Fruity Chutes Inc - https://fruitychutes.com


Channel Configuration for Default Configuration
The image above shows the channel configuration that will work for most applications.
Channel 1 - Trigger out, PWM, 45 to 135 degrees servo position, PWM always on, 0 ms delay
Channel 2- Trigger out, Level, High, 500 ms channel delay
Channel 3 - Trigger out, PWM, 45 to 135 degrees servo position, PWM always on, 0 ms delay, Channel can
accept 5V power in. This is ideal for the Skycat V3 trigger which supplied 5V power to the SATS-MINI. and also
accepts the parachute trigger in.
Channel 4 - Input Trigger, Detect PWM pulse at 2000us +- 20%. This is ideal for the Nano TBS receiver used for
the rescue radio.
For Trigger PWM output the Always On option, when checked, causes the PWM pulse to always be present at
all times so a mechanical servo is always driven. Clearing this will cause the servo PWM to only be present
when the servo needs to move. Not checking Always On can possibly save power. Electronic servo switches,
like those used on the the Skycat V2 or V3 trigger, must have a continuous pulse in order to operate properly.
In this case Always On must be checked.
In all cases for PWM outputs the servo position can be set using the sliders. For Trigger PWM outs the position
is listed as servo arm degrees with the default being 45 degrees (1000us) and 135 degrees(2000us). These can
be manually set as well by typing the degrees into the box.
© Fruity Chutes Inc - https://fruitychutes.com
Inhaltsverzeichnis
Andere Fruity Chutes Drohnen- und Quadcopter-Zubehör Handbücher