Glowworm Climapro 2 RF Bedienungsanleitung

Climapro2RF
www.glow-worm.co.uk


- 1 -
1 Instructionsguidance.........................................................................................................................2
1.1 Productdocumentation...........................................................................................2
1.2 Explanationofsymbols...........................................................................................2
2 Climapro2RFdescription...................................................................................................................2
2.1 Regulationandstatutoryrequirements..................................................................2
2.2 OperationalDiagram..............................................................................................2
3 Safetyinstructionsandregulations....................................................................................................2
3.1 Safetyinstructions..................................................................................................2
3.2 Regulations.............................................................................................................2
4 Recycling...........................................................................................................................................3
4.1 Climapro2RF..........................................................................................................3
4.2 Packaging...............................................................................................................3
5 Installationlocation............................................................................................................................4
6 Climapro2RFInstallation...................................................................................................................4
6.1 Dimensions.............................................................................................................4
6.2 Listofcontents.......................................................................................................4
7 Fixing.................................................................................................................................................5
7.1 Fixingtheroomthermostat.....................................................................................5
8 Electricalconnections.......................................................................................................................5
8.1 Pairing(recognition)...............................................................................................5
9 Commissioning..................................................................................................................................5
9.1 Appliancesincludedintheinstallation....................................................................5
9.2 Roomthermostat...................................................................................................5
10 Specicsettings.................................................................................................................................6
10.1 Mainsettings..........................................................................................................6
10.2 Accesstotheinstallermenu...................................................................................6
10.3 Descriptionoftheinstallermenu............................................................................6
10.4 Heatingfunction......................................................................................................6
10.5 Domestichotwaterfunction...................................................................................7
10.6 Coolingfunction......................................................................................................7
10.7 Options...................................................................................................................8
10.8 Radio......................................................................................................................9
11 Control/Commissioning..................................................................................................................10
12 Userinformation...............................................................................................................................10
13 Faultdiagnosis................................................................................................................................. 11
14 Climapro2RF...................................................................................................................................12

0020094581_01-08/10-Glow-worm
- 2 -
INTRODUCTION
TheinstructionsareanintegralpartoftheClimapro2RFand
mustbehandedtotheuseroncompletionoftheinstallationin
ordertocomplywiththecurrentregulation.
• Carefullyreadthemanual,toenablesafeinstallation,use
andservicing.Noliabilitycanbeacceptedintheevent
ofdamagefornotcomplyingwiththeguidanceinthis
instructionmanual.
•
- Userinstructions
eDANGER: Risk of electric shock.
ATTENTION: Risk of damage to the Climapro2 RF
or to its vicinity.
IMPORTANT: Useful information.
CE Mark
heCEmarkindicatesthattheappliancesdescribedinthis
manualareincompliancewiththefollowingdirectives:
- EuropeanDirectiveNum.2004-108oftheEuropean
ParliamentandtheCouncilregardingelectromagnetic
compatibility
- EuropeanDirectiveNum.2006-95oftheEuropean
ParliamentandtheCouncilregardinglowvoltage
- Directiverelatingtotelecommunicationsequipment(Council
oftheEuropeanCommunitydirectiveR&TTE99/5/CEE).
Theroomthermostatcommunicateswithacontrolunitviaa
wirelessconnection.
1
2
3
4
AllworkinsideClimapro2RFmustbecarriedoutbyaqualied
professionalorGlow-worm’sAfter-SalesService.
Climapro2RFmustonlybeinstalledbyaqualiedand
responsibleprofessional.
Respectthebasicsafetyinstructions:
• Turnoffthecontrolunit’spowersupply.
• Whenworkontheapplianceiscompleted,performan
operationaltestandcheckforsafety.
Duringtheinstallationandactivationoftheappliance,the
decrees,directives,technicalregulations,standardsand
clauseshereaftermustbecompliedwithintheversionsthatare
currentlyinforce.

0020094581_01-08/10-Glow-worm
- 3 -
INTRODUCTION
The recycling of the packaging must be carried out
by the qualied professional who installed the room
thermostat.
Mostoftheapplianceismadeofrecyclablematerials.
Thissymbolindicatesthatthisunitmustnotbe
disposedofwithhouseholdwaste.Itshouldbe
selectivelycollectedforenergyrecovery,reuseor
recycling.
• Taketheunittoanappropriatecollectionpointfor
processing,energyrecoveryandrecyclingofwaste.
By complying with this directive, you will contribute
to the preservation of natural resources and the
protection of human health.
WerecommendthatyourecyclethepackagingofClimapro2RF
inaresponsiblefashion.
• Sortthewasteinordertoseparatethoseelementswhich
canberecycled(cardboard,plastics)andthosewhich
cannotberecycled.
• Disposeofthewasteinaccordancewithexistingregulations.
0020094581_01-08/10-Glow-worm
- 4 -
INSTALLATION
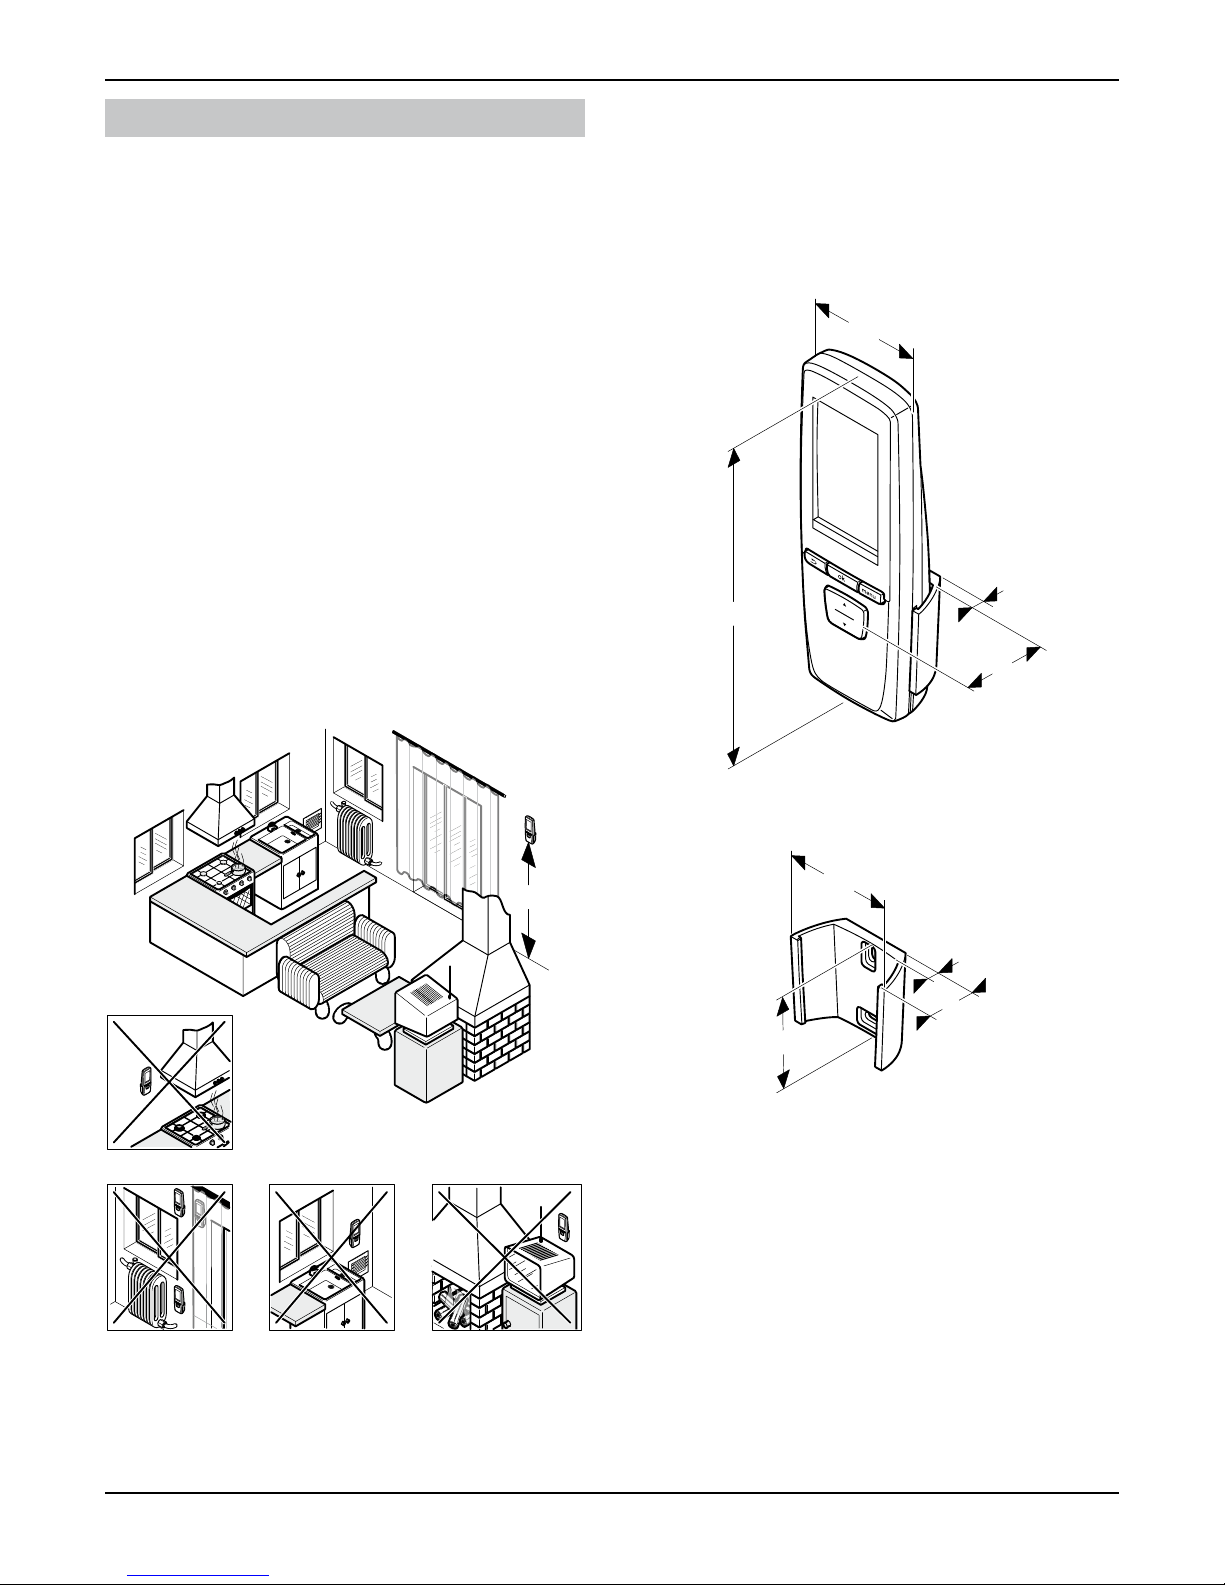
• Explainthefollowingrequirementstotheuser.
- inaroomprotectedfromfrost,
- onaninteriorwallofthemainroominthehome,
- atapproximately1.50metresfromtheoor(accordingtothe
regulationsinforce).
- nearsourcesofheat,suchasradiators,chimneywalls,
televisionsorsolarradiation,
- aboveacookerthatislikelytogiveoffsteamandgrease,
- oncoldwalls,
- betweenunitsorbehindcurtainsorotherobjectsthatmight
disturbtemperaturerecordingfortheambientairintheroom,
- inaroomthatisheavilyloadedwithdustorwherethe
atmosphereiscorrosive,
- nearaircurrentsthatmaycomefromdoorsorwindows.
1500
Allofthemeasurementsinthischapterareexpressedinmm.
62.5
34
6
173
66
27
58
6
- Thislistcontainsthefollowing:
- Climapro2RFprogrammableroomthermostat
- wallsupportforClimapro2RF
- packetcontaining2xingscrewswithrawlplugs
- 4“AALR6"alkalinebatteries.

0020094581_01-08/10-Glow-worm
- 5 -
INSTALLATION
• Determinetheinstallationlocation.Seethe"Installation
location"chapter.
A
B
1
2
4
3
5
6
• Positiontheroomthermostatsupport(4)onawall.
• Drill(A)thescrewholes(1)inaccordancewith2mounting
holes(3)inthewallsupport(4).
• Inserttherawlplugs(5)intheholes(1).
• Secure(B)theroomthermostatsupport(4)withscrews(2).
• Slidetheroomthermostat(6)intoitssupport(4).
Seetheinstallationmanualcontrolunit.
TheClimapro2RFandtheSystemprocontrolunitmustbe
paired.
• Turnontheappliancesthatmakeuptheinstallation(seethe
installationmanuals).
B
A
C
1
3
2
4
5
• Removetheinsulatingstrip(3)locatedinthebattery
compartment,respectingtheorderofoperations(A)to(C).
Theroomthermostatshowsitisnotconnected.
0020094581_01-08/10-Glow-worm
- 6 -
INSTALLATION
• Performthepairingoftheroomthermostatbasedonyour
installation(seepairingsection).
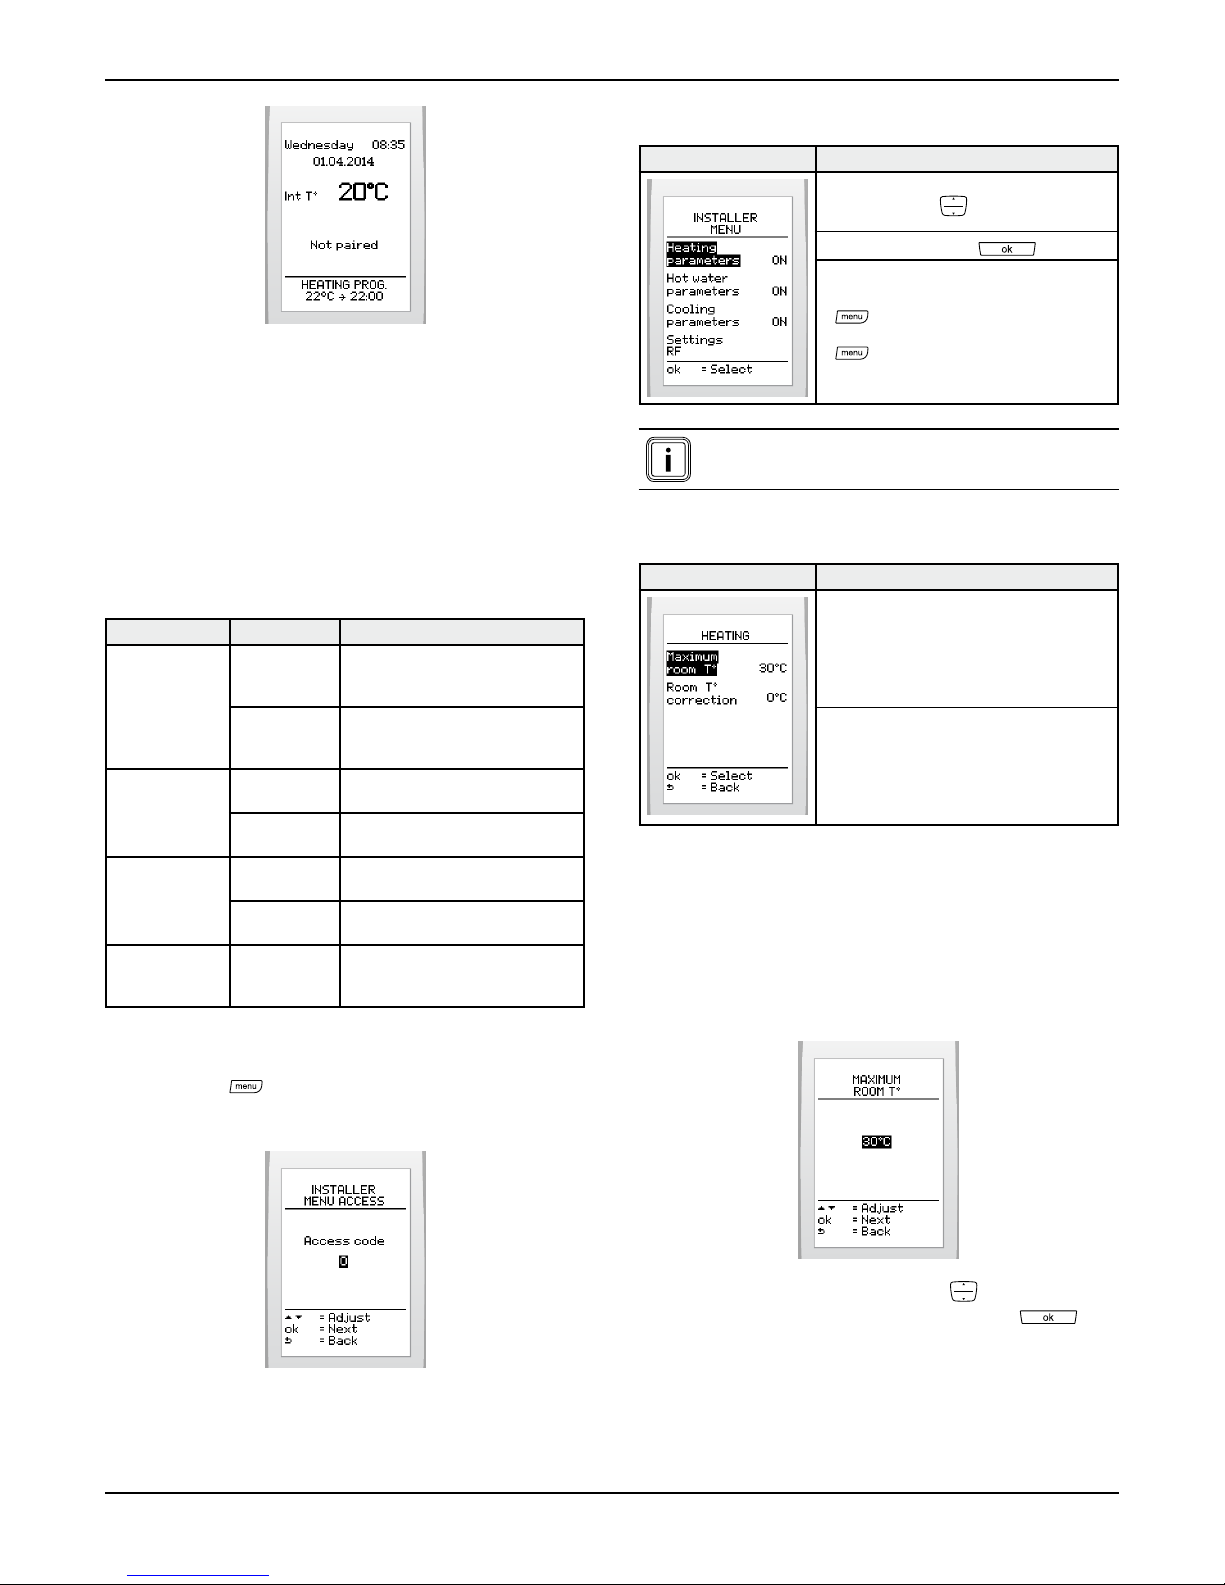
Accessingtheinstallermenuallowsforsomeadjustmentstobe
madetotheinstallation(roomthermostatandwirelessoutdoor
sensor)andtheroomthermostat’susermenu.
Heating Maximum
room
temperature
Chooseavaluebetween5°Cand
30°C.(factorysetting:30°C).
Room
temperature
correction
Chooseavaluebetween-5°Cand
5°Cwithastepof0.5°C.(factory
setting:0°C).
Hotwater On/Off Activate(ON)ordeactivate(OFF)
(defaultsetting:ON).
Program Enable(YES)ordisable(NO)
(defaultsetting:ON).
Coolingfunction On/Off Activate(ON)ordeactivate(OFF)
(defaultsetting:OFF).
Program Enable(YES)ordisable(NO)
(defaultsetting:OFF).
Efcientenergy
use
Energy
efciency
index
Enable(YES)ordisable(NO)
(defaultsetting:OFF).
• Pressbutton for7seconds.
• Entertheinstalleraccesscode96.
Usethebuttons:
Selectwiththebutton:
Pressthebutton:
- toreturntotheinstallermenu
screen,,
- for3secondstoreturntotheuser's
mainscreen.
Showing/enabling and disabling of functions is
reected in the user menu.
Denethemaximumadjustableroom
temperature.
Correctthemeasurementoftheroom
temperature.
Thisfunctionletsyouadjustthemaximumroomtemperature
thatcanbesetbytheuser(valueadjustablebetween5and
30°C-factorysetting:30°C).
• Fromtheinstallermenu(seeaccesstotheinstallermenu)
>selectonthescreen>heatingfunction>maximumroom
temp.
• Increaseordecreasewiththebuttons todisplaythe
initialcoolingtemperatureandpressthebutton .

0020094581_01-08/10-Glow-worm
- 7 -
INSTALLATION
Thisfunctionletsyourectifythetemperaturemeasuredbythe
roomtemperaturethermostat(by+/-5°Cwithastepof0.5°C-
(factorysetting:0).
• Fromtheinstallermenu(seeaccesstotheinstallermenu)
>selectonthescreen>>
• Increaseorreducewiththe buttonstodisplaythe
desiredcorrectionandvalidatewithbutton .
Showorhidethedomestichotwater
functionintheendusermenu.
Enableordisablethedomestichotwater
heatingprogramintheendusermenu.
Thisfunctionletsyouactivateordeactivatethehotwatermenu
fortheuser.Whenthefunctionisactivated,thefunctionwillbe
shownintheendusermenu.
If the function is deactivated, the domestic hot water
settings are adjusted via the appliance.
• Fromtheinstallermenu(seeaccesstotheinstallermenu)>
selectonthescreen>>
• Press tohighlightyourchoice(activateordeactivate)
andpressthebutton toconrm.
The hot water function must be activated before the
program can be set up. Depending on the appliance,
deactivation cuts off the hot water heating as well
as the production of hot water (see the appliances
installation manual).
Thisfunctionmakesitpossibletoallowtheusertoprogram
domestichotwaterheating.
• Fromtheinstallermenu(seeaccesstotheinstallermenu)>
selectonthescreen>>.
• Press tohighlightyourchoice(enableordisable)and
pressthebutton toconrm.
Showorhidethecoolingfunctioninthe
endusermenu.
Enableordisablethecoolingprogramin
theendusermenu.
Thisfunctionallowstheusertoactivateordeactivatethe
coolingmenu.Whenthefunctionisactivatedthefunctionwillbe
shownintheendusermenu.
• Fromtheinstallermenu(seeaccesstotheinstallermenu)>
selectonthescreen>>.

0020094581_01-08/10-Glow-worm
- 8 -
INSTALLATION
• Press tohighlightyourchoice(activateordeactivate)
andpressthebutton toconrm.
The cooling function must be activated before the
program can be set up.
Thisfunctionmakesitpossibletoallowtheusertoprogram
cooling.
• Fromtheinstallermenu(seeaccesstotheinstallermenu)>
selectonthescreen>>
• Press tohighlightyourchoice(activateordeactivate)
andpressthebutton toconrm.
Activateordeactivatethesystem
efciencyinfo.
Adjustthedateandtime
Choosethelanguage
Displayinformation:zone,typeand
softwareversionfortheroomthermostat
Thisfunctionallowstheusertoactivateordeactivatethe
systemefciencyinformation.
• Viatheinstallermenu(seeinstallermenu)>select>
>onthescreen.
• Press tohighlightyourchoice(activateordeactivate)
andpressthebutton toconrm.
• Fromtheinstallermenu(seeaccesstotheinstallermenu)>
selectonthescreen>>
•
• Setthedisplayformatofthecurrentdatebypressing
andpressing toconrm.Thereisachoicebetween
thefactorysettingday/month/yearandyear/month/day.
• Setthecurrentdatebypressing andpressingthe
button toconrm.
• Fromtheinstallermenu(seeaccesstotheinstallermenu)>
selectonthescreen>>
• Setthetimebypressing andpressingthebutton
toconrm.
Inhaltsverzeichnis
Andere Glowworm Thermostat Handbücher

Glowworm
Glowworm Climapro Bedienungsanleitung

Glowworm
Glowworm Climapro2 RF Bedienungsanleitung

Glowworm
Glowworm Climastat Bedienungsanleitung

Glowworm
Glowworm MiSet SRT 380 Bedienungsanleitung

Glowworm
Glowworm Climapro1 Bedienungsanleitung

Glowworm
Glowworm Climapro1 Leitfaden

Glowworm
Glowworm Climapro2RF Bedienungsanleitung
Beliebte Thermostat Handbücher anderer Marken

EWELLY
EWELLY EW-181 Bedienungsanleitung

Prolon
Prolon T1100 Montageanleitung

Computherm
Computherm Q20 Bedienungsanleitung

Heatmiser
Heatmiser neoStat Bedienungsanleitung

Aube Technologies
Aube Technologies TH111GFCI-NP 240 VCA Bedienungsanleitung

Mars
Mars HEAT CONTROLLER IR Wireless Thermostat Bedienungsanleitung


