Hepha Trekking 7 Bedienungsanleitung

Hepha Trekking 7
User Manual
HEPHA GmbH
www.hepha.com [email protected]
Lise-Meitner-Str. 7a, 82216 Maisach, Germany
+49 (0) 8142 2844480

English version
German version
French version
Italian version
Spanish version
1
25
51
77
103

Package Contents
The toolbox
Trekking 7
Unboxing Guide
Take the bike out of the box
Adjust the stem
Attach the pedals
Install and fasten your display
Adjust your handlebar and saddle
Before First Ride
Adjust the handlebar
Adjust the saddle height
Check that everything is tight
Charge the battery
Turn on/off the power
Select assist mode
Removal of the battery
Riding safety
Storage
Disposal
Maintenance
Regular inspection
Cleaning
Screw connections
Warranty
1
2
3
5
6
7
8
9
10
11
11
12
13
14
17
19
19
20
21
21
22
Content
English Version
Package Contents
Package Contents Package Contents
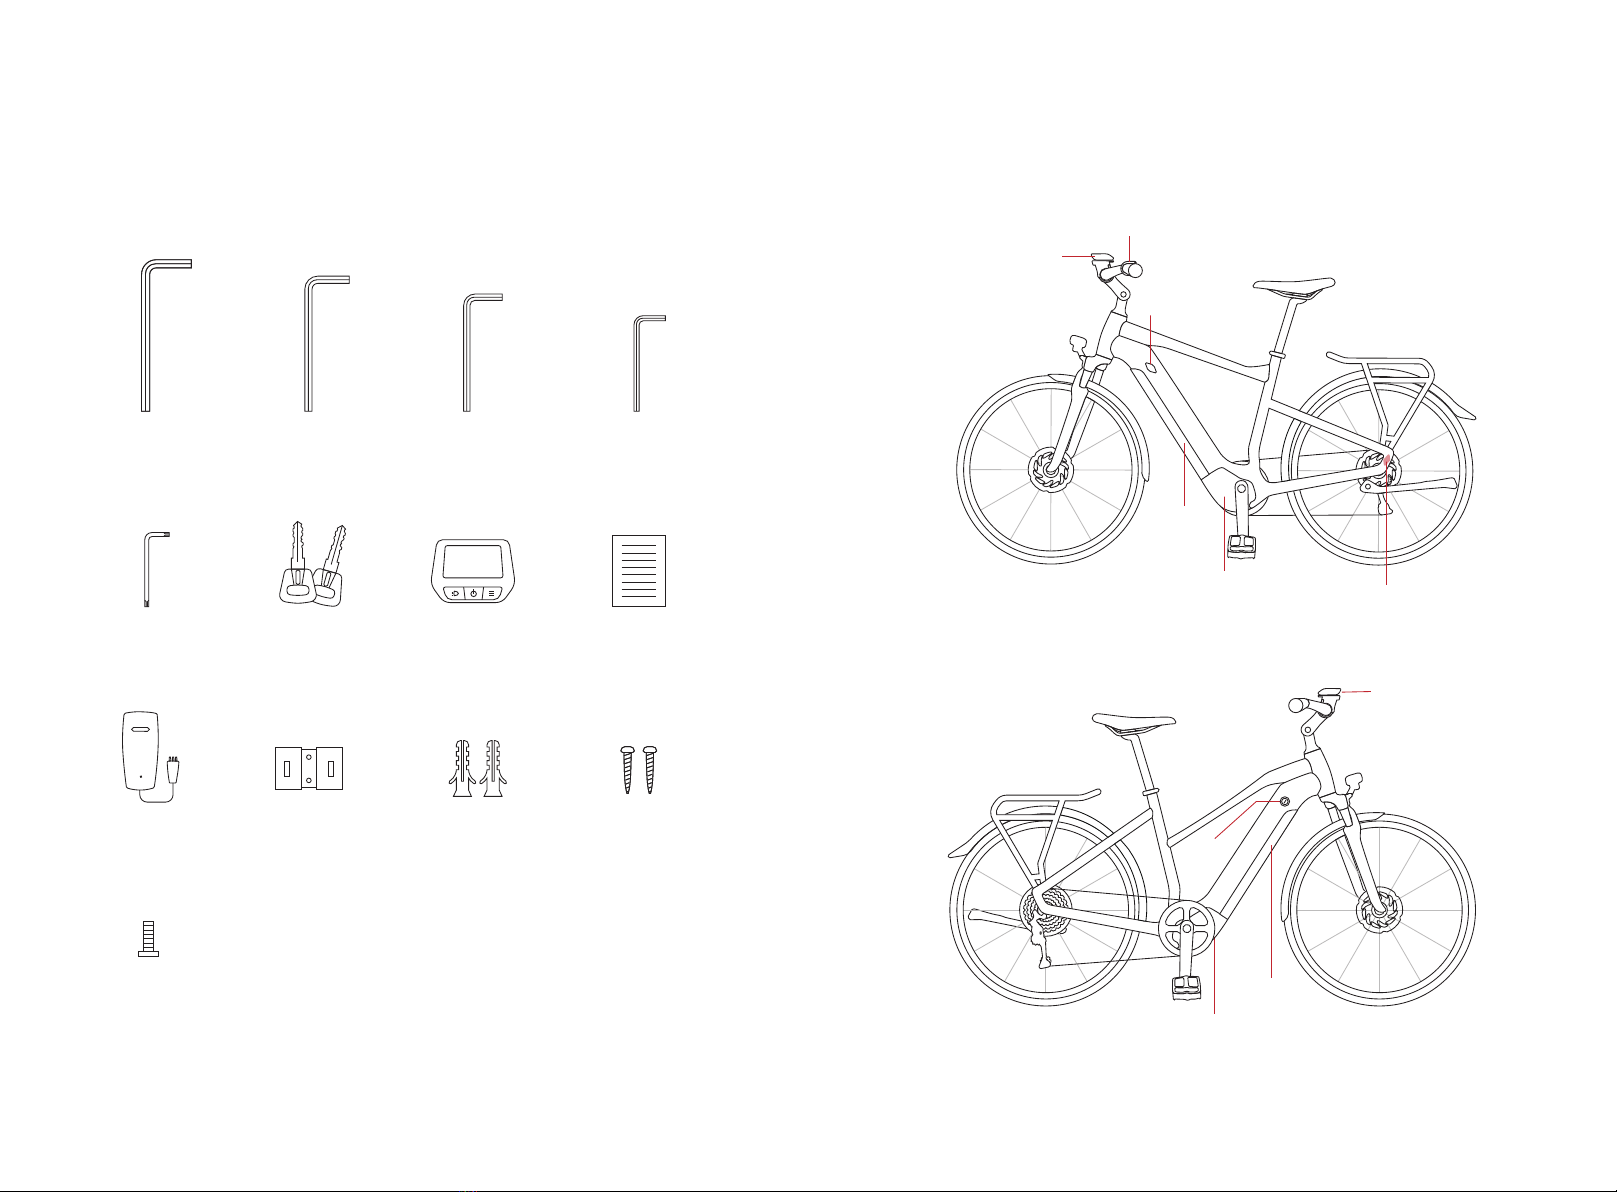
1. The toolbox
1 2
Allen key #6 Allen key #5 Allen key #4 Allen key #3
Charger wall holder Holder screw*2
M3 screw
Expansion screws*2
T10 Star Allen Key
Torx Wrench
Charger
Battery key*2 Display User manual
2. Trekking 7
Display
Battery
Motor
Sensor ( inside the frame)
High step
Low step
Switch
Battery
Battery
lock
Display
Motor
Charging port

Unboxing Guide Unboxing Guide
3 4
Unboxing Guide
1.Take the bike out of the box
Gently open the packing box, take the bike out of the box.
When pulling out the bike, hold the bike steady so that it
does not fall over.
Remove (and recycle) all protective packaging. Squeeze the
tabs on the cable ties and remove them without cutting -
you can reuse them later.
Hold the bike steady to prevent it from falling over during pulling out !
tool box
pedals
Get the tools and pedals
from the box on the
carrier to assemble the
bike.
Pull the bike out
of the box.

2. Adjust the stem
Rotate the stem 90° clockwise to align with the front fender. Tighten the screws
with an Allen key #5 to ensure the stem stays in line with the front fork.
STEP 1
90°
Rotate
#5 Allen key
tighten
Unboxing Guide Unboxing Guide
5 6
Allen key #6
smooth
3. Attach the pedals
Take the pedals out of the box. The left side pedal has threads on the axle.
Screw onto the left crank by hand in an anticlockwise direction.
Tighten the pedal using Allen key #6.
Allen key #6
has threads on the axle
STEP 1
The axle of the right side pedal is smooth.
Screw onto the right crank by hand in a clockwise direction.
Tighten the pedal using Allen key #6.
STEP 2
STEP 1
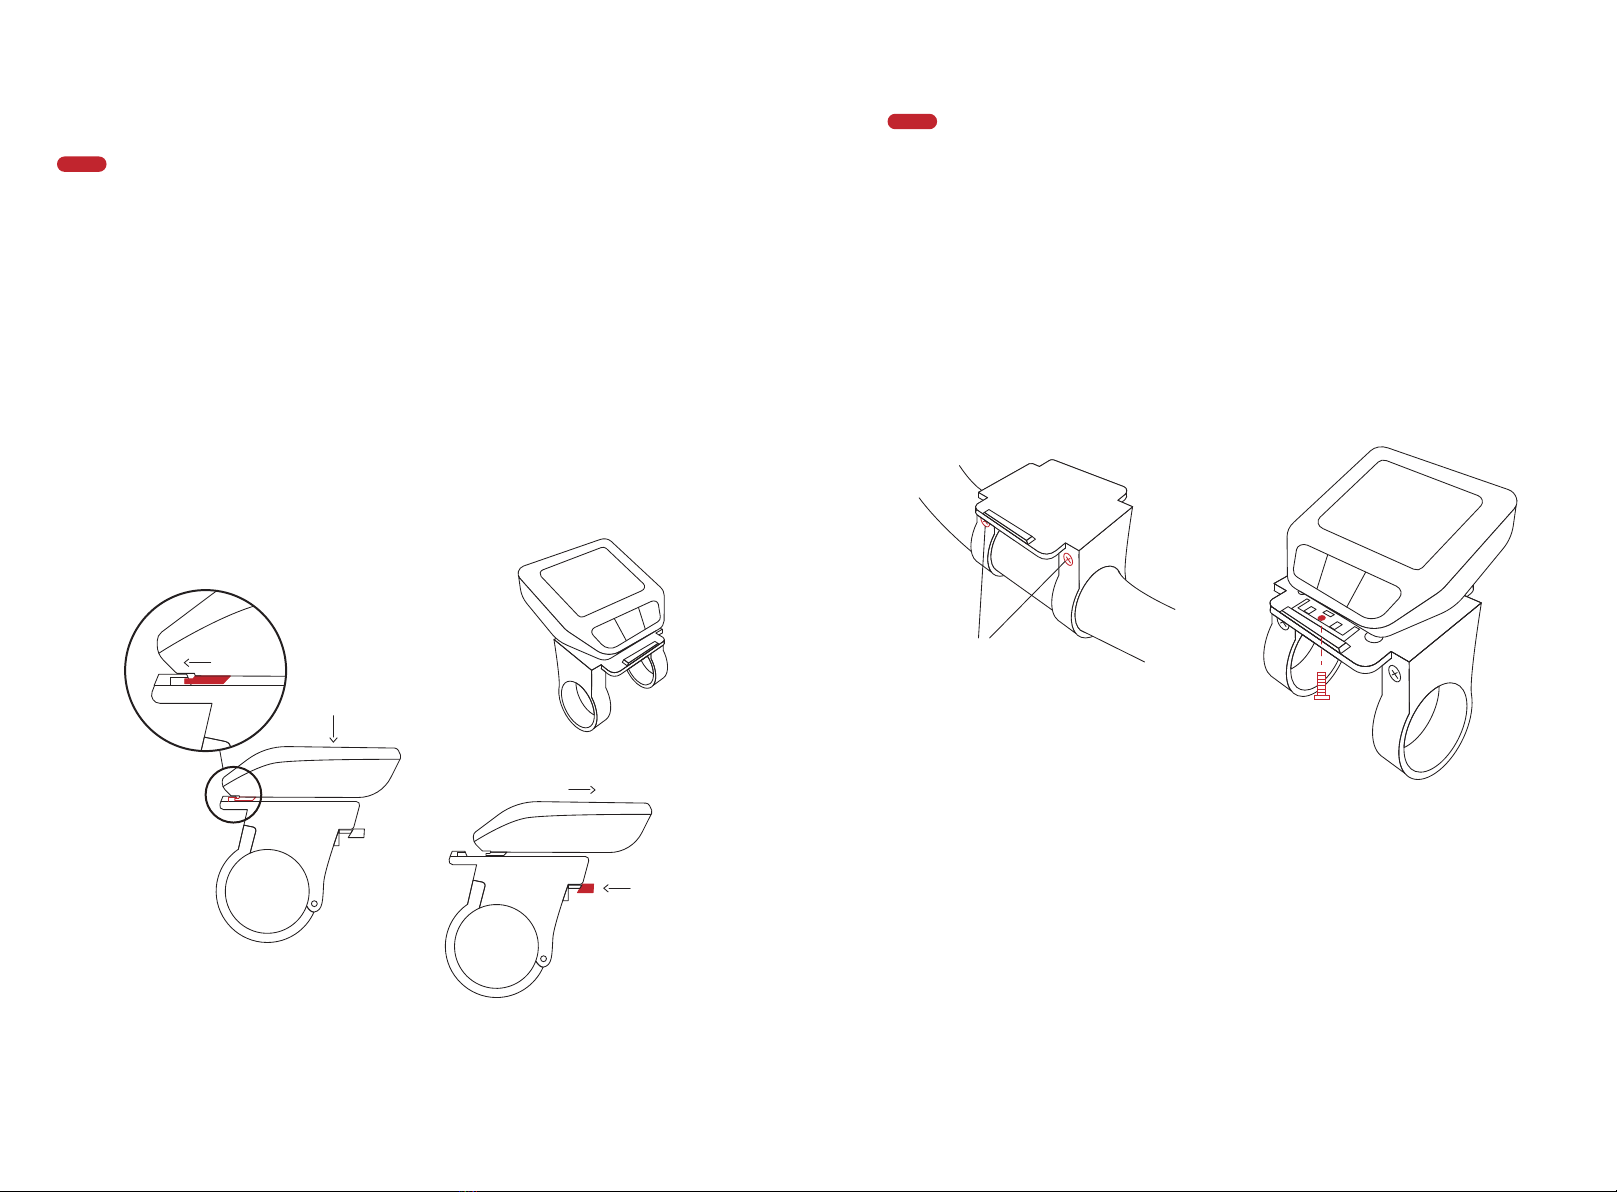
4. Install and fasten your display
5. Adjust your handlebar and saddle
Unboxing Guide Unboxing Guide
7 8
Take the display from the toolbox. Position the lower end to the display holder
correctly, press the upper part onto the holder, and you'll hear a "click".
When parking the bike, remove the display by pressing the raised part of the
display holder. Take the display away.
STEP 2
Fasten the display if you don't want to carry the display with you.
Remove the display holder using Allen key #3. Press the display to your display
holder. Turn to the back of the display holder, take an M3 screw from the
toolbox, and fasten it using Allen key #3. Then install the display holder and the
display back to your handlebar.
See page 09-11 for how to adjust the handlebar and the saddle.
Note: Your bike has activated the Bike Lock Function by default set. That means
your display is the key to your bike. Remove the display and the motor will be
automatically deactivated. To unlock it, install the same display on the bike, and
the motor support will be reactivated. The display shows the Locked status
when motor it is activated or deactivated support through the Lock function.
① insert ② press after
insert the display
① press here
② remove
Install
Uninstall
① unscrew these two
screws and remove
the holder from the
bike
③fix the screw and
install the holder back
to the bike
② install the display to
the holder before fix
the screw
Install/remove the display
Fasten the display
M3 screw

Before First Ride Before First Ride
9 10
loosen these two
screws and rotate the
display
STEP 1
STEP 3
STEP 5
STEP 1
Before First Ride
1. Adjust the handlebar
2. Adjust the saddle height
Hold the front wheel between your knees
to see if the angle between the handle-
bar and the front wheel is 90°. If not,
adjust the screws as shown on page 05
(adjust the stem).
Rotate the handlebar up and
down, adjust the handlebar to
your suitable position. Tighten
the four screws using the Allen
key #4.
STEP 2 Loosen the 2 screws shown in the
picture with an Allen key#5. You
can adjust the handlebars' angle to
the appropriate position suitable
for you. Then you can tighten the
screws to fix the angle.
STEP 4
Loosen the two screws using Allen
key #3, rotate the display holder up
and down to your comfortable
position, then tighten the screws.
Adjust the display holder
When properly adjusted, the saddle
should be at hip height, or check if your
knees form a 90° angle at the top of the
pedal motion, straightening out when
your foot reaches the bottom.
Rotate the grips up and down,
adjust the grips to your suitable
position. Tighten the screw using
the Allen key #3.

3. Check that everything is tight
5. Turn on/off the power
Check that all the screws or other tightening features are sufficiently tight, such as the
brake calipers, seatclamp, stem, levers, headset, derailleur, wheels and so on.
Install the display into the holder. Press the power button to turn on the power. Press and
hold the button for 2 seconds to turn off the power. Fully charge the battery of the ebike
before turning it on for the first time.
4. Charge the battery
Open the rubber cover and gently insert the charging plug into the charging port. When
fully charged, the indicator light on the charger will change from yellow to green. It will
take about 4 hours to charge the battery fully.
Unplug the charger after complete charging and close the rubber cover.
Follow these simple tips to keep your battery running in perfect condition for longer
- Only use the official Hepha battery charger.
- Charge the bike indoors, in a well-ventilated dry location (moisture and extreme
temperature fluctuations can affect the charging process).
- The bike will charge best at temperature between 10-40°C (50-104°F).
- Place the charger on a hard surface and make sure it is never covered. Never place
it on carpet or textile surface.
- Always keep the plug and connector free of dirt and moisture.
- Do not charge your bike if the charger or plug is damaged. If in doubt, contact
Hepha immediately.
- If you don't plan to use your bike for a long period of time, make sure the battery
gets a full charge cycle every six months.
STEP 2 Open the seatclamp on the seat
post, adjust the saddle height to
your suitable position and then
close the seatclamp to the right
position.
STEP 3 Make sure you don't exceed the
maximum saddle height indicated
on the seat post.
Before First Ride Before First Ride
1211
Your bike has activated the Bike
Lock Function by default set. That
means you can only unlock your
bike with the same display.
power botton
Charging port
Fully charge the battery
before your first ride.
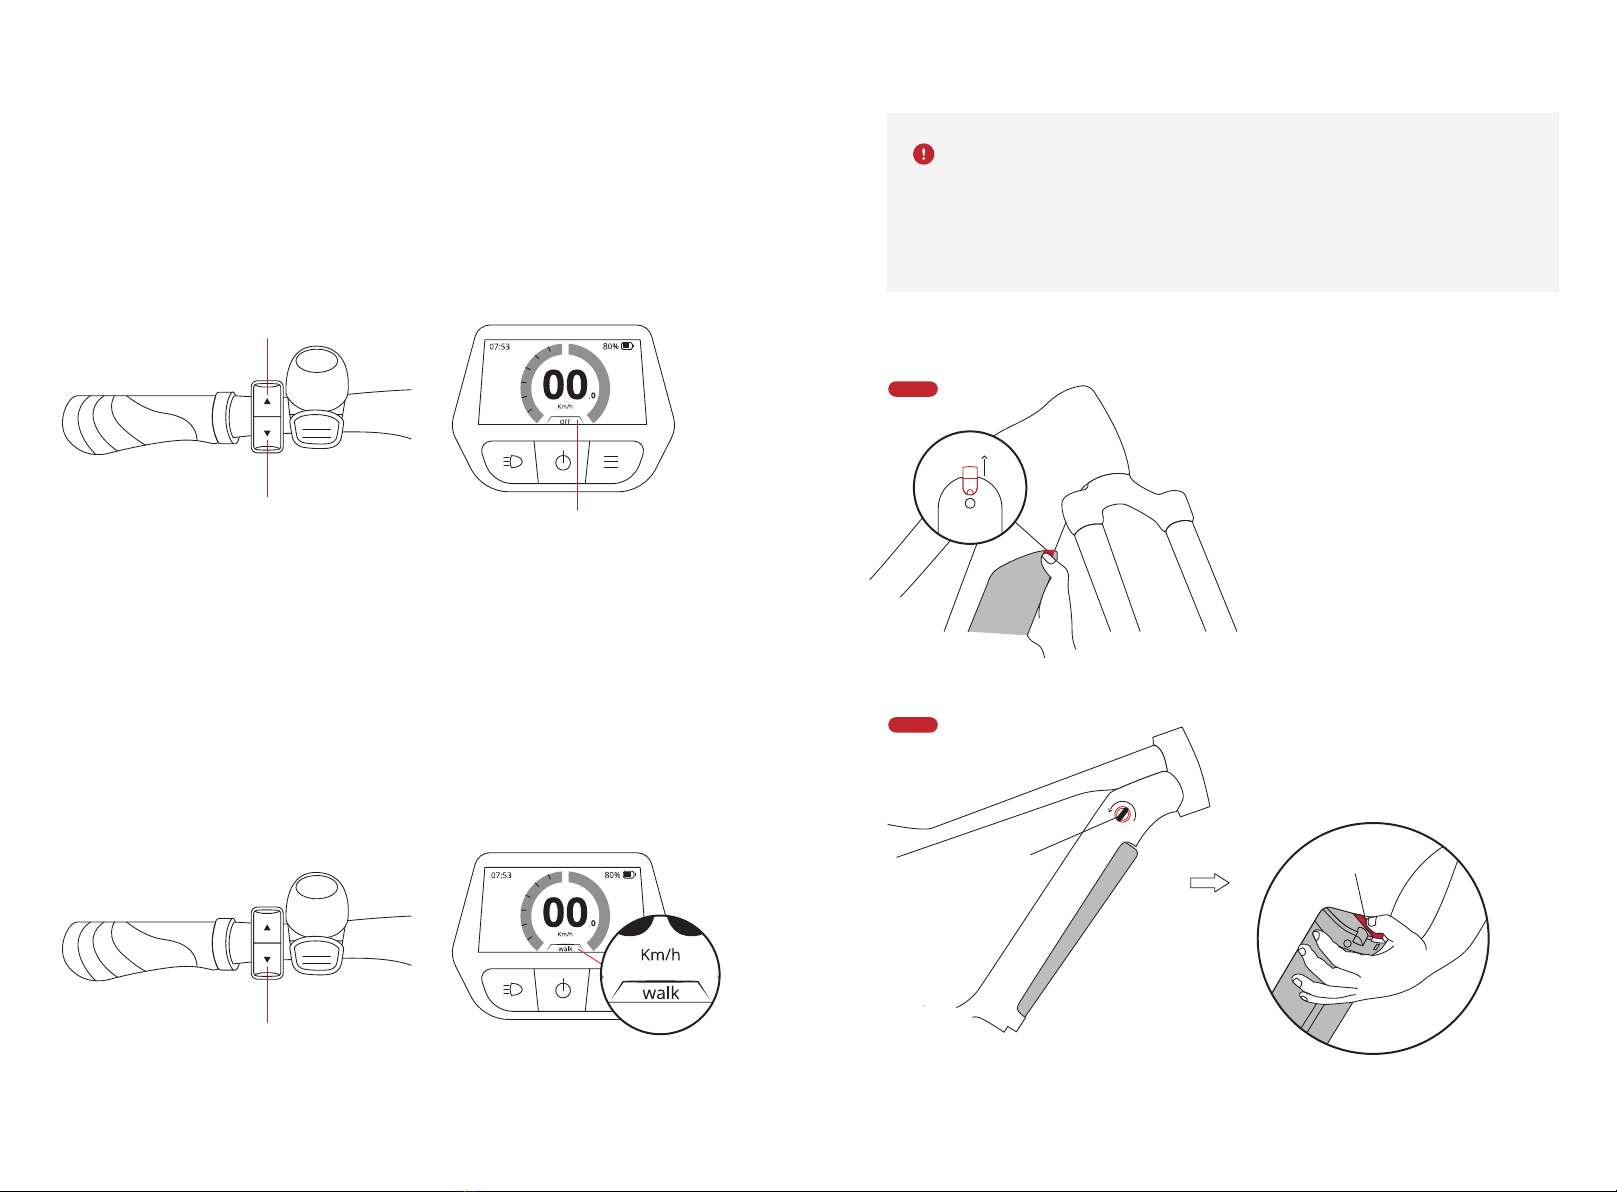
6. Select assist mode
Before First Ride Before First Ride
13 14
6.1 Select assist mode
If you turn the power on, the assist mode is reset to OFF irregardless of the assist mode
that you had selected before the last power OFF.
Press the UP and DOWN button on the switch to your preferred assist mode.
The walk assist function must only be used when pushing the bike. There is a
risk of injury if the wheels of the bike are not in contact with the ground while
using walk assistance.
The walk assist mode will exit if you pedal.
6.2 Walk assist
The walk assistance makes it easier to push your bike. The speed in this function depends
on the selected gear and can reach a maximum of 6 km/h.
To activate the walk assistance, press and hold the DOWN button on the switch for 3
seconds. The display shows WALK mode. Press and keep it held down when pushing the
bike.
To deactivate the walk assistance, press the UP button on the switch, and switch to your
preferred assist mode.
STEP 1
STEP 2
7. Removal of the battery
To remove the battery cover,
press and hold the steel tab
and push it up. Put the battery
cover on the floor.
Insert the battery key, rotate it,
press the metal shrapnel down and
remove the battery.
down button current assist mode
up button
hold the down botton on
insert the key
and rotate
push
metal shrapnel
Andere Handbücher für Trekking 7
1
Inhaltsverzeichnis
Sprachen:


